jacking HONDA CR-V 2010 RD1-RD5, RE7 / 3.G Owners Manual
[x] Cancel search | Manufacturer: HONDA, Model Year: 2010, Model line: CR-V, Model: HONDA CR-V 2010 RD1-RD5, RE7 / 3.GPages: 441, PDF Size: 8.12 MB
Page 5 of 441

CONT INUED
.................
Jacking up the Vehicle . 384
.......................................
Jack, Tire . 383
................................
Jump Starting . 390
..................................................
Keys . 82
Indicators
......
ABS (Anti-Lock Brake) . 63, 322
Brake (Parking and Brake
............................
System) . 62, 396
................
Charging System . 62, 394
.............................
Cruise Control . 64
DRL (Daytime Running
......................................
Lights) . 65
...................................
High Beam . 65
........
Key (Immobilizer System) . 63
......................................
Low Fuel . 65
................
Low Oil Pressure . 62, 394
..............
Low Tire Pressure . 66, 326
..........
Maintenance Minder . 67, 341
Malf unction Indicator
................................
Lamp . 62, 395
.................
Passenger Airbag Of f . 33
...........................
Side Airbag Of f . 63
...............................................
SRS . 63
...................................
TPMS . 66, 326
Turn Signal and Hazard
.............................
Warning . 76, 79
......................................
VSA Of f . 325
VSA (Vehicle Stability
................
Assist) System . 64, 324
..............................
Washer Level . 67 .........
Indicators, Instrument Panel . 62
...............................
Inf ant Restraint . 40
......................................
Inf ant Seats . 40
............
Tether Anchorage Point . 49
...................
Inf lation, Proper Tire . 370
........
Recommended Pressures . 371
.................................
Inside Mirror . 114
.............................
Inspection, Tire . 372
....................
Installing a Child Seat . 43
............................
Instrument Panel . 61
........
Instrument Panel Brightness . 79
..............
Instruments and Controls . 59
...............................
Interior Lights . 126
........................................
Introduction . i
.........................................
iPod . 177, 235 .......................
Label, Certif ication . 406
.................
Lane Change, Signaling . 76
..................
Lap/Shoulder Belts . 15, 20
...........
LATCH Anchorage System . 44
Lights
....................
Bulb Replacement . 359
.......................................
Indicator . 66
.........................................
Parking . 76
..................................
Turn Signal . 76
....................................
Load Limits . 305
......
LOCK (Ignition Key Position) . 84
Locks
.......
Anti-thef t Steering Column . 84
..........................
Childproof Door . 91
............................
Fuel Fill Door . 295
..........................
Glove Box . 120, 121
.................................
Power Door . 85
........................................
Tailgate . 95
........................
Low Coolant Level . 298
.........................
Low Fuel Indicator . 65
...
Low Oil Pressure Indicator . 62, 394
................................
Lower Anchors . 44
Index
L
K
J
INDEX
V
Page 399 of 441

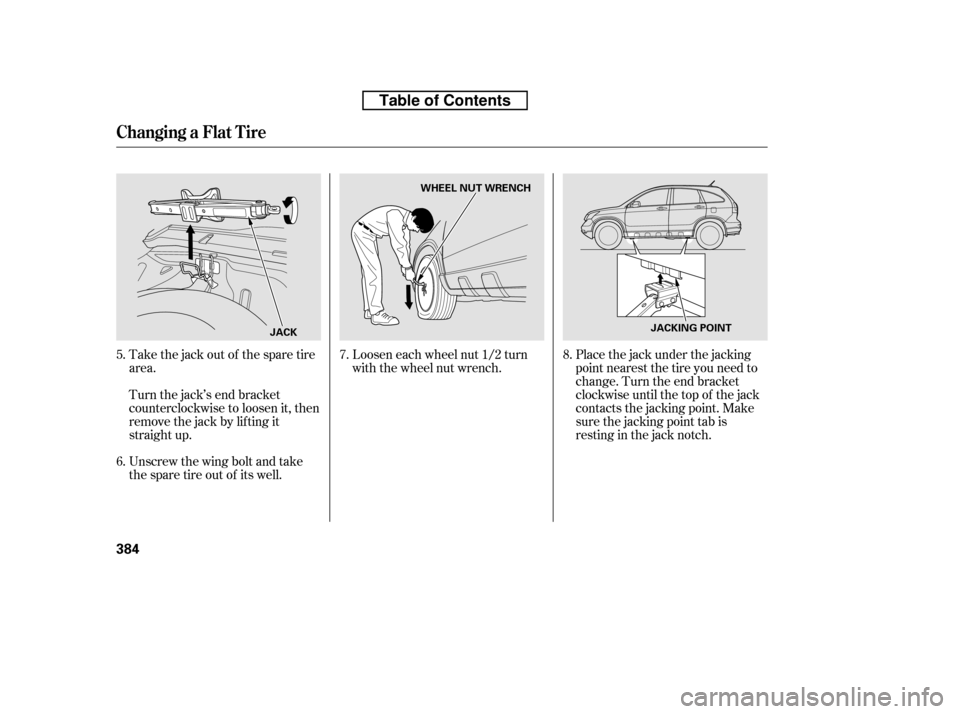
Take the jack out of the spare tire
area.
Turn the jack’s end bracket
counterclockwise to loosen it, then
remove the jack by lif ting it
straight up.
Unscrew the wing bolt and take
the spare tire out of its well.Loosen each wheel nut 1/2 turn
with the wheel nut wrench.
Placethejackunderthejacking
point nearest the tire you need to
change. Turn the end bracket
clockwise until the top of the jack
contacts the jacking point. Make
sure the jacking point tab is
restinginthejacknotch.
6.
5.
7.8.
Changing a Flat T ire
384
JACKWHEEL NUT WRENCH
JACKING POINT
Table of Contents