sensor HONDA CR-V 2011 RD1-RD5, RE7 / 3.G Owner's Manual
[x] Cancel search | Manufacturer: HONDA, Model Year: 2011, Model line: CR-V, Model: HONDA CR-V 2011 RD1-RD5, RE7 / 3.GPages: 445, PDF Size: 8.06 MB
Page 371 of 445

This f ilter removes the dust and
pollenthatisbroughtinfromthe
outside through the heating and
cooling system/climate control
system.
Have your dealer replace this filter
when this service is indicated by a
maintenance message on the
inf ormation display. It should be
replaced every 15,000 miles (24,000
km) if you drive primarily in urban
areas that have high concentrations
of soot in the air, or if the airf low
from the heating and cooling
system/climate control system
becomeslessthanusual.
If you remove a f loor mat, make sure
tore-anchoritwhenyouputitback
in your vehicle.
If you use a non-Honda f loor mat,
make sure it f its properly and that it
canbeusedwiththefloormat
anchors. Do not put additional f loor
mats on top of the anchored mats.
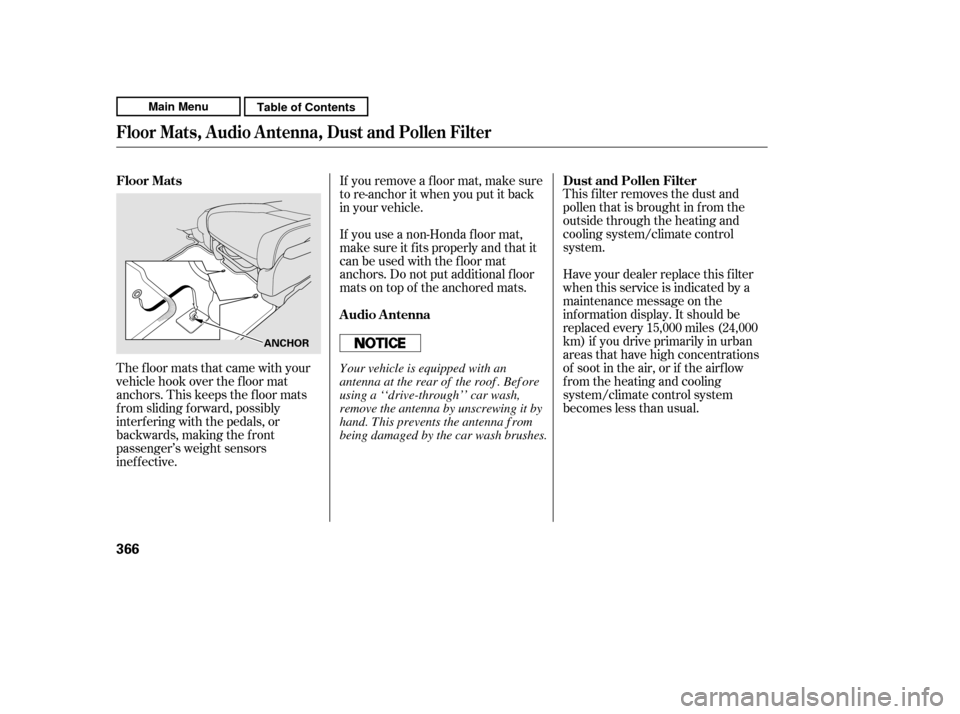
The floor mats that came with your
vehicle hook over the f loor mat
anchors. This keeps the f loor mats
f rom sliding f orward, possibly
interf ering with the pedals, or
backwards, making the f ront
passenger’s weight sensors
inef f ective. Dust and Pollen Filter
A udio A ntenna
Floor Mats
Floor Mats, Audio Antenna, Dust and Pollen Filter
366
ANCHOR
Your vehicle is equipped with an
antenna at the rear of the roof . Bef ore
using a ‘‘drive-through’’ car wash,
remove the antenna by unscrewing it by
hand. This prevents the antenna f rom
being damaged by the car wash brushes.
Main MenuTable of Contents
Page 392 of 445

Your vehicle’s original tire has a
tire pressure monitoring system
sensor. To replace a tire, ref er to(see
page ).
Store the jack in its holder. Turn
the jack’s end bracket to lock it in
place. Store the tools, and place
thecoverontheflattireof the
cargo area.
Store the center cap in the spare
tire well. Make sure it does not get
scratched or damaged.
Close the tailgate.
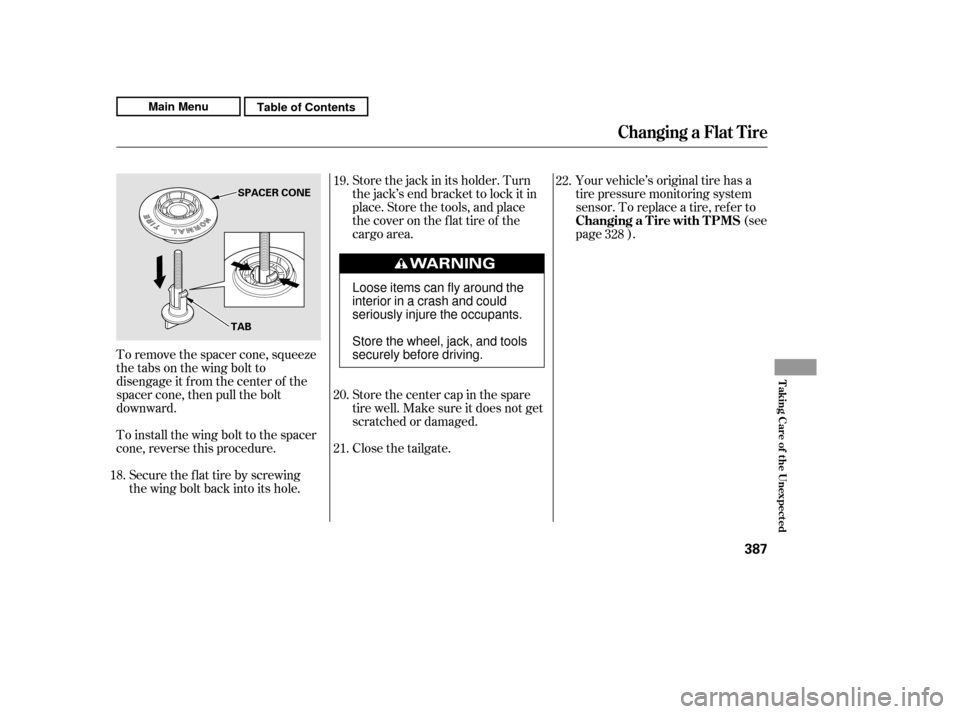
To remove the spacer cone, squeeze
the tabs on the wing bolt to
disengage it f rom the center of the
spacer cone, then pull the bolt
downward.
To install the wing bolt to the spacer
cone, reverse this procedure.
Securetheflattirebyscrewing
the wing bolt back into its hole. 22.
19. 20. 21.
18. 328
Changing a Flat T ire
Changing a T ire with T PMS
T aking Care of t he Unexpect ed
387
TAB
SPACER CONE
Loose items can fly around the
interiorinacrashandcould
seriously injure the occupants.
Store the wheel, jack, and tools
securely before driving.
Main MenuTable of Contents
Page 422 of 445

The PGM-FI system uses sequential
multiport f uel injection.
It has three subsystems: air intake,
engine control, and f uel control. The
powertrain control module (PCM)
uses various sensors to determine
how much air is going into the
engine. It then controls how much
f uel to inject under all operating
conditions.
This system constantly adjusts the
ignition timing, reducing the amount
of HC, CO, and NOx produced.The emissions control systems are
covered by warranties separate f rom
the rest of your vehicle. Read your
warranty manual f or more inf orma-
tion.
The emissions control systems are
designed and certif ied to work to-
gether in reducing emissions to
levels that comply with the Clean Air
Act. To make sure the emissions
remain low, you should use only new
Honda replacement parts or their
equivalent f or repairs. Using lower
qualitypartsmayincreasethe
emissions f rom your vehicle.
The three way catalytic converter is
in the exhaust system. Through
chemical reactions, it converts HC,
CO, and NOx in the engine’s exhaust
to carbon dioxide (CO ), nitrogen
(N ), and water vapor.
The exhaust emissions controls
include three systems: PGM-FI,
ignition timing control, and three
way catalytic converter. These three
systems work together to control the
engine’s combustion and minimize
the amount of HC, CO, and NOx that
comes out the tailpipe. The exhaust
emissions control systems are
separate f rom the crankcase and
evaporative emissions control
systems.
2
2
Exhaust Emissions Controls
Replacement PartsPGM-FI System
Ignit ion T iming Cont rol Syst em Three Way Catalytic Converter
Emissions Cont rols
T echnical Inf ormation
417
Main MenuTable of Contents
Page 433 of 445

...............
DANGER, Explanation of . iii
.........................
Dashboard . 3, 4, 60, 74
................
Daytime Running Lights . 78
Daytime Running Lights
.......................................
Indicator . 65
.................................
Dead Battery . 390
............
Def ects, Reporting Saf ety . 424
................
Def ogger, Rear Window . 80
......
Def rosting the Windows . 134, 139
.......................
Detachable Anchor . 109
....................................
Dimensions . 408
...............
Dimming the Headlights . 76
............................
Capacities Chart . 408
.............
Carbon Monoxide Hazard . 55
..............................................
Cargo . 304
...........................
Cargo area Light . 127
.................................
Cargo Hooks . 309
.............................
Carrying Cargo . 304
....................
Cargo, How to Carry . 304
.............
CAUTION, Explanation of . iii
.........................................
CD Care . 252
..........................
CD Changer . 166, 215
CD Changer Error
...........................
Messages . 176, 221
.............
CD Error Messages . 156, 214
..............................
CD Player . 149, 206
...............................
Center Pocket . 116
..................................
Center Table . 120
........................
Certif ication Label . 406
.................................
Chains, Tires . 375
....................
Changing a Flat Tire . 383
.................................
Changing Oil . 350
........................................
How to . 350
......................................
When to . 341
....
Charging System Message . 62, 394
............
Check Fuel Cap Indicator . 296 ............
Checklist, Bef ore Driving . 313
.....................................
Child Saf ety . 35
..............................
Booster Seats . 52
.............................
Child Seats . 42, 43
Important Saf ety
..........................
Reminders . 35-54
..........................................
Inf ants . 40
..........................
Larger Children . 51
.........................................
LATCH . 44
......................
Risks with Airbags . 36
.............................
Small Children . 41
.........................................
Tethers . 49
...........................
Warning Labels . 37
.........
Where Should a Child Sit? . 36
.......................................
Child Seats . 35
.........................................
LATCH . 44
..........
Tether Anchorage Points . 49
..................
Childproof Door Locks . 91
.......................
Cleaning Seat Belts . 365
..............
Climate Control Sensors . 135
..............................................
Clock . 259
..................
CO in the Exhaust . 55, 416
............
Cold Weather, Starting in . 314
.........................................
Compass . 260
.................
Consumer Inf ormation . 422
.............
Controls, Instruments and . 59 ....................
Conversation Mirror . 123
Coolant
........................................
Adding . 352
....................................
Checking . 298
.........................
Proper Solution . 352
...................
Temperature Gauge . 71
Crankcase Emissions Control
........................................
System . 416
................
Cruise Control Indicator . 64
............
Cruise Control Operation . 266
.........................
Customer Service . 422
Index
D
C
II
Main Menu