tailgate HONDA CR-V 2011 RD1-RD5, RE7 / 3.G Owner's Manual
[x] Cancel search | Manufacturer: HONDA, Model Year: 2011, Model line: CR-V, Model: HONDA CR-V 2011 RD1-RD5, RE7 / 3.GPages: 445, PDF Size: 8.06 MB
Page 137 of 445

Air f lows f rom the f loor
vents.
When you select , the system
automatically switches to f resh air
mode. If you switch the mode f rom or to , the system
keeps the A/C on. The A/C
indicator will not come on if it was
off to start with.
To turn of f the A/C, press the A/C
button to illuminate the indicator,
then press it again to turn off the
A/C.
Airf low is divided between
the f loor vents and def roster vents at
the base of the windshield. Air f lows f rom the def roster
vents at the base of the windshield.
When you select or ,
the system automatically switches to
f resh air mode and turns on the A/C.
You cannot turn the A/C of f in this
mode.
Set the temperature to the lower
limit.
Make sure the A/C is of f .
Select and fresh air mode.
Set the f an to the desired speed. The heater uses engine coolant to
warm the air. If the engine is cold, it
will be several minutes bef ore you
f eel warm air coming f rom the
system.
Select .
When you select , the system
automatically switches to f resh air
mode. If you switch the mode
f rom or , the system
also automatically turns on the
A/C. This helps prevent the
windows f rom f ogging up
unintendedly. The A/C indicator
willnotcomeonifitwasoffto
start with (see the f irst column on
this page).
Set the f an to the desired speed.
Adjust the warmth of the air with
the temperature control dial.
When you switch to or
mode f rom , the A/C
turnsoff.Butifitwasontostart
with, the A/C stays on. The f low-through ventilation system
draws in outside air, circulates it
through the interior, then discharges
it through vents near the tailgate. 1.2. 3.4.1. 2. 3.
Vents, Heating, and A/C
Ventilation
Using the Heater
132
Main MenuTable of Contents
Page 269 of 445
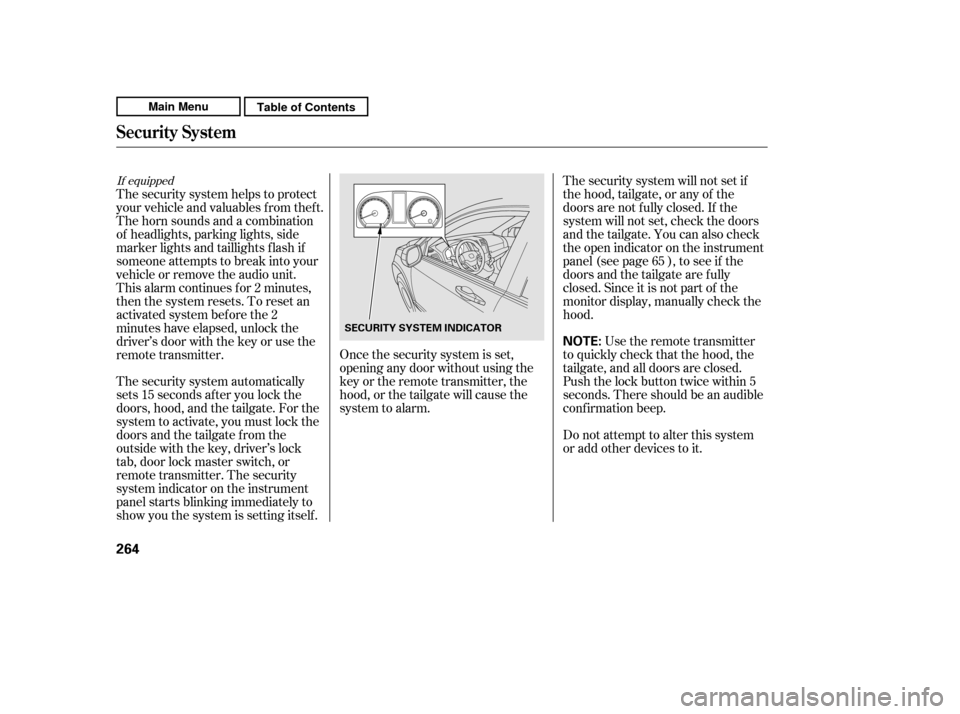
If equipped
Once the security system is set,
opening any door without using the
key or the remote transmitter, the
hood, or the tailgate will cause the
system to alarm.Use the remote transmitter
to quickly check that the hood, the
tailgate, and all doors are closed.
Push the lock button twice within 5
seconds. There should be an audible
conf irmation beep.
Do not attempt to alter this system
or add other devices to it.
The security system automatically
sets 15 seconds after you lock the
doors, hood, and the tailgate. For the
system to activate, you must lock the
doorsandthetailgatefromthe
outside with the key, driver’s lock
tab, door lock master switch, or
remote transmitter. The security
system indicator on the instrument
panel starts blinking immediately to
show you the system is setting itself .
The security system helps to protect
your vehicle and valuables f rom thef t.
The horn sounds and a combination
of headlights, parking lights, side
marker lights and taillights f lash if
someone attempts to break into your
vehicle or remove the audio unit.
This alarm continues f or 2 minutes,
then the system resets. To reset an
activated system before the 2
minutes have elapsed, unlock the
driver’s door with the key or use the
remote transmitter.
The security system will not set if
the hood, tailgate, or any of the
doors are not f ully closed. If the
system will not set, check the doors
and the tailgate. You can also check
the open indicator on the instrument
panel (see page ), to see if the
doors and the tailgate are f ully
closed. Since it is not part of the
monitor display, manually check thehood.
65
Security System
264
NOTE:
SECURITY SYSTEM INDICATOR
Main MenuTable of Contents
Page 312 of 445

Store or secure all items that could
be thrown around and hurt
someone during a crash.
Keep the lower glove box closed
while driving. If it is open, a
passenger could injure their knees
during a crash or sudden stop.If you carry large items that
prevent you f rom closing the
tailgate, exhaust gas can enter the
passenger area. To avoid the
possibility of
, f ollow the instructions
on page .
Distribute cargo evenly on the
f loor of the cargo area, placing the
heaviest items on the bottom and
as far forward as possible. Tie
down items that could be thrown
about the vehicle during a crash or
sudden stop.
Do not stack items higher than the
back of the rear seats. They can
block your view and be thrown
around the vehicle during a crash.
If youfoldtherearseatsupor
down, tie down items that could be
thrown about the vehicle during a
crash or sudden stop. Also, keep
all cargo below the bottom of the
windows. If it is higher, it could
interf ere with the proper operation
of thesidecurtainairbags.
Do not use the dual deck cargo shelf
with any rear seat f olded up or down.
Be sure items placed on the f loor
behind the f ront seats cannot roll
under the seats and interf ere with
the driver’s ability to operate the
pedals, the operation of the seats,
or the operation of the sensors
under the seats.
55
CONT INUED
If equipped
Carrying Cargo in the Passenger
Compartment
carbon monoxide
poisoning
Carrying Cargo in the Cargo A rea
or on a Roof Rack
Carrying Cargo
Bef ore Driving
307
Main MenuTable of Contents
Page 318 of 445

Check the adjustment of the
inside and outside mirrors (see
page ).
Check the steering wheel
adjustment (see page ).
Fasten your seat belt. Check that
your passengers have f astened
their seat belts (see page ).
Make sure the doors and the
tailgate are securely closed and
locked.
Youshoulddothefollowingchecks
and adjustments bef ore you drive
your vehicle.
Make sure all windows, mirrors,
and outside lights are clean and
unobstructed. Remove f rost, snow,
or ice.
Check that the hood is f ully closed.
Visually check the tires. If a tire
looks low, use a gauge to check its
pressure.
Check that any items you may be
carrying are stored properly or
f astened down securely. When you start the engine, check
the gauges and indicators in the
instrument panel (see pages to
).
Check the seat adjustment (see
pages and ).
1. 2.
10.
3. 4. 5. 6. 7. 8. 9.
114
81
15
68 61
97 98
Preparing to Drive
Driving
313
Main MenuTable of Contents
Page 325 of 445

Always use the parking brake when
you park your vehicle. Make sure
the parking brake is set f irmly, or
your vehicle may roll if it is parked
on an incline.Make sure the moonroof (if
equipped) and the windows are
closed.
Turn of f the lights.
Place any packages, valuables, etc.
in the cargo area or take them
with you.
Set the parking brake bef ore you put
the transmission in Park. This keeps
the vehicle from moving and putting
pressure on the parking mechanism
in the transmission. If the vehicle is f acing uphill, turn
the f ront wheels away f rom the
curb.
If the vehicle is f acing downhill,
turn the front wheels toward the
curb.
Make sure the parking brake is
f ully released bef ore driving away.
Driving with the parking brake
partially set can overheat or
damage the rear brakes.
Lock the doors and the tailgate.
Never park over dry leaves, tall
grass, or other f lammable
materials. The hot three way
catalytic converter could cause
these materials to catch on fire.
Check the indicator on the
instrument panel to verif y that the
security system is set.
If equipped
Parking T ips
Parking
320
Main MenuTable of Contents
Page 367 of 445
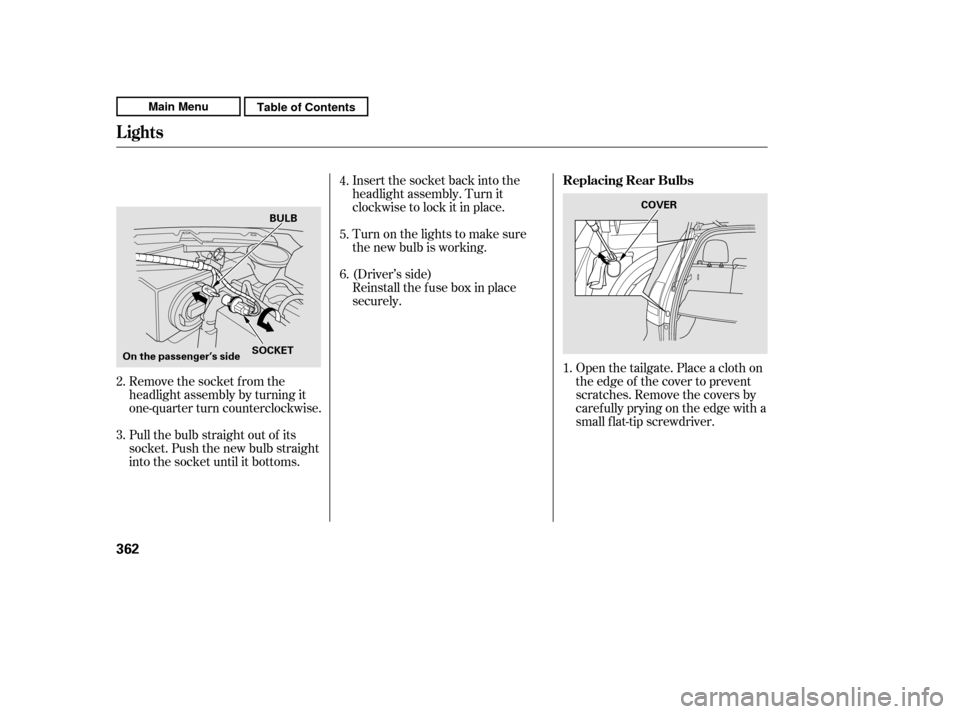
Remove the socket from the
headlight assembly by turning it
one-quarter turn counterclockwise.
Pull the bulb straight out of its
socket. Push the new bulb straight
into the socket until it bottoms.Insert the socket back into the
headlight assembly. Turn it
clockwise to lock it in place.
Turn on the lights to make sure
the new bulb is working.
(Driver’s side)
Reinstall the f use box in place
securely.
Open the tailgate. Place a cloth on
the edge of the cover to prevent
scratches. Remove the covers by
caref ully prying on the edge with a
small f lat-tip screwdriver.
2. 3. 4.5. 6.
1.
Lights
Replacing Rear Bulbs
362
On the passenger’s sideBULB
SOCKET COVER
Main MenuTable of Contents
Page 369 of 445
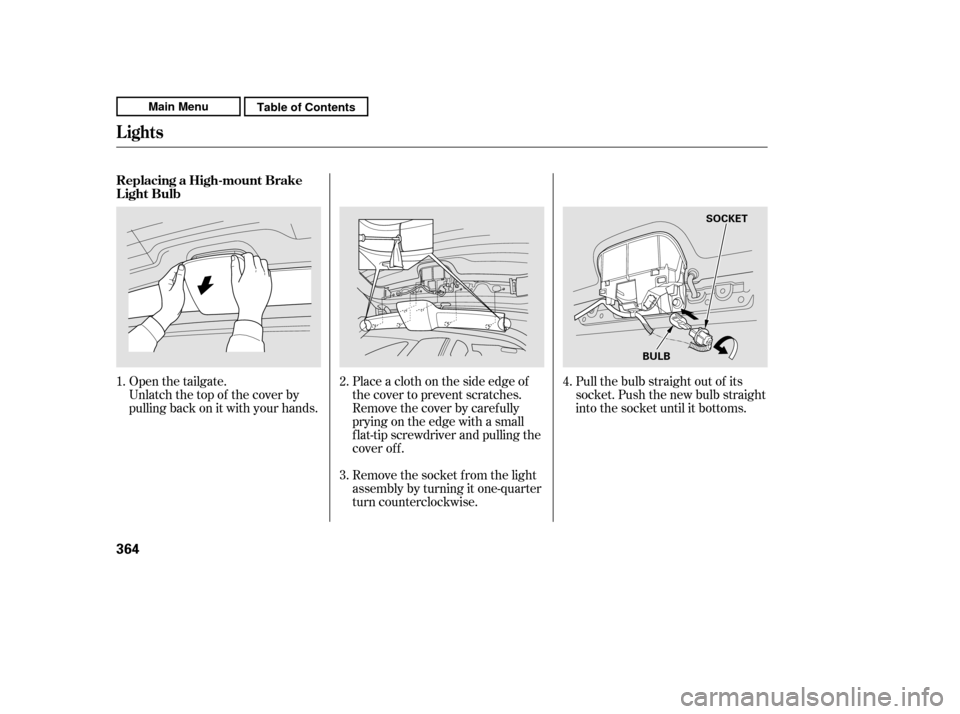
Open the tailgate.
Unlatch the top of the cover by
pulling back on it with your hands.Place a cloth on the side edge of
the cover to prevent scratches.
Remove the cover by caref ully
prying on the edge with a small
f lat-tip screwdriver and pulling the
cover of f .
Remove the socket f rom the light
assembly by turning it one-quarter
turn counterclockwise.Pull the bulb straight out of its
socket. Push the new bulb straight
into the socket until it bottoms.
1.
2. 3.4.
Lights
Replacing a High-mount Brake
Light Bulb
364
BULBSOCKET
Main MenuTable of Contents
Page 384 of 445

Support the f ront and rear wiper
blade arms with a f olded towel or
ragsotheydonottouchthe
windshield.
To minimize sticking, apply a
silicone spray lubricant to all door
and tailgate seals. Also, apply a
vehiclebodywaxtothepainted
surfaces that mate with the door
and tailgate seals.Cover the vehicle with a
‘‘breathable’’ cover, one made
f rom a porous material such as
cotton. Non-porous materials, such
as plastic sheeting, trap moisture,
which can damage the paint.
If possible, periodically run the
engine until it reaches f ull
operating temperature (the
cooling f ans cycle on and of f
twice). Pref erably, do this once a
month.Vacuum dirt and dust f rom the
leather f requently. Pay close
attention to the pleats and seams.
Clean the leather with a sof t cloth
dampened with a 90% water and 10%
neutral wool detergent solution.
Then buf f it with a clean, dry cloth.
Remove any dust or dirt on leather
surf aces immediately.
If equipped
Vehicle Storage, Interior Care
Leather
Maint enance
379
Main MenuTable of Contents
Page 388 of 445
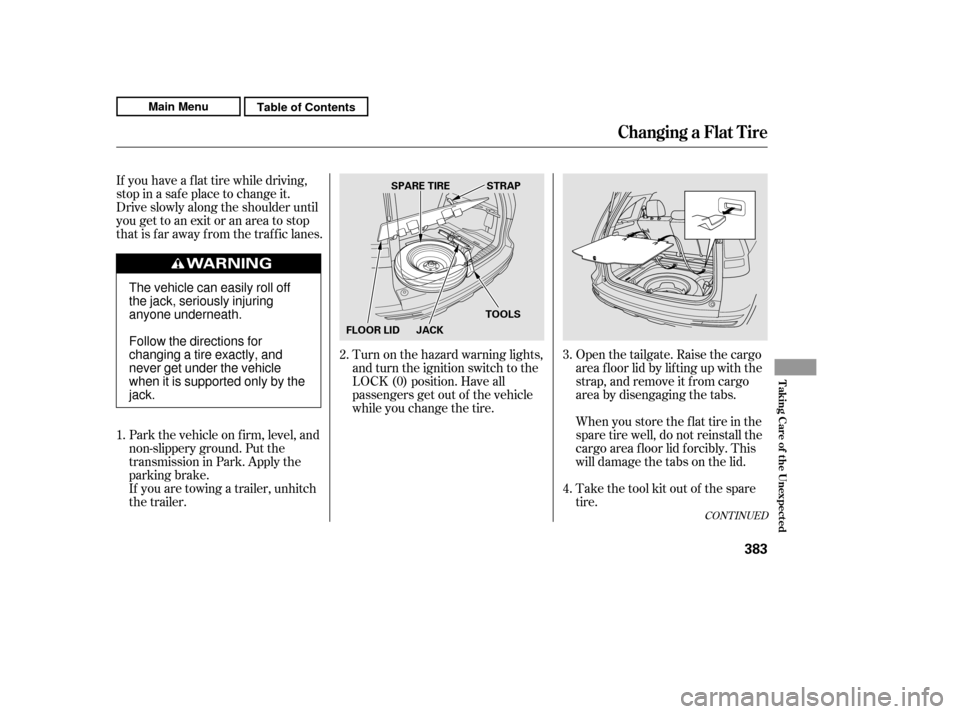
If you have a f lat tire while driving,
stop in a saf e place to change it.
Drive slowly along the shoulder until
you get to an exit or an area to stop
that is far away from the traffic lanes.Park the vehicle on f irm, level, and
non-slippery ground. Put the
transmission in Park. Apply the
parking brake.
If you are towing a trailer, unhitch
the trailer. Turn on the hazard warning lights,
and turn the ignition switch to the
LOCK (0) position. Have all
passengers get out of the vehicle
while you change the tire.
Open the tailgate. Raise the cargo
area f loor lid by lif ting up with the
strap, and remove it f rom cargo
area by disengaging the tabs.
When you store the f lat tire in the
spare tire well, do not reinstall the
cargo area f loor lid f orcibly. This
will damage the tabs on the lid.
Take the tool kit out of the spare
tire.
1. 2.
3. 4.
CONT INUED
Changing a Flat T ire
T aking Care of t he Unexpect ed
383
JACK
SPARE TIRE
TOOLSSTRAP
FLOOR LID
The vehicle can easily roll off
the jack, seriously injuring
anyone underneath.
Follow the directions for
changing a tire exactly, and
never get under the vehicle
when it is supported only by thejack.
Main MenuTable of Contents
Page 392 of 445
Your vehicle’s original tire has a
tire pressure monitoring system
sensor. To replace a tire, ref er to(see
page ).
Store the jack in its holder. Turn
the jack’s end bracket to lock it in
place. Store the tools, and place
thecoverontheflattireof the
cargo area.
Store the center cap in the spare
tire well. Make sure it does not get
scratched or damaged.
Close the tailgate.
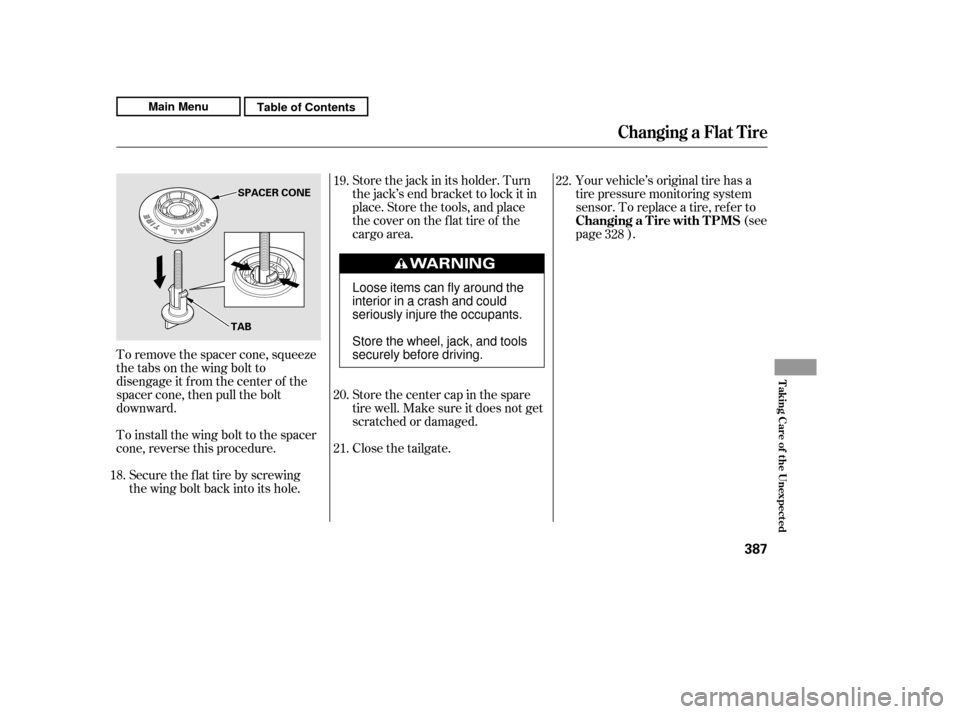
To remove the spacer cone, squeeze
the tabs on the wing bolt to
disengage it f rom the center of the
spacer cone, then pull the bolt
downward.
To install the wing bolt to the spacer
cone, reverse this procedure.
Securetheflattirebyscrewing
the wing bolt back into its hole. 22.
19. 20. 21.
18. 328
Changing a Flat T ire
Changing a T ire with T PMS
T aking Care of t he Unexpect ed
387
TAB
SPACER CONE
Loose items can fly around the
interiorinacrashandcould
seriously injure the occupants.
Store the wheel, jack, and tools
securely before driving.
Main MenuTable of Contents