run flat HONDA CR-V 2012 RM1, RM3, RM4 / 4.G Owners Manual
[x] Cancel search | Manufacturer: HONDA, Model Year: 2012, Model line: CR-V, Model: HONDA CR-V 2012 RM1, RM3, RM4 / 4.GPages: 361, PDF Size: 7.25 MB
Page 236 of 361

235
uuTowing a TraileruTowing Your Vehicle
Continued
Driving
Towing Your Vehicle
Your vehicle can be towed behind a motorhome.
Perform the following procedure before towing your vehicle. 1.Check the transmission fluid level.
uMake sure the fluid level is between the upper and lower marks.
2. Start the engine.
3. Depress the brake pedal. Move the shift lever through all its positions.
4. Shift to
(D and hold for five seconds, then to (N. Let the engine run for three
minutes, then turn it off.
5. Release the parking brake.
6. Leave the ignition switch in ACCESSORY
(q .uMake sure the steering wheel does not lock.
7. Turn off all the electric devices. Do not use any accessory power sockets.
uThis can prevent the battery from running down.
■When Your Vehicle is Towed Behind a Motorhome
1Towing Your Vehicle
NOTICEFailure to follow the recommended instructions
exactly will result in severe automatic transmission
damage. If you cannot shift the transmission or start
the engine, your vehicle must be transported on a
flat-bed truck or trailer.
Do not exceed 65 mph (100 km/h).
To avoid damage to the AWD system, your vehicle
must be towed with all four wheels on the ground.
Consult your towing parts sales or rental agency if
any other items are recommended or required for
your towing situation.
If you tow your vehicle behind a motorhome, the
transmission fluid must be changed every 2 years or
30,000 miles (48,000 km), whichever comes first.
AWD models
1When Your Vehicle is Towed Behind a Motorhome
NOTICESevere transmission damage will occur if the vehicle is
shifted from (R to (N and then towed with the drive
wheels on the ground.
Page 321 of 361

uuIf a Tire Goes FlatuChanging a Flat Tire
320
Handling the Unexpected
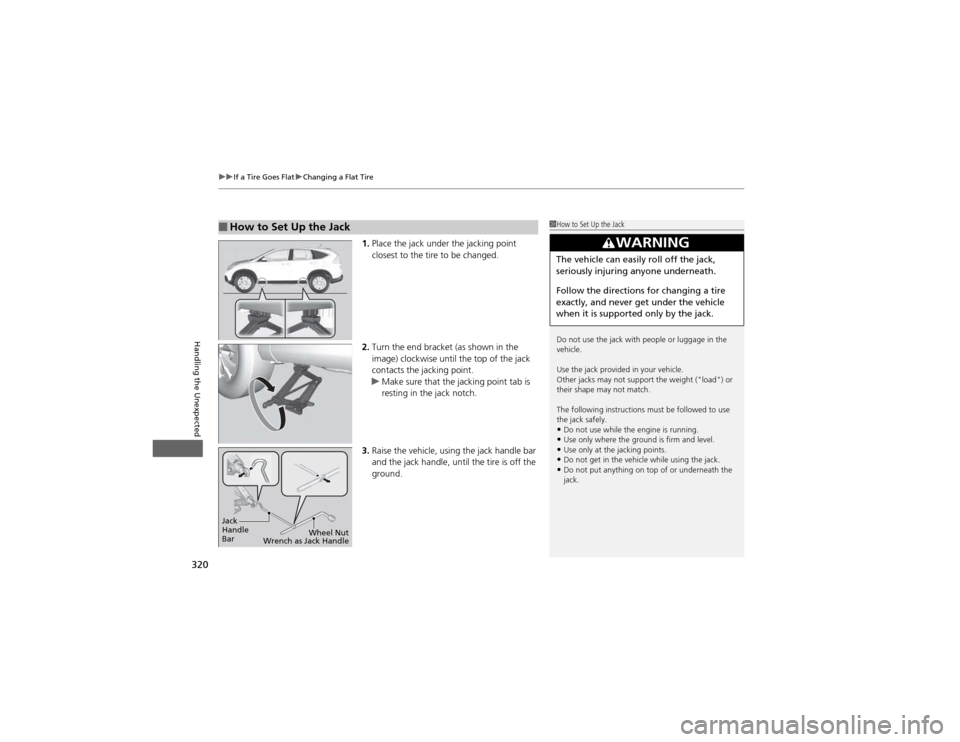
1. Place the jack under the jacking point
closest to the tire to be changed.
2. Turn the end bracket (as shown in the
image) clockwise until the top of the jack
contacts the jacking point.
uMake sure that the jacking point tab is
resting in the jack notch.
3. Raise the vehicle, using the jack handle bar
and the jack handle, until the tire is off the
ground.
■How to Set Up the Jack1How to Set Up the Jack
Do not use the jack with people or luggage in the
vehicle.
Use the jack provided in your vehicle.
Other jacks may not support the weight ("load") or
their shape may not match.
The following instructions must be followed to use
the jack safely.
• Do not use while the engine is running.
• Use only where the ground is firm and level.
• Use only at the jacking points.
• Do not get in the vehicle while using the jack.
• Do not put anything on top of or underneath the jack.
3WARNING
The vehicle can easily roll off the jack,
seriously injuring anyone underneath.
Follow the directions for changing a tire
exactly, and never get under the vehicle
when it is supported only by the jack.
Jack
Handle
Bar Wheel Nut
Wrench as Jack Handle