lock HONDA CR-V 2015 RM1, RM3, RM4 / 4.G Owners Manual
[x] Cancel search | Manufacturer: HONDA, Model Year: 2015, Model line: CR-V, Model: HONDA CR-V 2015 RM1, RM3, RM4 / 4.GPages: 533, PDF Size: 24.82 MB
Page 407 of 533
uuBraking uBrake System
406
Driving
Your vehicle is equipped with disc brakes at all four wheels. A vacuum power assist
helps reduce the effort needed on the brake pedal. The brake assist system increases
the stopping force when you depress th e brake pedal hard in an emergency
situation. The anti-lock brake system (ABS ) helps you retain steering control when
braking very hard.
2 Brake Assist System P. 408
2 Anti-lock Brake System (ABS) P. 407
■Foot Brake1Foot Brake
Check the brakes after driving through deep water,
or if there is a buildup of road surface water. If
necessary, dry the brakes by lightly depressing the
pedal several times.
If you hear a continuous me tallic friction sound when
applying the brakes, the brake pads need to be
replaced. Have the vehicle checked by a dealer.
Constantly using the brak e pedal while going down a
long hill builds up heat, which reduces the brake
effectiveness. Apply engine braking by taking your
foot off the accelerator pe dal and downshifting to a
lower gear.
Do not rest your foot on the brake pedal while
driving, as it will lightly apply the brakes and cause
them to lose effectiveness over time and reduce pad
life. It will also conf use drivers behind you.
15 CR-V-31T0A6300.book 406 ページ 2015年2月2日 月曜日 午前10時35分
Page 408 of 533
407
uuBraking uAnti-lock Brake System (ABS)
Driving
Anti-lock Brake System (ABS)
Helps prevent the wheels from locking up, and helps you retain steering control by
pumping the brakes rapidly, much faster than you.
The electronic brake distribu tion (EBD) system, which is part of the ABS, also
balances the front-to-rear braking distribution according to vehicle loading.
You should never pu mp the brake pedal. Let the ABS work for you by always
keeping firm, steady pressure on the brake pe dal. This is sometimes referred to as
“stomp and steer.“
■ABS operation
The brake pedal may pulsate slightly when the ABS is working. Keep holding the
pedal firmly down. On dry pavement, y ou need to press on the brake pedal very
hard before the ABS activates. However, you may feel the ABS activate immediately
if you are trying to stop on snow or ice.
When the vehicle speed goes unde r 6 mph (10 km/h), the ABS stops.
1Anti-lock Brake System (ABS)
NOTICE
The ABS may not function correctly if you use an
incorrect tire type and size.
When the ABS indicator comes on while driving,
there may be a problem with the system.
While normal braking is not affected, there is a
possibility of the ABS not operating. Have the vehicle
checked by a dealer immediately.
The ABS does not reduce the ti me or distance it takes
to stop the vehicle. It only helps with steering control
during hard braking.
In the following cases, yo ur vehicle may need more
stopping distance than a vehicle without the ABS:
•When driving on rough road surfaces, including
when driving on uneven surf aces, such as gravel or
snow.
•When tire chains are installed.
You may hear a motor sound coming from the
engine compartment while system checks are being
performed immediately after starting the engine or
while driving. This is normal.
15 CR-V-31T0A6300.book 407 ページ 2015年2月2日 月曜日 午前10時35分
Page 415 of 533
414
uuBraking uCollision Mitigation Braking SystemTM (CMBSTM)*
Driving
The system may automatically shut off and the CMBSTM indicator will come on under
certain conditions. Some examples of th ese conditions are listed below. Other
conditions may reduce some of the CMBS
TM functions.
2 Front Sensor Camera* P. 374
■Environmental conditions
• Driving in bad weather (rain, fog, snow, etc.).
• Sudden changes between light and dark, such as an entrance or exit of a tunnel.
• There is little contrast between objects and the background.
• Driving into low sunlight (e.g., at dawn or dusk).
• Strong light is reflected onto the roadway.
• Driving in the shadows of trees, buildings, etc.
• Roadway objects or structures are misint erpreted as vehicles and pedestrians.
• Reflections on the interior of the front windshield.
■Roadway conditions
• Driving on a snowy or wet roadway (obscured lane marking, vehicle tracks,
reflected lights, road spray, high contrast).
■Vehicle conditions
• Headlight lenses are dirty or the headlights are not properly adjusted.
• The outside of the windshie ld is blocked by dirt, mud, leaves, wet snow, etc.
• The inside of the windshield is fogged.
• An abnormal tire or wheel condition (wrong sized, varied size or construction,
improperly inflated, comp act spare tire, etc.).
• The vehicle is tilted due to a heav y load or suspension modifications.
• The camera temperature gets too hot.
■CMBSTM Conditions and Limitations
* Not available on all models
15 CR-V-31T0A6300.book 414 ページ 2015年2月2日 月曜日 午前10時35分
Page 442 of 533
441
uuMaintenance Under the Hood uOpening the Hood
Maintenance
Opening the Hood
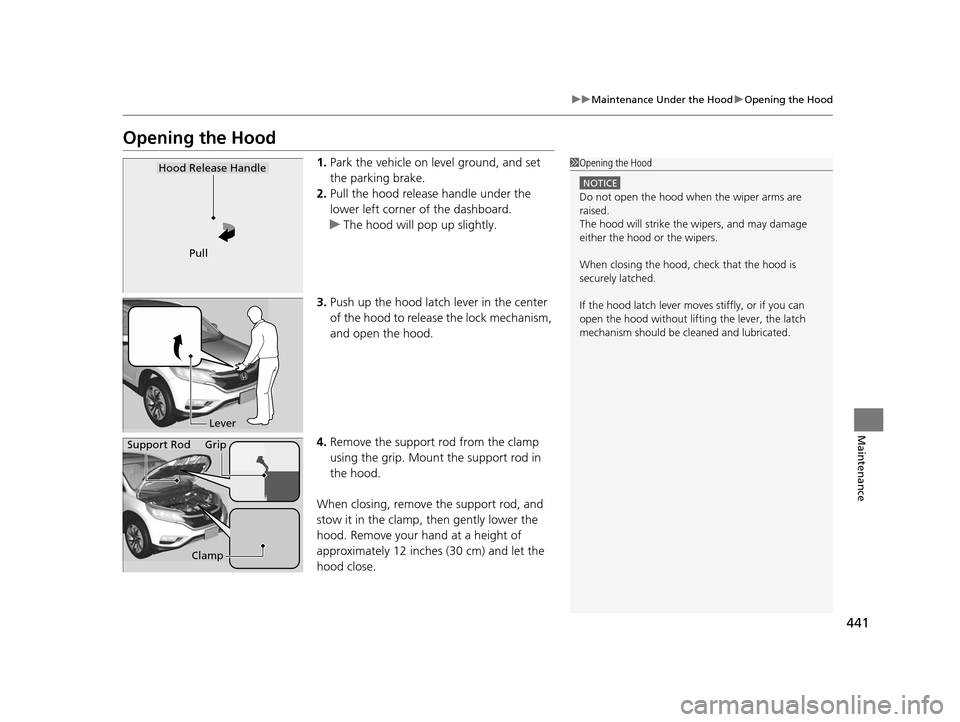
1. Park the vehicle on le vel ground, and set
the parking brake.
2. Pull the hood release handle under the
lower left corner of the dashboard.
u The hood will pop up slightly.
3. Push up the hood latch lever in the center
of the hood to release the lock mechanism,
and open the hood.
4. Remove the support rod from the clamp
using the grip. Mount the support rod in
the hood.
When closing, remove the support rod, and
stow it in the clamp, then gently lower the
hood. Remove your hand at a height of
approximately 12 inches (30 cm) and let the
hood close.1 Opening the Hood
NOTICE
Do not open the hood when the wiper arms are
raised.
The hood will strike the wipers, and may damage
either the hood or the wipers.
When closing the hood, check that the hood is
securely latched.
If the hood latch lever moves stiffly, or if you can
open the hood without lifti ng the lever, the latch
mechanism should be cl eaned and lubricated.
Hood Release Handle
Pull
Lever
Support Rod Grip
Clamp
15 CR-V-31T0A6300.book 441 ページ 2015年2月2日 月曜日 午前10時35分
Page 447 of 533
uuMaintenance Under the Hood uChanging the Engine Oil and Oil Filter
446
Maintenance
4. Remove the oil filter and dispose of the remaining oil.
5. Check that the filter gasket is not stuck to the engine contact surface.
u If it is stuck, you must detach it.
6. Wipe away dirt and dust adhering to th e contact surface of the engine block,
and install a new oil filter.
u Apply a light coat of new engine oil to the oil filter gasket.
7. Put a new washer on the drain bolt , then reinstall the drain bolt.
u Tightening torque:
30 lbf∙ft (40 N∙m, 4.0 kgf∙m)
8. Pour the recommended engine oil into the engine.
u Engine oil change capacity (including filter):
4.6 US qt (4.4 L)
9. Reinstall the engine oil fill ca p securely and start the engine.
10. Run the engine for a few minutes, and then check that there is no leak from the
drain bolt or oil filter.
11. Stop the engine, wait for three minutes, and then check the oil level on the
dipstick.
u If necessary, add more engine oil.1Changing the Engine Oil and Oil Filter
You will need a special wrench to replace the oil
filter. You can buy this wrench from a dealer.
When installing the new oil filter, follow the
instructions supplied with the oil filter.
Reinstall the engine oil fill cap. Start the engine. The
low oil pressure indicator should go off within five
seconds. If it does not, turn off the engine, and check
your work.
Be sure to verify that the o il filter is designed for your
vehicle. A genuine Honda oil filter is recommended
for optimum lubrication flow and filtration properties
to assure the reliability of the engine.
15 CR-V-31T0A6300.book 446 ページ 2015年2月2日 月曜日 午前10時35分
Page 449 of 533
uuMaintenance Under the Hood uEngine Coolant
448
Maintenance
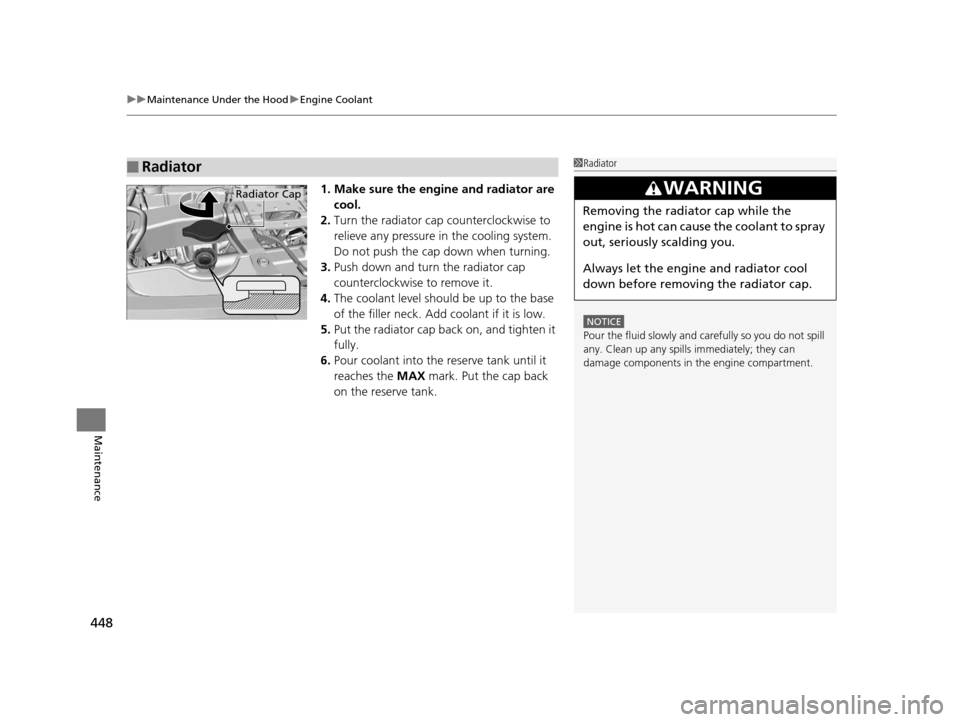
1. Make sure the engine and radiator are
cool.
2. Turn the radiator cap counterclockwise to
relieve any pressure in the cooling system.
Do not push the cap down when turning.
3. Push down and turn the radiator cap
counterclockwise to remove it.
4. The coolant level should be up to the base
of the filler neck. Add coolant if it is low.
5. Put the radiator cap back on, and tighten it
fully.
6. Pour coolant into the reserve tank until it
reaches the MAX mark. Put the cap back
on the reserve tank.
■Radiator1 Radiator
NOTICE
Pour the fluid slowly and ca refully so you do not spill
any. Clean up any spills immediately; they can
damage components in the engine compartment.
3WARNING
Removing the radiator cap while the
engine is hot can cause the coolant to spray
out, seriously scalding you.
Always let the engine and radiator cool
down before removing the radiator cap.
Radiator Cap
15 CR-V-31T0A6300.book 448 ページ 2015年2月2日 月曜日 午前10時35分
Page 462 of 533
461Continued
Maintenance
Checking and Maintaining Wiper Blades
Checking Wiper Blades
If the wiper blade rubber has deteriorated, it will leave streaks and the hard surfaces
of the blade may scratch the window glass.
Changing the Front Wiper Blade Rubber
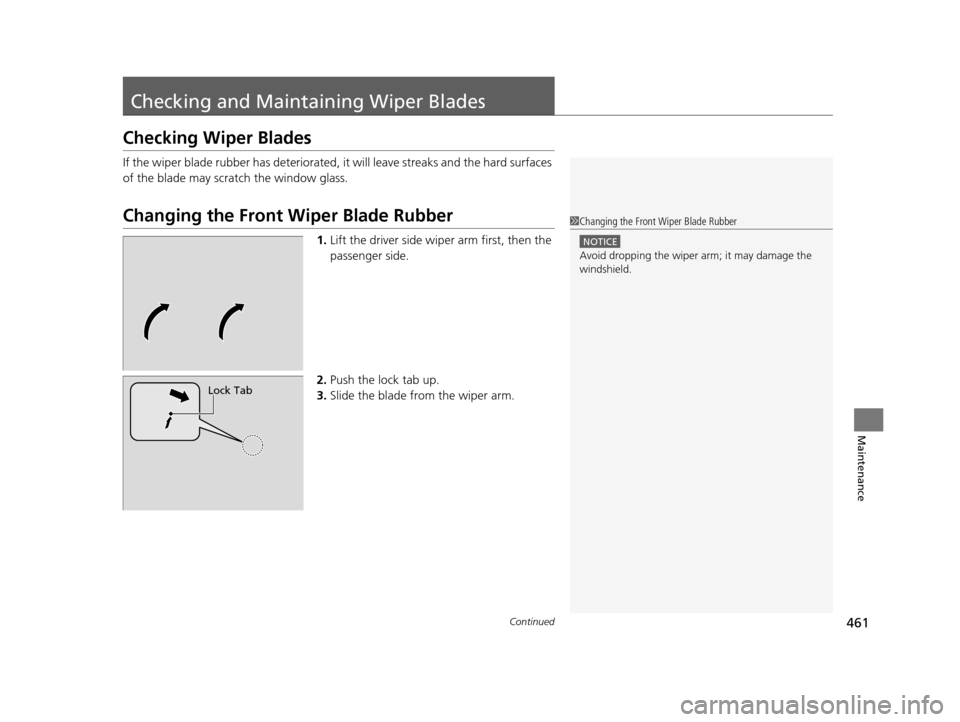
1.Lift the driver side wiper arm first, then the
passenger side.
2. Push the lock tab up.
3. Slide the blade from the wiper arm.
1Changing the Front Wiper Blade Rubber
NOTICE
Avoid dropping the wiper ar m; it may damage the
windshield.
Lock Tab
15 CR-V-31T0A6300.book 461 ページ 2015年2月2日 月曜日 午前10時35分
Page 464 of 533
463
uuChecking and Maintaining Wiper Blades uChanging the Rear Wiper Blade Rubber
Continued
Maintenance
Changing the Rear Wiper Blade Rubber
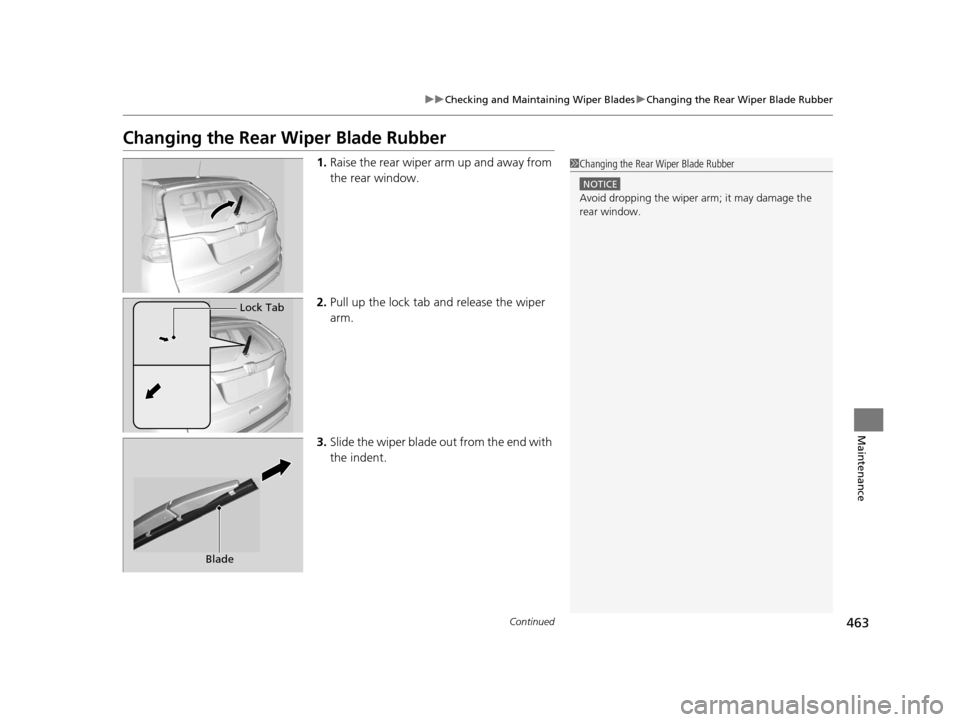
1.Raise the rear wiper arm up and away from
the rear window.
2. Pull up the lock tab and release the wiper
arm.
3. Slide the wiper blade out from the end with
the indent.1Changing the Rear Wiper Blade Rubber
NOTICE
Avoid dropping the wiper ar m; it may damage the
rear window.
Lock Tab
Blade
15 CR-V-31T0A6300.book 463 ページ 2015年2月2日 月曜日 午前10時35分
Page 475 of 533
474
Maintenance
Battery
Checking the Battery
Check the battery condition monthly and check the terminals for corrosion.
If your vehicle's battery is disconnected or goes dead:
• The audio system is disabled.
2 Reactivating the audio system P. 210
•The clock resets.
2 Clock P. 128
•The navigation system* is disabled.
2 Refer to the navigation system manual
Charging the Battery
Disconnect both battery cables to prevent da maging your vehicle's electrical system.
Always disconnect the negative (–) cable first, and reconnect it last.
1 Battery
WARNING: Battery post, terminals,
and related accessories contain lead
and lead compounds.
Wash your hands after handling.
When you find corrosion, cl ean the battery terminals
by applying a baking powder and water solution.
Clean the terminals with a damp towel. Cloth/towel
dry the battery. Coat the terminals with grease to
help prevent future corrosion.
When replacing the battery, the replacement must be
of the same specifications.
Please consult a dealer for more information.
3WARNING
The battery gives off explosive hydrogen
gas during normal operation.
A spark or flame can cause the battery to
explode with enough force to kill or
seriously hurt you.
When conducting any battery
maintenance, wear prot ective clothing and
a face shield, or have a skilled technician do
it.
* Not available on all models
15 CR-V-31T0A6300.book 474 ページ 2015年2月2日 月曜日 午前10時35分
Page 480 of 533
479
uuCleaning uInterior Care
Maintenance
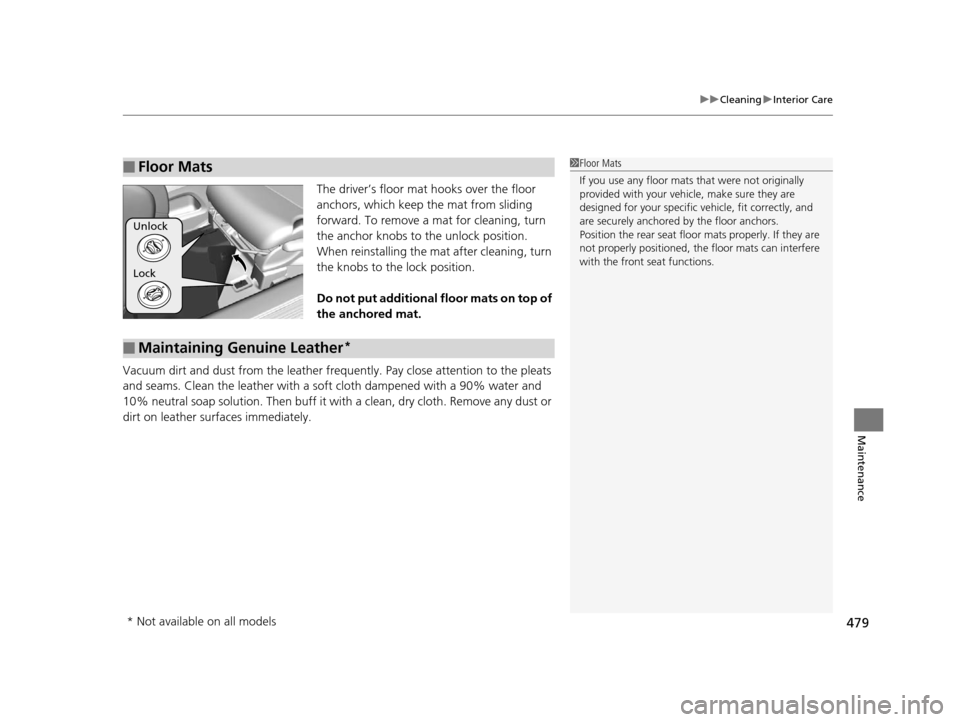
The driver’s floor mat hooks over the floor
anchors, which keep the mat from sliding
forward. To remove a mat for cleaning, turn
the anchor knobs to the unlock position.
When reinstalling the mat after cleaning, turn
the knobs to the lock position.
Do not put additional floor mats on top of
the anchored mat.
Vacuum dirt and dust from the leather frequ ently. Pay close attention to the pleats
and seams. Clean the leather with a so ft cloth dampened with a 90% water and
10% neutral soap solution. Then buff it with a clean, dry cloth. Remove any dust or
dirt on leather surfaces immediately.
■Floor Mats1 Floor Mats
If you use any floor mats that were not originally
provided with your vehicle, make sure they are
designed for your specific ve hicle, fit correctly, and
are securely anchored by the floor anchors.
Position the rear seat floor mats properly. If they are
not properly positioned, the floor mats can interfere
with the front seat functions.
Lock Unlock
■Maintaining Genuine Leather*
* Not available on all models
15 CR-V-31T0A6300.book 479 ページ 2015年2月2日 月曜日 午前10時35分