set clock HONDA CR-V 2015 RM1, RM3, RM4 / 4.G Owners Manual
[x] Cancel search | Manufacturer: HONDA, Model Year: 2015, Model line: CR-V, Model: HONDA CR-V 2015 RM1, RM3, RM4 / 4.GPages: 533, PDF Size: 24.82 MB
Page 13 of 533
12
Quick Reference Guide
Controls (P127)
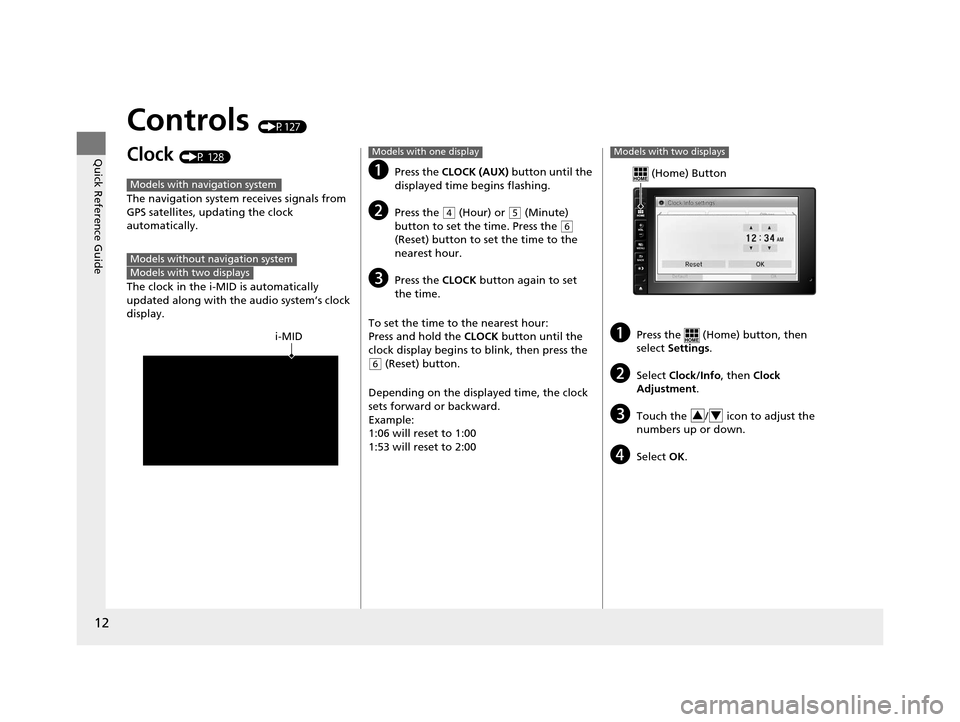
Clock (P 128)
The navigation system receives signals from
GPS satellites, updating the clock
automatically.
The clock in the i-MID is automatically
updated along with the audio system’s clock
display.
Models with navigation system
Models without navigation systemModels with two displays
i-MID
aPress the CLOCK (AUX) button until the
displayed time begins flashing.
bPress the ( 4 (Hour) or (5 (Minute)
button to set the time. Press the ( 6
(Reset) button to set the time to the
nearest hour.
cPress the CLOCK button again to set
the time.
To set the time to the nearest hour:
Press and hold the CLOCK button until the
clock display begins to blink, then press the
( 6 (Reset) button.
Depending on the displayed time, the clock
sets forward or backward.
Example:
1:06 will reset to 1:00
1:53 will reset to 2:00
Models with one display
aPress the (Home) button, then
select Settings .
bSelect Clock/Info , then Clock
Adjustment .
cTouch the / icon to adjust the
numbers up or down.
dSelect OK.
Models with two displays
(Home) Button
34
15 CR-V-31T0A6300.book 12 ページ 2015年2月2日 月曜日 午前10時35分
Page 119 of 533
118
uuGauges and Displays uintelligent Multi-Information Display (i-MID)
Instrument Panel
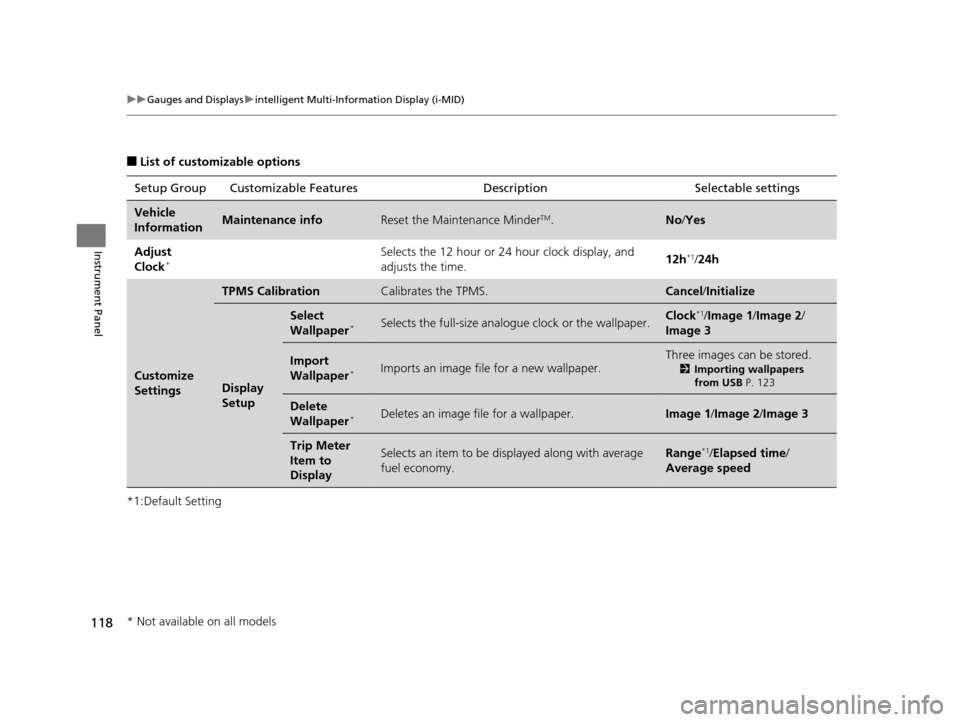
■List of customizable options
*1:Default Setting Setup Group Customizabl
e Features Description Selectable settings
Vehicle
InformationMaintenance infoReset the Maintenance MinderTM.No/Yes
Adjust
Clock
*Selects the 12 hour or 24 hour clock display, and
adjusts the time. 12h*1/
24h
Customize
Settings
TPMS CalibrationCalibrates the TPMS.Cancel /Initialize
Display
Setup
Select
Wallpaper*Selects the full-size analogue clock or the wallpaper.Clock*1/Image 1 /Image 2 /
Image 3
Import
Wallpaper*Imports an image file for a new wallpaper.
Three images can be stored.
2 Importing wallpapers
from USB P. 123
Delete
Wallpaper*Deletes an image file for a wallpaper.Image 1/Image 2/ Image 3
Trip Meter
Item to
DisplaySelects an item to be di splayed along with average
fuel economy.Range*1/ Elapsed time /
Average speed
* Not available on all models
15 CR-V-31T0A6300.book 118 ページ 2015年2月2日 月曜日 午前10時35分
Page 124 of 533
Continued123
uuGauges and Displays uintelligent Multi-Information Display (i-MID)
Instrument Panel
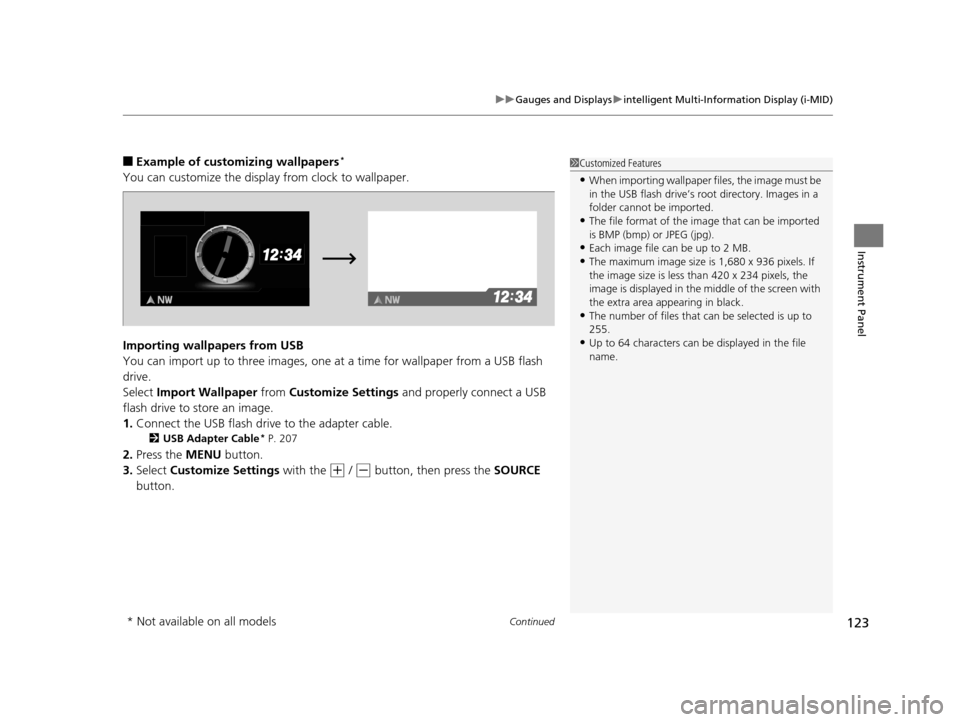
■Example of customizing wallpapers*
You can customize the display from clock to wallpaper.
Importing wallpapers from USB
You can import up to three images, one at a time for wallpaper from a USB flash
drive.
Select Import Wallpaper from Customize Settings and properly connect a USB
flash drive to store an image.
1. Connect the USB flash driv e to the adapter cable.
2USB Adapter Cable* P. 207
2.Press the MENU button.
3. Select Customize Settings with the
(+ / (- button, then press the SOURCE
button.
1 Customized Features
•When importing wallpaper files, the image must be
in the USB flash drive’s root directory. Images in a
folder cannot be imported.
•The file format of the im age that can be imported
is BMP (bmp) or JPEG (jpg).
•Each image file can be up to 2 MB.
•The maximum image size is 1,680 x 936 pixels. If
the image size is less than 420 x 234 pixels, the
image is displayed in the middle of the screen with
the extra area appearing in black.
•The number of files that can be selected is up to
255.
•Up to 64 characters can be displayed in the file
name.
* Not available on all models
15 CR-V-31T0A6300.book 123 ページ 2015年2月2日 月曜日 午前10時35分
Page 129 of 533
128
Controls
Clock
Adjusting the Clock
The audio and navigation system receives signals from GPS satellites, updating the
clock automatically.
You can adjust the time in the clock di splay with the ignition switch in ON
(w*1.
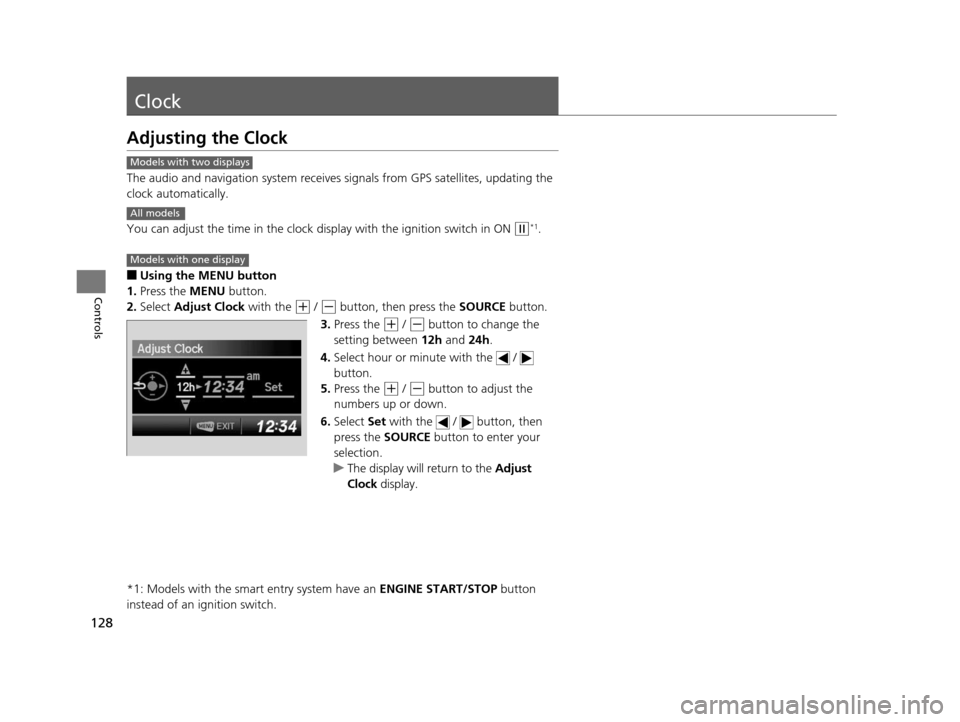
■Using the MENU button
1. Press the MENU button.
2. Select Adjust Clock with the
(+ / (- button, then press the SOURCE button.
3. Press the
(+ / (- button to change the
setting between 12h and 24h.
4. Select hour or minute with the /
button.
5. Press the
(+ / (- button to adjust the
numbers up or down.
6. Select Set with the / button, then
press the SOURCE button to enter your
selection.
u The display will return to the Adjust
Clock display.
*1: Models with the smart entry system have an ENGINE START/STOP button
instead of an ignition switch.
Models with two displays
All models
Models with one display
15 CR-V-31T0A6300.book 128 ページ 2015年2月2日 月曜日 午前10時35分
Page 130 of 533
129
uuClock uAdjusting the Clock
Controls
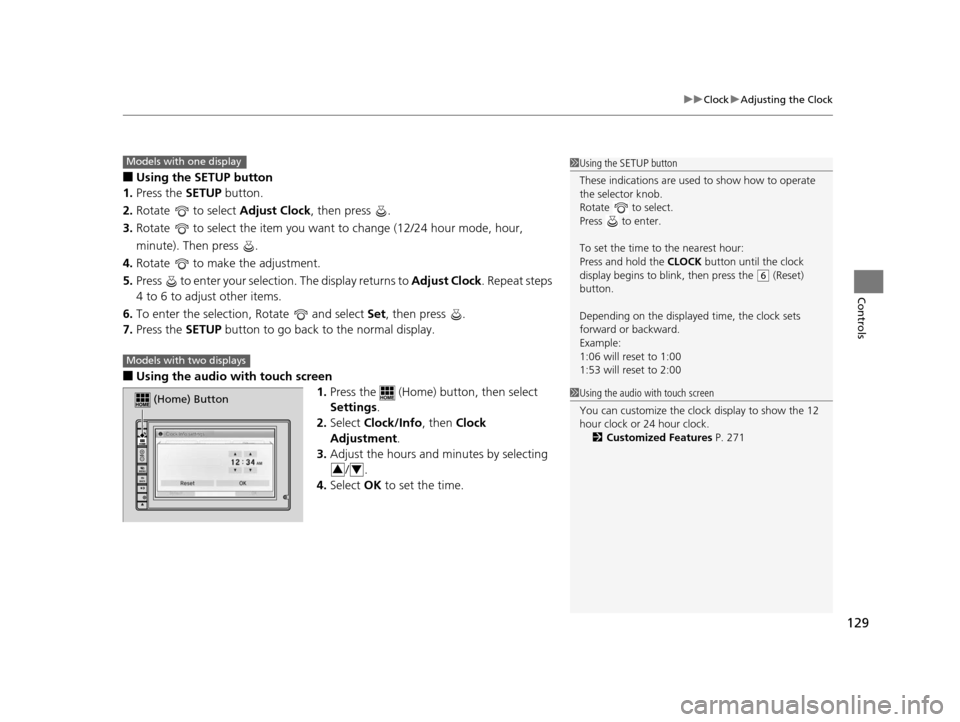
■Using the SETUP button
1. Press the SETUP button.
2. Rotate to select Adjust Clock, then press .
3. Rotate to select the item you want to change (12/24 hour mode, hour,
minute). Then press .
4. Rotate to make the adjustment.
5. Press to enter your selection. The display returns to Adjust Clock. Repeat steps
4 to 6 to adjust other items.
6. To enter the selection, Rotate and select Set, then press .
7. Press the SETUP button to go back to the normal display.
■Using the audio wi th touch screen
1.Press the (Home) button, then select
Settings .
2. Select Clock/Info , then Clock
Adjustment .
3. Adjust the hours and minutes by selecting
/.
4. Select OK to set the time.
1Using the SETUP button
These indications are used to show how to operate
the selector knob.
Rotate to select.
Press to enter.
To set the time to the nearest hour:
Press and hold the CLOCK button until the clock
display begins to blink, then press the
( 6 (Reset)
button.
Depending on the displayed time, the clock sets
forward or backward.
Example:
1:06 will reset to 1:00
1:53 will reset to 2:00
Models with one display
Models with two displays
(Home) Button
34
1 Using the audio with touch screen
You can customize the clock display to show the 12
hour clock or 24 hour clock.
2 Customized Features P. 271
15 CR-V-31T0A6300.book 129 ページ 2015年2月2日 月曜日 午前10時35分
Page 214 of 533
213
Features
Audio System Basic Operation
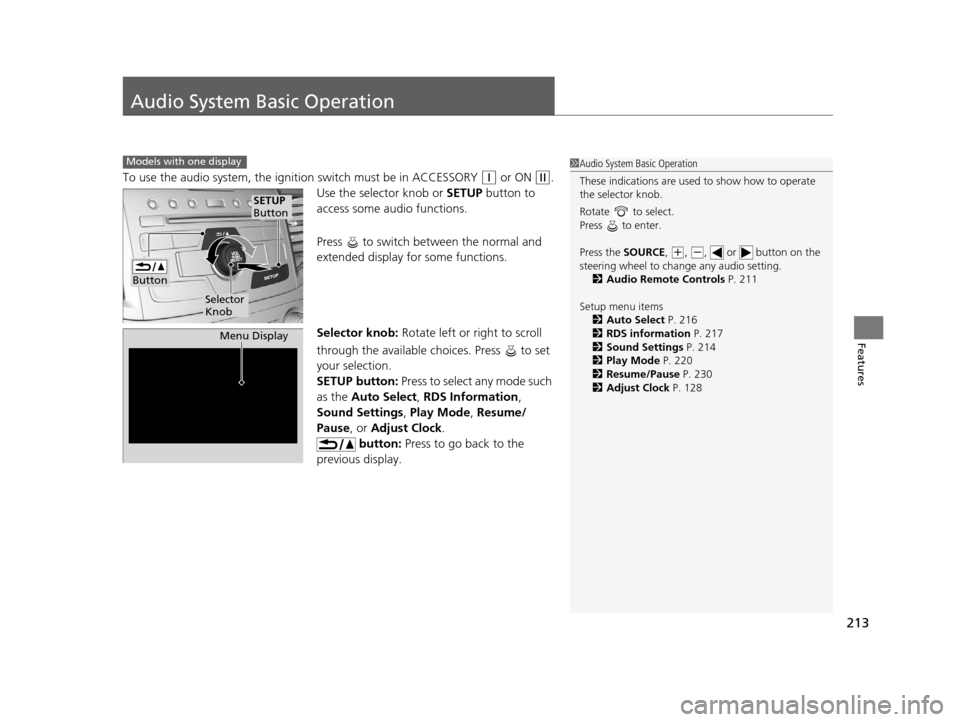
To use the audio system, the ignition switch must be in ACCESSORY (q or ON (w.
Use the selector knob or SETUP button to
access some audio functions.
Press to switch between the normal and
extended display fo r some functions.
Selector knob: Rotate left or right to scroll
through the available ch oices. Press to set
your selection.
SETUP button: Press to select any mode such
as the Auto Select , RDS Information ,
Sound Settings , Play Mode , Resume/
Pause , or Adjust Clock .
button: Press to go back to the
previous display.
Models with one display1 Audio System Basic Operation
These indications are used to show how to operate
the selector knob.
Rotate to select.
Press to enter.
Press the SOURCE ,
(+, ( -, or button on the
steering wheel to cha nge any audio setting.
2 Audio Remote Controls P. 211
Setup menu items 2 Auto Select P. 216
2 RDS information P. 217
2 Sound Settings P. 214
2 Play Mode P. 220
2 Resume/Pause P. 230
2 Adjust Clock P. 128
Button
Selector
Knob
SETUP
Button
Menu Display
15 CR-V-31T0A6300.book 213 ページ 2015年2月2日 月曜日 午前10時35分
Page 235 of 533
234
uuAudio System Basic Operation uAudio/Information Screen
Features
■Info
Shows the Trip Computer , Clock/Wallpaper , Voice Info, or System/Device
Information .
■Audio
Shows the current audio information.
■Settings
Enters the customiz ing menu screen.
2Customized Features P. 271
■Connect Apps
Connects with your smartphone*1 to play personalized music, information, and
social media streams.
2 Smartphone Apps P. 260
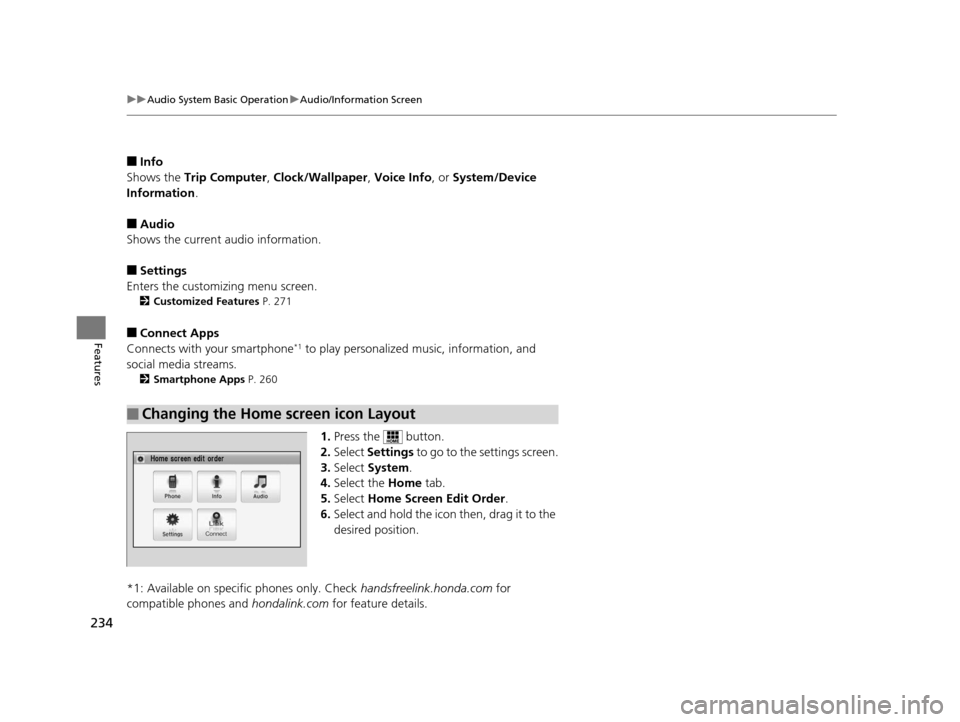
1.Press the button.
2. Select Settings to go to the settings screen.
3. Select System .
4. Select the Home tab.
5. Select Home Screen Edit Order.
6. Select and hold the icon then, drag it to the
desired position.
*1: Available on specific phones only. Check handsfreelink.honda.com for
compatible phones and hondalink.com for feature details.
■Changing the Home screen icon Layout
15 CR-V-31T0A6300.book 234 ページ 2015年2月2日 月曜日 午前10時35分
Page 236 of 533
Continued235
uuAudio System Basic Operation uAudio/Information Screen
Features
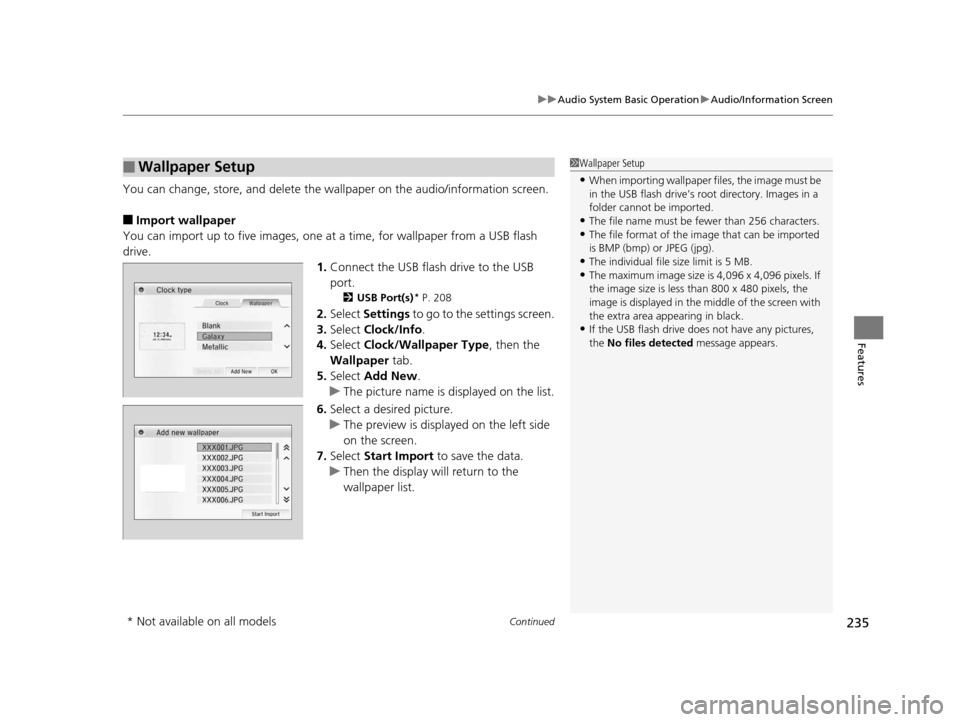
You can change, store, and delete the wa llpaper on the audio/information screen.
■Import wallpaper
You can import up to five images, one at a time, for wallpaper from a USB flash
drive.
1.Connect the USB flash drive to the USB
port.
2 USB Port(s)* P. 208
2.Select Settings to go to the settings screen.
3. Select Clock/Info .
4. Select Clock/Wallpaper Type , then the
Wallpaper tab.
5. Select Add New .
u The picture name is displayed on the list.
6. Select a desired picture.
u The preview is displayed on the left side
on the screen.
7. Select Start Import to save the data.
u Then the display will return to the
wallpaper list.
■Wallpaper Setup1Wallpaper Setup
•When importing wallpaper files, the image must be
in the USB flash drive’s root directory. Images in a
folder cannot be imported.
•The file name must be fewer than 256 characters.•The file format of the im age that can be imported
is BMP (bmp) or JPEG (jpg).
•The individual file size limit is 5 MB.•The maximum image size is 4,096 x 4,096 pixels. If
the image size is less than 800 x 480 pixels, the
image is displayed in the middle of the screen with
the extra area appearing in black.
•If the USB flash drive doe s not have any pictures,
the No files detected message appears.
* Not available on all models
15 CR-V-31T0A6300.book 235 ページ 2015年2月2日 月曜日 午前10時35分
Page 237 of 533
uuAudio System Basic Operation uAudio/Information Screen
236
Features
■Select wallpaper
1. Select Settings to go to the settings screen.
2. Select Clock/Info .
3. Select Clock/Wallpaper Type , then the Wallpaper tab.
u The screen changes to the wallpaper list.
4. Select a desired wallpaper.
u The preview is displayed on the left side on the screen.
u The pop-up menu appears on the screen.
5. Select Set.
u The display will return to the wallpaper list.
■Delete wallpaper
1. Select Settings to go to the settings screen.
2. Select Clock/Info .
3. Select Clock/Wallpaper Type , then the Wallpaper tab.
u The screen changes to the wallpaper list.
4. Select a wallpaper that you want to delete.
u The preview is displayed on the left side on the screen.
u The pop-up menu appears on the screen.
5. Select Delete.
u The confirmation message will appear.
6. Select Yes to delete completely.
u The display will return to the wallpaper list.
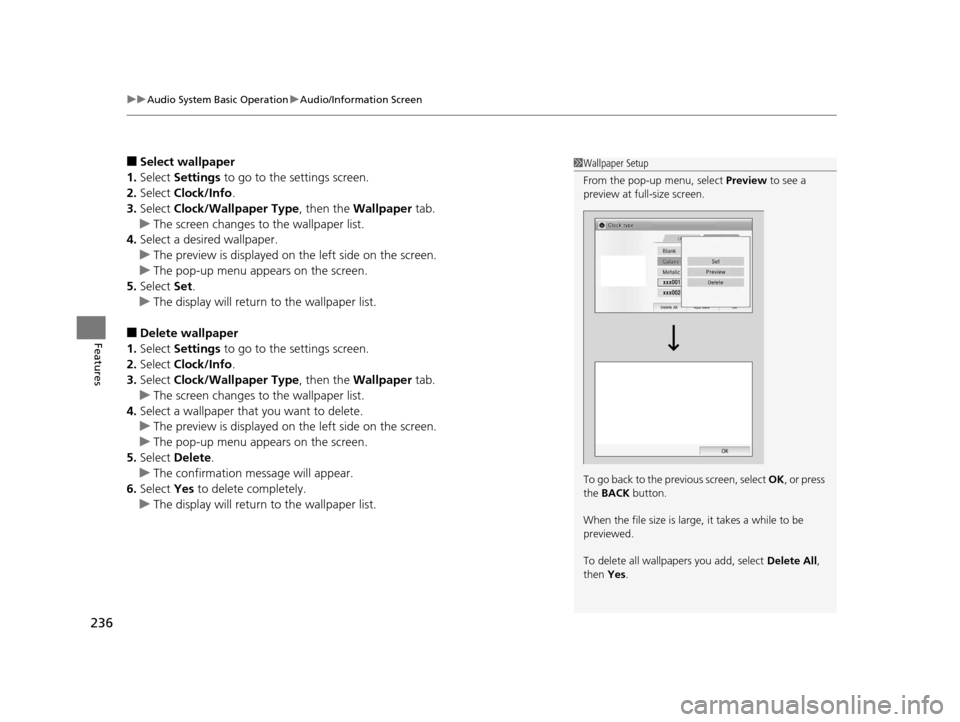
1Wallpaper Setup
From the pop-up menu, select Preview to see a
preview at full-size screen.
To go back to the previous screen, select OK, or press
the BACK button.
When the file size is large, it takes a while to be
previewed.
To delete all wallpapers you add, select Delete All,
then Yes.
15 CR-V-31T0A6300.book 236 ページ 2015年2月2日 月曜日 午前10時35分
Page 273 of 533
272
uuCustomized Features u
Features
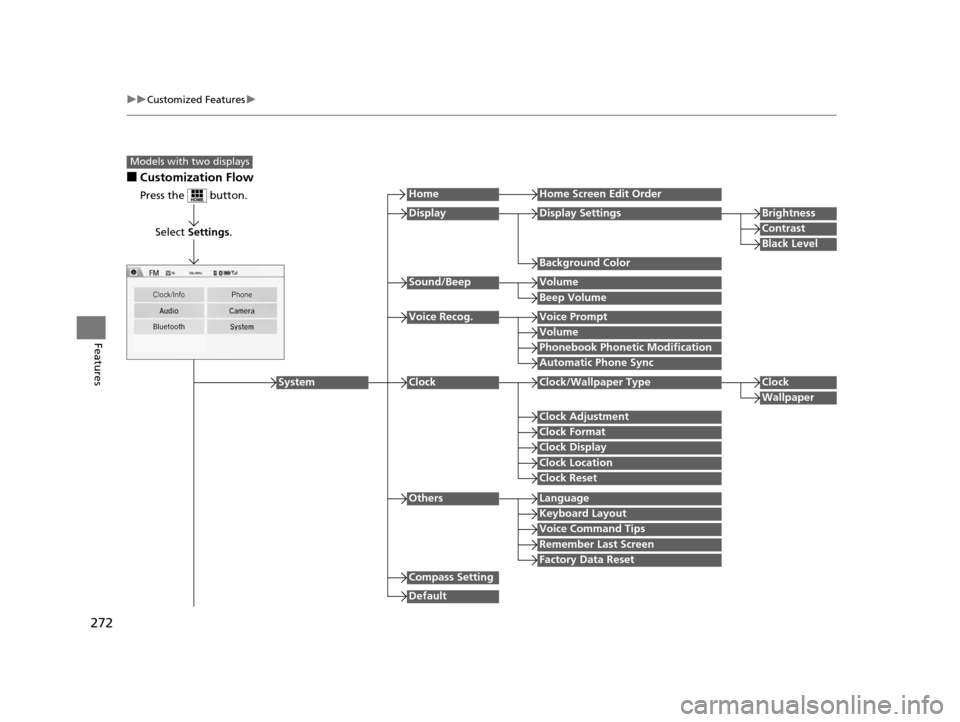
■Customization Flow
Models with two displays
Press the button.
Select Settings .
HomeHome Screen Edit Order
Background Color
DisplayDisplay SettingsBrightness
Contrast
Black Level
Beep Volume
Sound/BeepVolume
Volume
Voice Recog.Voice Prompt
Automatic Phone Sync
Phonebook Phonetic Modification
Default
Factory Data Reset
Clock Format
ClockClock/Wallpaper TypeClock
Wallpaper
Clock Adjustment
Clock Display
Clock Location
Clock Reset
Keyboard Layout
OthersLanguage
Remember Last Screen
Voice Command Tips
System
Compass Setting
15 CR-V-31T0A6300.book 272 ページ 2015年2月2日 月曜日 午前10時35分