center console HONDA CR-V 2015 RM1, RM3, RM4 / 4.G Quick Guide
[x] Cancel search | Manufacturer: HONDA, Model Year: 2015, Model line: CR-V, Model: HONDA CR-V 2015 RM1, RM3, RM4 / 4.GPages: 81, PDF Size: 14.87 MB
Page 31 of 81

54 || 55
AUDIO AND CONNECTIVITY
AUDIO AND CONNECTIVITY
Learn how to operate the vehicle’s audio system.
Basic Audio Operation
Connect audio devices and operate buttons and displays for the audio sys\
tem.
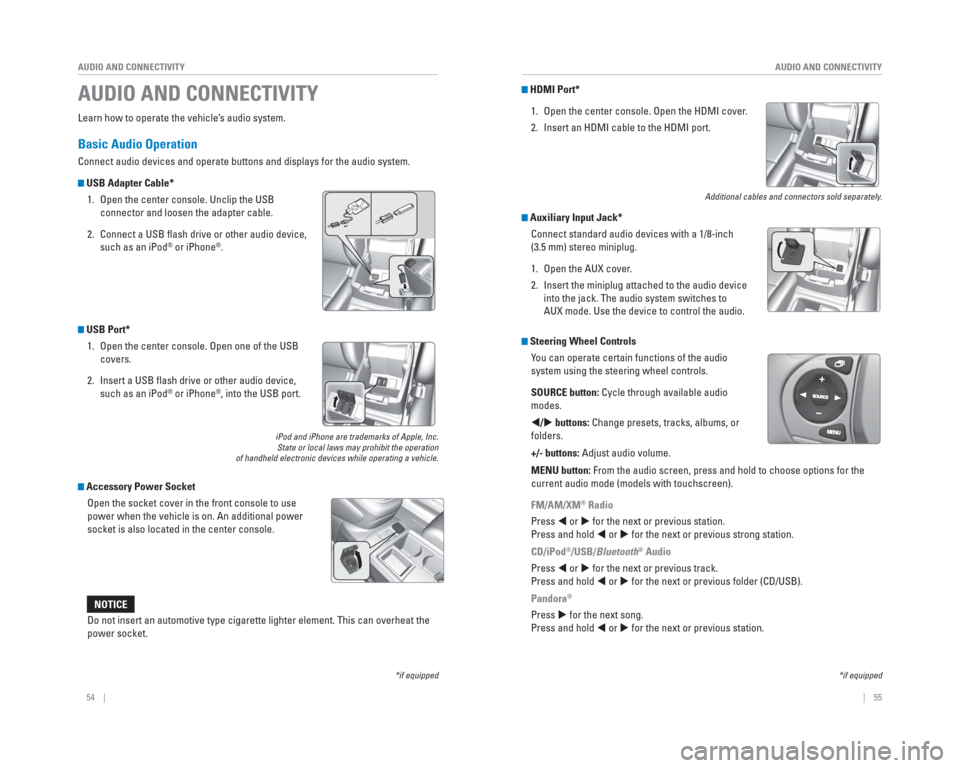
USB Adapter Cable*
1. Open the center console. Unclip the USB connector and loosen the adapter cable.
2. Connect a USB fl ash drive or other audio device, such as an iPod
® or iPhone®.
USB Port* 1. Open the center console. Open one of the USB covers.
2. Insert a USB fl ash drive or other audio device, such as an iPod
® or iPhone®, into the USB port.
iPod and iPhone are trademarks of Apple, Inc.State or local laws may prohibit the operation
of handheld electronic devices while operating a vehicle.
Accessory Power Socket
Open the socket cover in the front console to use
power when the vehicle is on. An additional power
socket is also located in the center console.
AUDIO AND CONNECTIVITY
*if equipped*if equipped
HDMI Port*
1. Open the center console. Open the HDMI cover.
2. Insert an HDMI cable to the HDMI port.
Additional cables and connectors sold separately.
Auxiliary Input Jack*Connect standard audio devices with a 1/8-inch
(3.5 mm) stereo miniplug.
1. Open the AUX cover.
2. Insert the miniplug attached to the audio device into the jack. The audio system switches to
AUX mode. Use the device to control the audio.
Steering Wheel Controls You can operate certain functions of the audio
system using the steering wheel controls.
SOURCE button: Cycle through available audio
modes.
/ buttons: Change presets, tracks, albums, or
folders.
+/- buttons: Adjust audio volume.
MENU button: From the audio screen, press and hold to choose options for the
current audio mode (models with touchscreen).
FM/AM/XM
® Radio
Press or for the next or previous station.
Press and hold or for the next or previous strong station.
CD/iPod
®/USB/Bluetooth® Audio
Press or for the next or previous track.
Press and hold or for the next or previous folder (CD/USB).
Pandora
®
Press for the next song.
Press and hold or for the next or previous station.Do not insert an automotive type cigarette lighter element. This can ove\
rheat the
power socket.
NOTICE
Page 64 of 81

120 || 121
HANDLING THE UNEXPECTED
HANDLING THE UNEXPECTED
Circuit ProtectedAmps1−−2ACG10 A3SRS10 A4Fuel Pump15 A
5Meter10 A6Power Window7.5 A7VB SOL7.5 A
8Passenger’s Side Door Lock
Motor 2 (Unlock)15 A
9Driver’s Side Door Lock Motor 1 (Unlock)15 A
10 (7.5 A)
11Moonroof*(20 A)
12 Accessory Power Socket
(Center Console) 20 A
13Washer Main*(15 A)
14 (20 A)
15Driver’s Door Lock Motor
(Unlock)10 A
16 (20 A)
17Driver's Power Seat
Reclining*(20 A)
18
19ACC7.5 A−−
Driver's Power Seat Sliding
*
Seat Heaters*
Trailer*
2021Daytime Running Lights7.5 A
22
23Wiper10 A
24
25Audio10 A
26 (20 A)
27Accessory Power Socket
(Front)20 A
28 15 A
29OPDS7.5 A
30 Driver’s Door Lock Motor
(Lock) 10 A
31Smart*(10 A)
32 Passenger’s Side Door Lock
Motor 2 (Lock) 15 A
33Driver’s Side Door Lock
Motor 1 (Lock)15 A
34
35Illumination7.5 A
36 (10 A)
37Front Fog Lights*(20 A)
38
3910 A
40
41Door Lock20 A
42 Driver’s Side Power
Window 20 A
43Rear Passenger’s Side
Power Window20 A
44 Front Passenger’s Side
Power Window 20 A
45Rear Driver’s Side Power
Window20 A
46
Circuit ProtectedAmps
Washer*
Power Tailgate*
7.5 A
ABS/VSA 7.5 A
A/C 7.5 A
ACC Key Lock
Right Headlight High Beam −− 10 A
Left Headlight High Beam Rear Wiper Main
*
10 A
Small Lights
−
−
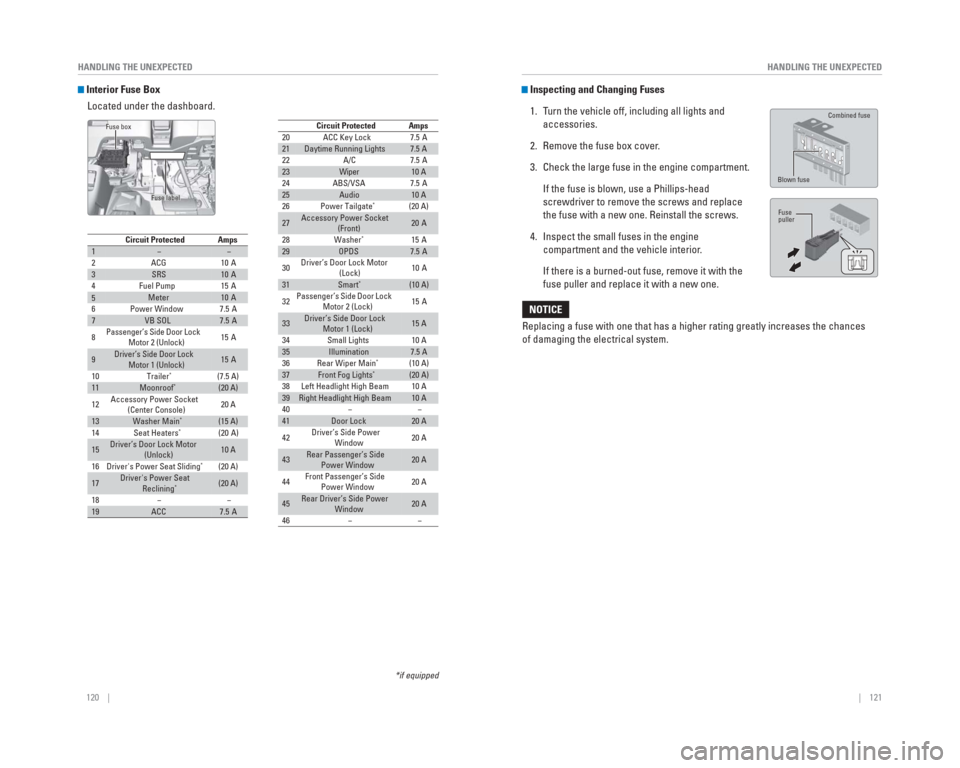
Interior Fuse Box
Located under the dashboard.
*if equipped
Fuse label
Fuse box
Inspecting and Changing Fuses
1. Turn the vehicle off, including all lights and accessories.
2. Remove the fuse box cover.
3. Check the large fuse in the engine compartment.
If the fuse is blown, use a Phillips-head screwdriver to remove the screws and replace
the fuse with a new one. Reinstall the screws.
4. Inspect the small fuses in the engine compartment and the vehicle interior.
If there is a burned-out fuse, remove it with the fuse puller and replace it with a new one.
Blown fuse Combined fuse
Fuse
puller
Replacing a fuse with one that has a higher rating greatly increases the\
chances
of damaging the electrical system.
NOTICE