brakes HONDA CR-V 2016 RM1, RM3, RM4 / 4.G Quick Guide
[x] Cancel search | Manufacturer: HONDA, Model Year: 2016, Model line: CR-V, Model: HONDA CR-V 2016 RM1, RM3, RM4 / 4.GPages: 80, PDF Size: 7.99 MB
Page 53 of 80

98 || 99
DRIVING
DRIVING
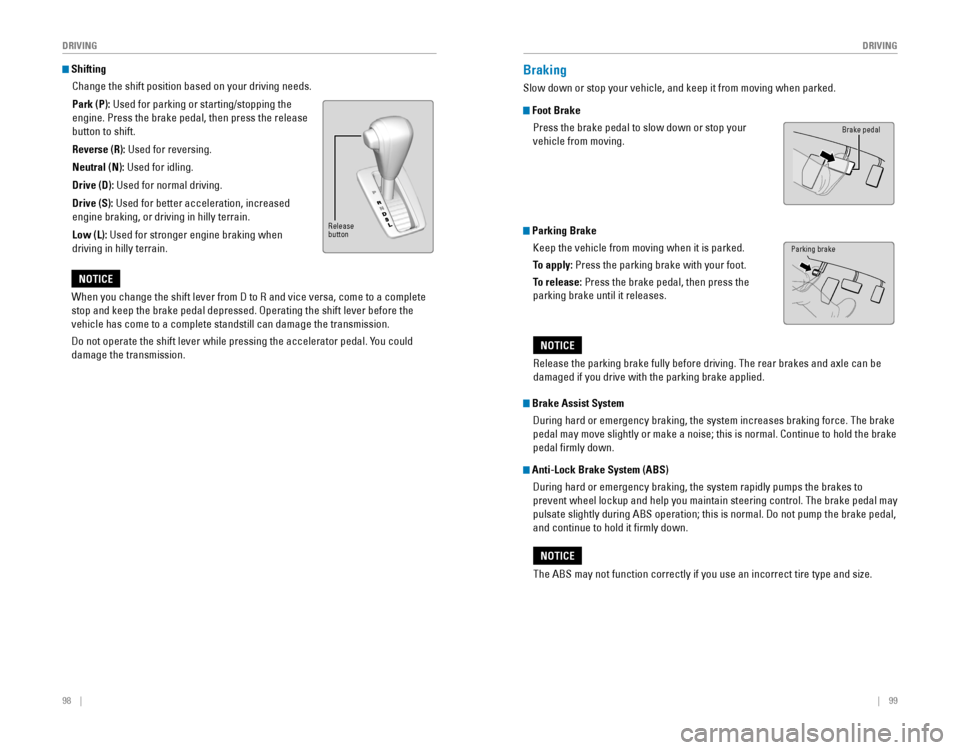
Shifting
Change the shift position based on your driving needs.
Park (P): Used for parking or starting/stopping the
engine. Press the brake pedal, then press the release
button to shift.
Reverse (R): Used for reversing.
Neutral (N): Used for idling.
Drive (D): Used for normal driving.
Drive (S):
Used for better acceleration, increased
engine braking, or driving in hilly terrain.
Low (L): Used for stronger engine braking when
driving in hilly terrain.
When you change the shift lever from D to R and vice versa, come to a complete
stop and keep the brake pedal depressed. Operating the shift lever before the
vehicle has come to a complete standstill can damage the transmission.
Do not operate the shift lever while pressing the accelerator pedal. You could
damage the transmission.
NOTICE
Braking
Slow down or stop your vehicle, and keep it from moving when parked.
Foot Brake
Press the brake pedal to slow down or stop your
vehicle from moving.
Parking Brake
Keep the vehicle from moving when it is parked.
To apply:
Press the parking brake with your foot.
To release: Press the brake pedal, then press the
parking brake until it releases.
Brake Assist System
During hard or emergency braking, the system increases braking force. The brake
pedal may move slightly or make a noise; this is normal. Continue to hold the brake
pedal firmly down.
Anti-Lock Brake System (ABS)
During hard or emergency braking, the system rapidly pumps the brakes to
prevent wheel lockup and help you maintain steering control. The brake pedal may
pulsate slightly during ABS operation; this is normal. Do not pump the brake pedal,
and continue to hold it firmly down.
The ABS may not function correctly if you use an incorrect tire type and size.
NOTICE
Brake pedal
Release
button
Parking brake
Release the parking brake fully before driving. The rear brakes and axle can be
damaged if you drive with the parking brake applied.
NOTICE
Page 54 of 80

100 || 101
DRIVING
DRIVING
Vehicle Stability Assist (VSA®), aka Electronic Stability Control
(ESC) System
Helps to stabilize the vehicle during cornering if the vehicle turns more or less
than what was intended. It assists in maintaining traction on slippery surfaces by
regulating engine output and selectively applying the brakes.
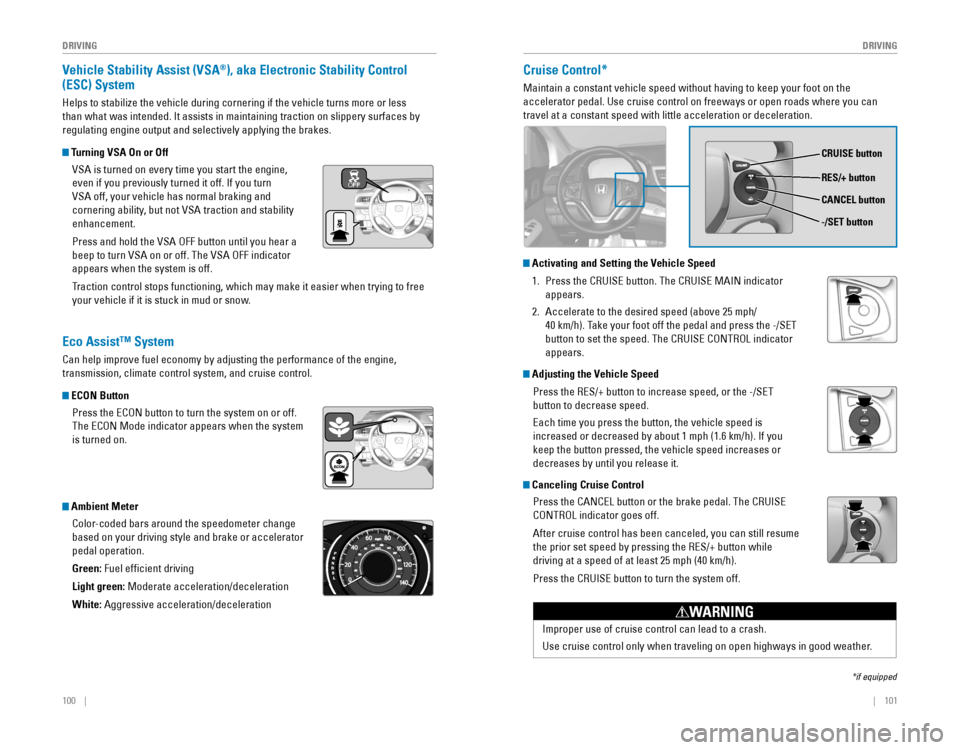
Turning VSA On or Off
VSA is turned on every time you start the engine,
even if you previously turned it off. If you turn
VSA off, your vehicle has normal braking and
cornering ability, but not VSA traction and stability
enhancement.
Press and hold the VSA OFF button until you hear a
beep to turn VSA on or off. The VSA OFF indicator
appears when the system is off.
Traction control stops functioning, which may make it easier when trying to free
your vehicle if it is stuck in mud or snow.
Cruise Control*
Maintain a constant vehicle speed without having to keep your foot on th\
e
accelerator pedal. Use cruise control on freeways or open roads where yo\
u can
travel at a constant speed with little acceleration or deceleration.
*if equipped
Eco Assist™ System
Can help improve fuel economy by adjusting the performance of the engine,
transmission, climate control system, and cruise control.
ECON Button
Press the ECON button to turn the system on or off.
The ECON Mode indicator appears when the system
is turned on.
Ambient Meter
Color-coded bars around the speedometer change
based on your driving style and brake or accelerator
pedal operation.
Green: Fuel efficient driving
Light green:
Moderate acceleration/deceleration
White: Aggressive acceleration/deceleration
CRUISE button
RES/+ button
-/SET button CANCEL button
Improper use of cruise control can lead to a crash.
Use cruise control only when traveling on open highways in good weather.
WARNING
Activating and Setting the Vehicle Speed
1. Press the CRUISE button. The CRUISE MAIN indicator
appears.
2. Accelerate to the desired speed (above 25 mph/
40 km/h). Take your foot off the pedal and press the -/SET
button to set the speed. The CRUISE CONTROL indicator
appears.
Adjusting the Vehicle Speed
Press the RES/+ button to increase speed, or the -/SET
button to decrease speed.
Each time you press the button, the vehicle speed is
increased or decreased by about 1 mph (1.6 km/h). If you
keep the button pressed, the vehicle speed increases or
decreases by until you release it.
Canceling Cruise Control
Press the CANCEL button or the brake pedal. The CRUISE
CONTROL indicator goes off.
After cruise control has been canceled, you can still resume
the prior set speed by pressing the RES/+ button while
driving at a speed of at least 25 mph (40 km/h).
Press the CRUISE button to turn the system off.
Page 55 of 80

102 || 103
DRIVING
DRIVING
Adaptive Cruise Control (ACC)*
Helps maintain a constant vehicle speed and a set following distance behind a
vehicle detected in front of yours. When the vehicle ahead changes speed\
, ACC
senses the change and accelerates or decelerates to maintain a set dista\
nce.
*if equipped
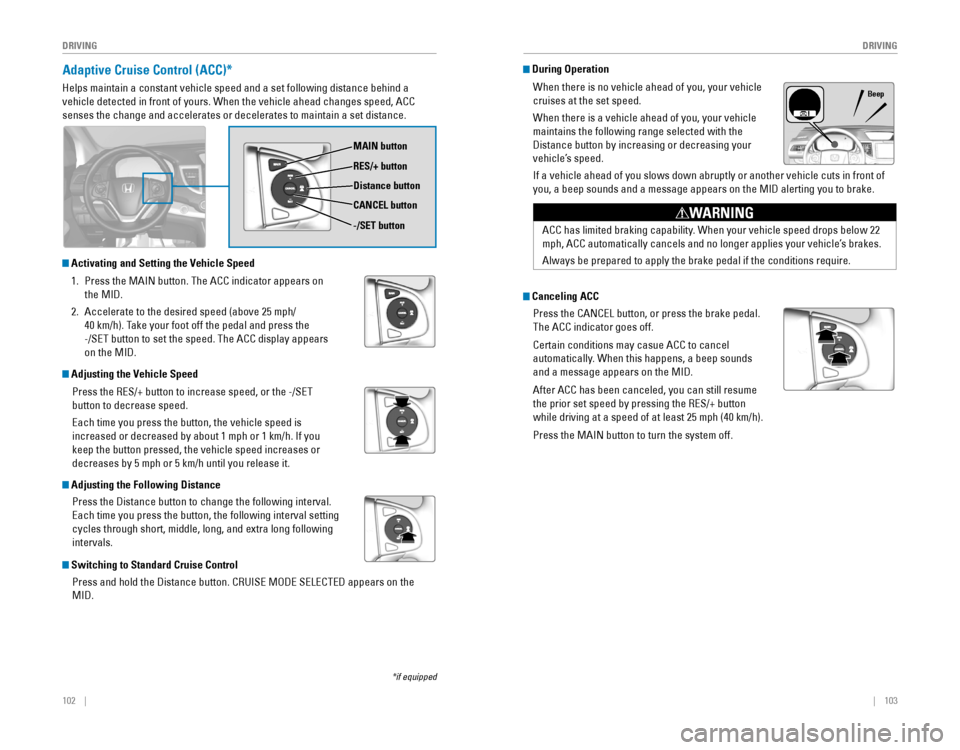
MAIN button
RES/+ button
Distance button
CANCEL button
-/SET button
During Operation
When there is no vehicle ahead of you, your vehicle
cruises at the set speed.
When there is a vehicle ahead of you, your vehicle
maintains the following range selected with the
Distance button by increasing or decreasing your
vehicle’s speed.
If a vehicle ahead of you slows down abruptly or another vehicle cuts in front of
you, a beep sounds and a message appears on the MID alerting you to brake.
Beep
Adjusting the Vehicle Speed
Press the RES/+ button to increase speed, or the -/SET
button to decrease speed.
Each time you press the button, the vehicle speed is
increased or decreased by about 1 mph or 1 km/h. If you
keep the button pressed, the vehicle speed increases or
decreases by 5 mph or 5 km/h until you release it.
Activating and Setting the Vehicle Speed
1. Press the MAIN button. The ACC indicator appears on
the MID.
2. Accelerate to the desired speed (above 25 mph/
40 km/h). Take your foot off the pedal and press the
-/SET button to set the speed. The ACC display appears
on the MID.
Adjusting the Following Distance
Press the Distance button to change the following interval.
Each time you press the button, the following interval setting
cycles through short, middle, long, and extra long following
intervals.
Switching to Standard Cruise Control
Press and hold the Distance button. CRUISE MODE SELECTED appears on the
MID.
ACC has limited braking capability. When your vehicle speed drops below 22
mph, ACC automatically cancels and no longer applies your vehicle’s brakes.
Always be prepared to apply the brake pedal if the conditions require.
WARNING
Canceling ACC
Press the CANCEL button, or press the brake pedal.
The ACC indicator goes off.
Certain conditions may casue ACC to cancel
automatically. When this happens, a beep sounds
and a message appears on the MID.
After ACC has been canceled, you can still resume
the prior set speed by pressing the RES/+ button
while driving at a speed of at least 25 mph (40 km/h).
Press the MAIN button to turn the system off.
Page 66 of 80

124 || 125
MAINTENANCE
MAINTENANCE
Maintenance Minder™
Reminds you when indicated maintenance service is due.
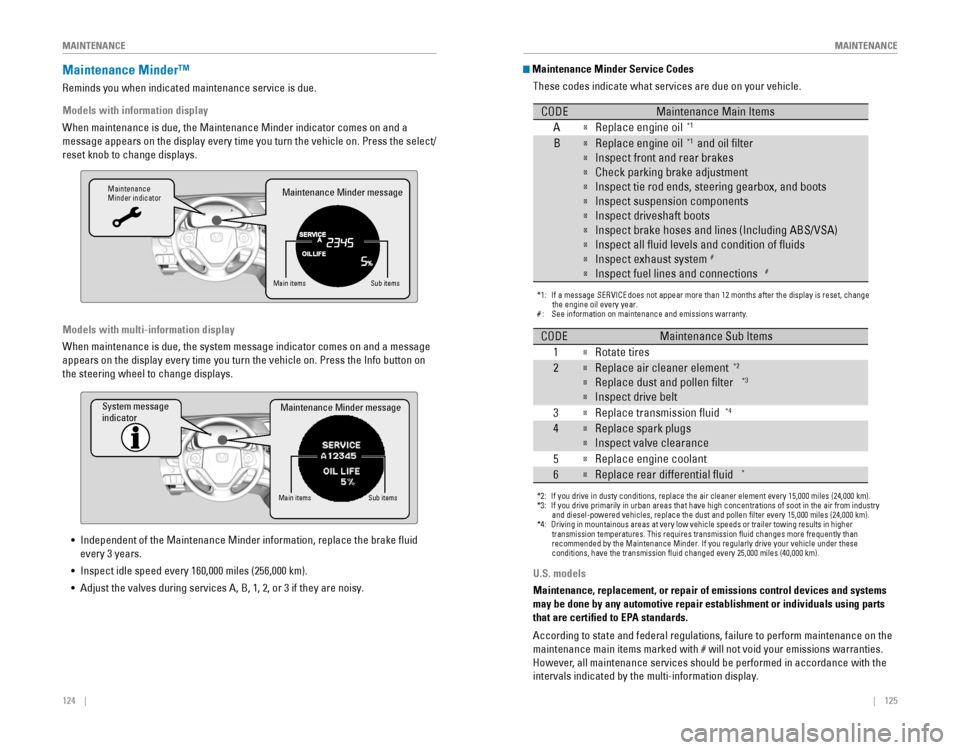
Models with information display
When maintenance is due, the Maintenance Minder indicator comes on and a\
message appears on the display every time you turn the vehicle on. Press the select/
reset knob to change displays.
Maintenance
Minder indicator
Main itemsSub items
Maintenance Minder message
Models with multi-information display
When maintenance is due, the system message indicator comes on and a mes\
sage
appears on the display every time you turn the vehicle on. Press the Info button on
the steering wheel to change displays.
System message
indicator
Main itemsSub items
Maintenance Minder message
• Independent of the Maintenance Minder information, replace the brake fluid
every 3 years.
•
Inspect idle speed every 160,000 miles (256,000 km).
• Adjust the valves during services A, B, 1, 2, or 3 if they are noisy.
U.S. models
Maintenance, replacement, or repair of emissions control devices and sys\
tems
may be done by any automotive repair establishment or individuals using \
parts
that are certified to EPA standards.
According to state and federal regulations, failure to perform maintenan\
ce on the
maintenance main items marked with # will not void your emissions warranties.
However, all maintenance services should be performed in accordance with the
intervals indicated by the multi-information display.
Maintenance Minder Service Codes
These codes indicate what services are due on your vehicle.
*1: If a message SERVICE does not appear more than 12 months after the display is reset, change \
the engine oil every year.
#: See information on maintenance and emissions warranty.
CODEMaintenance Main Items
A
�Replace engine oi l*1
B�Replace engine oil*1 and oil �lter
�Inspect front and rear brakes
�Check parking brake adjustment
�Inspect tie rod ends, steering gearbox, and boots
�Inspect suspension components
�Inspect driveshaft boots
�Inspect brake hoses and lines (Including ABS/VSA)
�Inspect all �uid levels and condition of �uids
�Inspect exhaust system#
�Inspect fuel lines and connections#
*2: If you drive in dusty conditions, replace the air cleaner element every \
15,000 miles (24,000 km).
*3: If you drive primarily in urban areas that have high concentrations of s\
oot in the air from industry and diesel-powered vehicles, replace the dust and pollen �lter every \
15,000 miles (24,000 km).
*4: Driving in mountainous areas at very low vehicle speeds or trailer towing results in higher
transmission temperatures. This requires transmission �uid changes mo\
re frequently than
recommended by the Maintenance Minder. If you regularly drive your vehic\
le under these
conditions, have the transmission �uid changed every 25,000 miles (4\
0,000 km).
CODEMaintenance Sub Items
1
�Rotate tires
2�Replace air cleaner element*2
�Replace dust and pollen �lter*3
�Inspect drive belt
3
�Replace transmission �uid*4
4�Replace spark plug s
�Inspect valve clearance
5
�Replace engine coolant
6�Replace rear differential �uid*