cooling HONDA CR-V 2016 RM1, RM3, RM4 / 4.G Quick Guide
[x] Cancel search | Manufacturer: HONDA, Model Year: 2016, Model line: CR-V, Model: HONDA CR-V 2016 RM1, RM3, RM4 / 4.GPages: 80, PDF Size: 7.99 MB
Page 29 of 80

50 || 51
V
EHICLE CONTROLSVEHICLE CONTROLS
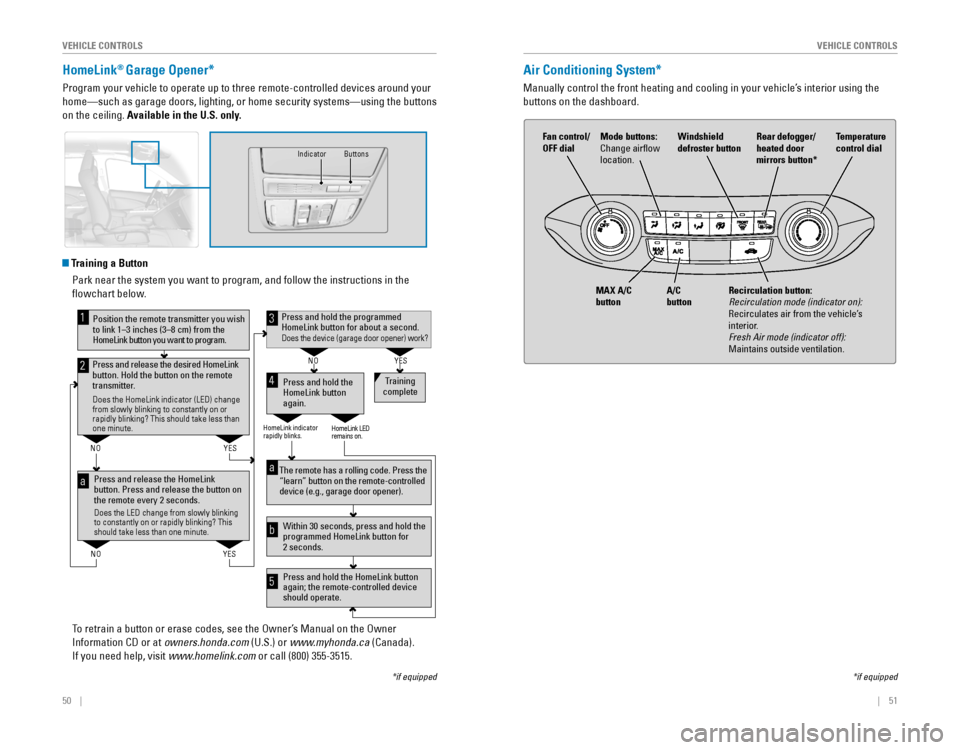
HomeLink® Garage Opener*
Program your vehicle to operate up to three remote-controlled devices ar\
ound your
home—such as garage doors, lighting, or home security systems—using the buttons
on the ceiling. Available in the U.S. only.
*if equipped
Indicator
Buttons
Air Conditioning System*
Manually control the front heating and cooling in your vehicle’s interior using the
buttons on the dashboard.
*if equipped
Press and release the HomeLink
button. Press and release the button on
the remote every 2 seconds.
Does the LED change from slowly blinking
to constantly on or rapidly blinking? This
should take less than one minute.
Press and hold the
HomeLink button
again. Training
complete
YES
NO
HomeLink indicator
rapidly blinks. HomeLink LED
remains on.
YES
NO
YES
NO
Position the remote transmitter you wish
to link 1–3 inches (3–8 cm) from the
HomeLink button you want to program.1
Press and release the desired HomeLink
button. Hold the button on the remote
transmitter.
Does the HomeLink indicator (LED) change
from slowly blinking to constantly on or
rapidly blinking? This should take less than
one minute.
2
aThe remote has a rolling code. Press the
“learn” button on the remote-controlled
device (e.g., garage door opener) .
Press and hold the HomeLink button
again; the remote-controlled device
should operate. Within 30 seconds, press and hold the
programmed HomeLink button for
2 seconds.a
Press and hold the programmed
HomeLink button for about a second.
Does the device (garage door opener) work?
3
b
4
5
Training a Button Park near the system you want to program, and follow the instructions in\
the
flowchart below.
To retrain a button or erase codes, see the Owner’s Manual on the Owner
Information CD or at owners.honda.com (U.S.) or www.myhonda.ca (Canada).
If you need help, visit www.homelink.com or call (800) 355-3515.
Fan control/
OFF dial
A/C
button
MAX A/C
button Windshield
defroster button
Temperature
control dial
Recirculation button:
Recirculation mode (indicator on):
Recirculates air from the vehicle’s
interior.
Fresh Air mode (indicator off):
Maintains outside ventilation. Rear defogger/
heated door
mirrors button*
Mode buttons:
Change airflow
location.
Page 52 of 80

96 || 97
DRIVING
DRIVING
Exceeding any load limit or improperly loading your vehicle and trailer can
cause a crash in which you can be seriously hurt or killed.
Check the loading of your vehicle and trailer carefully before starting to drive.
WARNING
Towing a Trailer
Your vehicle can tow a trailer if you carefully observe the load limits, use the proper
equipment, and follow the towing guidelines. See the Owner’s Manual on the Owner
Information CD or at owners.honda.com (U.S.) or www.myhonda.ca (Canada) for
more information.
Towing Load Limits
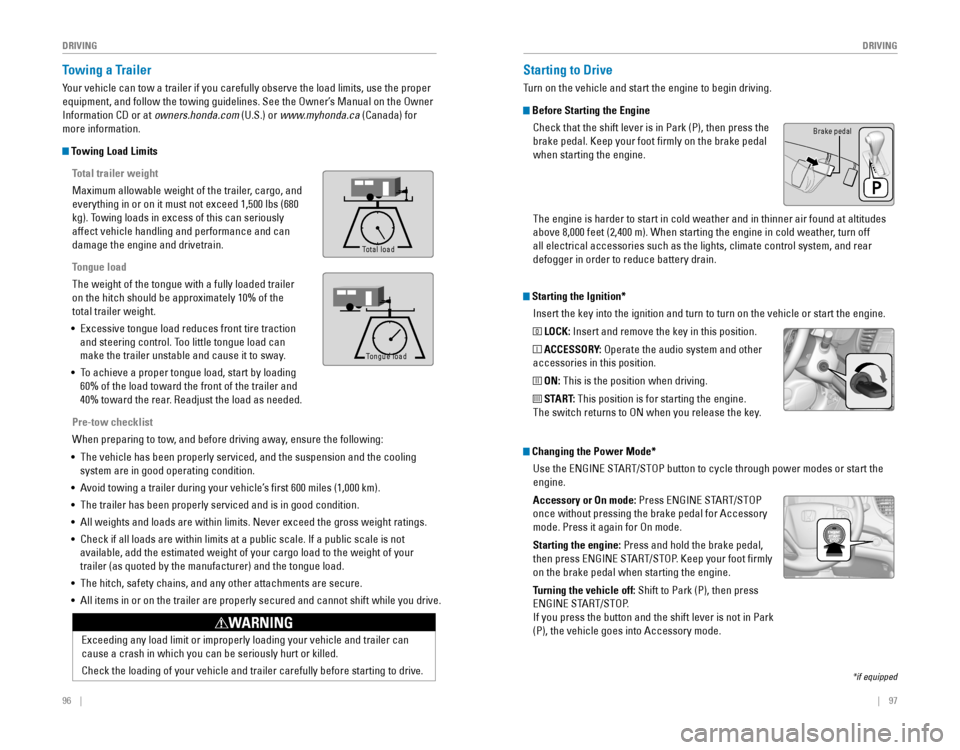
Total trailer weight
Maximum allowable weight of the trailer, cargo, and
everything in or on it must not exceed 1,500 lbs (680
kg). Towing loads in excess of this can seriously
affect vehicle handling and performance and can
damage the engine and drivetrain.
Tongue load
The weight of the tongue with a fully loaded trailer
on the hitch should be approximately 10% of the
total trailer weight.
•
Excessive tongue load reduces front tire traction
and steering control. Too little tongue load can
make the trailer unstable and cause it to sway.
• To achieve a proper tongue load, start by loading
60% of the load toward the front of the trailer and
40% toward the rear. Readjust the load as needed.
Pre-tow checklist
When preparing to tow, and before driving away, ensure the following:
• The vehicle has been properly serviced, and the suspension and the cooling
system are in good operating condition.
• Avoid towing a trailer during your vehicle’s first 600 miles (1,000 km).
•
The trailer has been properly serviced and is in good condition.
• All weights and loads are within limits. Never exceed the gross weight r\
atings.
•
Check if all loads are within limits at a public scale. If a public scale is not
available, add the estimated weight of your cargo load to the weight of your
trailer (as quoted by the manufacturer) and the tongue load.
• The hitch, safety chains, and any other attachments are secure.
• All items in or on the trailer are properly secured and cannot shift whi\
le you drive.
To ng ue Loa d
Tong ue Loa d
Total load
Tongue load
Starting the Ignition*
Insert the key into the ignition and turn to turn on the vehicle or start the engine.
0 LOCK: Insert and remove the key in this position.
I ACCESSORY: Operate the audio system and other
accessories in this position.
II ON: This is the position when driving.
III START: This position is for starting the engine.
The switch returns to ON when you release the key.
Starting to Drive
Turn on the vehicle and start the engine to begin driving.
Before Starting the Engine
Check that the shift lever is in Park (P), then press the
brake pedal. Keep your foot firmly on the brake pedal
when starting the engine.
Brake pedal
The engine is harder to start in cold weather and in thinner air found a\
t altitudes
above 8,000 feet (2,400 m). When starting the engine in cold weather, turn off
all electrical accessories such as the lights, climate control system, a\
nd rear
defogger in order to reduce battery drain.
*if equipped
Changing the Power Mode*Use the
ENGINE START/STOP button to cycle through power modes or start the
engine.
Accessory or On mode:
Press ENGINE START/STOP
once without pressing the brake pedal for Accessory
mode. Press it again for On mode.
Starting the engine:
Press and hold the brake pedal,
then press ENGINE START/STOP. Keep your foot firmly
on the brake pedal when starting the engine.
Turning the vehicle off: Shift to Park (P), then press
ENGINE START/STOP.
If you press the button and the shift lever is not in Park
(P), the vehicle goes into Accessory mode.
Page 60 of 80

112 || 113
HANDLING THE UNEXPECTED
HANDLING THE UNEXPECTED
After the Engine Starts
Once your vehicle’s engine has started, remove the jumper cables in the following
order:
1. Disconnect the jumper cable from your vehicle’s ground.
2. Disconnect the other end of the jumper cable from the assisting vehicle’s (-)
terminal.
3. Disconnect the jumper cable from your vehicle’s (+) terminal.
4. Disconnect the other end of the jumper cable from the assisting vehicle’s (+)
terminal.
5. Have your vehicle inspected by a nearby service station or a dealer.
Overheating
If the temperature gauge needle is at the H mark, the engine suddenly loses power,
or steam or spray comes out from under the hood, your engine is overheat\
ing.
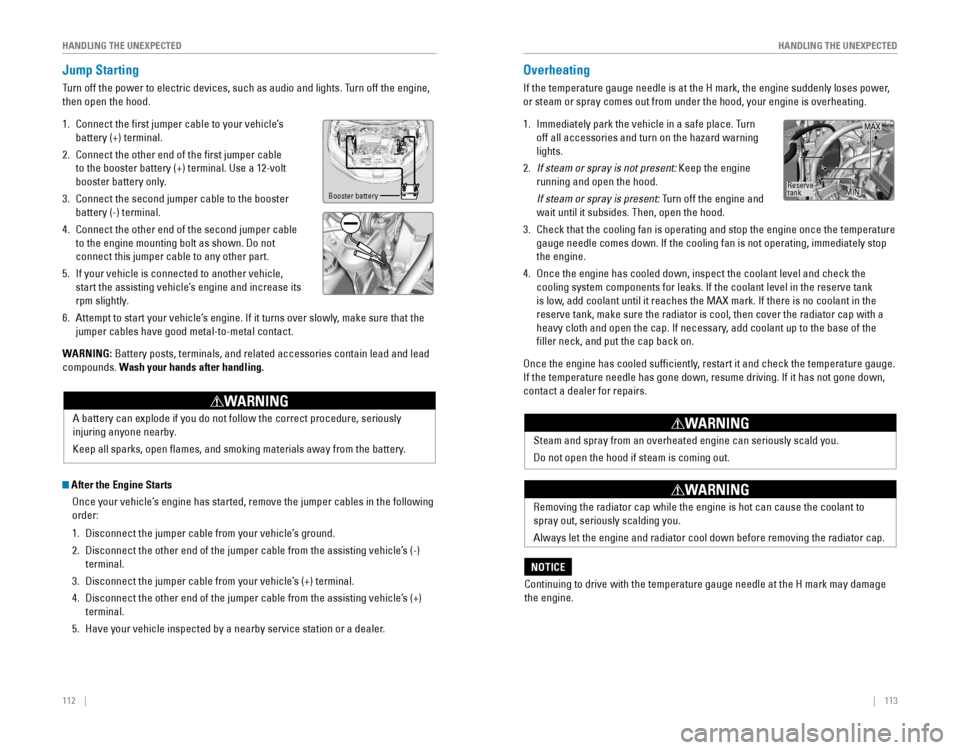
1. Immediately park the vehicle in a safe place. Turn
off all accessories and turn on the hazard warning
lights.
2. If steam or spray is not present: Keep the engine
running and open the hood.
If steam or spray is present: Turn off the engine and
wait until it subsides. Then, open the hood.
3. Check that the cooling fan is operating and stop the engine once the tem\
perature
gauge needle comes down. If the cooling fan is not operating, immediately stop
the engine.
4. Once the engine has cooled down, inspect the coolant level and check the
cooling system components for leaks. If the coolant level in the reserve tank
is low, add coolant until it reaches the MAX mark. If there is no coolant in the
reserve tank, make sure the radiator is cool, then cover the radiator ca\
p with a
heavy cloth and open the cap. If necessary, add coolant up to the base of the
filler neck, and put the cap back on.
Once the engine has cooled sufficiently, restart it and check the temperature gauge.
If the temperature needle has gone down, resume driving. If it has not gone down,
contact a dealer for repairs.
Reserve
tank MAX
MIN
A battery can explode if you do not follow the correct procedure, seriously
injuring anyone nearby.
Keep all sparks, open flames, and smoking materials away from the battery.
WARNING
Jump Starting
Turn off the power to electric devices, such as audio and lights. Turn off the engine,
then open the hood.
1. Connect the first jumper cable to your vehicle’s
battery (+) terminal.
2. Connect the other end of the first jumper cable
to the booster battery (+) terminal. Use a 12-volt
booster battery only.
3. Connect the second jumper cable to the booster
battery (-) terminal.
4. Connect the other end of the second jumper cable
to the engine mounting bolt as shown. Do not
connect this jumper cable to any other part.
5. If your vehicle is connected to another vehicle,
start the assisting vehicle’s engine and increase its
rpm slightly.
6. Attempt to start your vehicle’s engine. If it turns over slowly, make sure that the
jumper cables have good metal-to-metal contact.
WARNING: Battery posts, terminals, and related accessories contain lead and lead\
compounds. Wash your hands after handling.
Booster battery
Steam and spray from an overheated engine can seriously scald you.
Do not open the hood if steam is coming out.
WARNING
Removing the radiator cap while the engine is hot can cause the coolant \
to
spray out, seriously scalding you.
Always let the engine and radiator cool down before removing the radiator cap.
WARNING
Continuing to drive with the temperature gauge needle at the H mark may \
damage
the engine.
NOTICE
Page 68 of 80

128 || 129
MAINTENANCE
MAINTENANCE
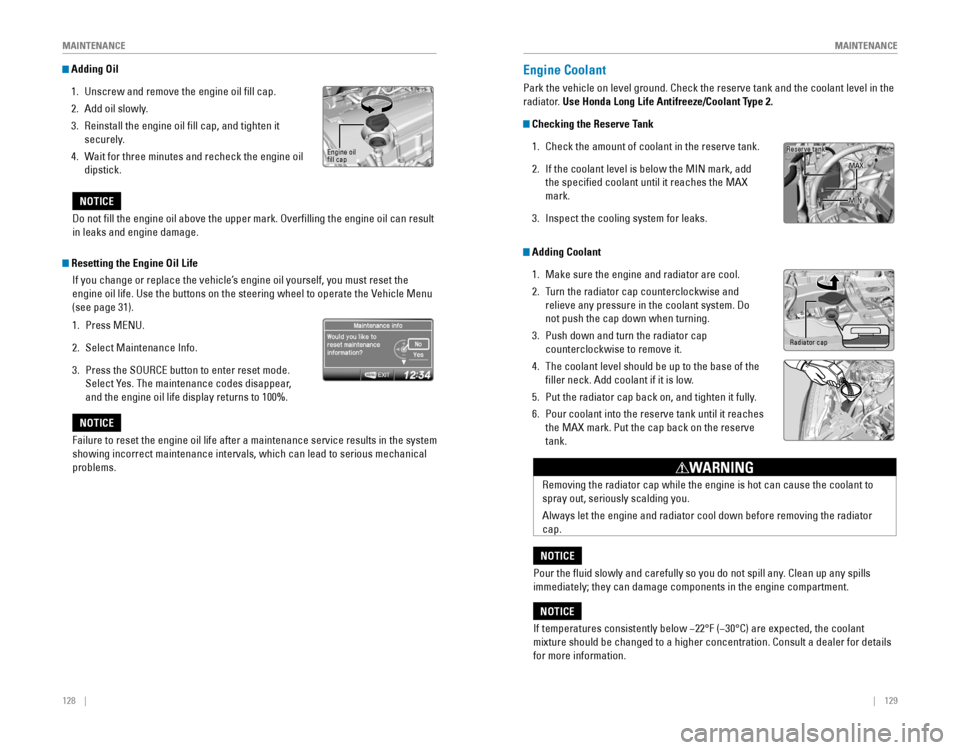
Adding Oil
1. Unscrew and remove the engine oil fill cap.
2. Add oil slowly.
3. Reinstall the engine oil fill cap, and tighten it
securely.
4. Wait for three minutes and recheck the engine oil
dipstick.Engine oil fill cap
Do not fill the engine oil above the upper mark. Overfilling the engine oil can result
in leaks and engine damage.
NOTICE
Failure to reset the engine oil life after a maintenance service results\
in the system
showing incorrect maintenance intervals, which can lead to serious mecha\
nical
problems.
NOTICE
Resetting the Engine Oil Life
If you change or replace the vehicle’s engine oil yourself, you must reset the
engine oil life. Use the buttons on the steering wheel to operate the Vehicle Menu
(see page 31).
1. Press MENU.
2. Select Maintenance Info.
3. Press the SOURCE button to enter reset mode.
Select Yes. The maintenance codes disappear,
and the engine oil life display returns to 100%.
Engine Coolant
Park the vehicle on level ground. Check the reserve tank and the coolant\
level in the
radiator. Use Honda Long Life Antifreeze/Coolant Type 2.
Checking the Reserve Tank
1. Check the amount of coolant in the reserve tank.
2. If the coolant level is below the MIN mark, add
the specified coolant until it reaches the MAX
mark.
3. Inspect the cooling system for leaks.
If temperatures consistently below −22°F (−30°C) are expected, the coolant
mixture should be changed to a higher concentration. Consult a dealer for details
for more information.
NOTICE
Reserve tank
MAX
MIN
Removing the radiator cap while the engine is hot can cause the coolant \
to
spray out, seriously scalding you.
Always let the engine and radiator cool down before removing the radiator
cap.
WARNING
Pour the fluid slowly and carefully so you do not spill any. Clean up any spills
immediately; they can damage components in the engine compartment.
NOTICE
Adding Coolant
1. Make sure the engine and radiator are cool.
2. Turn the radiator cap counterclockwise and
relieve any pressure in the coolant system. Do
not push the cap down when turning.
3. Push down and turn the radiator cap
counterclockwise to remove it.
4. The coolant level should be up to the base of the
filler neck. Add coolant if it is low.
5. Put the radiator cap back on, and tighten it fully.
6. Pour coolant into the reserve tank until it reaches
the MAX mark. Put the cap back on the reserve
tank.
Radiator cap