warning HONDA CR-V 2020 (in English) Repair Manual
[x] Cancel search | Manufacturer: HONDA, Model Year: 2020, Model line: CR-V, Model: HONDA CR-V 2020Pages: 671, PDF Size: 33.11 MB
Page 521 of 671
519
uuWhen Driving uLaneWatchTM*
Continued
Driving
LaneWatchTM*
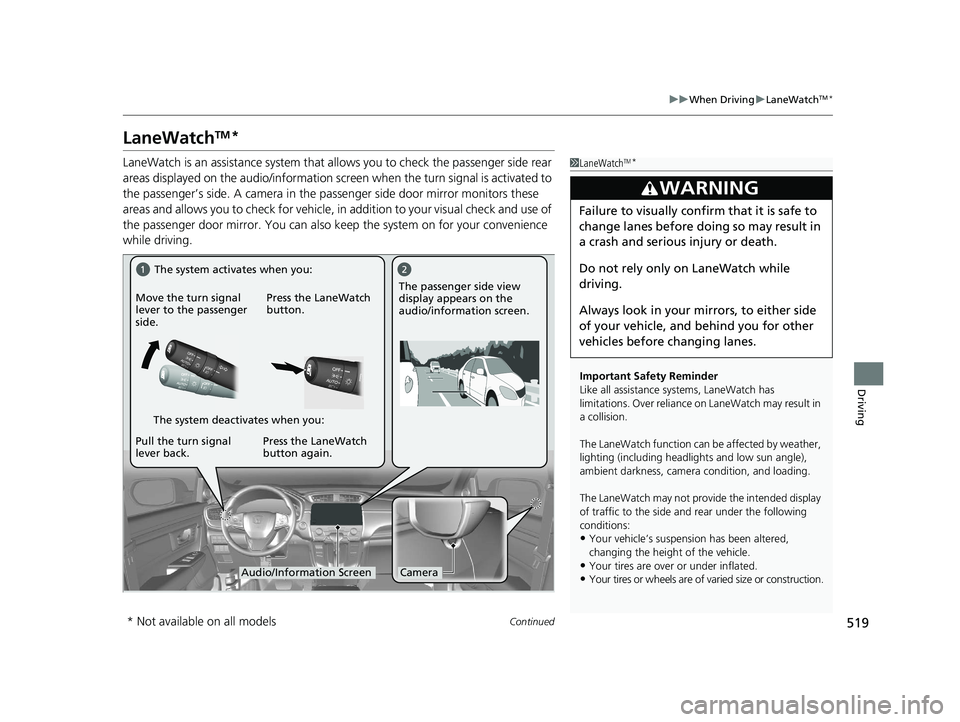
LaneWatch is an assistance system that al lows you to check the passenger side rear
areas displayed on the audio/information screen when the turn signal is activated to
the passenger’s side. A camera in the pa ssenger side door mirror monitors these
areas and allows you to check for vehicle, in addition to your visual check and use of
the passenger door mirror. You can also keep the system on for your convenience
while driving.1 LaneWatchTM*
Important Safety Reminder
Like all assistance systems, LaneWatch has
limitations. Over reliance on LaneWatch may result in
a collision.
The LaneWatch function can be affected by weather,
lighting (including headli ghts and low sun angle),
ambient darkness, camera condition, and loading.
The LaneWatch may not prov ide the intended display
of traffic to the side and rear under the following
conditions:
•Your vehicle’s suspensi on has been altered,
changing the height of the vehicle.
•Your tires are over or under inflated.
•Your tires or wheels are of varied size or construction.
3WARNING
Failure to visually confirm that it is safe to
change lanes before doing so may result in
a crash and serious injury or death.
Do not rely only on LaneWatch while
driving.
Always look in your mi rrors, to either side
of your vehicle, and behind you for other
vehicles before changing lanes.
CameraAudio/Information Screen
Move the turn signal
lever to the passenger
side.
Press the LaneWatch
button.
Pull the turn signal
lever back. Press the LaneWatch
button again. The passenger side view
display appears on the
audio/information screen.
The system activates when you:
The system deactivates when you:
* Not available on all models
20 CR-V PET ELP_MAP_HMIN_HCM_J-31TLA6310.book 519 ページ 2019年10月3日 木曜日 午後4時55分
Page 534 of 671
uuBraking uBrake System
532
Driving
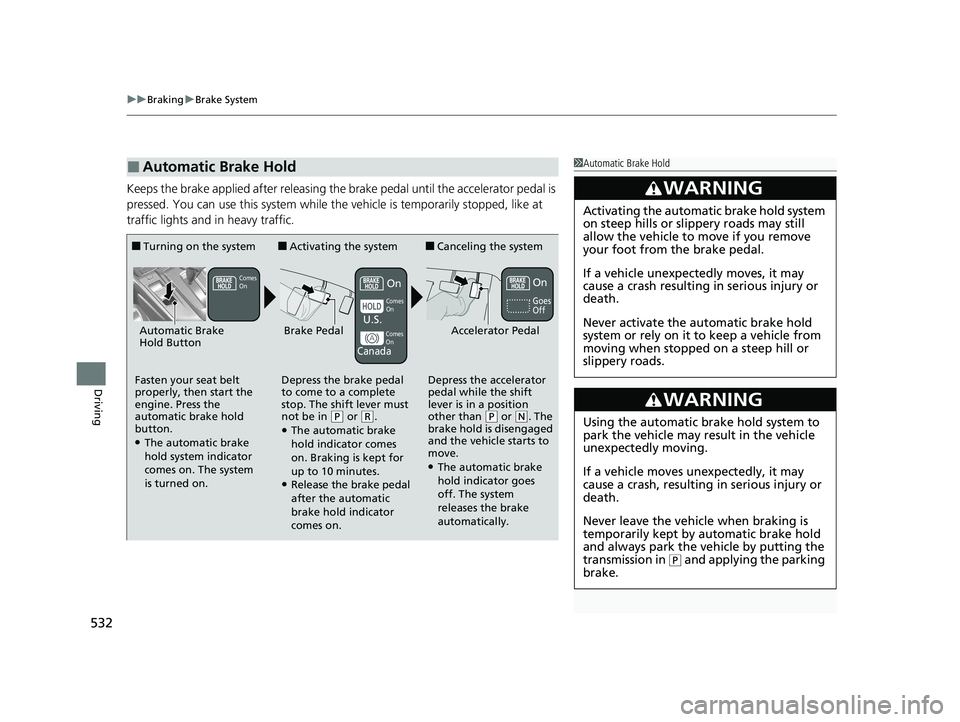
Keeps the brake applied after releasing the brake pedal until the accelerator pedal is
pressed. You can use this system while the vehicle is temporarily stopped, like at
traffic lights and in heavy traffic.
■Automatic Brake Hold1Automatic Brake Hold
3WARNING
Activating the automatic brake hold system
on steep hills or slippery roads may still
allow the vehicle to move if you remove
your foot from the brake pedal.
If a vehicle unexpectedly moves, it may
cause a crash resulting in serious injury or
death.
Never activate the automatic brake hold
system or rely on it to keep a vehicle from
moving when stopped on a steep hill or
slippery roads.
3WARNING
Using the automatic brake hold system to
park the vehicle may result in the vehicle
unexpectedly moving.
If a vehicle moves unexpectedly, it may
cause a crash, resulting in serious injury or
death.
Never leave the vehicle when braking is
temporarily kept by automatic brake hold
and always park the vehicle by putting the
transmission in
( P and applying the parking
brake.
■Turning on the system
Fasten your seat belt
properly, then start the
engine. Press the
automatic brake hold
button.
●The automatic brake
hold system indicator
comes on. The system
is turned on.
■Activating the system
Depress the brake pedal
to come to a complete
stop. The shift lever must
not be in
( P or (R.●The automatic brake
hold indicator comes
on. Braking is kept for
up to 10 minutes.
●Release the brake pedal
after the automatic
brake hold indicator
comes on.
■Canceling the system
Depress the accelerator
pedal while the shift
lever is in a position
other than
( P or (N. The
brake hold is disengaged
and the vehicle starts to
move.
●The automatic brake
hold indicator goes
off. The system
releases the brake
automatically.
Accelerator PedalBrake PedalAutomatic Brake
Hold Button
Goes
Off
On On
U.S.
Canada
Comes
On Comes
On
Comes
On
20 CR-V PET ELP_MAP_HMIN_HCM_J-31TLA6310.book 532 ページ 2019年10月3日 木曜日 午後4時55分
Page 541 of 671
539
uuBraking uCollision Mitigation Braking SystemTM (CMBSTM)
Continued
Driving
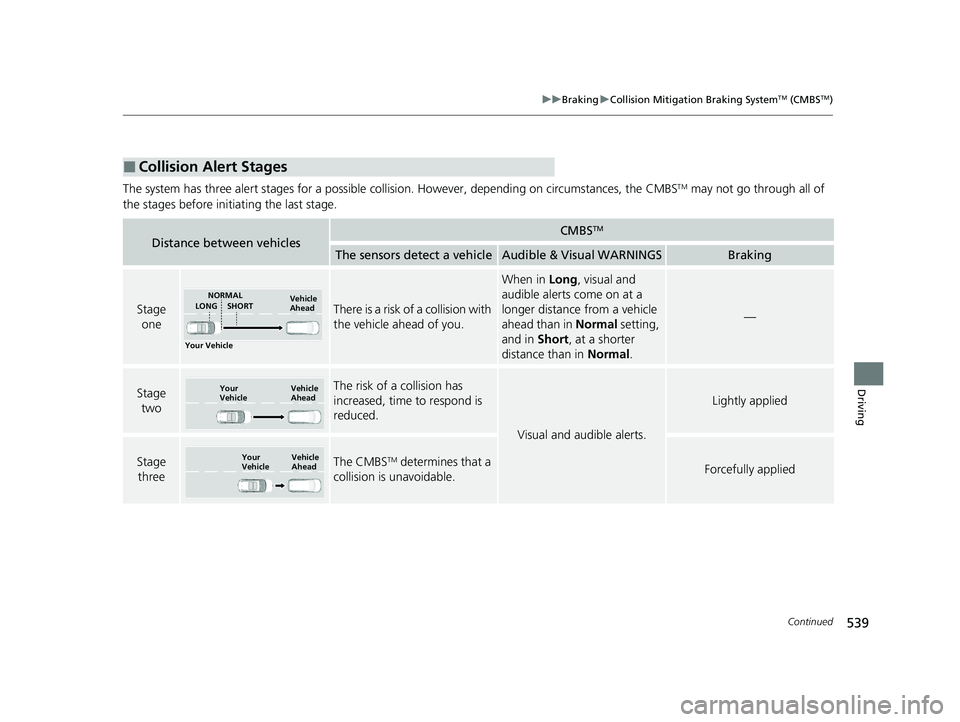
The system has three alert stages for a possible collis ion. However, depending on circumstances, the CMBSTM may not go through all of
the stages before initiating the last stage.
■Collision Alert Stages
Distance between vehiclesCMBSTM
The sensors detect a vehicleAudible & Visual WARNINGSBraking
Stage oneThere is a risk of a collision with
the vehicle ahead of you.
When in Long, visual and
audible alerts come on at a
longer distance from a vehicle
ahead than in Normal setting,
and in Short, at a shorter
distance than in Normal.
—
Stage
twoThe risk of a collision has
increased, time to respond is
reduced.
Visual and audible alerts.
Lightly applied
Stage three The CMBSTM determines that a
collision is unavoidable.Forcefully applied
Your Vehicle Vehicle
Ahead
NORMAL
SHORT
LONG
Your
Vehicle Vehicle
Ahead
Your
Vehicle
Vehicle
Ahead
20 CR-V PET ELP_MAP_HMIN_HCM_J-31TLA6310.book 539 ページ 2019年10月3日 木曜日 午後4時55分
Page 543 of 671
Continued541
uuBraking uCollision Mitigation Braking SystemTM (CMBSTM)
Driving
The CMBSTM may activate even when you are aware of a vehicle ahead of you, or
when there is no vehicle ahead. Some examples of this are:
■When Passing
Your vehicle approaches another vehicle ah ead of you and you change lanes to pass.
■At an intersection
Your vehicle approaches or passes another ve hicle that is making a left or right turn.
■On a curve
When driving through curves, your vehicle comes to a point where an oncoming
vehicle is right in front of you.
■Through a low bridge at high speed
You drive under a low or na rrow bridge at high speed.
■Speed bumps, road work sites, tra in tracks, roadside objects, etc.
You drive over speed bumps, st eel road plates, etc., or your vehicle approaches train
tracks or roadside objects [such as a traffic sign and guard rail] on a curve or, when
parking, stationary vehicles and walls.
■With Little Chance of a Collision1 Collision Mitigation Braking SystemTM (CMBSTM)
For the CMBS
TM to work properly:
Always keep the radar sensor cover clean.
Never use chemical solvents or polishing powder for
cleaning the sensor cover. Clean it with water or a
mild detergent.
Do not paint, or apply any coverings or paint to radar
sensor area. This can impact CMBS
TM operation.
Have your vehicle checked by a dealer if you find any
unusual behavior of the system (e.g. the warning
message appears too frequently).
If the front of the vehicle is impacted in any of the
following situations, the ra dar sensor may not work
properly. Have your vehi cle checked by a dealer:
•The vehicle mounted onto a bump, curb, chock,
embankment, etc.
•You drive the vehicle where the water is deep.
•Your vehicle has a frontal collision.
20 CR-V PET ELP_MAP_HMIN_HCM_J-31TLA6310.book 541 ページ 2019年10月3日 木曜日 午後4時55分
Page 548 of 671
546
Driving
Parking Your Vehicle
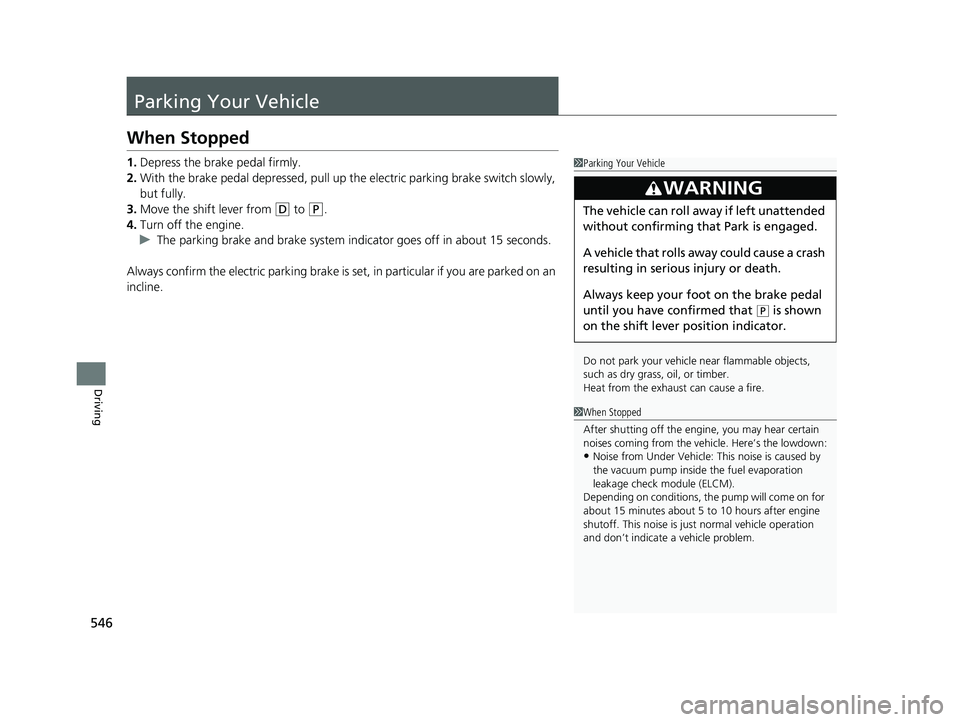
When Stopped
1.Depress the brake pedal firmly.
2. With the brake pedal depressed, pull up th e electric parking brake switch slowly,
but fully.
3. Move the shift lever from
(D to (P.
4. Turn off the engine.
u The parking brake and brake system in dicator goes off in about 15 seconds.
Always confirm the electric parking brake is se t, in particular if you are parked on an
incline.
1 Parking Your Vehicle
Do not park your vehicle near flammable objects,
such as dry grass, oil, or timber.
Heat from the exhaust can cause a fire.
3WARNING
The vehicle can roll aw ay if left unattended
without confirming that Park is engaged.
A vehicle that rolls away could cause a crash
resulting in seriou s injury or death.
Always keep your foot on the brake pedal
until you have confirmed that
( P is shown
on the shift lever position indicator.
1When Stopped
After shutting off the engi ne, you may hear certain
noises coming from the vehicle. Here’s the lowdown:
•Noise from Under Vehicle: This noise is caused by
the vacuum pump inside the fuel evaporation
leakage check module (ELCM).
Depending on conditions, the pump will come on for
about 15 minutes about 5 to 10 hours after engine
shutoff. This noise is ju st normal vehicle operation
and don’t indicate a vehicle problem.
20 CR-V PET ELP_MAP_HMIN_HCM_J-31TLA6310.book 546 ページ 2019年10月3日 木曜日 午後4時55分
Page 551 of 671
Continued549
uuParking Your Vehicle uCross Traffic Monitor*
Driving
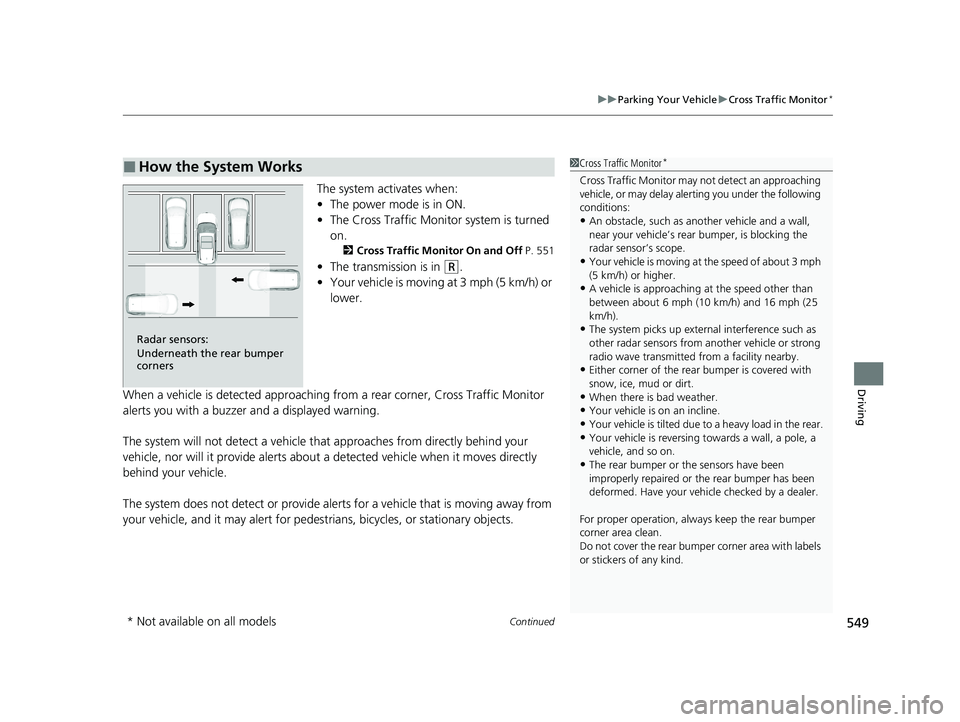
The system activates when:
• The power mode is in ON.
• The Cross Traffic Monitor system is turned
on.
2 Cross Traffic Monitor On and Off P. 551
•The transmission is in (R.
• Your vehicle is moving at 3 mph (5 km/h) or
lower.
When a vehicle is detected approaching from a rear corner, Cross Traffic Monitor
alerts you with a buzzer and a displayed warning.
The system will not detect a vehicle that approaches from directly behind your
vehicle, nor will it provide alerts about a detected vehicle when it moves directly
behind your vehicle.
The system does not detect or provide alerts for a vehicle that is moving away from
your vehicle, and it may alert for pedest rians, bicycles, or stationary objects.
■How the System Works1Cross Traffic Monitor*
Cross Traffic Monitor may not detect an approaching
vehicle, or may delay alerting you under the following
conditions:
•An obstacle, such as a nother vehicle and a wall,
near your vehicle’s rear bumper, is blocking the
radar sensor’s scope.
•Your vehicle is moving at the speed of about 3 mph
(5 km/h) or higher.
•A vehicle is approaching at the speed other than
between about 6 mph (10 km/h) and 16 mph (25
km/h).
•The system picks up external interference such as
other radar sensors from an other vehicle or strong
radio wave transmitted fr om a facility nearby.
•Either corner of the rear bumper is covered with
snow, ice, mud or dirt.
•When there is bad weather.
•Your vehicle is on an incline.
•Your vehicle is tilted due to a heavy load in the rear.
•Your vehicle is reversing towards a wall, a pole, a
vehicle, and so on.
•The rear bumper or the sensors have been
improperly repaired or the rear bumper has been
deformed. Have your vehi cle checked by a dealer.
For proper operation, always keep the rear bumper
corner area clean.
Do not cover the rear bumper corner area with labels
or stickers of any kind.
Radar sensors:
Underneath the rear bumper
corners
* Not available on all models
20 CR-V PET ELP_MAP_HMIN_HCM_J-31TLA6310.book 549 ページ 2019年10月3日 木曜日 午後4時55分
Page 557 of 671
555
uuRefueling uHow to Refuel
Continued
Driving
How to Refuel
Your fuel tank is not equipped with a fuel filler cap. You can insert the filler nozzle
directly into the filler neck. The tank seals itself again when you pull out the filler
nozzle. 1.Stop your vehicle with the service station
pump on the left side of the vehicle in the
rear.
2. Turn off the engine.
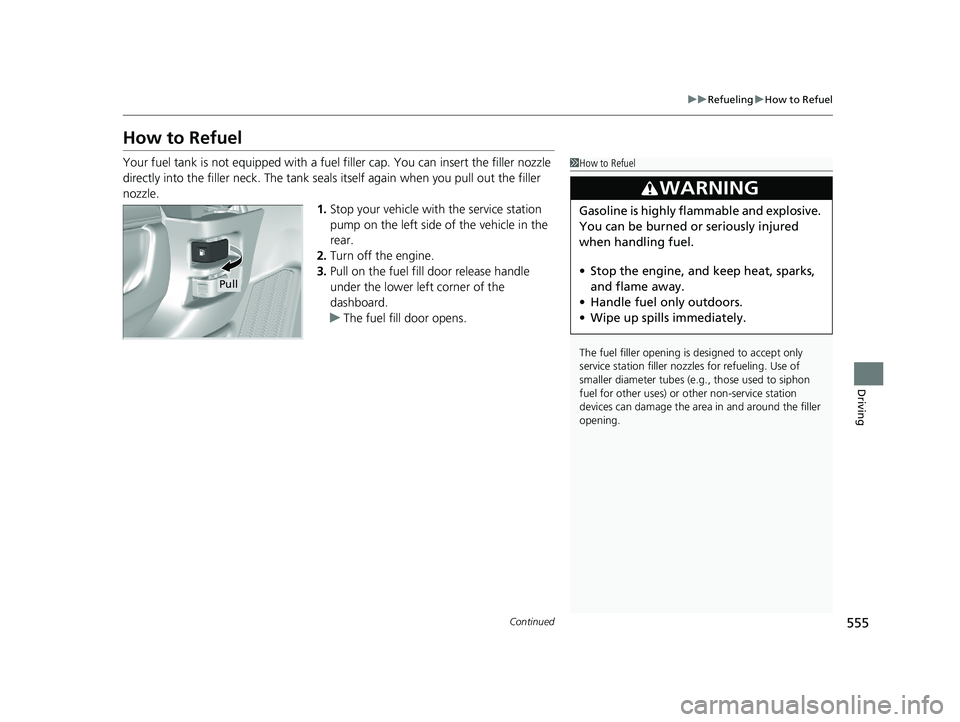
3. Pull on the fuel fill door release handle
under the lower left corner of the
dashboard.
u The fuel fill door opens.1How to Refuel
The fuel filler opening is designed to accept only
service station filler nozzles for refueling. Use of
smaller diamet er tubes (e.g., those used to siphon
fuel for other uses) or other non-service station
devices can damage the area in and around the filler
opening.
3WARNING
Gasoline is highly flammable and explosive.
You can be burned or seriously injured
when handling fuel.
• Stop the engine, and keep heat, sparks,
and flame away.
• Handle fuel only outdoors.
• Wipe up spills immediately.
Pull
20 CR-V PET ELP_MAP_HMIN_HCM_J-31TLA6310.book 555 ページ 2019年10月3日 木曜日 午後4時55分
Page 563 of 671
561
uuBefore Performing Maintenance uSafety When Performing Maintenance
Maintenance
Safety When Performing Maintenance
Some of the most important safety precau tions are given here. However, we cannot
warn you of every conceivable hazard that can arise in performing maintenance.
Only you can decide whether you should perform a given task.
• To reduce the possibility of fire or explos ion, keep cigarettes, sparks, and flames
away from the battery and all fuel related parts.
• Never leave rags, towels, or other flammable objects under the hood.
u Heat from the engine and exhaust can ignite them causing a fire.
• To clean parts, use a co mmercially available degreas er or parts cleaner, not
gasoline.
• Wear eye protection and protective clothi ng when working with the battery or
compressed air.
• Engine exhaust contains carbon monoxide, which is poisonous and can kill you.
u Only operate the engine if th ere is sufficient ventilation.
• The vehicle must be in a stationary condition.
u Make sure your vehicle is parked on le vel ground, the parking brake is set, and
the engine is off.
• Be aware that hot parts can burn you.
u Make sure to let the engine and exhaust system cool thoroughly before
touching vehicle parts.
• Be aware that moving parts can injure you.
u Do not start the engine unless instruct ed, and keep your hands and limbs away
from moving parts.
u Do not open the hood while the Auto Idle Stop function is activated.
■Maintenance Safety
■Vehicle Safety
1Safety When Performing Maintenance
3WARNING
Improperly maintaining this vehicle or
failing to correct a pr oblem before driving
can cause a crash in which you can be
seriously hurt or killed.
Always follow the inspection and
maintenance recommendations according
to the schedules in this owner's manual.
3WARNING
Failure to properly follow maintenance
instructions and precautions can cause you
to be seriously hurt or killed.
Always follow the procedures and
precautions in this owner's manual.
20 CR-V PET ELP_MAP_HMIN_HCM_J-31TLA6310.book 561 ページ 2019年10月3日 木曜日 午後4時55分
Page 572 of 671
570
uuMaintenance Under the Hood uOpening the Hood
Maintenance
Opening the Hood
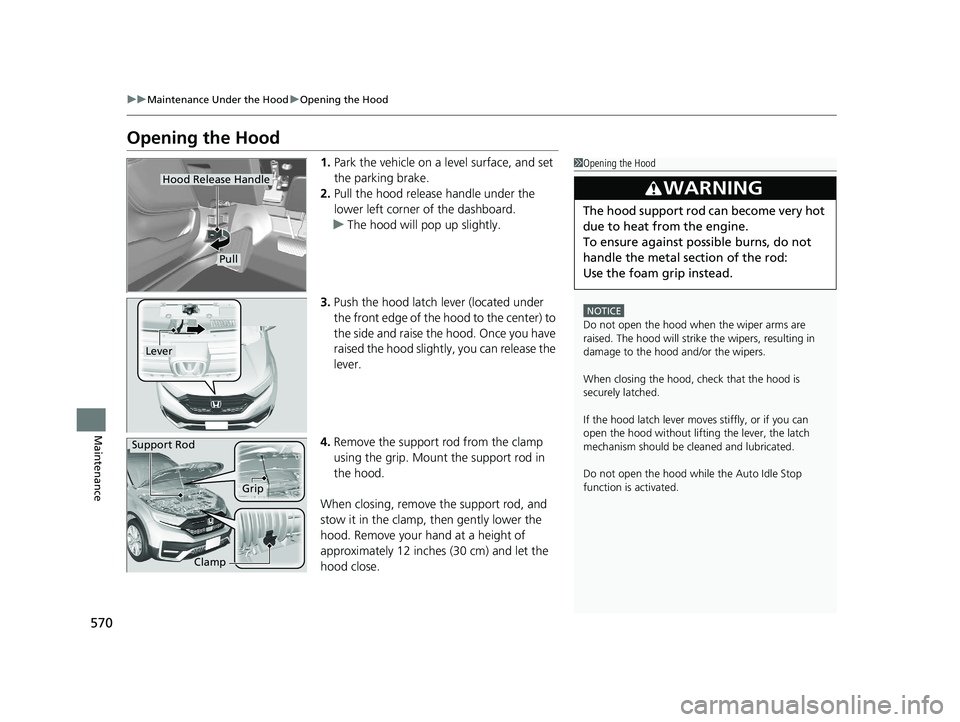
1. Park the vehicle on a level surface, and set
the parking brake.
2. Pull the hood release handle under the
lower left corner of the dashboard.
u The hood will pop up slightly.
3. Push the hood latch lever (located under
the front edge of the hood to the center) to
the side and raise the hood. Once you have
raised the hood slightly, you can release the
lever.
4. Remove the support rod from the clamp
using the grip. Mount the support rod in
the hood.
When closing, remove the support rod, and
stow it in the clamp, then gently lower the
hood. Remove your hand at a height of
approximately 12 inches (30 cm) and let the
hood close.1 Opening the Hood
NOTICE
Do not open the hood when the wiper arms are
raised. The hood will strike the wipers, resulting in
damage to the hood and/or the wipers.
When closing the hood, check that the hood is
securely latched.
If the hood latch lever moves stiffly, or if you can
open the hood without lifti ng the lever, the latch
mechanism should be cl eaned and lubricated.
Do not open the hood while the Auto Idle Stop
function is activated.
3WARNING
The hood support rod can become very hot
due to heat fr om the engine.
To ensure against po ssible burns, do not
handle the metal section of the rod:
Use the foam grip instead.
Hood Release Handle
Pull
Lever
Support Rod
Grip
Clamp
20 CR-V PET ELP_MAP_HMIN_HCM_J-31TLA6310.book 570 ページ 2019年10月3日 木曜日 午後4時55分
Page 578 of 671
576
uuMaintenance Under the Hood uEngine Coolant
Maintenance
Engine Coolant
This coolant is premixed with 50% antifreeze and 50% water. Do not add any
straight antifreeze or water.
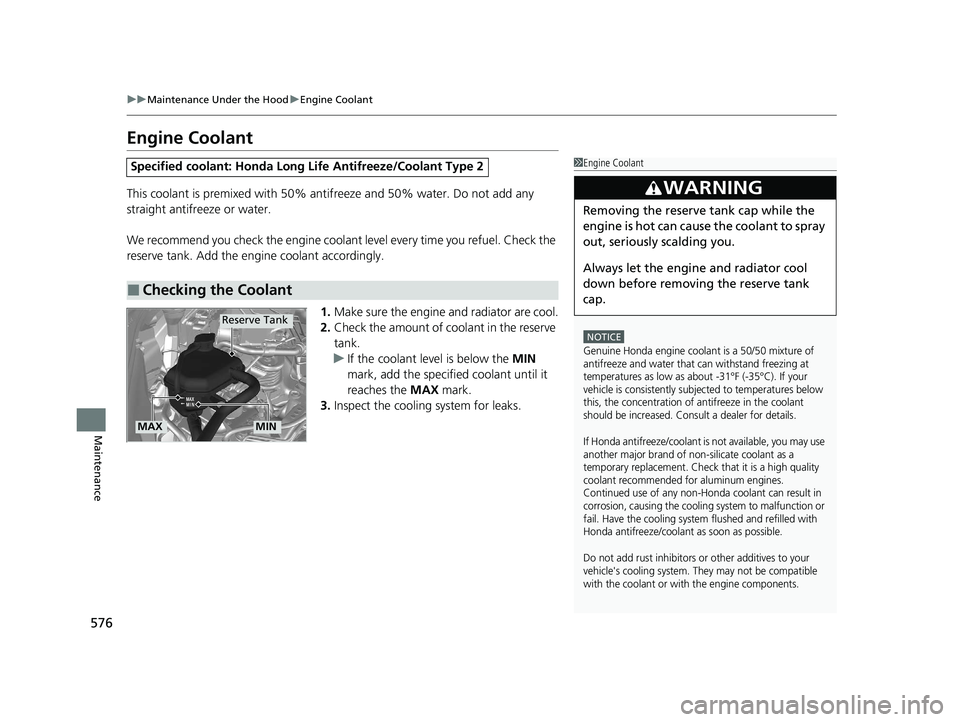
We recommend you check the engine coolant level every time you refuel. Check the
reserve tank. Add the engine coolant accordingly.
1.Make sure the engine and radiator are cool.
2. Check the amount of coolant in the reserve
tank.
u If the coolant level is below the MIN
mark, add the specified coolant until it
reaches the MAX mark.
3. Inspect the cooling system for leaks.
Specified coolant: Honda Long Life Antifreeze/Coolant Type 2
■Checking the Coolant
1Engine Coolant
NOTICE
Genuine Honda engine coolant is a 50/50 mixture of
antifreeze and water that can withstand freezing at
temperatures as low as about -31°F (-35°C). If your
vehicle is consistently subjected to temperatures below
this, the concentration of antifreeze in the coolant
should be increased. Consult a dealer for details.
If Honda antifreeze/coolant is not available, you may use
another major brand of non-silicate coolant as a
temporary replacement. Check that it is a high quality
coolant recommended for aluminum engines.
Continued use of any non-Honda coolant can result in
corrosion, causing the cooling system to malfunction or
fail. Have the cooling system flushed and refilled with
Honda antifreeze/coolant as soon as possible.
Do not add rust inhibitors or other additives to your
vehicle's cooling system. They may not be compatible
with the coolant or with the engine components.
3WARNING
Removing the reserve tank cap while the
engine is hot can cause the coolant to spray
out, seriously scalding you.
Always let the engine and radiator cool
down before removing the reserve tank
cap.
Reserve Tank
MAXMIN
20 CR-V PET ELP_MAP_HMIN_HCM_J-31TLA6310.book 576 ページ 2019年10月3日 木曜日 午後4時55分