clock HONDA CR-V 2020 Owner's Manual (in English)
[x] Cancel search | Manufacturer: HONDA, Model Year: 2020, Model line: CR-V, Model: HONDA CR-V 2020Pages: 671, PDF Size: 33.11 MB
Page 4 of 671
Contents
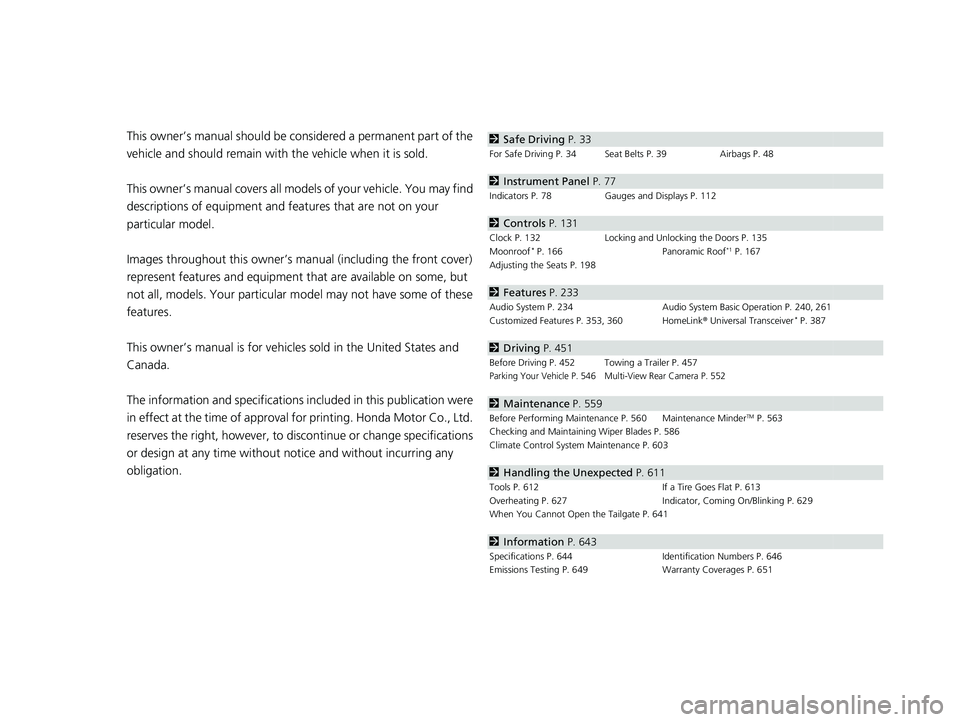
This owner’s manual should be considered a permanent part of the
vehicle and should remain with the vehicle when it is sold.
This owner’s manual covers all models of your vehicle. You may find
descriptions of equipment and features that are not on your
particular model.
Images throughout this owner’s manual (including the front cover)
represent features and equipment that are available on some, but
not all, models. Your particular mo del may not have some of these
features.
This owner’s manual is for vehicles sold in the United States and
Canada.
The information and specifications in cluded in this publication were
in effect at the time of approval for printing. Honda Motor Co., Ltd.
reserves the right, however, to discontinue or change specifications
or design at any time without notice and without incurring any
obligation.2 Safe Driving P. 33
For Safe Driving P. 34 Seat Belts P. 39 Airbags P. 48
2Instrument Panel P. 77
Indicators P. 78 Gauges and Displays P. 112
2Controls P. 131
Clock P. 132 Locking and Unlocking the Doors P. 135
Moonroof* P. 166 Panoramic Roof*1 P. 167
Adjusting the Seats P. 198
2 Features P. 233
Audio System P. 234 Audio System Basic Operation P. 240, 261
Customized Features P. 353, 360 HomeLink ® Universal Transceiver* P. 387
2 Driving P. 451
Before Driving P. 452 Towing a Trailer P. 457Parking Your Vehicle P. 546 Multi-View Rear Camera P. 552
2Maintenance P. 559
Before Performing Maintenance P. 560 Maintenance MinderTM P. 563
Checking and Maintaining Wiper Blades P. 586
Climate Control System Maintenance P. 603
2Handling the Unexpected P. 611
Tools P. 612 If a Tire Goes Flat P. 613
Overheating P. 627 Indicator, Coming On/Blinking P. 629
When You Cannot Open the Tailgate P. 641
2 Information P. 643
Specifications P. 644 Identification Numbers P. 646
Emissions Testing P. 649 Warranty Coverages P. 651
20 CR-V PET ELP_MAP_HMIN_HCM_J-31TLA6310.book 2 ページ 2019年10月3日 木曜日 午後4時55分
Page 15 of 671
13
Quick Reference Guide
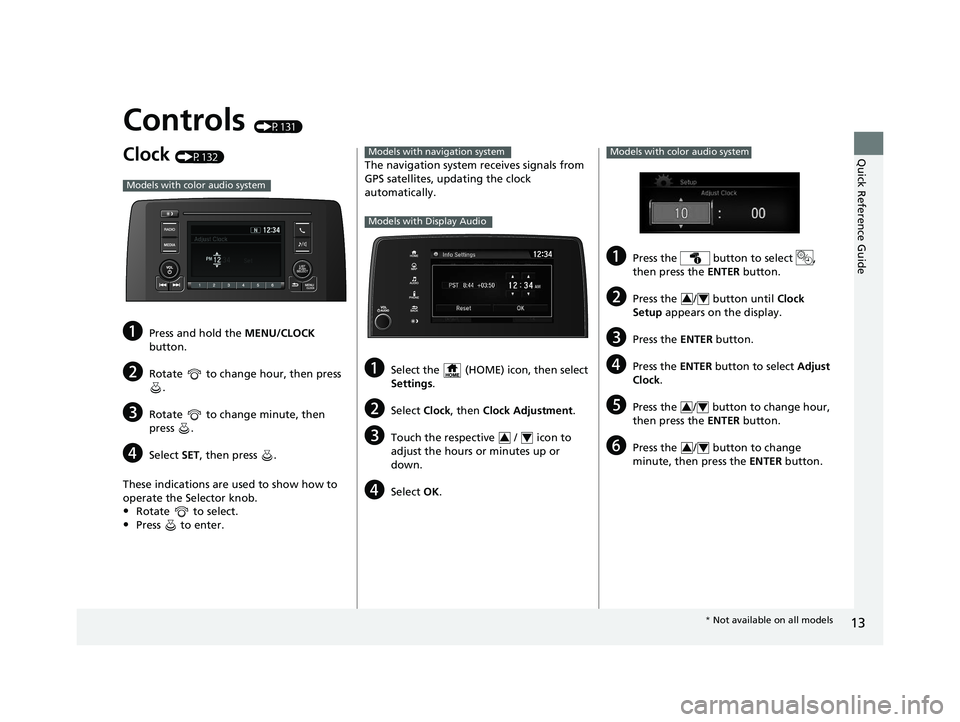
Controls (P131)
Clock (P132)
aPress and hold the MENU/CLOCK
button.
bRotate to change hour, then press .
cRotate to change minute, then
press .
dSelect SET, then press .
These indications are used to show how to
operate the Selector knob.
•Rotate to select.
•Press to enter.
Models with color audio system
The navigation system receives signals from
GPS satellites, updating the clock
automatically.
aSelect the (HOME) icon, then select
Settings .
bSelect Clock, then Clock Adjustment .
cTouch the respective / icon to
adjust the hours or minutes up or
down.
dSelect OK.
Models with navigation system
Models with Display Audio
34
aPress the button to select ,
then press the ENTER button.
bPress the / button until Clock
Setup appears on the display.
cPress the ENTER button.
dPress the ENTER button to select Adjust
Clock .
ePress the / button to change hour,
then press the ENTER button.
fPress the / button to change
minute, then press the ENTER button.
Models with color audio system
34
34
34
* Not available on all models
20 CR-V PET ELP_MAP_HMIN_HCM_J-31TLA6310.book 13 ページ 2019年10月3日 木曜日 午後4時55分
Page 23 of 671
21
Quick Reference Guide
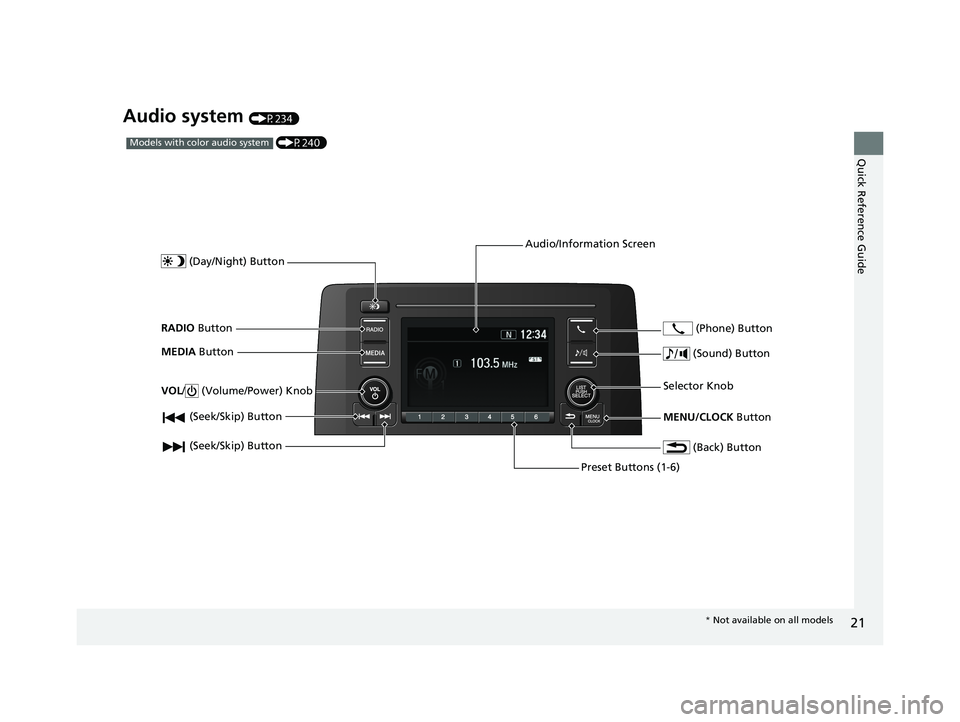
Audio system (P234)
(P240)Models with color audio system
(Seek/Skip) Button
RADIO Button
(Day/Night) Button
MEDIA Button
Preset Buttons (1-6)
(Seek/Skip) Button
VOL
/ (Volume/Power) Knob
Audio/Information Screen
(Back) Button
(Sound) Button
MENU/CLOCK Button
Selector Knob (Phone) Button
*
Not available on all models
20 CR-V PET ELP_MAP_HMIN_HCM_J-31TLA6310.book 21 ページ 2019年10月3日 木曜日 午後4時55分
Page 123 of 671
Continued121
uuGauges and Displays uDriver Information Interface
Instrument Panel
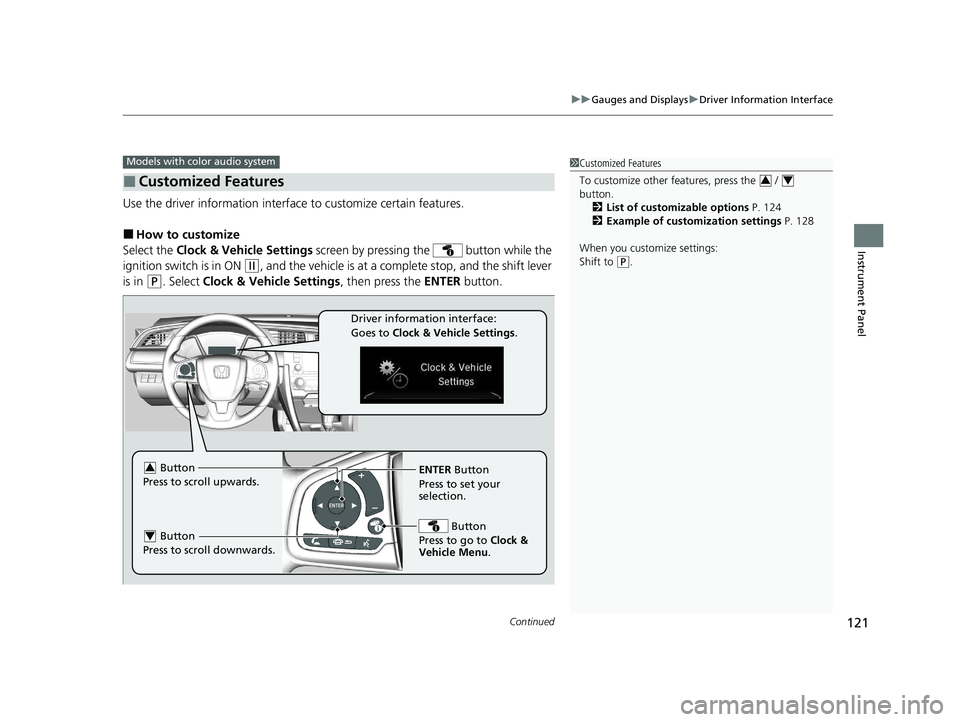
Use the driver information interface to customize certain features.
■How to customize
Select the Clock & Vehicle Settings screen by pressing the button while the
ignition switch is in ON
(w, and the vehicle is at a complete stop, and the shift lever
is in
(P. Select Clock & Vehicle Settings , then press the ENTER button.
■Customized Features
Models with color audio system1Customized Features
To customize other features, press the /
button.
2 List of customizable options P. 124
2 Example of customization settings P. 128
When you customize settings:
Shift to
( P.
34
ENTER Button
Press to set your
selection.
Button
Press to go to Clock &
Vehicle Menu . Button
Press to scroll upwards.3
Button
Press to scroll downwards.4
Driver information interface:
Goes to Clock & Vehicle Settings.
20 CR-V PET ELP_MAP_HMIN_HCM_J-31TLA6310.book 121 ページ 2019年10月3日 木曜日 午後4時55分
Page 124 of 671
122
uuGauges and Displays uDriver Information Interface
Instrument Panel
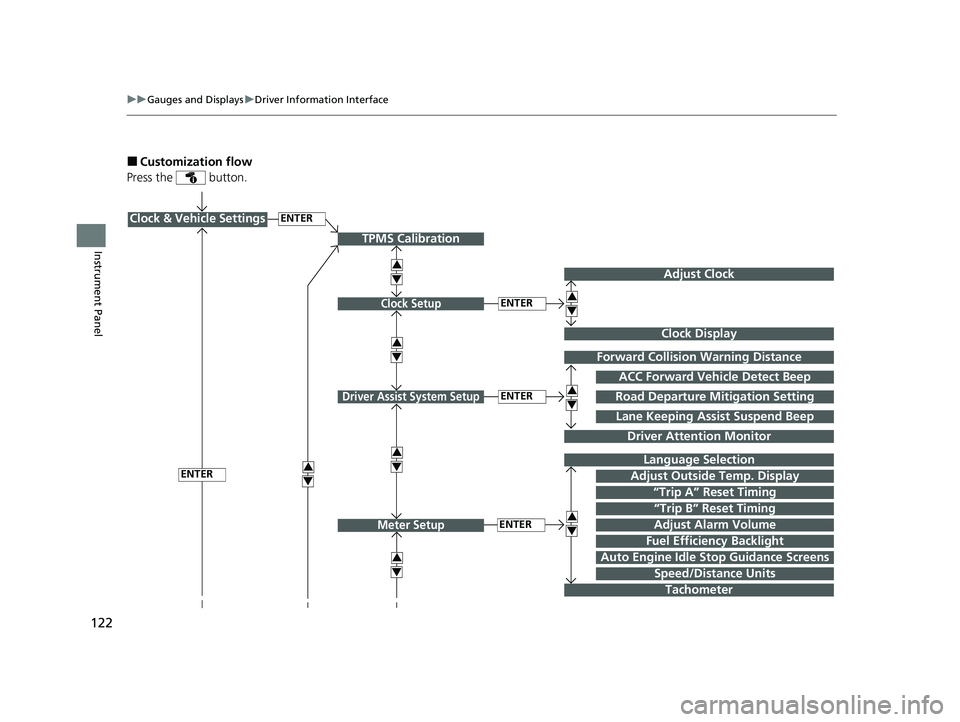
■Customization flow
Press the button.
ENTERClock & Vehicle Settings
“Trip A” Reset Timing
Language Selection
Adjust Outside Temp. Display
3
4
TPMS Calibration
ENTER
“Trip B” Reset Timing
Fuel Efficiency Backlight
3
4
ACC Forward Vehicle Detect Beep
3
4
Tachometer
ENTER
Forward Collision Warning Distance
3
4
3
4
Lane Keeping Assist Suspend Beep
Road Departure Mitigation Setting
Adjust Alarm Volume
Speed/Distance Units
3
4
ENTER
Driver Assist System Setup
Meter Setup
Driver Attention Monitor
Auto Engine Idle Stop Guidance Screens
ENTER
Adjust Clock
3
4Clock Setup
Clock Display
3
4
20 CR-V PET ELP_MAP_HMIN_HCM_J-31TLA6310.book 122 ページ 2019年10月3日 木曜日 午後4時55分
Page 126 of 671
124
uuGauges and Displays uDriver Information Interface
Instrument Panel
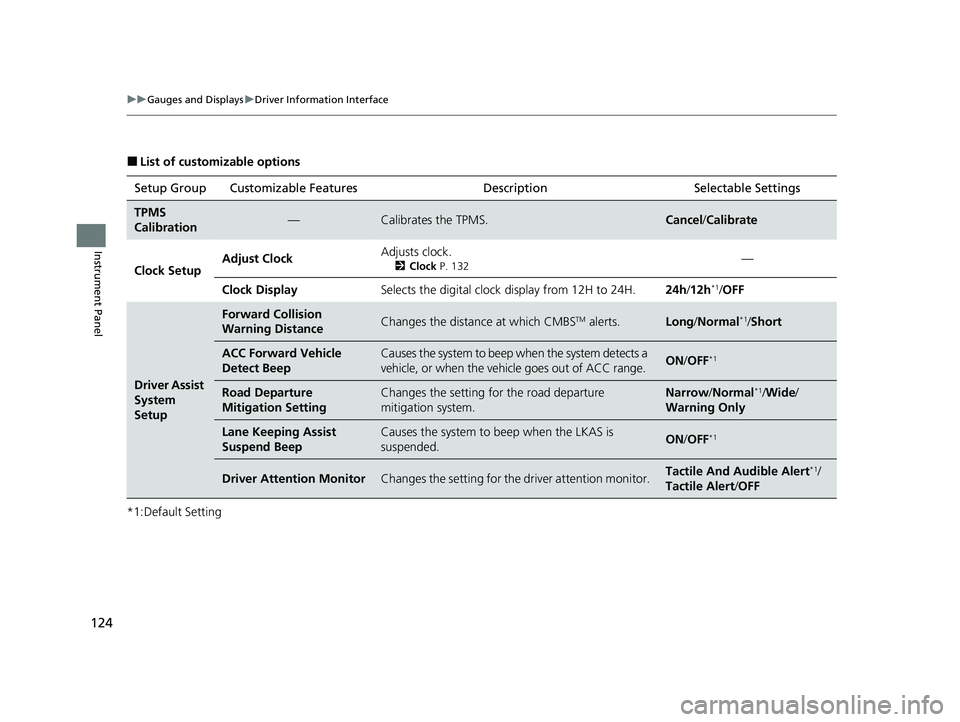
■List of customizable options
*1:Default Setting Setup Group Customizable Features Description Selectable Settings
TPMS
Calibration—Calibrates the TPMS.Cancel
/Calibrate
Clock Setup Adjust Clock
Adjusts clock.
2
Clock P. 132—
Clock Display Selects the digital clock display from 12H to 24H. 24h/12h
*1/ OFF
Driver Assist
System
Setup
Forward Collision
Warning DistanceChanges the distance at which CMBSTM alerts.Long /Normal*1/Short
ACC Forward Vehicle
Detect BeepCauses the system to beep when the system detects a
vehicle, or when the vehi cle goes out of ACC range.ON/OFF*1
Road Departure
Mitigation SettingChanges the setting for the road departure
mitigation system.Narrow /Normal*1/Wide /
Warning Only
Lane Keeping Assist
Suspend BeepCauses the system to beep when the LKAS is
suspended.ON /OFF*1
Driver Attention MonitorChanges the setting for the driver attention monitor.Tactile And Audible Alert*1/
Tactile Alert /OFF
20 CR-V PET ELP_MAP_HMIN_HCM_J-31TLA6310.book 124 ページ 2019年10月3日 木曜日 午後4時55分
Page 130 of 671
128
uuGauges and Displays uDriver Information Interface
Instrument Panel
■Example of customization settings
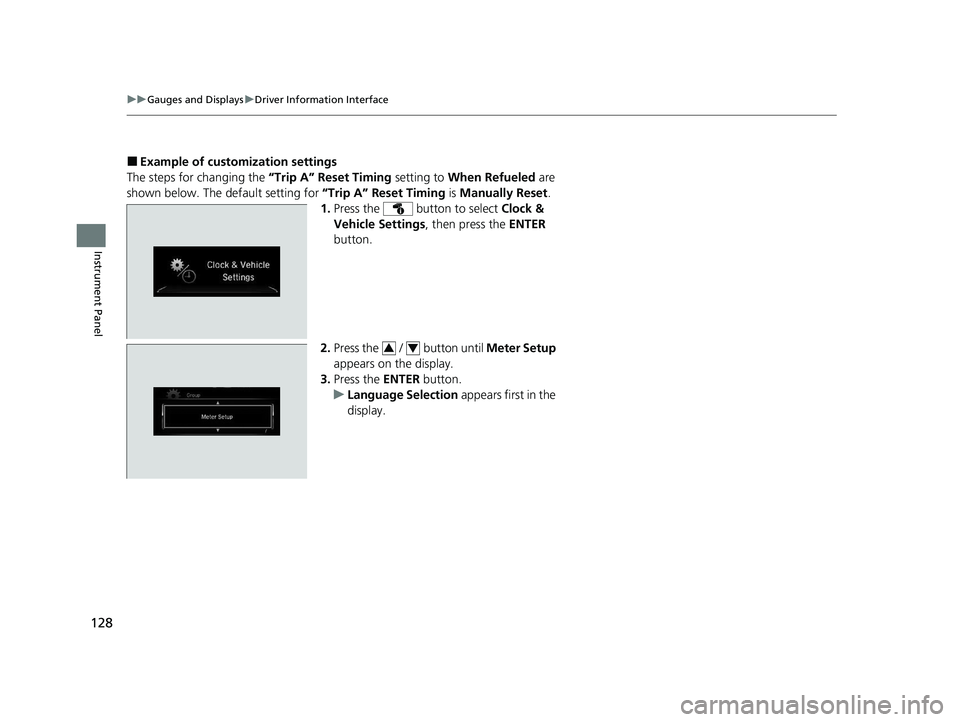
The steps for changing the “Trip A” Reset Timing setting to When Refueled are
shown below. The default setting for “Trip A” Reset Timing is Manually Reset .
1. Press the button to select Clock &
Vehicle Settings , then press the ENTER
button.
2. Press the / button until Meter Setup
appears on the display.
3. Press the ENTER button.
u Language Selection appears first in the
display.
34
20 CR-V PET ELP_MAP_HMIN_HCM_J-31TLA6310.book 128 ページ 2019年10月3日 木曜日 午後4時55分
Page 133 of 671
131
Controls
This chapter explains how to operate the various controls necessary for driving.
Clock.................................................. 132
Locking and Unlocking the Doors
Key Types and Functions .................. 135
Low Smart Entry Remote Signal Strength*..137Locking/Unlocking the Doors from the Outside .......................................... 138
Locking/Unlocking the Doors from the Inside ... 146Childproof Door Locks ..................... 147
Auto Door Locking/Unlocking .......... 148
Opening and Closing the Tailgate ... 149
Security System
Immobilizer System .......................... 160
Security System Alarm
*.................... 160Opening and Closing the Windows ..... 163
Moonroof*.............................................. 166Panoramic Roof*1.................................... 167Operating the Switches Around the Steering WheelIgnition Switch*............................... 170
ENGINE START/STOP Button*........... 171
Ignition Switch and Power Mode Comparison ................................... 174
Turn Signals ..................................... 175
Light Switches.................................. 176
Fog Lights
*...................................... 180
Auto High-Beam .............................. 181
Daytime Running Lights ................... 185
Wipers and Washers ........................ 186
Brightness Control ........................... 189 Defogger/Heated Door Mirror
*........ 191
Driving Position Memory System*.... 193
Adjusting the Steering Wheel .......... 195
Adjusting the Mirrors ....................... 196
Adjusting the Seats .......................... 198
Interior Lights/Interior Convenience Items.. 208Climate Control System
Using Automatic Climate Control .... 228
Synchronization Mode
*................... 231Automatic Climate Control Sensors ...... 232
(*1: Canadian models only, if equipped)
* Not available on all models
20 CR-V PET ELP_MAP_HMIN_HCM_J-31TLA6310.book 131 ページ 2019年10月3日 木曜日 午後4時55分
Page 134 of 671
132
Controls
Clock
Adjusting the Clock
You can adjust the time in the clock display with the ignition switch in ON (w*1.
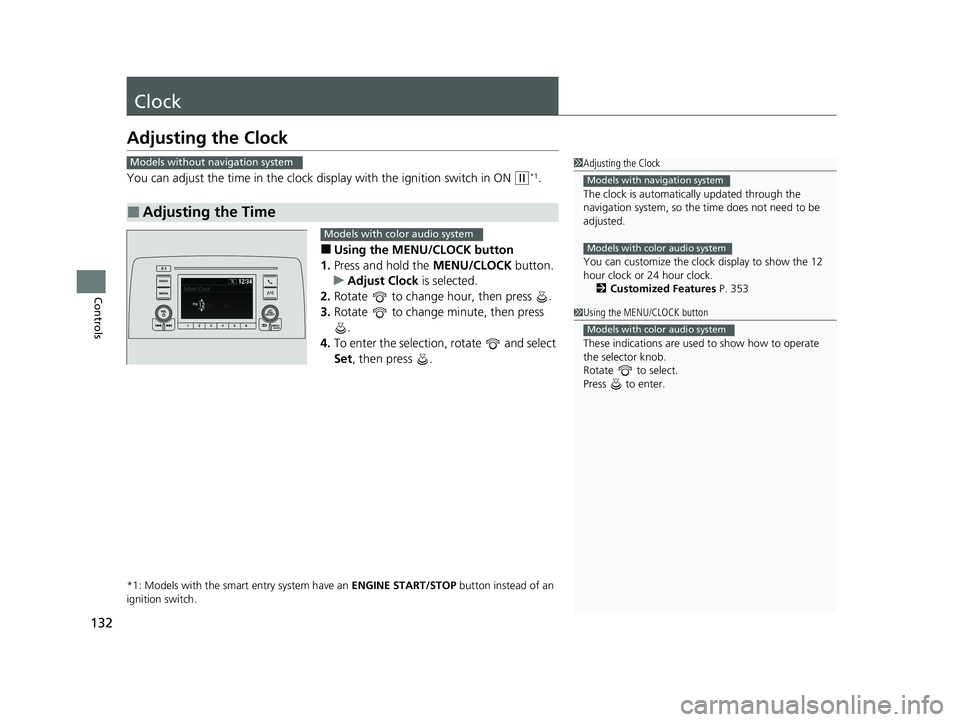
■Using the MENU/CLOCK button
1. Press and hold the MENU/CLOCK button.
u Adjust Clock is selected.
2. Rotate to change hour, then press .
3. Rotate to change minute, then press
.
4. To enter the selection, rotate and select
Set , then press .
*1: Models with the smart entry system have an ENGINE START/STOP button instead of an
ignition switch.
■Adjusting the Time
1 Adjusting the Clock
The clock is automatica lly updated through the
navigation system, so the ti me does not need to be
adjusted.
You can customize the clock display to show the 12
hour clock or 24 hour clock. 2 Customized Features P. 353
Models with navigation system
Models with color audio system
Models without navigation system
1Using the MENU/CLOCK button
These indications are used to show how to operate
the selector knob.
Rotate to select.
Press to enter.
Models with color audio system
Models with color audio system
20 CR-V PET ELP_MAP_HMIN_HCM_J-31TLA6310.book 132 ページ 2019年10月3日 木曜日 午後4時55分
Page 135 of 671
Continued133
uuClock uAdjusting the Clock
Controls
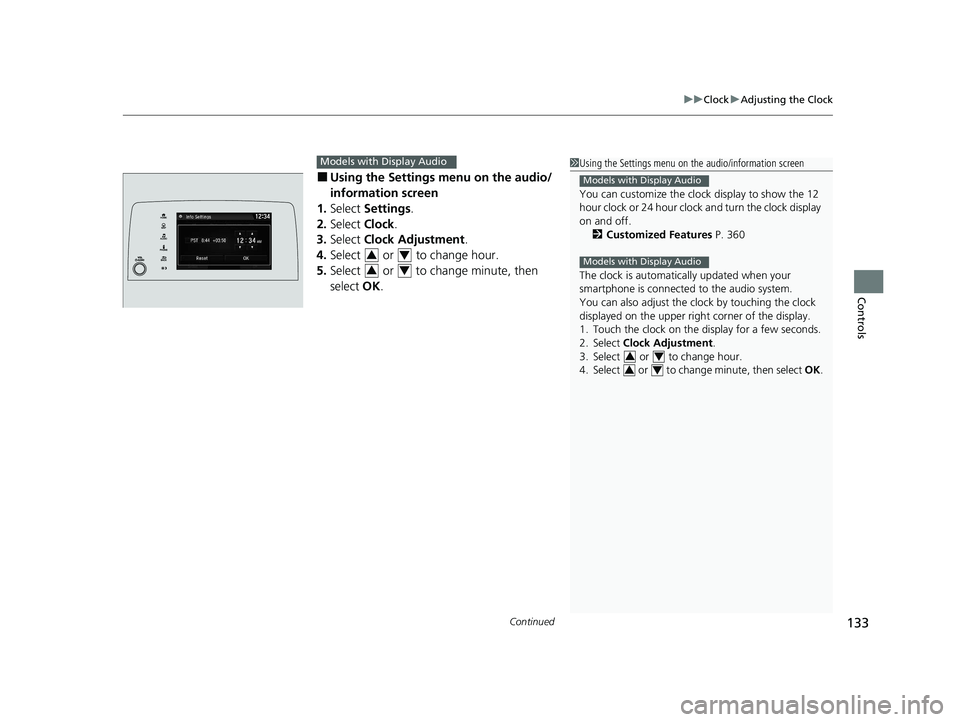
■Using the Setti ngs menu on the audio/
information screen
1. Select Settings .
2. Select Clock.
3. Select Clock Adjustment .
4. Select or to change hour.
5. Select or to change minute, then
select OK.
Models with Display Audio1Using the Settings menu on the audio/information screen
You can customize the clock display to show the 12
hour clock or 24 hour clock and turn the clock display
on and off.
2 Customized Features P. 360
The clock is automatica lly updated when your
smartphone is connected to the audio system.
You can also adjust the clock by touching the clock
displayed on the upper right corner of the display.
1. Touch the clock on the display for a few seconds.
2. Select Clock Adjustment .
3. Select or to change hour.
4. Select or to change minute, then select OK.
Models with Display Audio
Models with Display Audio
34
34
34
34
20 CR-V PET ELP_MAP_HMIN_HCM_J-31TLA6310.book 133 ページ 2019年10月3日 木曜日 午後4時55分