engine oil indicator HONDA CR-V 2020 Owner's Manual (in English)
[x] Cancel search | Manufacturer: HONDA, Model Year: 2020, Model line: CR-V, Model: HONDA CR-V 2020Pages: 671, PDF Size: 33.11 MB
Page 83 of 671
81
uuIndicators u
Continued
Instrument Panel
*1:Models with the smart entry system have an ENGINE START/STOP button instead of an ignition switch.
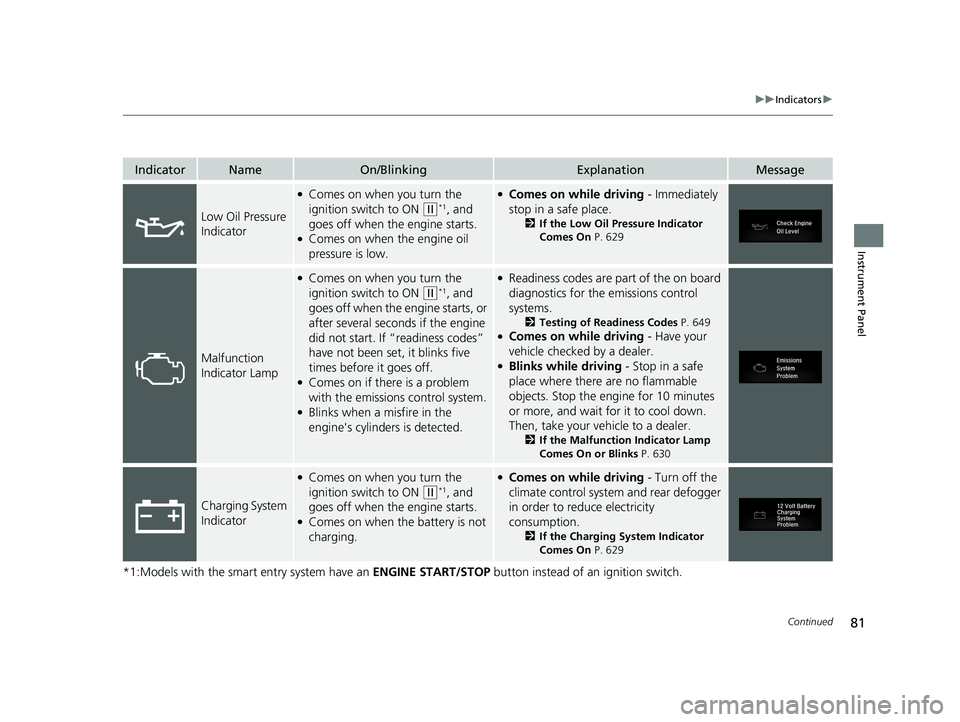
IndicatorNameOn/BlinkingExplanationMessage
Low Oil Pressure
Indicator
●Comes on when you turn the
ignition switch to ON
(w*1, and
goes off when the engine starts.
●Comes on when the engine oil
pressure is low.
●Comes on while driving - Immediately
stop in a safe place.
2 If the Low Oil Pressure Indicator
Comes On P. 629
Malfunction
Indicator Lamp
●Comes on when you turn the
ignition switch to ON
(w*1, and
goes off when the engine starts, or
after several seconds if the engine
did not start. If “readiness codes”
have not been set, it blinks five
times before it goes off.
●Comes on if there is a problem
with the emissions control system.
●Blinks when a misfire in the
engine's cylinders is detected.
●Readiness codes are part of the on board
diagnostics for the emissions control
systems.
2 Testing of Readiness Codes P. 649●Comes on while driving - Have your
vehicle checked by a dealer.
●Blinks while driving - Stop in a safe
place where there are no flammable
objects. Stop the engine for 10 minutes
or more, and wait for it to cool down.
Then, take your vehicle to a dealer.
2 If the Malfunction Indicator Lamp
Comes On or Blinks P. 630
Charging System
Indicator
●Comes on when you turn the
ignition switch to ON
(w*1, and
goes off when the engine starts.
●Comes on when the battery is not
charging.
●Comes on while driving - Turn off the
climate control system and rear defogger
in order to reduce electricity
consumption.
2 If the Charging System Indicator
Comes On P. 629
20 CR-V PET ELP_MAP_HMIN_HCM_J-31TLA6310.book 81 ページ 2019年10月3日 木曜日 午後4時55分
Page 220 of 671
uuInterior Lights/Interior Convenience Items uInterior Convenience Items
218
Controls
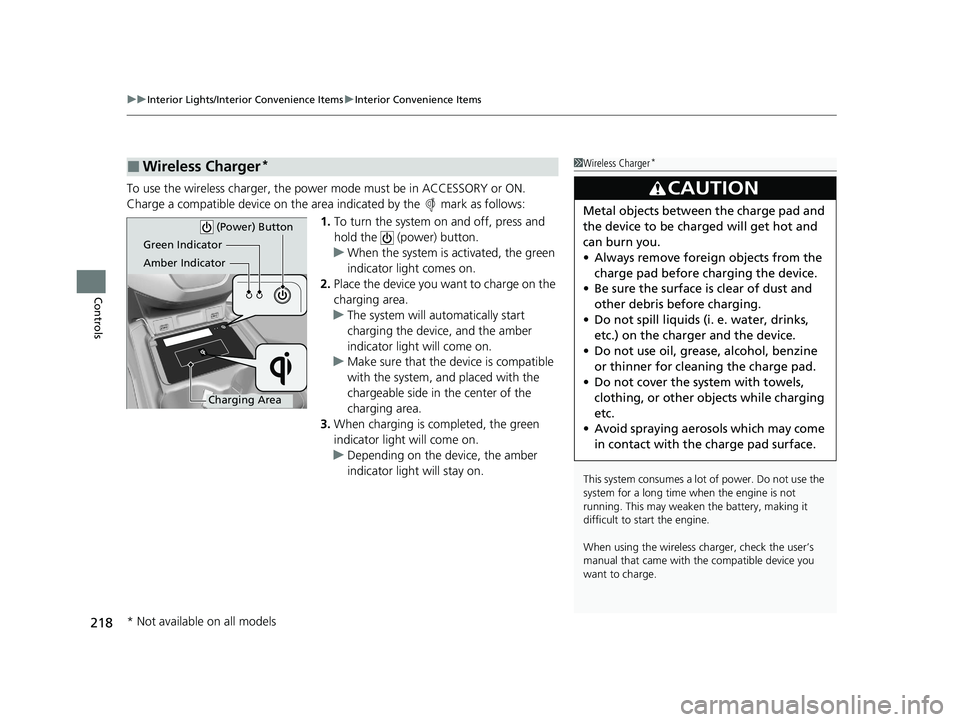
To use the wireless charger, the powe r mode must be in ACCESSORY or ON.
Charge a compatible device on the ar ea indicated by the mark as follows:
1. To turn the system on and off, press and
hold the (power) button.
u When the system is activated, the green
indicator light comes on.
2. Place the device you want to charge on the
charging area.
u The system will automatically start
charging the device, and the amber
indicator light will come on.
u Make sure that the device is compatible
with the system, a nd placed with the
chargeable side in the center of the
charging area.
3. When charging is completed, the green
indicator light will come on.
u Depending on the device, the amber
indicator light will stay on.
■Wireless Charger*1Wireless Charger*
This system consumes a lot of power. Do not use the
system for a long time when the engine is not
running. This may weaken the battery, making it
difficult to start the engine.
When using the wireless charger, check the user’s
manual that came with th e compatible device you
want to charge.
3CAUTION
Metal objects between the charge pad and
the device to be charged will get hot and
can burn you.
• Always remove foreign objects from the
charge pad before charging the device.
• Be sure the surface is clear of dust and
other debris before charging.
• Do not spill liquids (i. e. water, drinks,
etc.) on the charger and the device.
• Do not use oil, grease, alcohol, benzine
or thinner for cleaning the charge pad.
• Do not cover the system with towels,
clothing, or other objects while charging
etc.
• Avoid spraying aerosols which may come
in contact with the charge pad surface.
Green Indicator
Amber Indicator
Charging Area (Power) Button
* Not available on all models
20 CR-V PET ELP_MAP_HMIN_HCM_J-31TLA6310.book 218 ページ 2019年10月3日 木曜日 午後4時55分
Page 548 of 671
546
Driving
Parking Your Vehicle
When Stopped
1.Depress the brake pedal firmly.
2. With the brake pedal depressed, pull up th e electric parking brake switch slowly,
but fully.
3. Move the shift lever from
(D to (P.
4. Turn off the engine.
u The parking brake and brake system in dicator goes off in about 15 seconds.
Always confirm the electric parking brake is se t, in particular if you are parked on an
incline.
1 Parking Your Vehicle
Do not park your vehicle near flammable objects,
such as dry grass, oil, or timber.
Heat from the exhaust can cause a fire.
3WARNING
The vehicle can roll aw ay if left unattended
without confirming that Park is engaged.
A vehicle that rolls away could cause a crash
resulting in seriou s injury or death.
Always keep your foot on the brake pedal
until you have confirmed that
( P is shown
on the shift lever position indicator.
1When Stopped
After shutting off the engi ne, you may hear certain
noises coming from the vehicle. Here’s the lowdown:
•Noise from Under Vehicle: This noise is caused by
the vacuum pump inside the fuel evaporation
leakage check module (ELCM).
Depending on conditions, the pump will come on for
about 15 minutes about 5 to 10 hours after engine
shutoff. This noise is ju st normal vehicle operation
and don’t indicate a vehicle problem.
20 CR-V PET ELP_MAP_HMIN_HCM_J-31TLA6310.book 546 ページ 2019年10月3日 木曜日 午後4時55分
Page 561 of 671
559
Maintenance
This chapter discusses basic maintenance.
Before Performing MaintenanceInspection and Maintenance ............ 560
Safety When Performing Maintenance ..561Parts and Fluids Used in Maintenance Service ........................................... 562
Maintenance Minder
TM..................... 563
Maintenance Under the Hood Maintenance Items Under the Hood .. 569
Opening the Hood ........................... 570
Recommended Engine Oil ................ 571
Oil Check ......................................... 572
Adding Engine Oil ............................ 573
Changing the Engine Oil and Oil Filter ...574
Engine Coolant ................................ 576
Transmission Fluid ............................ 578
Brake Fluid ....................................... 579
Refilling Window Wa sher Fluid......... 580
Replacing Light Bulbs ....................... 581
Checking and Maintaining Wiper Blades.. 586Checking and Maintaining Tires
Checking Tires ................................. 590
Tire and Loading Information Label ...... 591Tire Labeling .................................... 591DOT Tire Quality Grading (U.S. Vehicles).. 593Wear Indicators................................ 595
Tire Service Life ................................ 595 Tire and Wheel Replacement ........... 596
Tire Rotation .................................... 597
Winter Tires ..................................... 598
Battery ............................................... 599
Remote Transmitter Care Replacing the Button Battery ........... 601
Climate Control System Maintenance .. 603Cleaning
Interior Care .................................... 604
Exterior Care.................................... 606
Accessories and Modifications .......... 609
20 CR-V PET ELP_MAP_HMIN_HCM_J-31TLA6310.book 559 ページ 2019年10月3日 木曜日 午後4時55分
Page 567 of 671
565
uuMaintenance MinderTMuTo Use Maintenance MinderTM
Continued
Maintenance
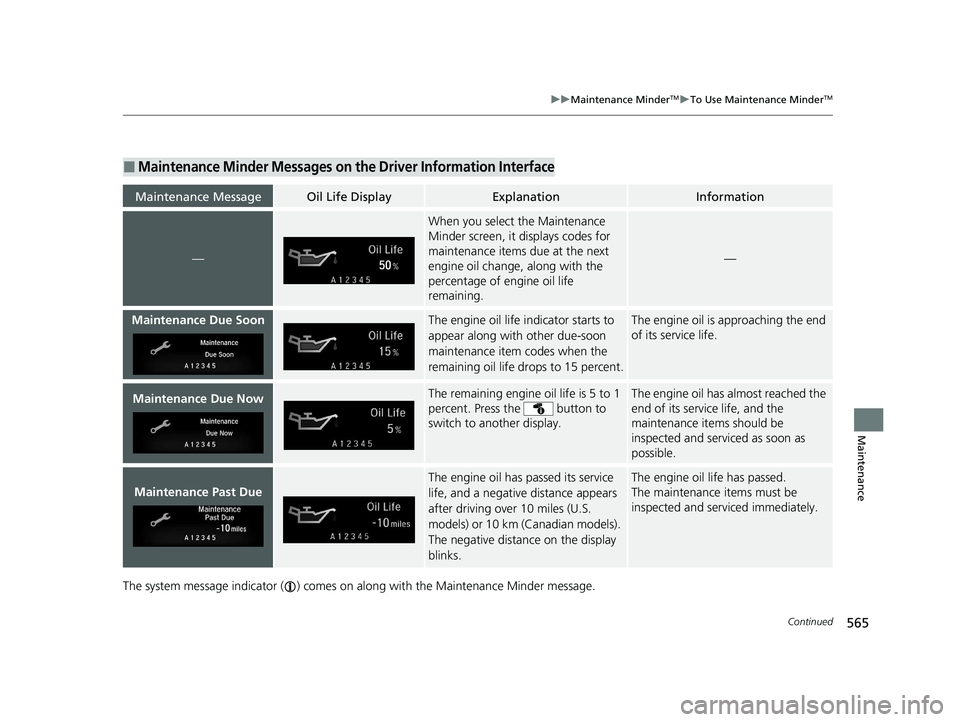
The system message indicator ( ) comes on along with the Maintenance Minder message.
■Maintenance Minder Messages on the Driver Information Interface
Maintenance MessageOil Life DisplayExplanationInformation
—
When you select the Maintenance
Minder screen, it displays codes for
maintenance items due at the next
engine oil change, along with the
percentage of engine oil life
remaining.
—
Maintenance Due SoonThe engine oil life indicator starts to
appear along with other due-soon
maintenance item codes when the
remaining oil life drops to 15 percent.The engine oil is approaching the end
of its service life.
Maintenance Due NowThe remaining engine oil life is 5 to 1
percent. Press the button to
switch to another display.The engine oil has almost reached the
end of its service life, and the
maintenance items should be
inspected and serviced as soon as
possible.
Maintenance Past Due
The engine oil has passed its service
life, and a negative distance appears
after driving over 10 miles (U.S.
models) or 10 km (Canadian models).
The negative distance on the display
blinks.The engine oil life has passed.
The maintenance items must be
inspected and serviced immediately.
20 CR-V PET ELP_MAP_HMIN_HCM_J-31TLA6310.book 565 ページ 2019年10月3日 木曜日 午後4時55分
Page 568 of 671
566
uuMaintenance MinderTMuTo Use Maintenance MinderTM
Maintenance
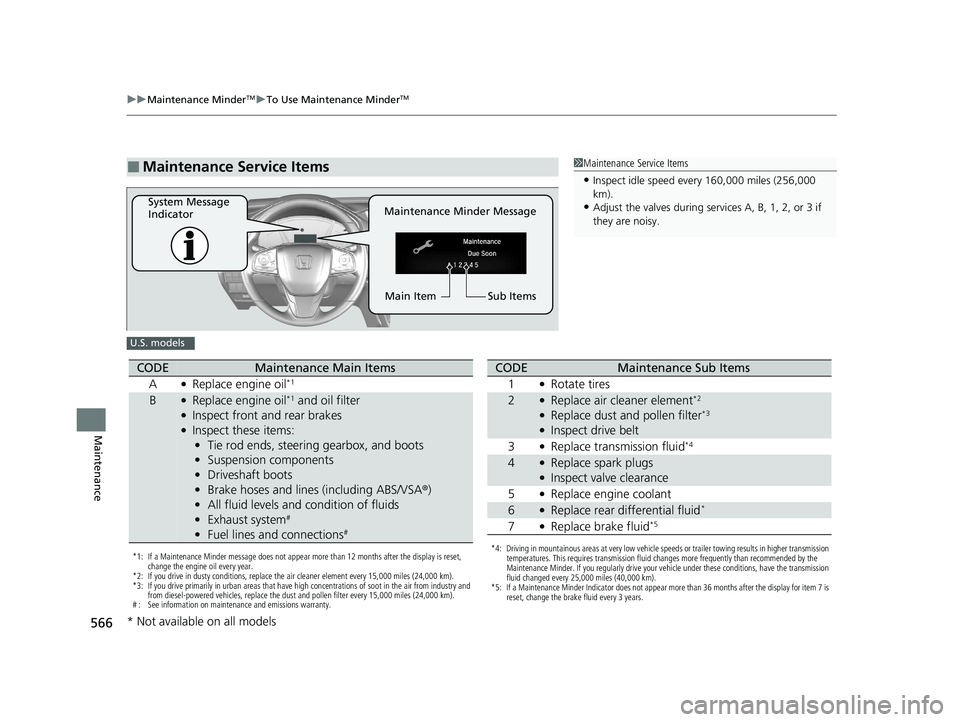
■Maintenance Service Items1Maintenance Service Items
•Inspect idle speed every 160,000 miles (256,000
km).
•Adjust the valves during services A, B, 1, 2, or 3 if
they are noisy.Maintenance Minder Message
System Message
Indicator
Sub Items
Main Item
U.S. models
*1: If a Maintenance Minder message does not appear more than 12 months after the display is reset,
change the engine oil every year.
*2: If you drive in dusty conditions, replace the air cleaner element every 15,000 miles (24,000 km).
*3: If you drive primarily in urban areas that have high concentrations of soot in the air from industry and from diesel-powered vehicles, replace the dust and pollen filter every 15,000 miles (24,000 km).
# : See information on maintenance and emissions warranty.
CODEMaintenance Main Items
A
●Replace engine oil*1
B●Replace engine oil*1 and oil filter●Inspect front and rear brakes●Inspect these items: • Tie rod ends, steering gearbox, and boots
• Suspension components
• Driveshaft boots
• Brake hoses and lines (including ABS/VSA®)
• All fluid levels and condition of fluids
• Exhaust system
#
•Fuel lines and connections#
*4: Driving in mountainous areas at very low vehicle speeds or trailer towing results in higher transmission
temperatures. This requires transmission fluid changes more frequently than recommended by the
Maintenance Minder. If you regularly drive your vehicle under these conditions, have the transmission
fluid changed every 25,000 miles (40,000 km).
*5: If a Maintenance Minder Indicator does not appear more than 36 months after the display for item 7 is reset, change the brake fluid every 3 years.
CODEMaintenance Sub Items
1
●Rotate tires
2●Replace air cleaner element*2
●Replace dust and pollen filter*3
●Inspect drive belt
3
●Replace transmission fluid*4
4●Replace spark plugs●Inspect valve clearance
5
●Replace engine coolant
6●Replace rear differential fluid*
7●Replace brake fluid*5
* Not available on all models
20 CR-V PET ELP_MAP_HMIN_HCM_J-31TLA6310.book 566 ページ 2019年10月3日 木曜日 午後4時55分
Page 569 of 671
567
uuMaintenance MinderTMuTo Use Maintenance MinderTM
Continued
Maintenance
1Maintenance Service Items
•Inspect idle speed every 256,000 km (160,000
miles).
•Adjust the valves during services A, 0, 9, 1, 2, or 3
if they are noisy.
Canadian models
*1: If a Maintenance Minder message does not appear more than 12 months after the display is reset,
change the engine oil every year.
*2: If you drive in dusty conditions, replace the air cleaner element every 24,000 km (15,000 miles).
*3: If you drive primarily in urban areas that have high concentrations of soot in the air from industry and from diesel-powered vehicles, replace the dust and pollen filter every 24,000 km (15,000 miles).
*4: Driving in mountainous areas at very low vehicle speeds or trailer towing results in higher transmission
temperatures. This requires transmission fluid changes more frequently than recommended by the
Maintenance Minder. If you regularly drive your vehicle under these conditions, have the transmission
fluid changed every 40,000 km (25,000 miles).
*5: If a Maintenance Minder Indicator does not appear more than 36 months after the display for item 7 is reset, change the brake fluid every 3 years.
# : See information on maintenance and emissions warranty.
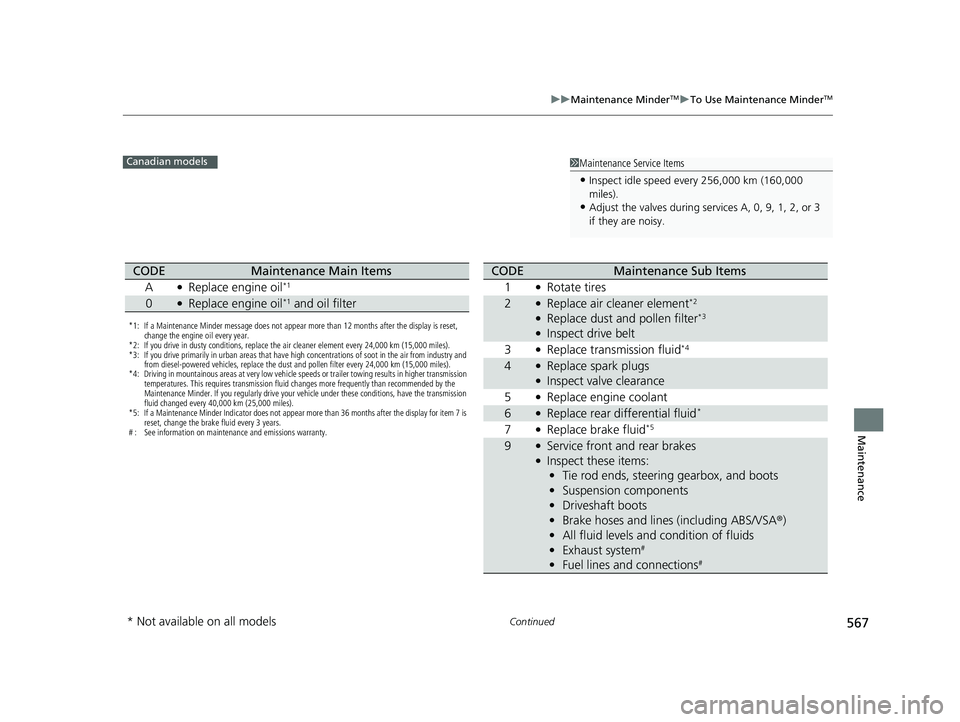
CODEMaintenance Main Items
A
●Replace engine oil*1
0●Replace engine oil*1 and oil filter
CODEMaintenance Sub Items
1
●Rotate tires
2●Replace air cleaner element*2
●Replace dust and pollen filter*3
●Inspect drive belt
3
●Replace transmission fluid*4
4●Replace spark plugs●Inspect valve clearance
5
●Replace engine coolant
6●Replace rear differential fluid*
7●Replace brake fluid*5
9●Service front and rear brakes●Inspect these items: • Tie rod ends, steering gearbox, and boots
• Suspension components
• Driveshaft boots
• Brake hoses and lines (including ABS/VSA ®)
• All fluid levels and condition of fluids
• Exhaust system
#
•Fuel lines and connections#
* Not available on all models
20 CR-V PET ELP_MAP_HMIN_HCM_J-31TLA6310.book 567 ページ 2019年10月3日 木曜日 午後4時55分
Page 577 of 671
575
uuMaintenance Under the Hood uChanging the Engine Oil and Oil Filter
Maintenance
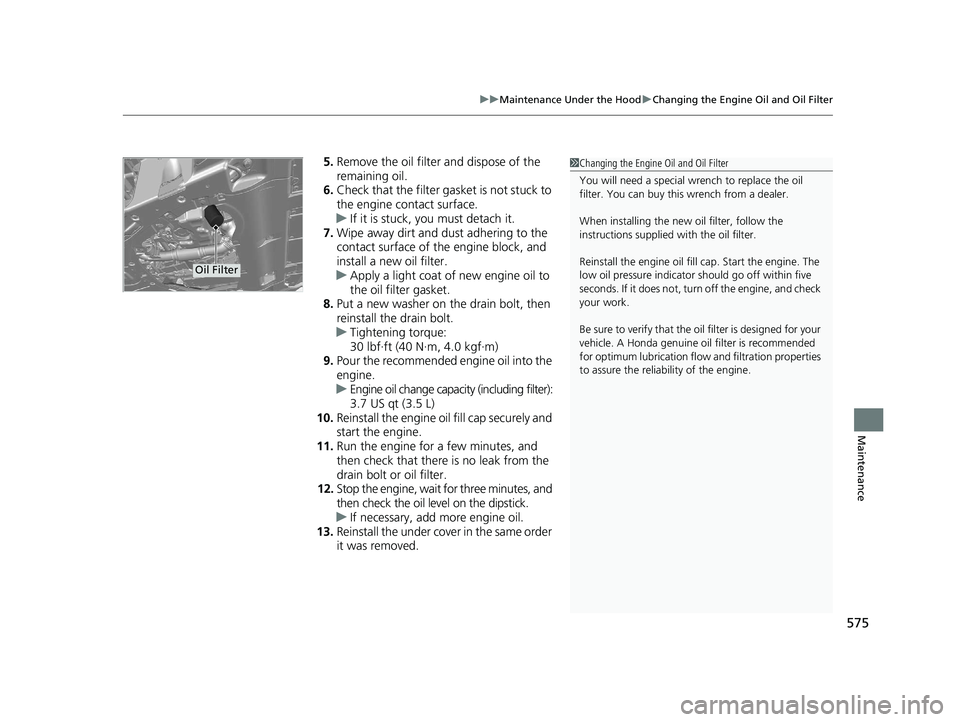
5. Remove the oil filter and dispose of the
remaining oil.
6. Check that the filter gasket is not stuck to
the engine contact surface.
u If it is stuck, you must detach it.
7. Wipe away dirt and dust adhering to the
contact surface of the engine block, and
install a new oil filter.
u Apply a light coat of new engine oil to
the oil filter gasket.
8. Put a new washer on the drain bolt, then
reinstall the drain bolt.
u Tightening torque:
30 lbf∙ft (40 N∙m, 4.0 kgf∙m)
9. Pour the recommended engine oil into the
engine.
u Engine oil change capacity (including filter):
3.7 US qt (3.5 L)
10. Reinstall the engine oil fill cap securely and
start the engine.
11. Run the engine for a few minutes, and
then check that there is no leak from the
drain bolt or oil filter.
12. Stop the engine, wait for three minutes, and
then check the oil level on the dipstick.
u If necessary, add more engine oil.
13. Reinstall the under cover in the same order
it was removed.1Changing the Engine Oil and Oil Filter
You will need a special wrench to replace the oil
filter. You can buy this wrench from a dealer.
When installing the new oil filter, follow the
instructions supplied with the oil filter.
Reinstall the engine oil fill cap. Start the engine. The
low oil pressure indicator should go off within five
seconds. If it does not, turn off the engine, and check
your work.
Be sure to verify that the o il filter is designed for your
vehicle. A Honda genuine oil filter is recommended
for optimum lubrication flow and filtration properties
to assure the reliability of the engine.
Oil Filter
20 CR-V PET ELP_MAP_HMIN_HCM_J-31TLA6310.book 575 ページ 2019年10月3日 木曜日 午後4時55分
Page 613 of 671
611
Handling the Unexpected
This chapter explains how to handle unexpected troubles.
ToolsTypes of Tools .................................. 612
If a Tire Goes Flat Changing a Flat Tire ......................... 613
Engine Does Not Start Checking the Engine ........................ 620
If the Smart Entry Remote Battery is Weak .......................................... 621
Emergency Engine Stop ................... 622
Jump Starting .................................... 623
Shift Lever Does Not Move .............. 626
Overheating How to Handle Overheating ............. 627 Indicator, Coming On/Blinking
If the Low Oil Pressu
re Indicator Comes
On................................................ 629
If the Charging System Indicator Comes
On ................................................. 629
If the Malfunction Indicator Lamp Comes On or Blinks ................................... 630
If the Brake System Indicator (Red) Comes On or Blinks ....................................... 631
If the Brake System Indicator (Red) Comes On or
Blinks at the Same Time When the Brake
System Indicator (Amber) Comes On ..... 632
If the Electric Power Steering (EPS) System Indicator Comes On ........................... 633
If the Low Tire Pressure/TPMS Indicator Comes On or Blinks ....................... 634
Fuses Fuse Locations ................................. 635
Inspecting and Changing Fuses ........ 639
Emergency Towing ........................... 640
When You Cannot Open the Tailgate.. 641Refueling................................................. 642
20 CR-V PET ELP_MAP_HMIN_HCM_J-31TLA6310.book 611 ページ 2019年10月3日 木曜日 午後4時55分
Page 631 of 671
629
Handling the Unexpected
Indicator, Coming On/Blinking
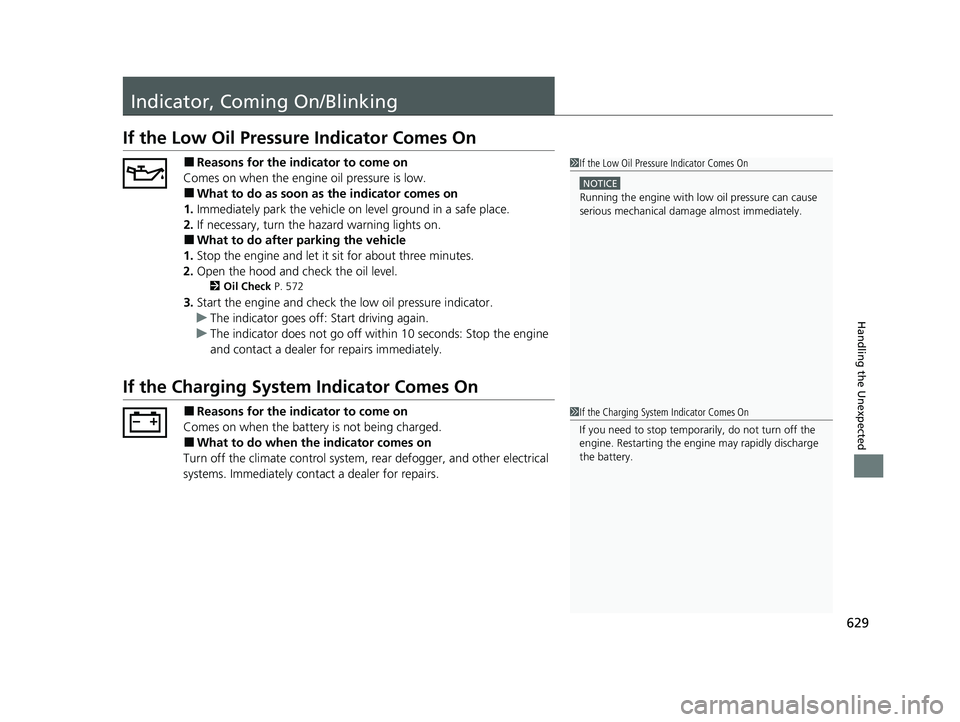
If the Low Oil Pressure Indicator Comes On
■Reasons for the indicator to come on
Comes on when the engine oil pressure is low.
■What to do as soon as the indicator comes on
1. Immediately park the vehicle on level ground in a safe place.
2. If necessary, turn the hazard warning lights on.
■What to do after parking the vehicle
1. Stop the engine and let it sit for about three minutes.
2. Open the hood and check the oil level.
2 Oil Check P. 572
3.Start the engine and check th e low oil pressure indicator.
u The indicator goes off: Start driving again.
u The indicator does not go off within 10 seconds: Stop the engine
and contact a dealer for repairs immediately.
If the Charging System Indicator Comes On
■Reasons for the indicator to come on
Comes on when the battery is not being charged.
■What to do when th e indicator comes on
Turn off the climate control system, rear defogger, and other electrical
systems. Immediately cont act a dealer for repairs.
1If the Low Oil Pressure Indicator Comes On
NOTICE
Running the engine with low oil pressure can cause
serious mechanical damage almost immediately.
1If the Charging System Indicator Comes On
If you need to stop temporarily, do not turn off the
engine. Restarting the engi ne may rapidly discharge
the battery.
20 CR-V PET ELP_MAP_HMIN_HCM_J-31TLA6310.book 629 ページ 2019年10月3日 木曜日 午後4時55分