automatic transmission HONDA CR-Z 2013 1.G Owner's Manual
[x] Cancel search | Manufacturer: HONDA, Model Year: 2013, Model line: CR-Z, Model: HONDA CR-Z 2013 1.GPages: 325, PDF Size: 11.73 MB
Page 184 of 325
183
uuWhen DrivinguShifting
Continued
Driving
Shifting
Change the shift position in accordance with your driving needs.
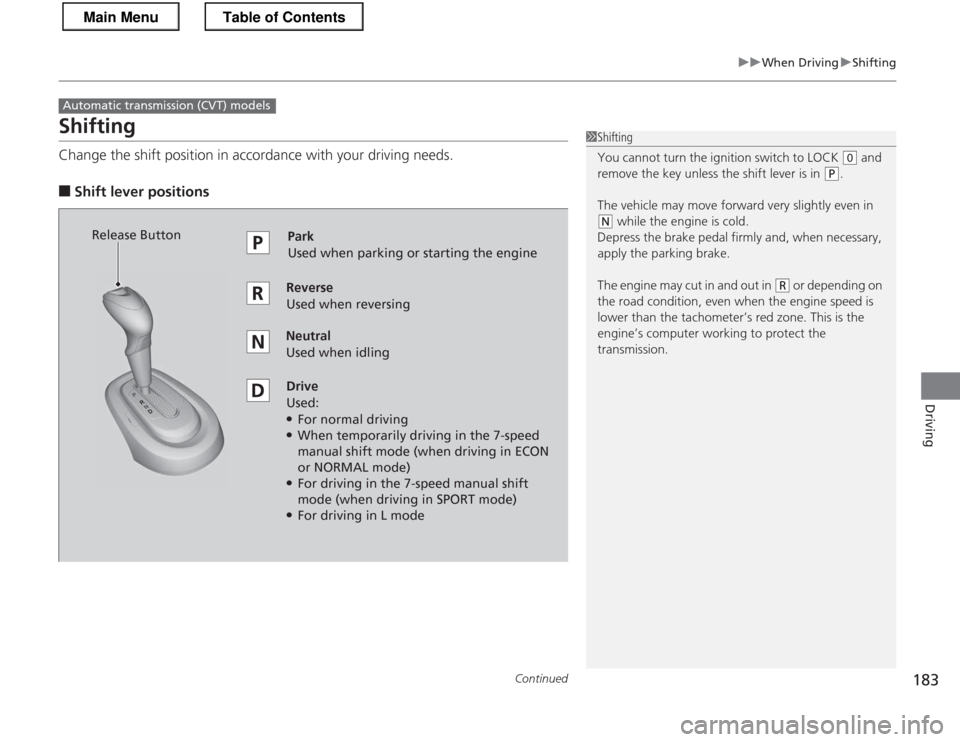
■ Shift lever positions
Automatic transmiss ion (CVT) models
1Shifting
You cannot turn the ignition switch to LOCK
(0 and
remove the key unless the shift lever is in
(P.
The vehicle may move forward very slightly even in
(N while the engine is cold.
Depress the brake pedal firmly and, when necessary,
apply the parking brake.
The engine may cut in and out in
(R or depending on
the road condition, even when the engine speed is
lower than the ta chometer’s red zone. This is the
engine’s computer working to protect the
transmission.
Park
Used when parking or starting the engine
ReverseUsed when reversing
Neutral Used when idling
Drive Used:● For normal driving
● When temporarily driving in the 7-speed
manual shift mode (when driving in ECON
or NORMAL mode)
● For driving in the 7-speed manual shift
mode (when driving in SPORT mode)
● For driving in L mode
Release Button
Main MenuTable of Contents
Page 186 of 325
Continued185
uuWhen DrivinguShifting
Driving
Use the paddle shifters to change between 1st and 7th speeds without removing
your hands from the steering wheel. The transmission switches to the 7-speed
manual shift mode when you pull a paddle shifter while driving. This mode is useful
when engine braking is needed.
You can cancel this mode by pressing any of the three driving mode buttons, or
pulling the
(+ paddle shifter for a few seconds.
■ When the driving mode is in ECON or NORMAL
The shift mode goes into the 7-speed manual shift mode temporarily, and the
number is displayed in the shift indicator.
The 7-speed manual shift mode is canceled automatically if you drive at constant
speed or accelerate, and the number in the shift indicator goes off.
The 7-speed manual shift mode is especially useful when reducing the vehicle speed
temporarily before making a turn. ■ When the driving mo de is in SPORT
The shift mode goes into the 7-speed manual shift mode. The M indicator and the
speed number are displayed in the shift indicat or. As the vehicle speed slows down,
the transmission automatically shifts down accordingly. When the vehicle comes to
a stop, it automatically shifts down into 1st.
If the vehicle speed increases and the engine speed reaches near the tachometer’s
red zone, the transmission automatically shifts up.
■7-Speed Manual Shift Mode17-Speed Manual Shift Mode
To improve fuel economy, the transmission may shift
up to a higher speed than the seventh under certain circumstances. In this case, the number in the shift
indicator remains as 7.
In the 7-speed manual shift mode, the transmission
shifts up or down by operating either paddle shifter
under the following conditions:
Shift Up: The engine speed reaches the lowest
threshold of the higher speed position.
Shift Down: The engine speed reaches the highest
threshold of the lower speed position.
When the engine speed reaches near the
tachometer’s red zone, the transmission shifts up
automatically.
When the engine speed reaches the lowest threshold
of the selected speed position, the transmission shifts down automatically.
Operating the paddle shifters on slippery surfaces
may cause the tires to lock up. In this case, the 7-
speed manual shift mode is canceled and goes back
to the normal D driving mode.
Main MenuTable of Contents
Page 195 of 325
194
uuWhen DrivinguAuto Idle Stop
Driving
Auto Idle Stop
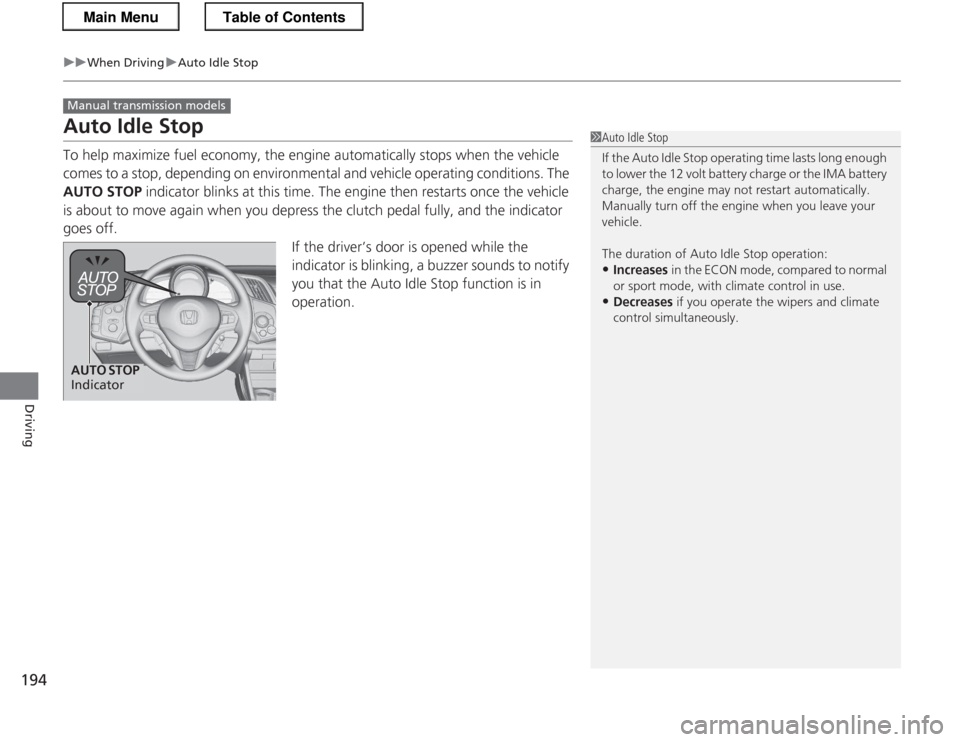
To help maximize fuel economy, the engine automatically stops when the vehicle
comes to a stop, depending on environmental and vehicle operating conditions. The
AUTO STOP indicator blinks at this time. The engine then restarts once the vehicle
is about to move again when you depress the clutch pedal fully, and the indicator
goes off.
If the driver’s door is opened while the
indicator is blinking, a buzzer sounds to notify
you that the Auto Idle Stop function is in operation.
Manual transmission models
1Auto Idle Stop
If the Auto Idle Stop operating time lasts long enough
to lower the 12 volt battery charge or the IMA battery charge, the engine may not restart automatically.
Manually turn off the engine when you leave your
vehicle.
The duration of Auto Idle Stop operation:• Increases in the ECON mode, compared to normal
or sport mode, with climate control in use.
• Decreases if you operate the wipers and climate
control simultaneously.
AUTO STOP
Indicator
Main MenuTable of Contents
Page 203 of 325
uuWhen DrivinguCruise Control
202
Driving
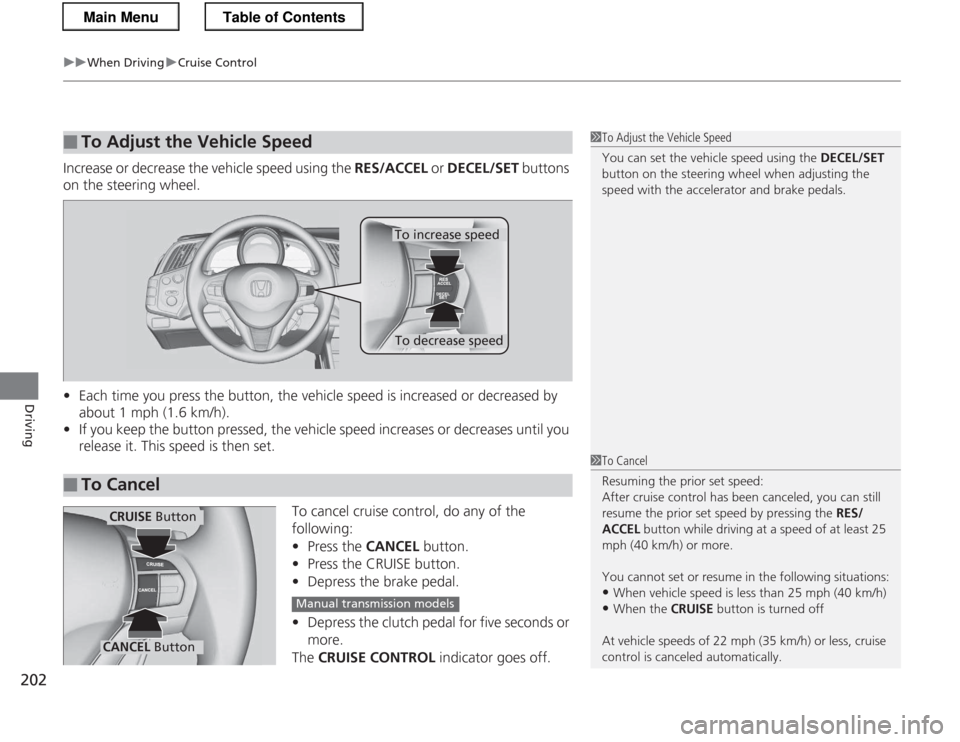
Increase or decrease the vehicle speed using the RES/ACCEL or DECEL/SET buttons
on the steering wheel. • Each time you press the button, the vehicle speed is increased or decreased by
about 1 mph (1.6 km/h).
• If you keep the button pressed, the vehicle speed increases or decreases until you
release it. This speed is then set.
To cancel cruise control, do any of the
following: • Press the CANCEL button.
• Press the CRUISE button.
• Depress the brake pedal.
• Depress the clutch pedal for five seconds or more.
The CRUISE CONTROL indicator goes off.
■To Adjust the Vehicle Speed1To Adjust the Vehicle Speed
You can set the vehicle speed using the DECEL/SET
button on the steering wheel when adjusting the
speed with the accelerator and brake pedals.
■To Cancel
To decrease speed
To increase speed
1To Cancel
Resuming the prior set speed:
After cruise control has been canceled, you can still
resume the prior set speed by pressing the RES/
ACCEL button while driving at a speed of at least 25
mph (40 km/h) or more.
You cannot set or resume in the following situations: • When vehicle speed is less than 25 mph (40 km/h)
• When the CRUISE button is turned off
At vehicle speeds of 22 mph (35 km/h) or less, cruise control is canceled automatically.
CRUISE Button
CANCEL Button
Manual transmission models
Main MenuTable of Contents
Page 213 of 325
212
Driving
Parking Your Vehicle
When Stopped 1.Depress the brake pedal firmly.
2. Firmly apply the parking brake.
3. Move the shift lever from
(D to (P.
3. Move the shift lever to
(1 or (R .
4. Turn off the engine.
Always set the parking brake firmly, in particular if you are parked on an incline.
1Parking Your Vehicle
Do not park your vehicle near flammable objects,
such as dry grass, oil, or timber.
Heat from the exhaust can cause a fire.
1When Stopped
NOTICE
The following can damage the transmission: • Depressing the accelerator and brake pedals
simultaneously.
• Holding the vehicle in place when facing uphill by
depressing the accelerator pedal.
• Moving the shift lever into
(P before the vehicle
stops completely.
Raise the wiper arms when snow is expected.
Automatic transmission (CVT) models
Automatic transmiss ion (CVT) models
Manual transmission models
Main MenuTable of Contents
Page 230 of 325
229
Maintenance
Maintenance Under the Hood
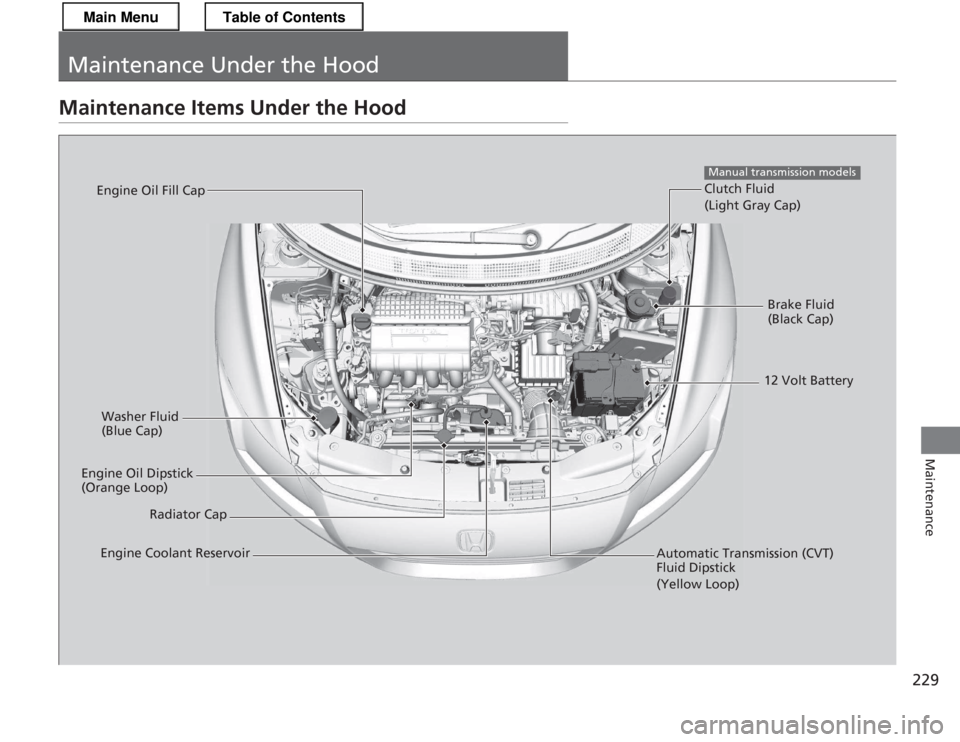
Maintenance Items Under the Hood
Brake Fluid
(Black Cap)
Clutch Fluid (Light Gray Cap)
Manual transmission models
Washer Fluid
(Blue Cap)
Engine Oil Dipstick
(Orange Loop) Radiator Cap
Engine Oil Fill Cap
Automatic Transmission (CVT) Fluid Dipstick (Yellow Loop)
Engine Coolant Reservoir 12 Volt Battery
Main MenuTable of Contents
Page 239 of 325
238
uuMaintenance Under the HooduTransmission Fluid
Maintenance
Transmission Fluid ■Continuously Variable Trans mission (CVT)
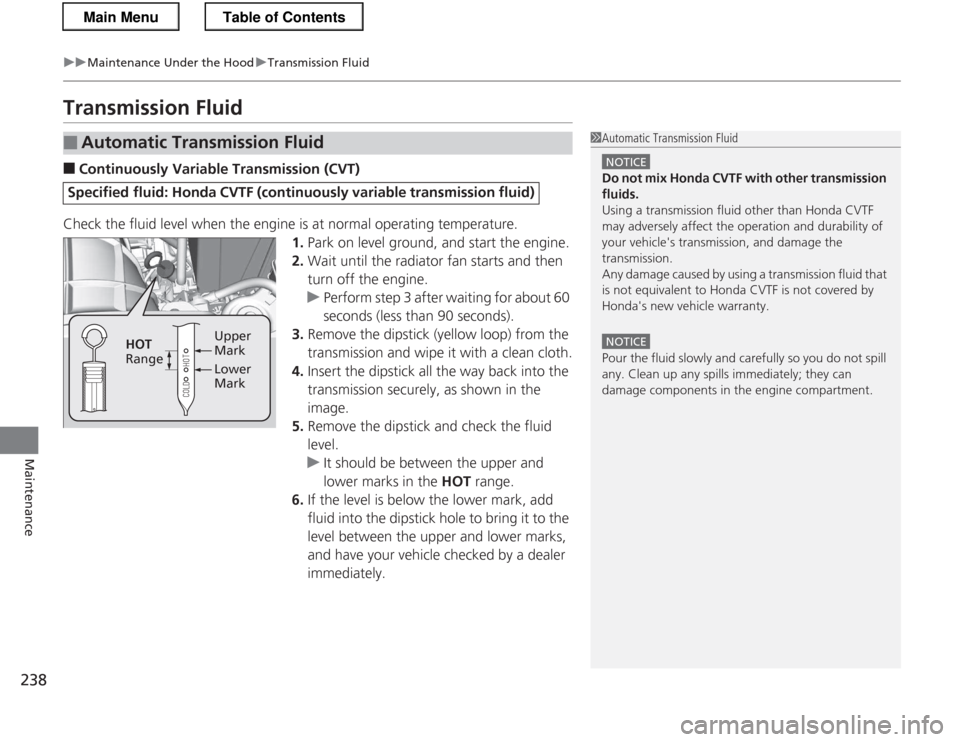
Check the fluid level when the engine is at normal operating temperature. 1.Park on level ground, and start the engine.
2. Wait until the radiator fan starts and then
turn off the engine.
uPerform step 3 after waiting for about 60
seconds (less than 90 seconds).
3. Remove the dipstick (yellow loop) from the
transmission and wipe it with a clean cloth.
4. Insert the dipstick all the way back into the
transmission securely, as shown in the image.
5. Remove the dipstick and check the fluid level.
uIt should be between the upper and
lower marks in the HOT range.
6. If the level is below the lower mark, add
fluid into the dipstick hole to bring it to the level between the upper and lower marks,
and have your vehicle checked by a dealer immediately.
■Automatic Transmission Fluid
Specified fluid: Hond a CVTF (continuously variabl e transmission fluid)
1Automatic Transmission Fluid
NOTICE
Do not mix Honda CVTF with other transmission fluids.
Using a transmission fluid other than Honda CVTF
may adversely affect the operation and durability of
your vehicle's transmission, and damage the
transmission.
Any damage caused by using a transmission fluid that
is not equivalent to Honda CVTF is not covered by Honda's new vehicle warranty.
NOTICE
Pour the fluid slowly and carefully so you do not spill
any. Clean up any spills immediately; they can
damage components in the engine compartment.
Upper Mark
Lower Mark
HOT
Range
Main MenuTable of Contents
Page 272 of 325
271
Continued
Handling the Unexpected
If a Tire Goes Flat
Changing a Flat Tire *
If a tire goes flat while driving, grasp the steering wheel firmly, and brake gradually
to reduce speed. Then, stop in a safe place. Replace the flat tire with a compact
spare tire. Go to a dealer as soon as possible to have the full-size tire repaired or
replaced. 1. Park the vehicle on firm, level, and non-slippery surface and apply the parking brake.
2. Move the shift lever to
(P .
2. Move the shift lever to
(R .
3. Turn on the hazard warning lights and turn the ignition switch to LOCK
(0 .
1Changing a Flat Tire *
Follow compact spare precautions:
Periodically check the tire pressure of the compact
spare. It should be set to the specified pressure.
Specified Pressure: 60 psi (420 kPa, 4.2 kgf/cm 2
)
When driving with the compact spare tire, keep the
vehicle speed under 50 mph (80 km/h). Replace with
a full-size tire as soon as possible.
The compact spare tire and wheel in your vehicle are
specifically for this model.
Do not use them with another vehicle.
Do not use another type of compact spare tire or
wheel with your vehicle.
Do not mount tire chains on a compact spare tire.
If a chain-mounted front tire goes flat, remove one of
the full-size rear tires and replace it with the compact
spare tire. Remove the flat front tire and replace it
with the full-size tire th at was removed from the rear.
Mount the tire chains on the front tire.
NOTICE
Do not use a puncture-repairing agent, other than
the one provided in the kit that came with your
vehicle. If used, you may permanently damage the
tire pressure sensor.
Automatic transmiss ion (CVT) models
Manual transmission models
All models
* Not available on all models
Main MenuTable of Contents
Page 278 of 325
277
uuIf a Tire Goes FlatuTemporarily Repairing a Flat Tire
Continued
Handling the Unexpected
Temporarily Repairing a Flat Tire
This vehicle is not equipped with a spare tire. If the tire has a large cut or is otherwise
severely damaged, you will need to have the vehicle towed. If the tire only has a
small puncture, from a nail for instance, you can use the temporary tire repair kit so
that you can drive to the nearest service station for a more permanent repair.
If a tire goes flat while driving, grasp the steering wheel firmly, and brake gradually
to reduce speed. Then stop in a safe place. 1.Park the vehicle on firm, level, and non-slippery surface, and apply the parking brake.
2. Move the shift lever to
(P .
2. Move the shift lever to
(R .
3. Turn on the hazard warning lights and turn the ignition switch to LOCK
(0 .
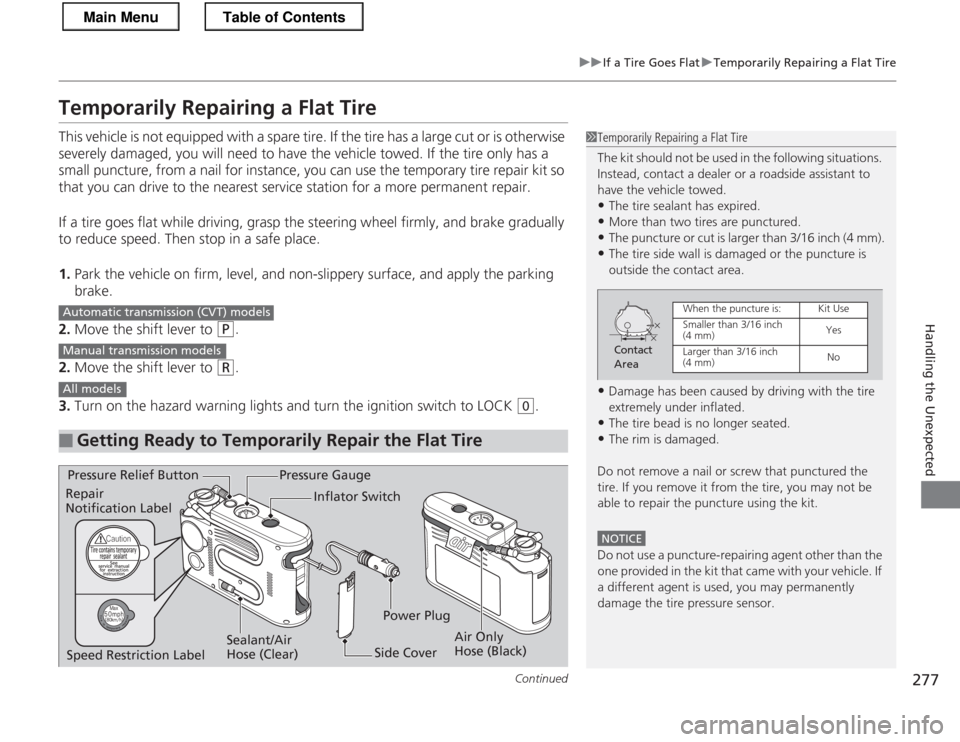
■Getting Ready to Temporarily Repair the Flat Tire
1Temporarily Repairing a Flat Tire
The kit should not be used in the following situations.
Instead, contact a dealer or a roadside assistant to
have the vehicle towed.
• The tire sealant has expired.
• More than two tires are punctured.
• The puncture or cut is larger than 3/16 inch (4 mm).
• The tire side wall is damaged or the puncture is
outside the contact area.
• Damage has been caused by driving with the tire
extremely under inflated.
• The tire bead is no longer seated.
• The rim is damaged.
Do not remove a nail or screw that punctured the
tire. If you remove it from the tire, you may not be
able to repair the puncture using the kit.
NOTICE
Do not use a puncture-repairing agent other than the
one provided in the ki t that came with your vehicle. If
a different agent is used, you may permanently damage the tire pressure sensor.
Contact
Area
When the puncture is:Kit Use
Smaller than 3/16 inch (4 mm)Yes
Larger than 3/16 inch (4 mm) No
Automatic transmiss ion (CVT) models
Manual transmission models
All models
Pressure Gauge
Sealant/Air
Hose (Clear)
Pressure Relief Button
Air Only
Hose (Black)
Inflator Switch
Side Cover
Repair Notification Label
Power Plug
Speed Restriction Label
Main MenuTable of Contents
Page 294 of 325
293
uuIndicator, Coming On/BlinkinguIf the Charging System Indicator Comes On
Handling the Unexpected
If the Charging System Indicator Comes On■Reasons for the indicator to come on
Comes on when the 12 volt battery is not being charged. ■ What to do when the indicator comes on
Turn off the climate control system, rear defogger, and other electrical
systems, and immediately contact a dealer for repairs.
1If the Charging System Indicator Comes On If you need to stop temporarily, do not turn off the
engine. Restarting the engine may rapidly discharge
the 12 volt battery.
This indicator may also come on when the Auto Idle
Stop function is activated for a while. Restart the
engine. 2 Auto Idle Stop P. 194
This indicator may also come on when the IMA
battery charge drops below a desired level.
The engine starts to recharge the battery. 2 Auto Idle Stop P. 191
The indicator goes off when the battery is being
charged normally.
This indicator may blink after starting when the
outside temperature is below -20°F (-30°C). It will stop blinking after the IMA battery warms up.
Manual transmission models
Automatic transmission (CVT) models
Main MenuTable of Contents