power steering HONDA CR-Z 2013 1.G Owners Manual
[x] Cancel search | Manufacturer: HONDA, Model Year: 2013, Model line: CR-Z, Model: HONDA CR-Z 2013 1.GPages: 325, PDF Size: 11.73 MB
Page 15 of 325
14
Quick Reference Guide
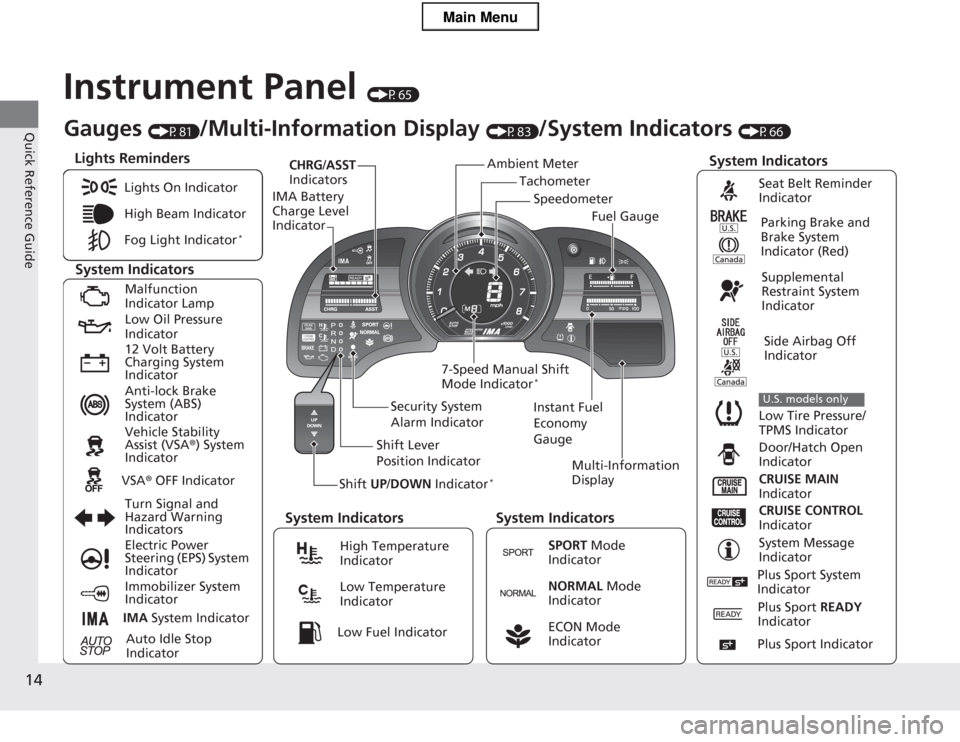
Instrument Panel (P65)
Tachometer
CHRG
/ASST
Indicators
IMA Battery Charge Level Indicator
Shift UP/DOWN Indicator * Multi-Information
Display
7-Speed Manual Shift Mode Indicator
*
System Indicators
Lights Reminders
Instant Fuel
Economy GaugeSpeedometer
Fuel Gauge
Security System
Alarm Indicator
Shift Lever
Position Indicator
Gauges
(P81)/Multi-Information Display (P83)/System Indicators (P66)
Ambient Meter
System Indicators System Indicators System Indicators
Lights On Indicator
High Beam Indicator
Fog Light Indicator
*
Malfunction
Indicator Lamp
Low Oil Pressure Indicator
12 Volt Battery
Charging System Indicator
Anti-lock Brake
System (ABS) Indicator
Vehicle Stability Assist (VSA
®) System
Indicator
VSA ® OFF Indicator
Turn Signal and
Hazard Warning
Indicators
Electric Power
Steering (EPS) System Indicator
Immobilizer System Indicator
IMA System Indicator
Auto Idle Stop
Indicator
Seat Belt Reminder
Indicator
Parking Brake and
Brake System Indicator (Red)
Supplemental
Restraint System
Indicator
Side Airbag Off
Indicator
Low Tire Pressure/
TPMS Indicator
U.S. models only
Door/Hatch Open
Indicator
CRUISE MAIN
Indicator
CRUISE CONTROL
Indicator
System Message
IndicatorHigh Temperature Indicator
Low Temperature Indicator
SPORT Mode
Indicator
NORMAL Mode
Indicator
ECON Mode
Indicator Low Fuel Indicator
Plus Sport System
Indicator
Plus Sport READY
Indicator
Plus Sport Indicator
Main Menu
Page 17 of 325
16
Quick Reference Guide
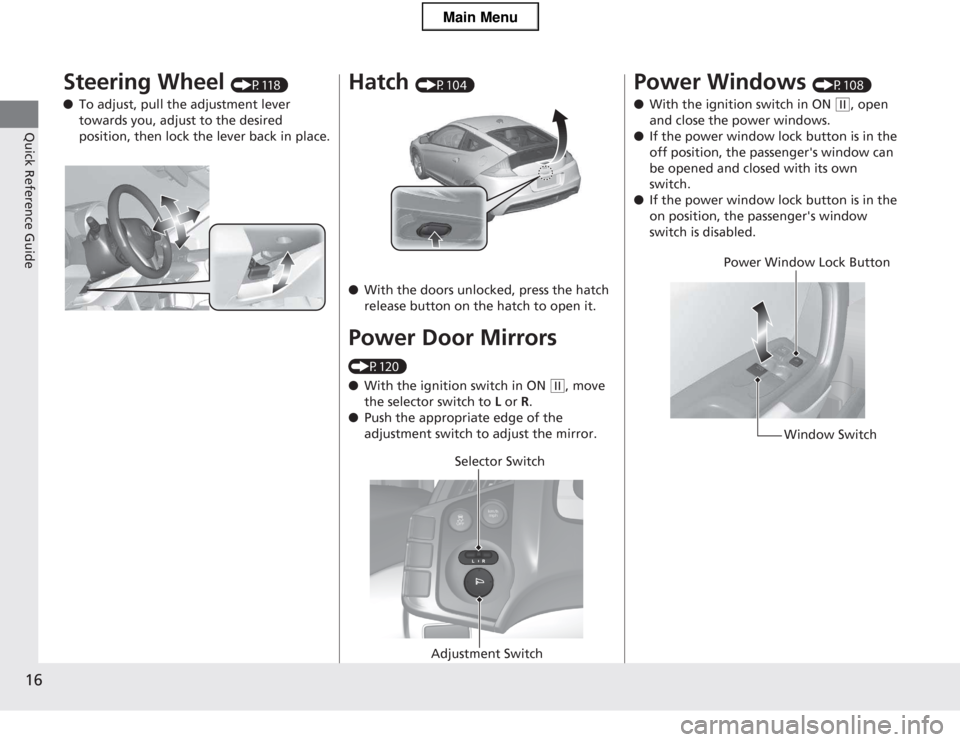
Steering Wheel (P118)
● To adjust, pull the adjustment lever
towards you, adjust to the desired
position, then lock the lever back in place.Hatch (P104)
● With the doors unlocked, press the hatch
release button on the hatch to open it.
Power Door Mirrors
(P120) ● With the ignition switch in ON
(w, move
the selector switch to L or R.
● Push the appropriate edge of the
adjustment switch to adjust the mirror.
Selector Switch
Adjustment Switch
Power Windows (P108)
● With the ignition switch in ON
(w, open
and close the power windows.
● If the power window lock button is in the
off position, the passenger's window can be opened and closed with its own
switch.
● If the power window lock button is in the
on position, the passenger's window
switch is disabled.
Power Window Lock Button
Window Switch
Main Menu
Page 20 of 325
19
Quick Reference Guide
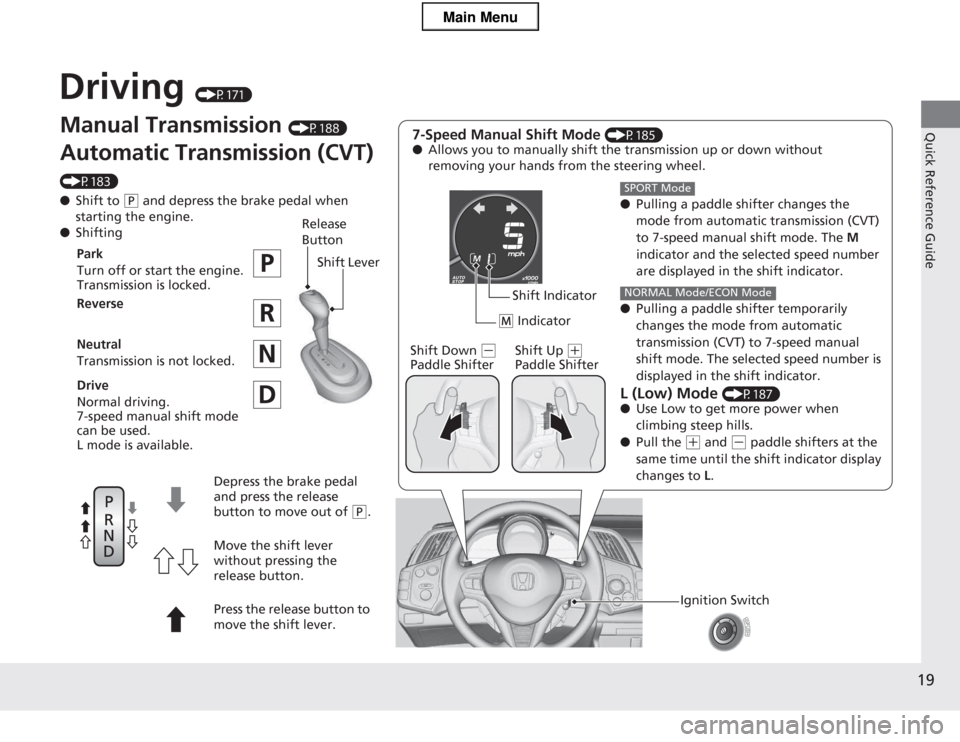
Driving (P171)
Manual Transmission (P188)
Automatic Transmission (CVT)
(P183) ● Shift to
(P and depress the brake pedal when
starting the engine.
● Shifting 7-Speed Manual Shift Mode
(P185)
● Allows you to manually shift the transmission up or down without
removing your hands from the steering wheel.
●Pulling a paddle shifter changes the
mode from automatic transmission (CVT)
to 7-speed manual shift mode. The M
indicator and the selected speed number
are displayed in the shift indicator.
● Pulling a paddle shifter temporarily
changes the mode from automatic
transmission (CVT) to 7-speed manual
shift mode. The selected speed number is
displayed in the shift indicator.
L (Low) Mode (P187)
● Use Low to get more power when
climbing steep hills.
● Pull the
(+ and (- paddle shifters at the
same time until the shift indicator display changes to L.
SPORT Mode
NORMAL Mode/ECON Mode
(
M Indicator
Shift Indicator
Shift Down
(-
Paddle Shifter Shift Up (+
Paddle Shifter
Ignition Switch
Release
ButtonShift Lever
Park
Turn off or start the engine.
Transmission is locked.
Reverse
Neutral
Transmission is not locked.
Drive
Normal driving.
7-speed manual shift mode can be used.
L mode is available.
Depress the brake pedal
and press the release button to move out of
(P.
Move the shift lever
without pressing the
release button.
Press the release button to
move the shift lever.
Main Menu
Page 72 of 325
71
uuIndicatorsu
Continued
Instrument Panel
IndicatorNameOn/BlinkingExplanationMessage
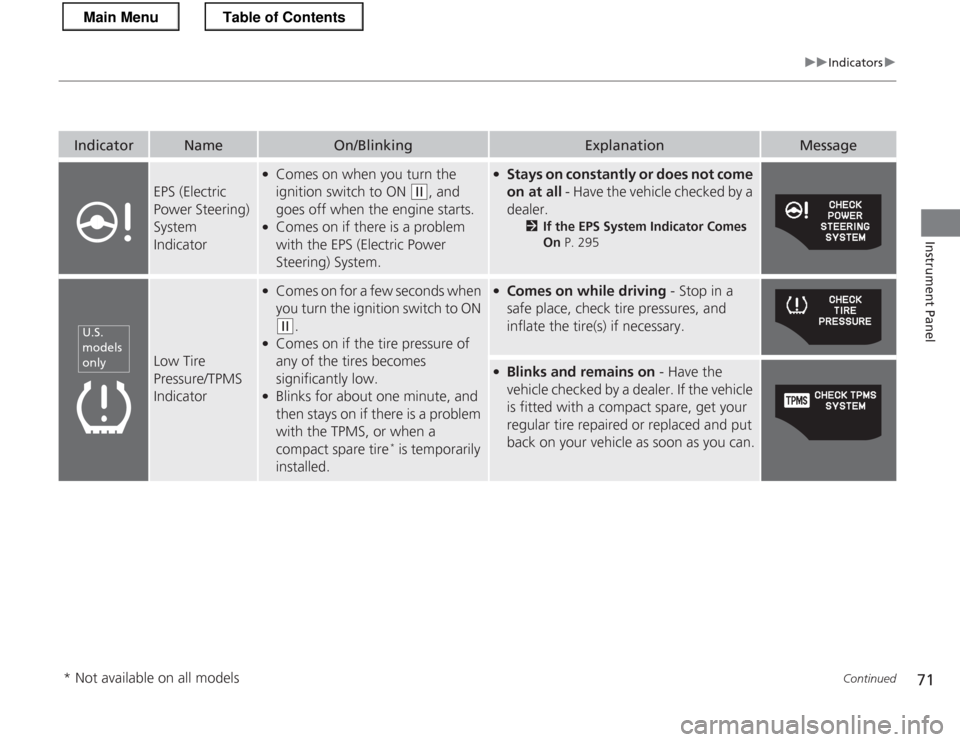
EPS (Electric
Power Steering) System
Indicator
●Comes on when you turn the ignition switch to ON
(w , and
goes off when the engine starts.
● Comes on if there is a problem
with the EPS (Electric Power Steering) System.
●Stays on constantly or does not come on at all - Have the vehicle checked by a
dealer. 2If the EPS System Indicator Comes On P. 295
Low Tire Pressure/TPMS
Indicator
●
Comes on for a few seconds when
you turn the ignition switch to ON
(w .
● Comes on if the tire pressure of
any of the tires becomes
significantly low.
● Blinks for about one minute, and
then stays on if there is a problem
with the TPMS, or when a
compact spare tire *
is temporarily
installed.
● Comes on while driving - Stop in a
safe place, check tire pressures, and
inflate the tire(s) if necessary.
● Blinks and remains on - Have the
vehicle checked by a dealer. If the vehicle
is fitted with a compact spare, get your
regular tire repaired or replaced and put
back on your vehicle as soon as you can.
U.S.
models only
* Not available on all models
Main MenuTable of Contents
Page 98 of 325
97
Controls
This chapter explains how to operate the various controls necessary for driving.
Setting the Clock................................ 98
Locking and Unlocking the Doors
Key Types and Functions .................... 99
Locking/Unlocking the Doors from the Outside .......................................... 100
Locking/Unlocking the Doors from the Inside ............................................. 102
Auto Door Locking/Unlocking .......... 103
Opening and Closing the Hatch ....... 104
Security System Immobilizer System .......................... 106
Security System Alarm ...................... 106
Opening and Closing the Windows ..... 108Operating the Switches Around the
Steering Wheel
Ignition Switch ................................. 110
Turn Signals ..................................... 111
Light Switches.................................. 111 Fog Lights *
...................................... 113
Daytime Running Lights ................... 113
Wipers and Washers ........................ 114
Brightness Control ........................... 116
Rear Defogger/Heated Door Mirror *
Button ........................................... 117
Adjusting the Steering Wheel........... 118 Adjusting the Mirrors
Interior Rearview Mirror ................... 119
Power Door Mirrors ......................... 120
Adjusting the Seats Adjusting the Seat Positions ............. 121
Interior Lights/Interior Convenience ItemsInterior Lights .................................. 126
Interior Convenience Items .............. 127
Climate Control System Using Automatic Climate Control .... 134
Automatic Climate Control Sensors ...... 136
* Not available on all models
Main Menu
Page 118 of 325
117
uuOperating the Switches Around the Steering WheeluRear Defogger/Heated Door Mirror*
Button
Controls
Rear Defogger/Heated Door Mirror *
Button
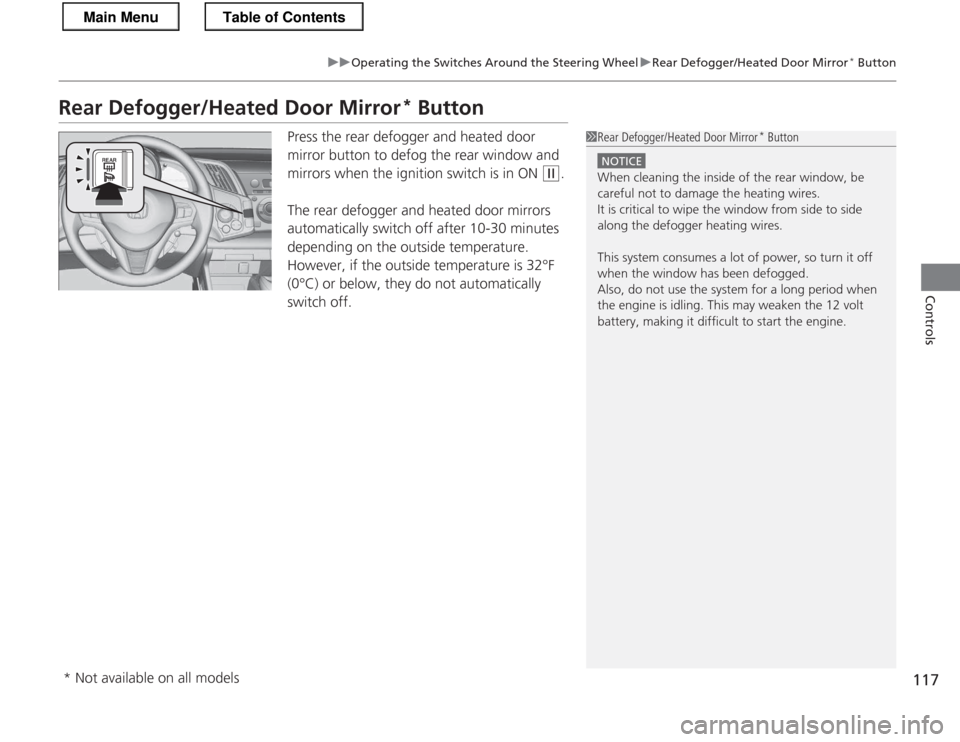
Press the rear defogger and heated door
mirror button to defog the rear window and
mirrors when the ignition switch is in ON
(w .
The rear defogger and heated door mirrors
automatically switch off after 10-30 minutes
depending on the outside temperature.
However, if the outside temperature is 32°F
(0°C) or below, they do not automatically switch off.
1Rear Defogger/Heated Door Mirror *
Button
NOTICE
When cleaning the inside of the rear window, be
careful not to damage the heating wires.
It is critical to wipe the window from side to side
along the defogger heating wires.
This system consumes a lot of power, so turn it off
when the window has been defogged.
Also, do not use the system for a long period when
the engine is idling. This may weaken the 12 volt
battery, making it difficult to start the engine.
* Not available on all models
Main MenuTable of Contents
Page 182 of 325
181
uuWhen DrivinguPrecautions While Driving
Driving
Precautions While Driving
Avoid driving in deep water and on flooded roads. This can damage the engine and
driveline, and cause electrical component failure.
If there is a strong impact with something under the vehicle, stop in a safe location.
Check the underside of the vehicle for damage or any fluid leaks.
■In Rain
■Other Precautions
1Precautions While Driving
NOTICE
Do not operate the shift lever while pressing the
accelerator pedal. You could damage the
transmission.
If the ignition switch is turned to ACCESSORY
(q or
LOCK
(0 while driving, the engine will shut down
and all steering and brake power assist functions will
stop, making it difficult to control the vehicle.
Do not put the shift lever in
(N , as you will lose
engine braking (and acceleration) performance.
During the first 600 miles (1,000 km) of operation,
avoid sudden acceleration or full throttle operation so
as to not damage the engine or powertrain.
Avoid hard braking for the first 200 miles (300 km).
You should also follow this when the brake pads are replaced.
NOTICE
Following can damage the under spoiler: • Parking the vehicle by a parking block
• Parallel parking along the road shoulder
• Driving towards the bottom of a hill
• Driving up or down to a different surface level
(such as a road shoulder)
• Driving on a rutted or bumpy road
• Driving on a road with potholes
Main MenuTable of Contents
Page 199 of 325
198
uuWhen DrivinguPlus Sport System
Driving
Plus Sport System
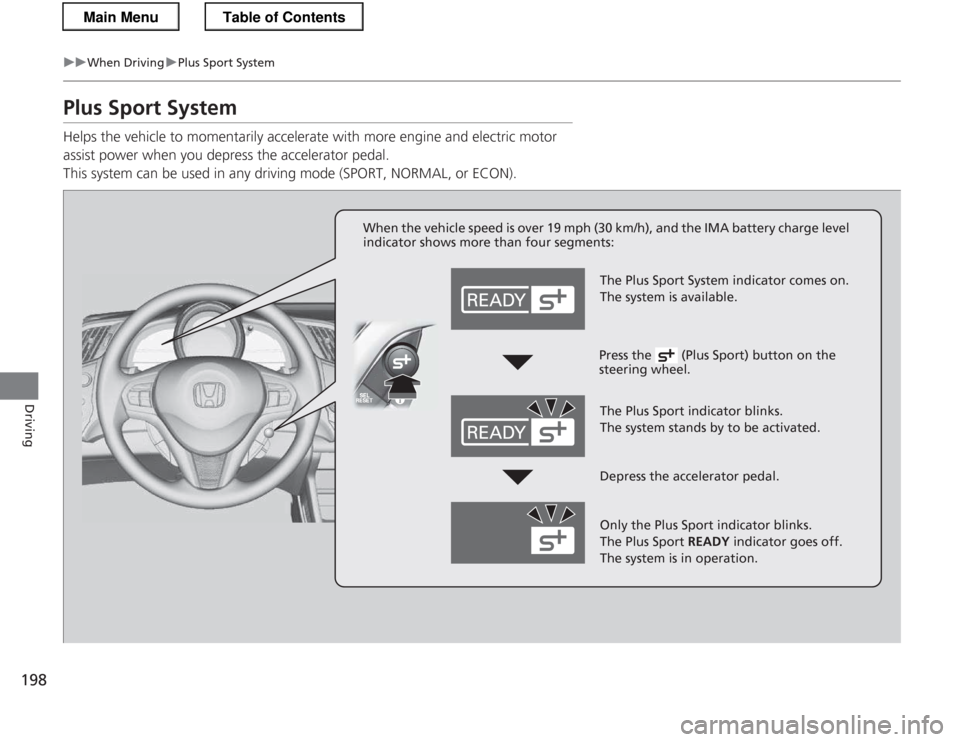
Helps the vehicle to momentarily accelerate with more engine and electric motor
assist power when you depress the accelerator pedal.
This system can be used in any driving mode (SPORT, NORMAL, or ECON).
When the vehicle speed is over 19 mph (30 km/h), and the IMA battery charge level
indicator shows more than four segments:
The Plus Sport System indicator comes on.
The system is available.
The Plus Sport indicator blinks.
The system stands by to be activated.
Only the Plus Sport indicator blinks.
The Plus Sport READY indicator goes off.
The system is in operation.
Press the (Plus Sport) button on the steering wheel.
Depress the accelerator pedal.
Main MenuTable of Contents
Page 210 of 325
209
uuBrakinguBrake System
Driving
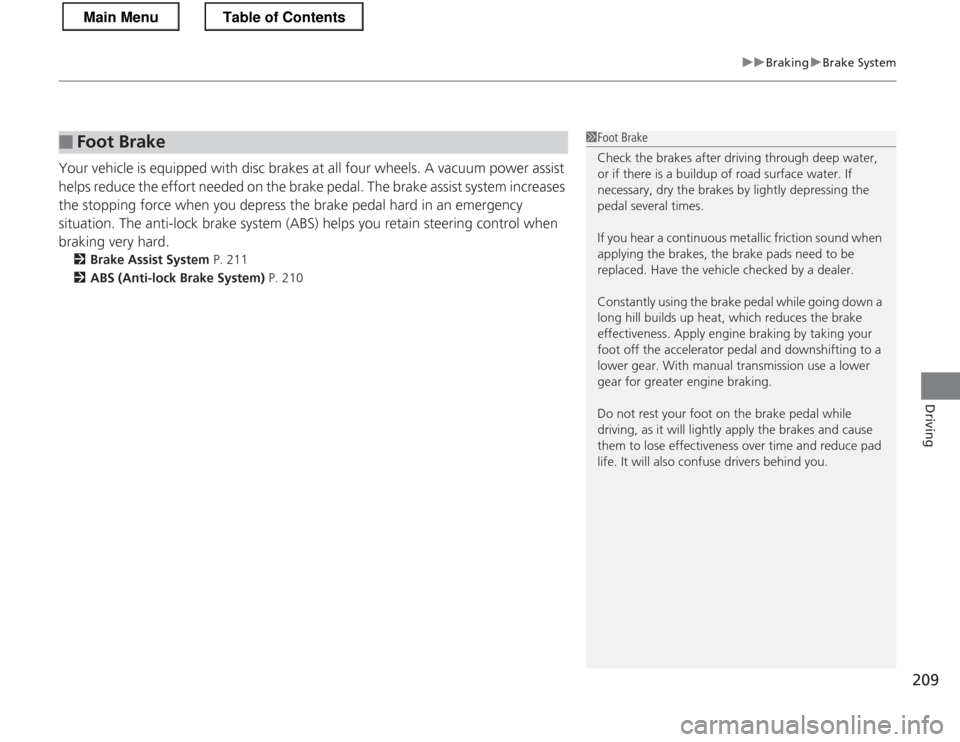
Your vehicle is equipped with disc brakes at all four wheels. A vacuum power assist
helps reduce the effort needed on the brake pedal. The brake assist system increases
the stopping force when you depress the brake pedal hard in an emergency
situation. The anti-lock brake system (ABS) helps you retain steering control when braking very hard. 2 Brake Assist System P. 211
2 ABS (Anti-lock Brake System) P. 210
■Foot Brake1Foot Brake
Check the brakes after driving through deep water,
or if there is a buildup of road surface water. If
necessary, dry the brakes by lightly depressing the
pedal several times.
If you hear a continuous metallic friction sound when
applying the brakes, the brake pads need to be
replaced. Have the vehicle checked by a dealer.
Constantly using the brake pedal while going down a
long hill builds up heat, which reduces the brake
effectiveness. Apply engine braking by taking your
foot off the accelerator pedal and downshifting to a
lower gear. With manual transmission use a lower
gear for greater engine braking.
Do not rest your foot on the brake pedal while
driving, as it will lightly apply the brakes and cause
them to lose effectiveness over time and reduce pad
life. It will also confuse drivers behind you.
Main MenuTable of Contents
Page 278 of 325
277
uuIf a Tire Goes FlatuTemporarily Repairing a Flat Tire
Continued
Handling the Unexpected
Temporarily Repairing a Flat Tire
This vehicle is not equipped with a spare tire. If the tire has a large cut or is otherwise
severely damaged, you will need to have the vehicle towed. If the tire only has a
small puncture, from a nail for instance, you can use the temporary tire repair kit so
that you can drive to the nearest service station for a more permanent repair.
If a tire goes flat while driving, grasp the steering wheel firmly, and brake gradually
to reduce speed. Then stop in a safe place. 1.Park the vehicle on firm, level, and non-slippery surface, and apply the parking brake.
2. Move the shift lever to
(P .
2. Move the shift lever to
(R .
3. Turn on the hazard warning lights and turn the ignition switch to LOCK
(0 .
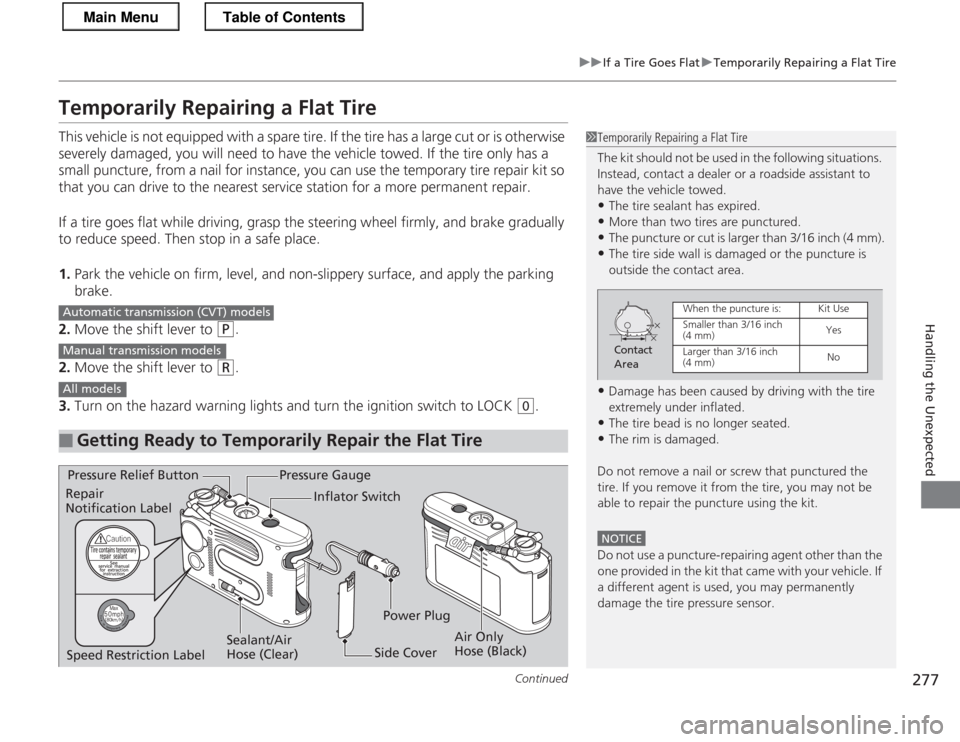
■Getting Ready to Temporarily Repair the Flat Tire
1Temporarily Repairing a Flat Tire
The kit should not be used in the following situations.
Instead, contact a dealer or a roadside assistant to
have the vehicle towed.
• The tire sealant has expired.
• More than two tires are punctured.
• The puncture or cut is larger than 3/16 inch (4 mm).
• The tire side wall is damaged or the puncture is
outside the contact area.
• Damage has been caused by driving with the tire
extremely under inflated.
• The tire bead is no longer seated.
• The rim is damaged.
Do not remove a nail or screw that punctured the
tire. If you remove it from the tire, you may not be
able to repair the puncture using the kit.
NOTICE
Do not use a puncture-repairing agent other than the
one provided in the ki t that came with your vehicle. If
a different agent is used, you may permanently damage the tire pressure sensor.
Contact
Area
When the puncture is:Kit Use
Smaller than 3/16 inch (4 mm)Yes
Larger than 3/16 inch (4 mm) No
Automatic transmiss ion (CVT) models
Manual transmission models
All models
Pressure Gauge
Sealant/Air
Hose (Clear)
Pressure Relief Button
Air Only
Hose (Black)
Inflator Switch
Side Cover
Repair Notification Label
Power Plug
Speed Restriction Label
Main MenuTable of Contents