steering HONDA CROSSTOUR 2014 1.G Workshop Manual
[x] Cancel search | Manufacturer: HONDA, Model Year: 2014, Model line: CROSSTOUR, Model: HONDA CROSSTOUR 2014 1.GPages: 573, PDF Size: 21.2 MB
Page 462 of 573
461
Maintenance
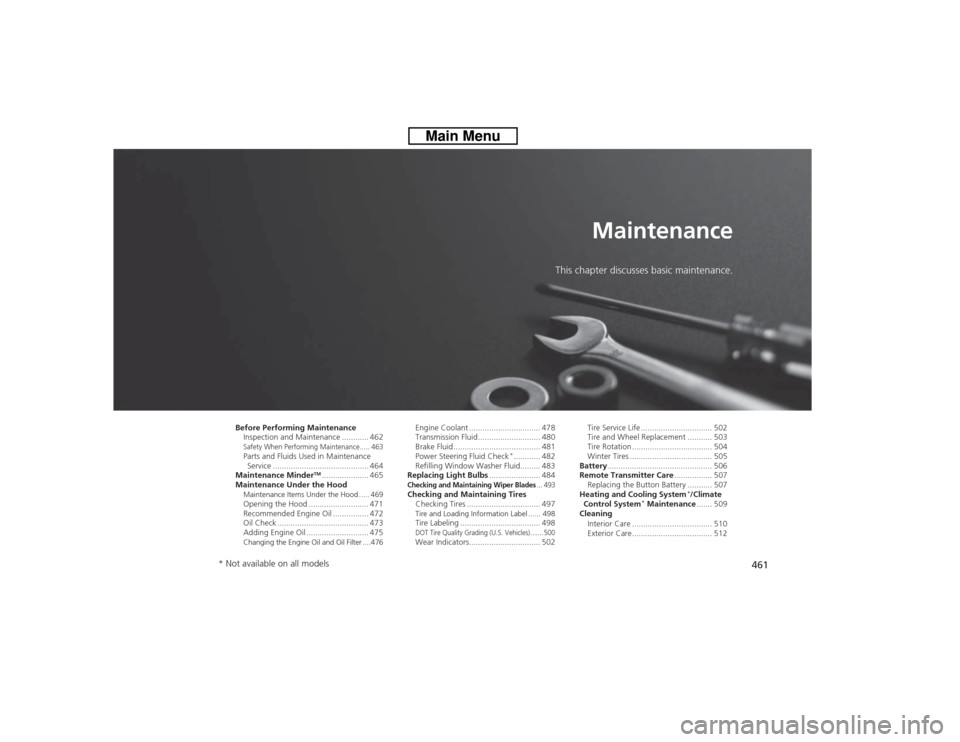
This chapter discusses basic maintenance.
Before Performing Maintenance
Inspection and Maintenance ............ 462Safety When Performing Maintenance..... 463Parts and Fluids Used in Maintenance
Service ........................................... 464
Maintenance Minder
TM..................... 465
Maintenance Under the Hood
Maintenance Items Under the Hood ..... 469Opening the Hood ........................... 471
Recommended Engine Oil ................ 472
Oil Check ......................................... 473
Adding Engine Oil ............................ 475Changing the Engine Oil and Oil Filter ....476
Engine Coolant ................................ 478
Transmission Fluid ............................ 480
Brake Fluid ....................................... 481
Power Steering Fluid Check
*............ 482
Refilling Window Washer Fluid......... 483
Replacing Light Bulbs....................... 484
Checking and Maintaining Wiper Blades
... 493
Checking and Maintaining Tires
Checking Tires ................................. 497Tire and Loading Information Label ...... 498Tire Labeling .................................... 498DOT Tire Quality Grading (U.S. Vehicles)....... 500Wear Indicators................................ 502Tire Service Life ................................ 502
Tire and Wheel Replacement ........... 503
Tire Rotation .................................... 504
Winter Tires ..................................... 505
Battery............................................... 506
Remote Transmitter Care................. 507
Replacing the Button Battery ........... 507
Heating and Cooling System
*/Climate
Control System
* Maintenance....... 509
Cleaning
Interior Care .................................... 510
Exterior Care.................................... 512
* Not available on all models
Page 468 of 573
467
uuMaintenance Minder
TMuTo Use Maintenance Minder
TM
Continued
Maintenance
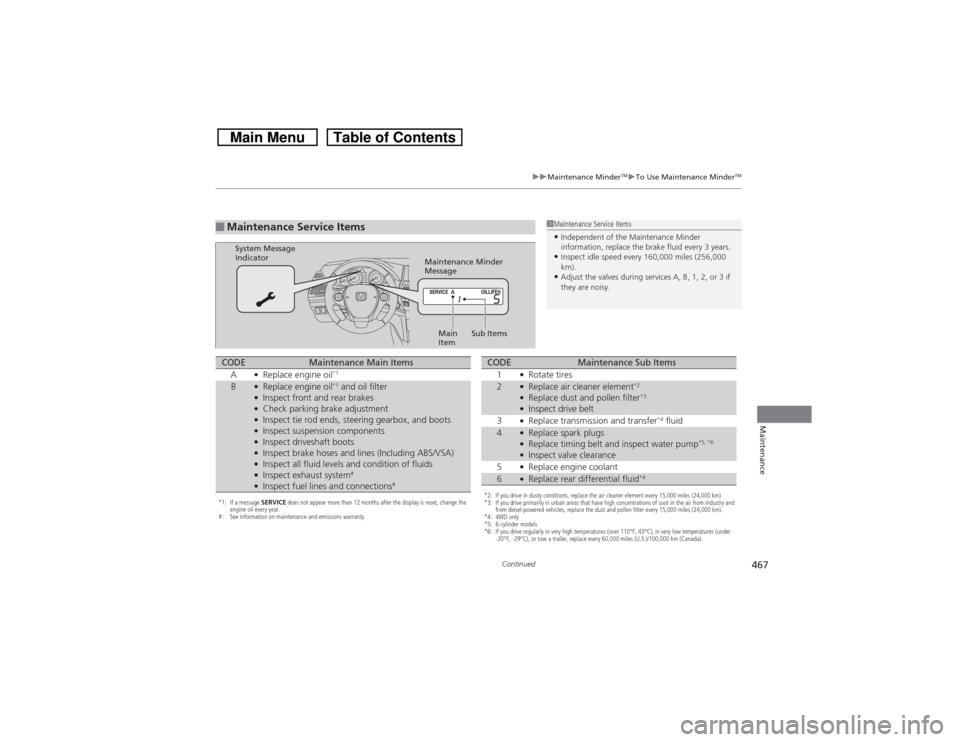
■Maintenance Service Items
1Maintenance Service Items•Independent of the Maintenance Minder
information, replace the brake fluid every 3 years.•Inspect idle speed every 160,000 miles (256,000
km).•Adjust the valves during services A, B, 1, 2, or 3 if
they are noisy.
Maintenance Minder
Message System Message
Indicator
Sub Items Main
Item
*1: If a message SERVICE does not appear more than 12 months after the display is reset, change the
engine oil every year.
# : See information on maintenance and emissions warranty.CODE
Maintenance Main Items
A
●Replace engine oil
*1
B
●Replace engine oil
*1 and oil filter
●Inspect front and rear brakes●Check parking brake adjustment●Inspect tie rod ends, steering gearbox, and boots●Inspect suspension components●Inspect driveshaft boots●Inspect brake hoses and lines (Including ABS/VSA)●Inspect all fluid levels and condition of fluids●Inspect exhaust system
#
●Inspect fuel lines and connections
#
*2: If you drive in dusty conditions, replace the air cleaner element every 15,000 miles (24,000 km).
*3: If you drive primarily in urban areas that have high concentrations of soot in the air from industry and
from diesel-powered vehicles, replace the dust and pollen filter every 15,000 miles (24,000 km).
*4: 4WD only
*5: 6-cylinder models
*6: If you drive regularly in very high temperatures (over 110°F, 43°C), in very low temperatures (under
-20°F, -29°C), or tow a trailer, replace every 60,000 miles (U.S.)/100,000 km (Canada).CODE
Maintenance Sub Items
1
●Rotate tires
2
●Replace air cleaner element
*2
●Replace dust and pollen filter
*3
●Inspect drive belt
3●Replace transmission and transfer
*4 fluid
4
●Replace spark plugs●Replace timing belt and inspect water pump
*5, *6
●Inspect valve clearance
5●Replace engine coolant
6
●Replace rear differential fluid
*4
Page 470 of 573
469
Continued
Maintenance
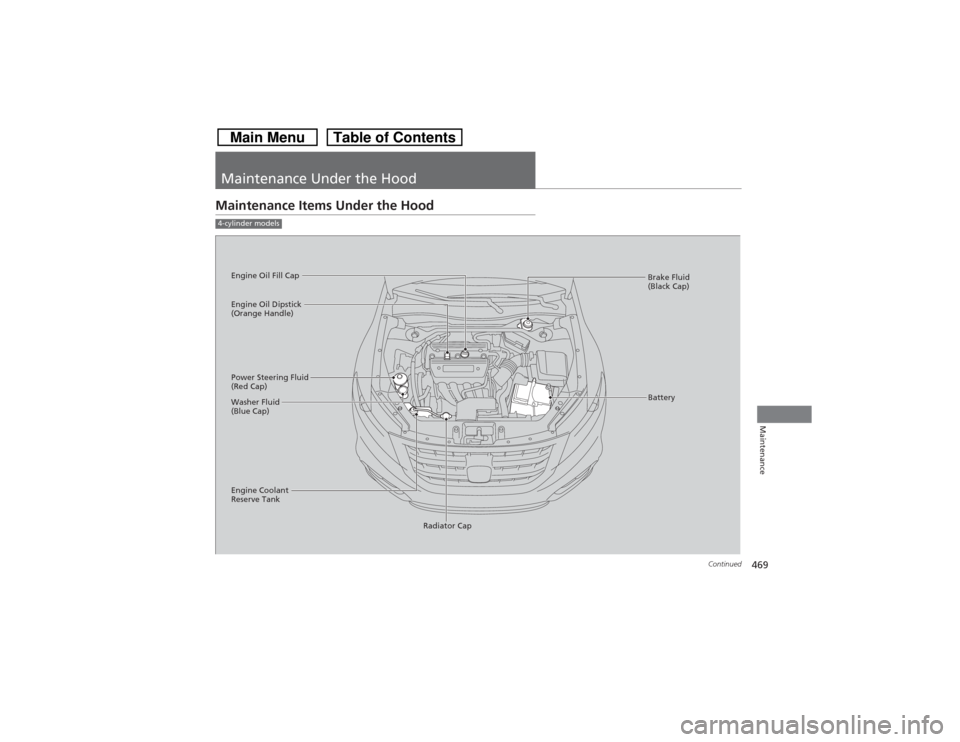
Maintenance Under the HoodMaintenance Items Under the Hood4-cylinder models
Brake Fluid
(Black Cap)
Engine Coolant
Reserve Tank
Radiator Cap Washer Fluid
(Blue Cap) Engine Oil Dipstick
(Orange Handle) Engine Oil Fill Cap
Battery
Power Steering Fluid
(Red Cap)
Page 483 of 573
482
uuMaintenance Under the HooduPower Steering Fluid Check
*
Maintenance
Power Steering Fluid Check
*
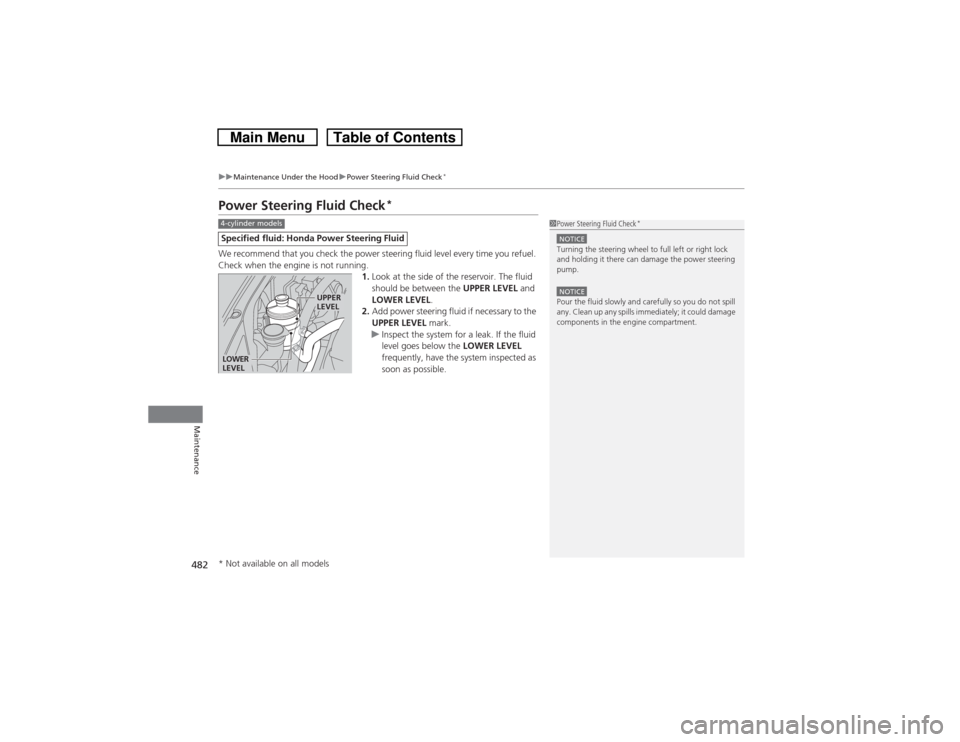
We recommend that you check the power steering fluid level every time you refuel.
Check when the engine is not running.
1.Look at the side of the reservoir. The fluid
should be between the UPPER LEVEL and
LOWER LEVEL.
2.Add power steering fluid if necessary to the
UPPER LEVEL mark.
uInspect the system for a leak. If the fluid
level goes below the LOWER LEVEL
frequently, have the system inspected as
soon as possible.Specified fluid: Honda Power Steering Fluid
1Power Steering Fluid Check
*
NOTICETurning the steering wheel to full left or right lock
and holding it there can damage the power steering
pump.NOTICEPour the fluid slowly and carefully so you do not spill
any. Clean up any spills immediately; it could damage
components in the engine compartment.
4-cylinder modelsLOWER
LEVEL
UPPER
LEVEL
* Not available on all models
Page 486 of 573
485
uuReplacing Light BulbsuHeadlight Bulbs
Maintenance
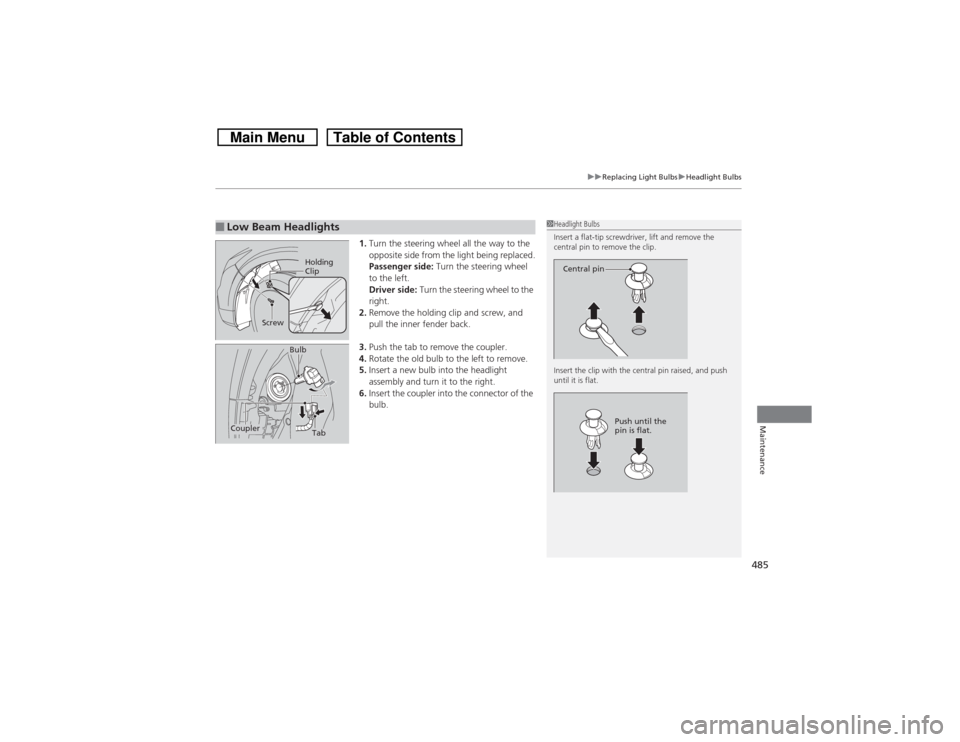
1.Turn the steering wheel all the way to the
opposite side from the light being replaced.
Passenger side: Turn the steering wheel
to the left.
Driver side: Turn the steering wheel to the
right.
2.Remove the holding clip and screw, and
pull the inner fender back.
3.Push the tab to remove the coupler.
4.Rotate the old bulb to the left to remove.
5.Insert a new bulb into the headlight
assembly and turn it to the right.
6.Insert the coupler into the connector of the
bulb.
■Low Beam Headlights
1Headlight Bulbs
Insert a flat-tip screwdriver, lift and remove the
central pin to remove the clip.
Insert the clip with the central pin raised, and push
until it is flat.
Central pin
Push until the
pin is flat.
Holding
Clip
ScrewTab
Coupler
Bulb
Page 488 of 573
487
uuReplacing Light BulbsuFog Light Bulbs
Maintenance
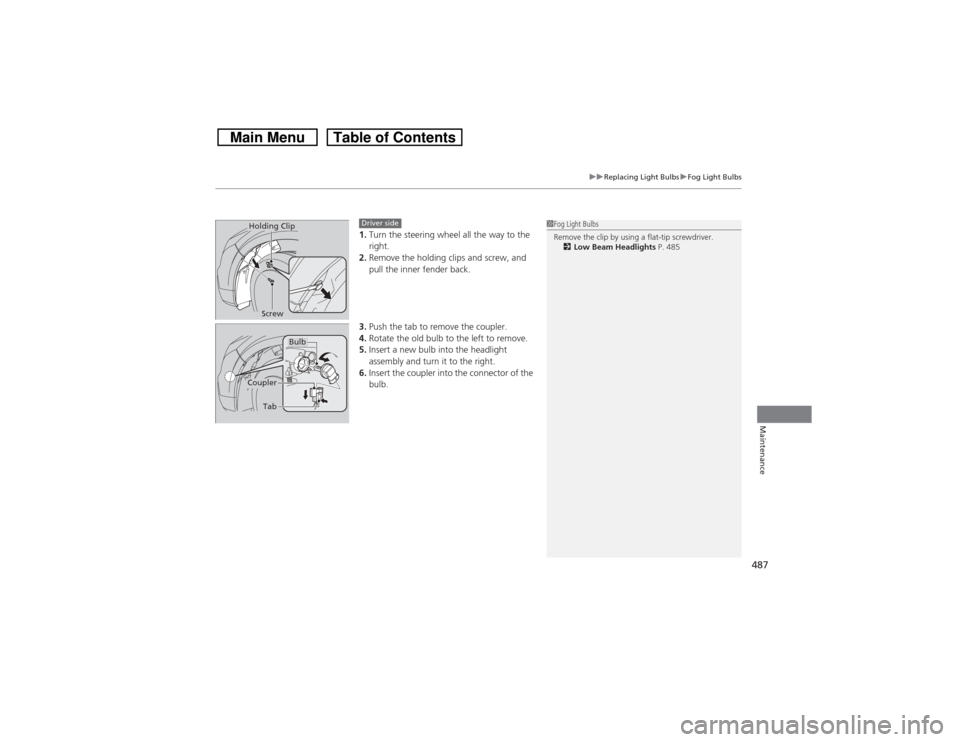
1.Turn the steering wheel all the way to the
right.
2.Remove the holding clips and screw, and
pull the inner fender back.
3.Push the tab to remove the coupler.
4.Rotate the old bulb to the left to remove.
5.Insert a new bulb into the headlight
assembly and turn it to the right.
6.Insert the coupler into the connector of the
bulb.
1Fog Light Bulbs
Remove the clip by using a flat-tip screwdriver.
2Low Beam Headlights P. 485
Holding Clip
Screw
Driver side
Bulb
Coupler
Tab
Page 489 of 573
488
uuReplacing Light BulbsuFront Side Marker Light Bulb
Maintenance
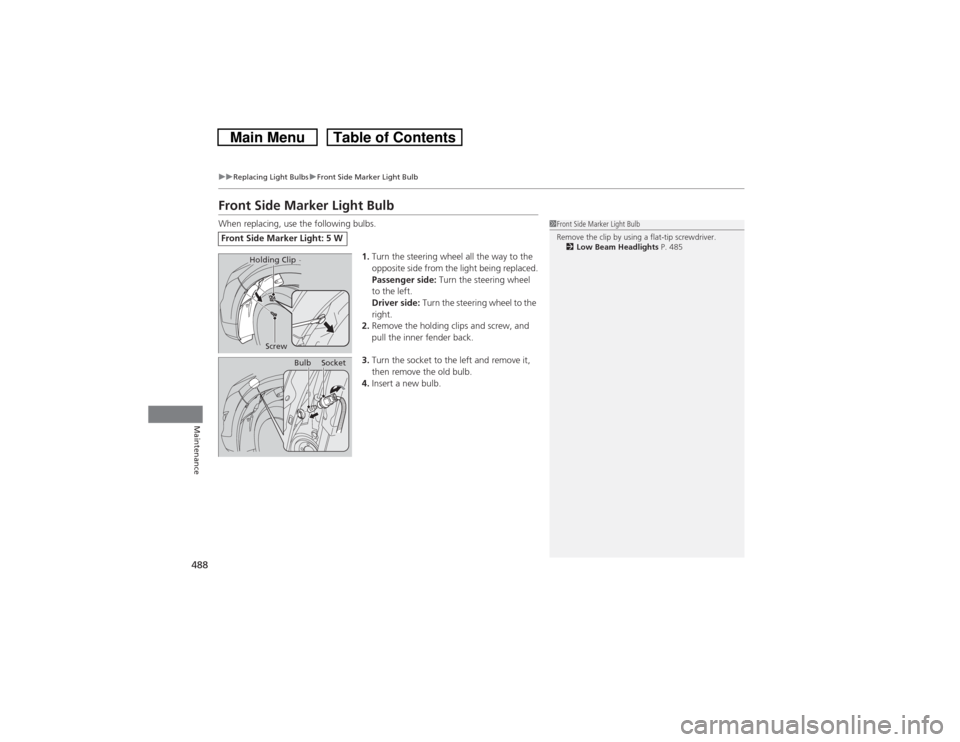
Front Side Marker Light BulbWhen replacing, use the following bulbs.
1.Turn the steering wheel all the way to the
opposite side from the light being replaced.
Passenger side: Turn the steering wheel
to the left.
Driver side: Turn the steering wheel to the
right.
2.Remove the holding clips and screw, and
pull the inner fender back.
3.Turn the socket to the left and remove it,
then remove the old bulb.
4.Insert a new bulb.Front Side Marker Light: 5 W
1Front Side Marker Light Bulb
Remove the clip by using a flat-tip screwdriver.
2Low Beam Headlights P. 485
Holding Clip
Screw
Bulb
Socket
Page 506 of 573
505
uuChecking and Maintaining TiresuWinter Tires
Maintenance
Winter TiresIf driving on snowy or frozen roads, mount all season marked M+S tires, snow tires,
or tire chains; reduce speed; and maintain sufficient distance between vehicles when
driving.
Be particularly careful when operating the steering wheel or brakes to prevent
skidding.
Use tire chains, snow tires, or all season tires when necessary or according to the law.
When mounting, refer to the following points.
For winter tires:
•Select the size and load ranges that are the same as the original tires.
•Mount the tires to all four wheels.
For tire chains:
•Install them on the front tires only.
•Because your vehicle has limited tire clearance, we strongly recommend using the
chains listed below:
•Follow the chain manufacturer’s instruction when installing. Mount them as
tightly as you can.
•Check that the chains do not touch the brake lines or suspension.
•Drive slowly.Cable-type: SCC Radial Chain SC1042Cable-type: SCC Radial Chain TC2111 MM
1Winter TiresNOTICETraction devices that are the wrong size or improperly
installed can damage your vehicle’s brake lines,
suspension, body, and wheels. Stop driving if they are
hitting any part of the vehicle.
When tire chains are mounted, follow the chain
manufacturer’s instructions regarding vehicle
operational limits.
If your vehicle is equipped with summer tires, be
aware that these tires are not designed for winter
driving conditions. For more information, contact a
dealer.
3
WARNING
Using the wrong chains, or not properly
installing chains, can damage the brake
lines and cause a crash in which you can be
seriously injured or killed.
Follow all instructions in this owner’s
manual regarding the selection and use of
tire chains.
4-cylinder models6-cylinder models
Page 516 of 573
515
Handling the Unexpected
This chapter explains how to handle unexpected troubles.
Tools
Types of Tools .................................. 516
If a Tire Goes Flat
Changing a Flat Tire ......................... 517
Engine Does Not Start
Checking the Engine ........................ 525If the Smart Entry Remote Battery is
Weak ..........................................526Emergency Engine Stop ................... 527
Jump Starting.................................... 528
Shift Lever Does Not Move.............. 531Overheating
How to Handle Overheating............. 532
Indicator, Coming On/Blinking
If the Low Oil Pressure Indicator Comes
On................................................ 534If the Charging System Indicator Comes
On ................................................. 534
If the Malfunction Indicator Lamp Comes
On or Blinks ................................... 535
If the Brake System Indicator (Red) Comes
On ................................................... 536If the Electric Power Steering (EPS) System
Indicator Comes On .............................536
If the Low Tire Pressure Indicator Comes
On ................................................. 537
If the TPMS Indicator Comes On ...... 537
Fuses
Fuse Locations ................................. 538
Inspecting and Changing Fuses ........ 541
Emergency Towing........................... 542
When You Cannot Unlock the Fuel Fill
Door................................................. 543
When You Cannot Open the Tailgate.. 544
Page 518 of 573
517
Continued
Handling the Unexpected
If a Tire Goes FlatChanging a Flat TireIf a tire goes flat while driving, grasp the steering wheel firmly, and brake gradually
to reduce speed. Then, stop in a safe place. Replace the flat tire with a compact
spare tire. Go to a dealer as soon as possible to have the full-size tire repaired or
replaced.
1.Park the vehicle on firm, level, and non-slippery surface and apply the parking
brake.
2.Move the shift lever to
(P.
3.Turn on the hazard warning lights and turn the ignition switch to LOCK
(0*1.
*1: Models with the smart entry system have an ENGINE START/STOP button instead of an
ignition switch.
1Changing a Flat Tire
Periodically check the tire pressure of the compact
spare. It should be set to the specified pressure.
Specified Pressure: 60 psi (420 kPa, 4.2 kgf/cm
2)
When driving with the compact spare tire, keep the
vehicle speed under 50 mph (80 km/h). Replace with
a full-size tire as soon as possible.
The compact spare tire and wheel in your vehicle are
specifically for this model.
Do not use them with another vehicle.
Do not use another type of compact spare tire or
wheel with your vehicle.
Do not mount tire chains on a compact spare tire.
If a chain-mounted front tire goes flat, remove one of
the full-size rear tires and replace it with the compact
spare tire. Remove the flat front tire and replace it
with the full-size tire that was removed from the rear.
Mount the tire chains on the front tire.
Do not use a puncture-repairing agent on a flat tire,
as it can damage the tire pressure sensor.