lock HONDA CROSSTOUR 2014 1.G Owners Manual
[x] Cancel search | Manufacturer: HONDA, Model Year: 2014, Model line: CROSSTOUR, Model: HONDA CROSSTOUR 2014 1.GPages: 573, PDF Size: 21.2 MB
Page 1 of 573
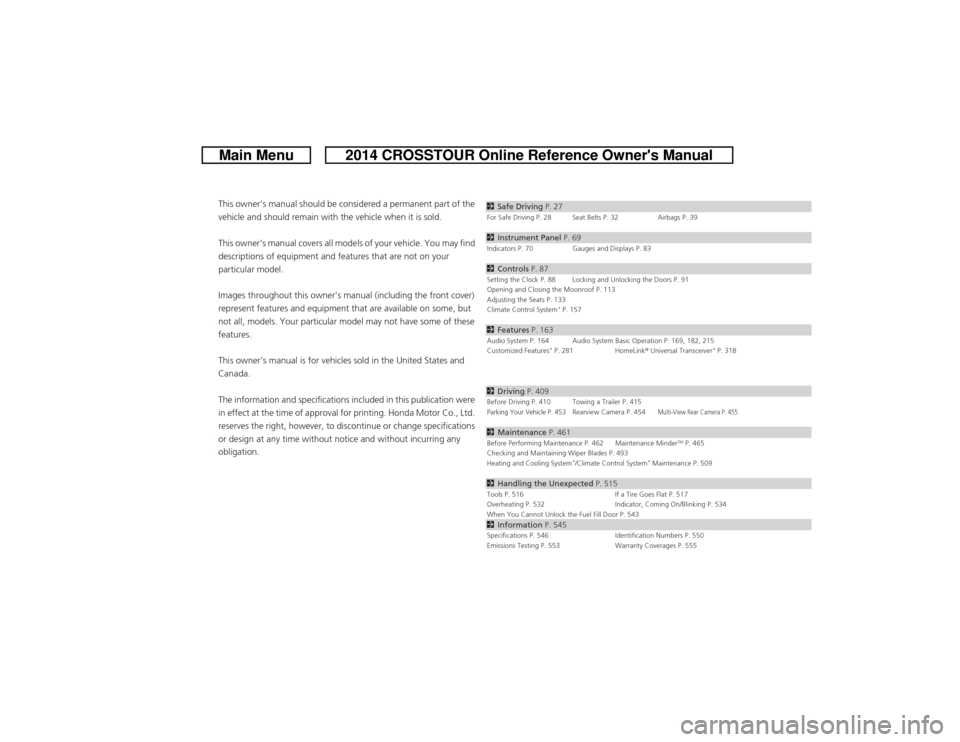
ContentsThis owner’s manual should be considered a permanent part of the
vehicle and should remain with the vehicle when it is sold.
This owner’s manual covers all models of your vehicle. You may find
descriptions of equipment and features that are not on your
particular model.
Images throughout this owner’s manual (including the front cover)
represent features and equipment that are available on some, but
not all, models. Your particular model may not have some of these
features.
This owner’s manual is for vehicles sold in the United States and
Canada.
The information and specifications included in this publication were
in effect at the time of approval for printing. Honda Motor Co., Ltd.
reserves the right, however, to discontinue or change specifications
or design at any time without notice and without incurring any
obligation.
2Safe Driving P. 27For Safe Driving P. 28 Seat Belts P. 32 Airbags P. 392Instrument Panel P. 69Indicators P. 70 Gauges and Displays P. 832Controls P. 87Setting the Clock P. 88 Locking and Unlocking the Doors P. 91
Opening and Closing the Moonroof P. 113
Adjusting the Seats P. 133
Climate Control System
* P. 157
2Features P. 163Audio System P. 164 Audio System Basic Operation P. 169, 182, 215
Customized Features
* P. 281 HomeLink® Universal Transceiver
* P. 318
2Driving P. 409Before Driving P. 410 Towing a Trailer P. 415Parking Your Vehicle P. 453
Rearview Camera P. 454
Multi-View Rear Camera P. 455
2Maintenance P. 461Before Performing Maintenance P. 462 Maintenance Minder
TM P. 465
Checking and Maintaining Wiper Blades P. 493
Heating and Cooling System
*/Climate Control System
* Maintenance P. 509
2Handling the Unexpected P. 515Tools P. 516 If a Tire Goes Flat P. 517
Overheating P. 532 Indicator, Coming On/Blinking P. 534
When You Cannot Unlock the Fuel Fill Door P. 5432Information P. 545Specifications P. 546 Identification Numbers P. 550
Emissions Testing P. 553 Warranty Coverages P. 555
Page 5 of 573
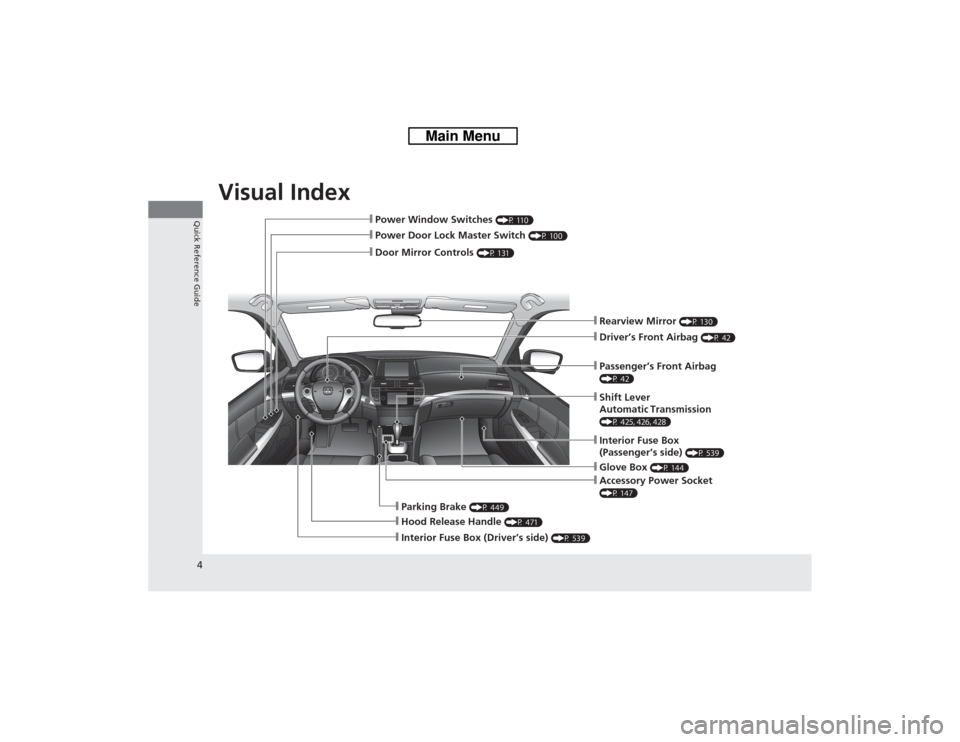
Visual Index
4Quick Reference Guide
❙Power Door Lock Master Switch
(P 100)
❙Power Window Switches
(P 110)
❙Rearview Mirror
(P 130)
❙Hood Release Handle
(P 471)
❙Shift Lever
Automatic Transmission (P 425, 426, 428)❙Glove Box
(P 144)
❙Driver’s Front Airbag
(P 42)
❙Door Mirror Controls
(P 131)
❙Passenger’s Front Airbag (P 42)❙Accessory Power Socket (P 147)❙Interior Fuse Box
(Passenger’s side)
(P 539)
❙Interior Fuse Box (Driver’s side)
(P 539)
❙Parking Brake
(P 449)
Page 7 of 573
Visual Index
6Quick Reference Guide
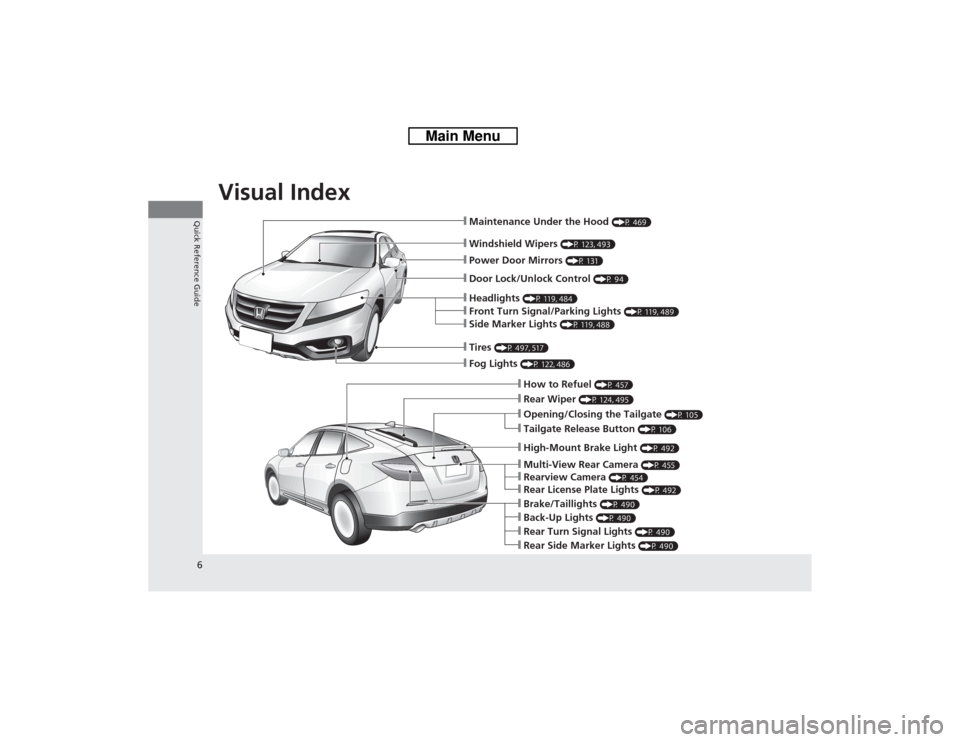
❙Windshield Wipers
(P 123, 493)
❙Maintenance Under the Hood
(P 469)
❙Fog Lights
(P 122, 486)
❙Front Turn Signal/Parking Lights
(P 119, 489)
❙Side Marker Lights
(P 119, 488)
❙Tires
(P 497, 517)
❙How to Refuel
(P 457)
❙Opening/Closing the Tailgate
(P 105)
❙Rear Wiper
(P 124, 495)
❙Back-Up Lights
(P 490)
❙Brake/Taillights
(P 490)
❙Rear Turn Signal Lights
(P 490)
❙Rear Side Marker Lights
(P 490)
❙Multi-View Rear Camera
(P 455)
❙Rearview Camera
(P 454)
❙Rear License Plate Lights
(P 492)
❙Headlights
(P 119, 484)
❙Power Door Mirrors
(P 131)
❙Door Lock/Unlock Control
(P 94)
❙High-Mount Brake Light
(P 492)
❙Tailgate Release Button
(P 106)
Page 9 of 573
8Quick Reference Guide
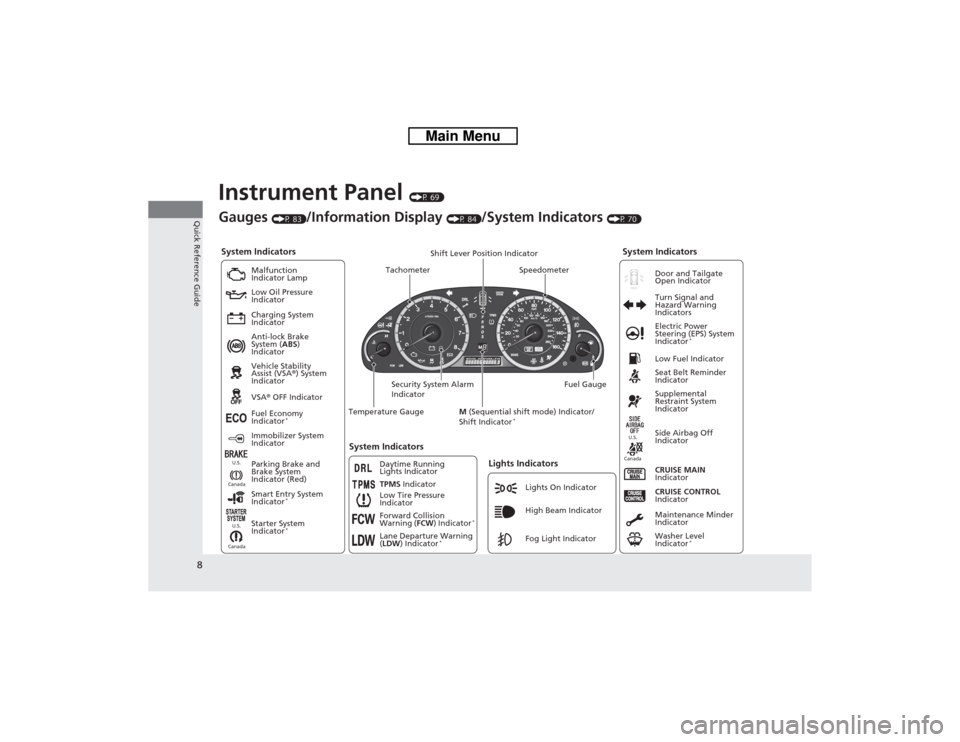
Instrument Panel
(P 69)
System Indicators
Malfunction
Indicator Lamp
Low Oil Pressure
Indicator
Charging System
Indicator
Anti-lock Brake
System (ABS)
Indicator
Vehicle Stability
Assist (VSA®) System
Indicator
VSA® OFF Indicator
Low Tire Pressure
Indicator
Lights Indicators
Lights On Indicator
High Beam Indicator
Fog Light Indicator Immobilizer System
IndicatorSeat Belt Reminder
Indicator
System Indicators
CRUISE CONTROL
Indicator Parking Brake and
Brake System
Indicator (Red)Supplemental
Restraint System
Indicator
Side Airbag Off
Indicator
CRUISE MAIN
Indicator Tachometer Speedometer
Fuel Gauge Security System Alarm
IndicatorShift Lever Position Indicator
Low Fuel Indicator
Gauges
(P 83)
/Information Display
(P 84)
/System Indicators
(P 70)
Fuel Economy
Indicator
*
TPMS Indicator
Maintenance Minder
Indicator
Washer Level
Indicator
*
Temperature Gauge
Electric Power
Steering (EPS) System
Indicator
*
Turn Signal and
Hazard Warning
Indicators
System Indicators
CanadaU.S.
CanadaU.S.
Starter System
Indicator
*
Door and Tailgate
Open Indicator
Smart Entry System
Indicator
*
CanadaU.S.
Forward Collision
Warning (FCW) Indicator
*
Lane Departure Warning
(LDW) Indicator
*
M (Sequential shift mode) Indicator/
Shift Indicator
*
Daytime Running
Lights Indicator
Page 10 of 573
9Quick Reference Guide
Controls
(P 87)
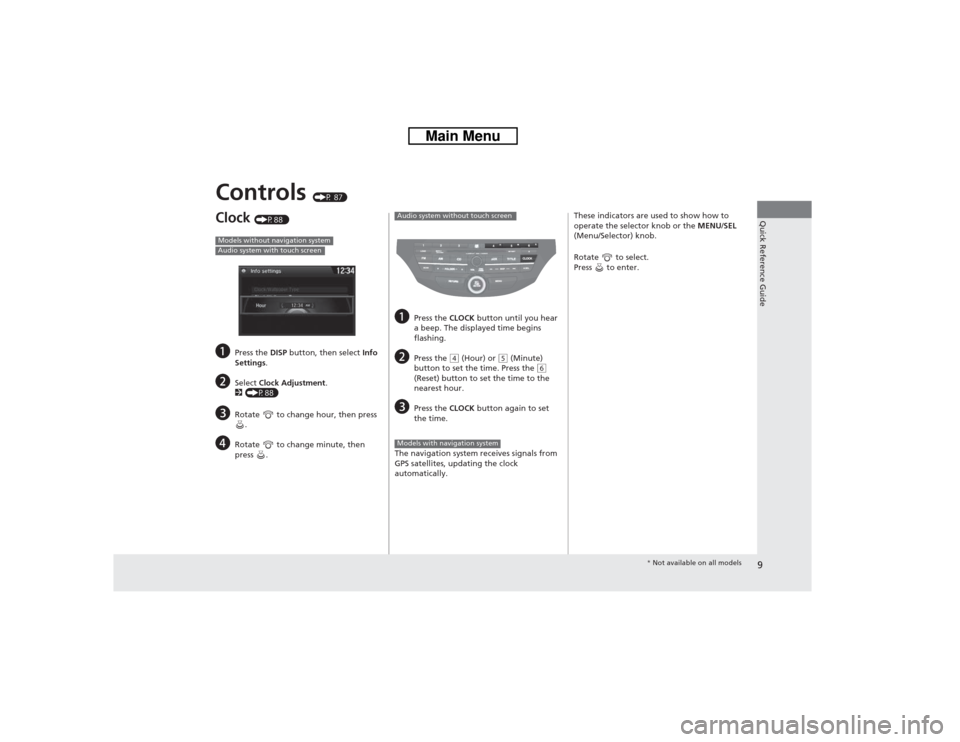
Clock
(P88 )
a
Press the DISP button, then select Info
Settings.
b
Select Clock Adjustment.
2(P88)
c
Rotate to change hour, then press
.
d
Rotate to change minute, then
press .
Models without navigation systemAudio system with touch screen
a
Press the CLOCK button until you hear
a beep. The displayed time begins
flashing.
b
Press the
(4 (Hour) or
(5 (Minute)
button to set the time. Press the
(6
(Reset) button to set the time to the
nearest hour.
c
Press the CLOCK button again to set
the time.
The navigation system receives signals from
GPS satellites, updating the clock
automatically.
Audio system without touch screenModels with navigation system
These indicators are used to show how to
operate the selector knob or the MENU/SEL
(Menu/Selector) knob.
Rotate to select.
Press to enter.
* Not available on all models
Page 11 of 573
10Quick Reference Guide
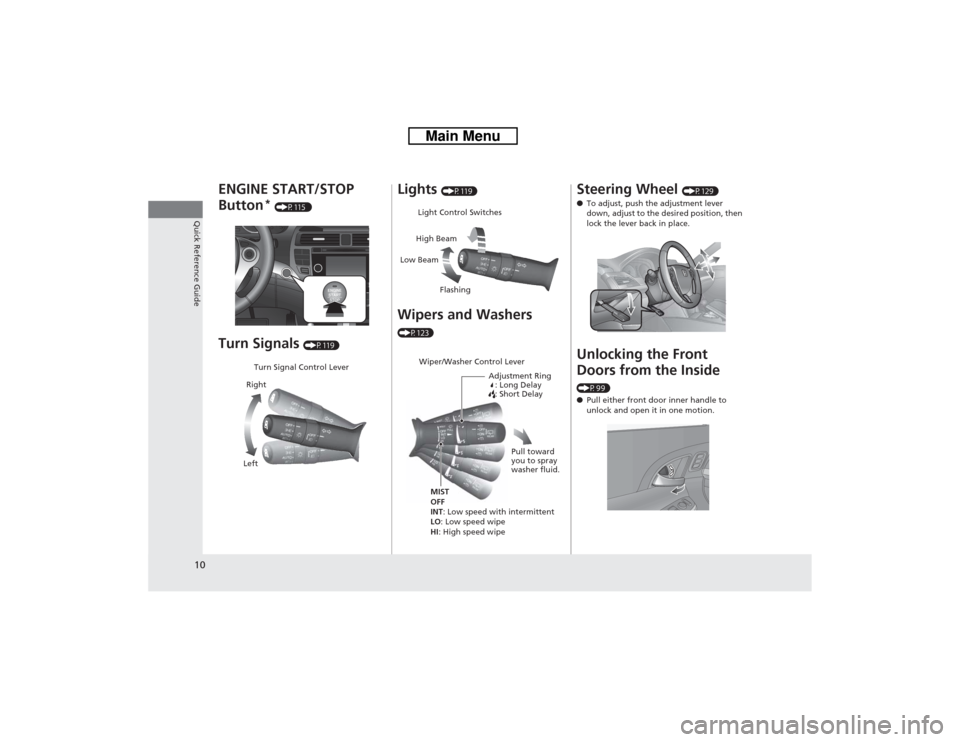
ENGINE START/STOP
Button
* (P115 )
Turn Signals
(P119)
Turn Signal Control Lever
Right
Left
Lights
(P119)
Wipers and Washers (P123)
Light Control Switches
Low BeamHigh Beam
FlashingWiper/Washer Control Lever
Adjustment Ring
: Long Delay
: Short DelayMIST
OFF
INT: Low speed with intermittent
LO: Low speed wipe
HI: High speed wipePull toward
you to spray
washer fluid.
Steering Wheel
(P129)
●To adjust, push the adjustment lever
down, adjust to the desired position, then
lock the lever back in place.
Unlocking the Front
Doors from the Inside (P99)
●Pull either front door inner handle to
unlock and open it in one motion.
Page 12 of 573
11Quick Reference Guide
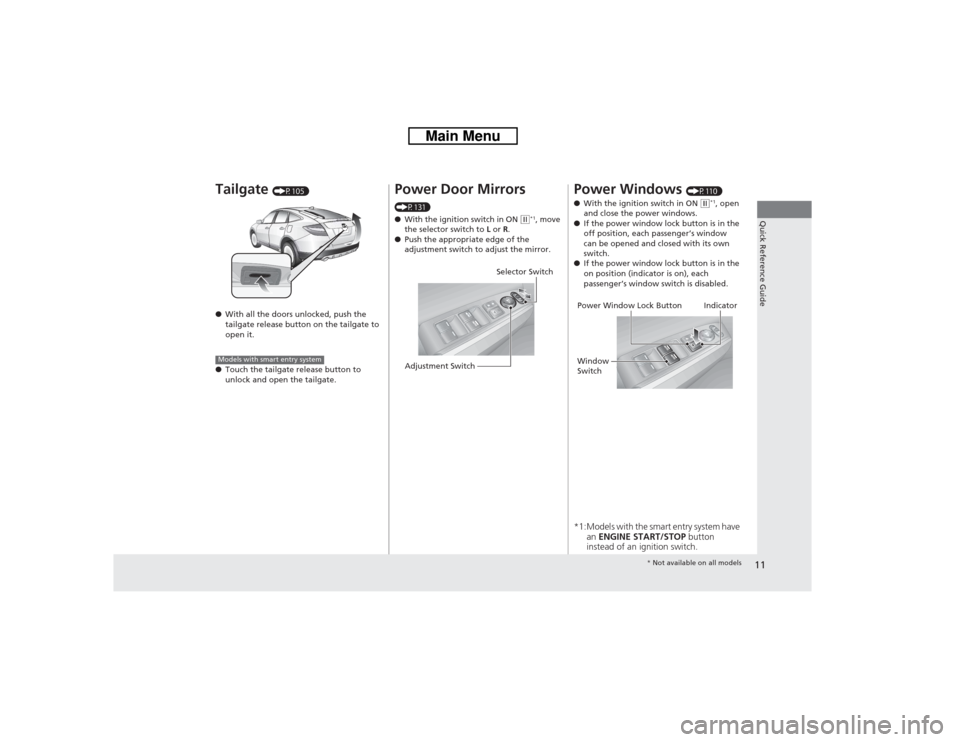
Tailgate
(P105)
●With all the doors unlocked, push the
tailgate release button on the tailgate to
open it.
●Touch the tailgate release button to
unlock and open the tailgate.
Models with smart entry system
Power Door Mirrors (P131)
●With the ignition switch in ON
(w*1, move
the selector switch to L or R.
●Push the appropriate edge of the
adjustment switch to adjust the mirror.
Selector Switch
Adjustment Switch
Power Windows
(P110)
●With the ignition switch in ON
(w*1, open
and close the power windows.
●If the power window lock button is in the
off position, each passenger’s window
can be opened and closed with its own
switch.
●If the power window lock button is in the
on position (indicator is on), each
passenger’s window switch is disabled.
*1:Models with the smart entry system have
an ENGINE START/STOP button
instead of an ignition switch.Power Window Lock Button
Window
SwitchIndicator
* Not available on all models
Page 17 of 573
16Quick Reference Guide
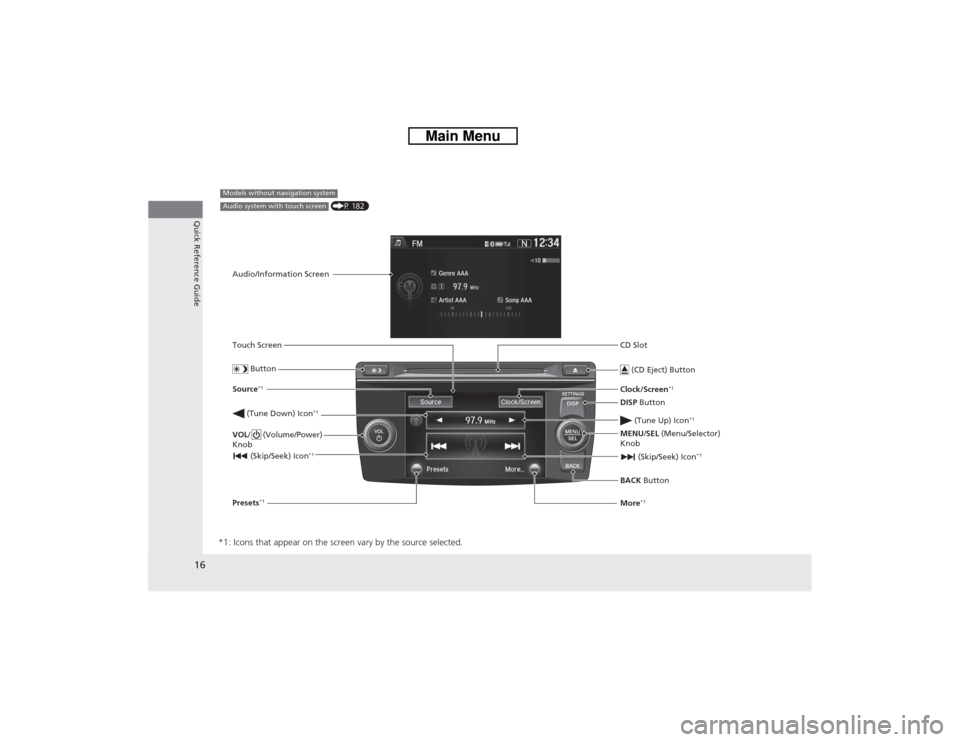
*1: Icons that appear on the screen vary by the source selected.
CD Slot
(CD Eject) ButtonBACK Button MENU/SEL (Menu/Selector)
Knob (Tune Down) Icon
*1
(Skip/Seek) Icon
*1
Models without navigation systemAudio/Information Screen
Touch Screen
ButtonSource
*1
VOL/ (Volume/Power)
Knob
(Skip/Seek) Icon
*1
Presets
*1
Clock/Screen
*1
DISP Button
(Tune Up) Icon
*1
More
*1
(P 182)
Audio system with touch screen
Page 19 of 573
18Quick Reference Guide
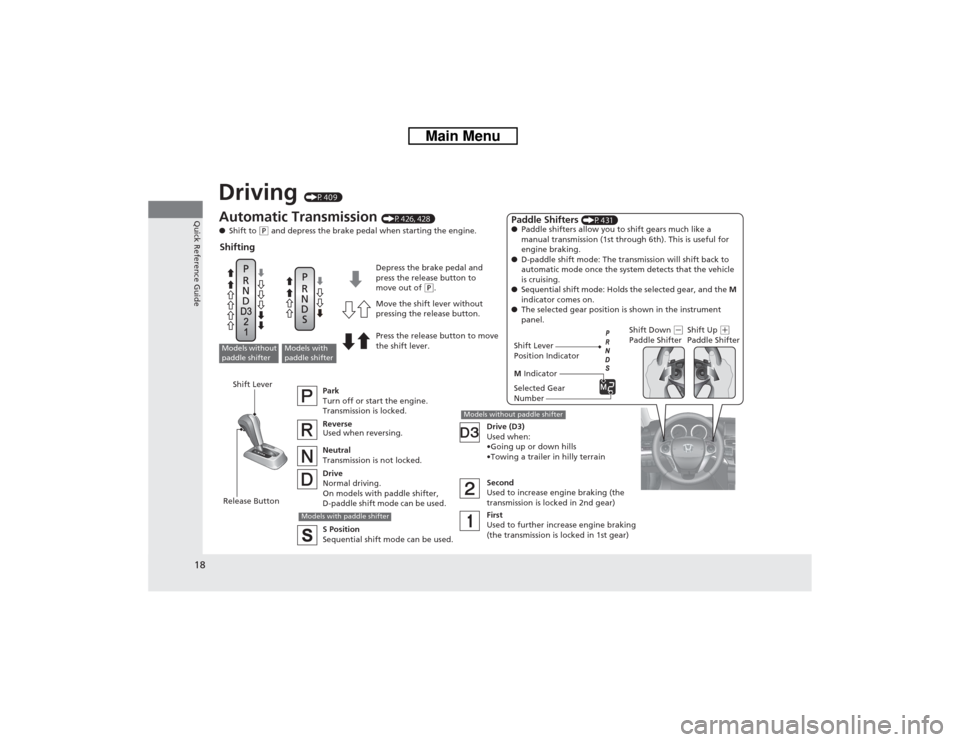
Driving
(P409)
Release ButtonShift LeverAutomatic Transmission
(P426, 428)
●Shift to
(P and depress the brake pedal when starting the engine.
Shifting
Park
Turn off or start the engine.
Transmission is locked.
Reverse
Used when reversing.
Neutral
Transmission is not locked.
Drive
Normal driving.
On models with paddle shifter,
D-paddle shift mode can be used.Drive (D3)
Used when:
•Going up or down hills
•Towing a trailer in hilly terrain
Second
Used to increase engine braking (the
transmission is locked in 2nd gear)
First
Used to further increase engine braking
(the transmission is locked in 1st gear)
Models with
paddle shifter
Models without
paddle shifter
S Position
Sequential shift mode can be used.
Models with paddle shifter
Models without paddle shifter
Paddle Shifters
(P431)
●Paddle shifters allow you to shift gears much like a
manual transmission (1st through 6th). This is useful for
engine braking.
●D-paddle shift mode: The transmission will shift back to
automatic mode once the system detects that the vehicle
is cruising.
●Sequential shift mode: Holds the selected gear, and the M
indicator comes on.
●The selected gear position is shown in the instrument
panel.
Shift Down
(-
Paddle ShifterShift Up
(+
Paddle Shifter
Selected Gear
Number M Indicator Shift Lever
Position Indicator Depress the brake pedal and
press the release button to
move out of
(P.
Move the shift lever without
pressing the release button.
Press the release button to move
the shift lever.
Page 20 of 573
19Quick Reference Guide
VSA® OFF Button
(P 443)
●The vehicle stability assist (VSA®) system
helps stabilize the vehicle during
cornering, and helps maintain traction
while accelerating on loose or slippery
road surfaces.
●VSA® comes on automatically every time
you start the engine.
●To turn VSA® on or off, press and hold
the button until you hear a beep.
Cruise Control
(P 432)
●Cruise control allows you to maintain a
set speed without keeping your foot on
the accelerator pedal.
●To use cruise control, press the CRUISE
button, then press –/SET once you have
received the desired speed (above 25 mph
or 40 km/h).
Tire Pressure Monitoring
System (TPMS)
(P 446)
●TPMS monitors tire pressure.
●TPMS is turned on automatically every
time you start the engine.
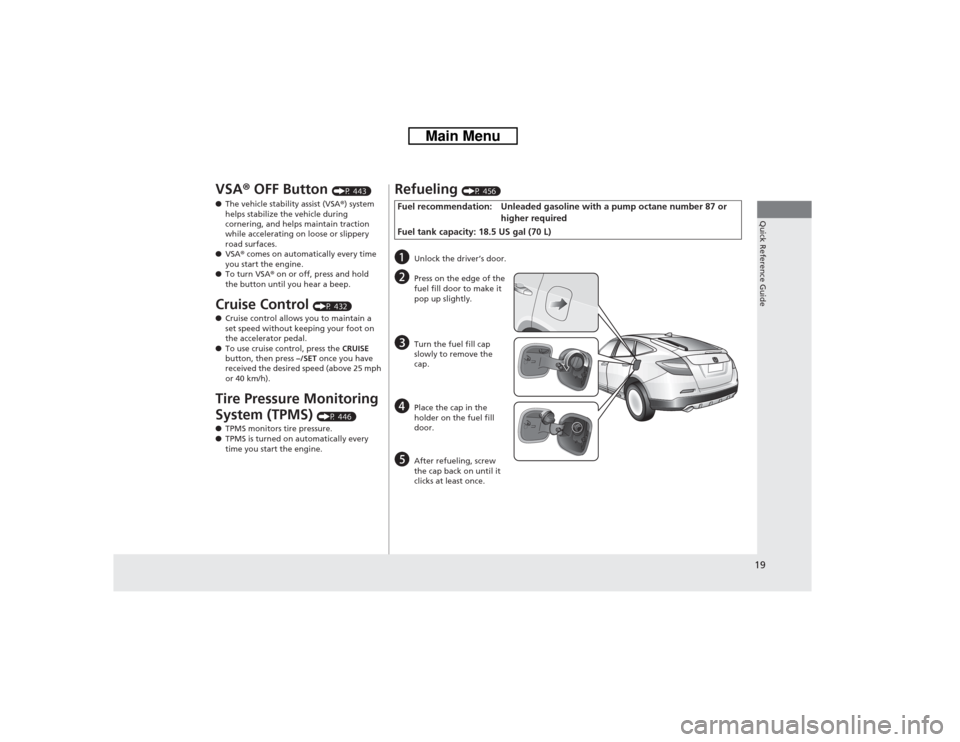
Refueling
(P 456)
Fuel recommendation: Unleaded gasoline with a pump octane number 87 or
higher required
Fuel tank capacity: 18.5 US gal (70 L)a
Unlock the driver’s door.
b
Press on the edge of the
fuel fill door to make it
pop up slightly.
c
Turn the fuel fill cap
slowly to remove the
cap.
d
Place the cap in the
holder on the fuel fill
door.
e
After refueling, screw
the cap back on until it
clicks at least once.