audio HONDA CROSSTOUR 2015 1.G User Guide
[x] Cancel search | Manufacturer: HONDA, Model Year: 2015, Model line: CROSSTOUR, Model: HONDA CROSSTOUR 2015 1.GPages: 573
Page 85 of 573
84
uuGauges and Displays uInformation Display
Instrument Panel
Information Display
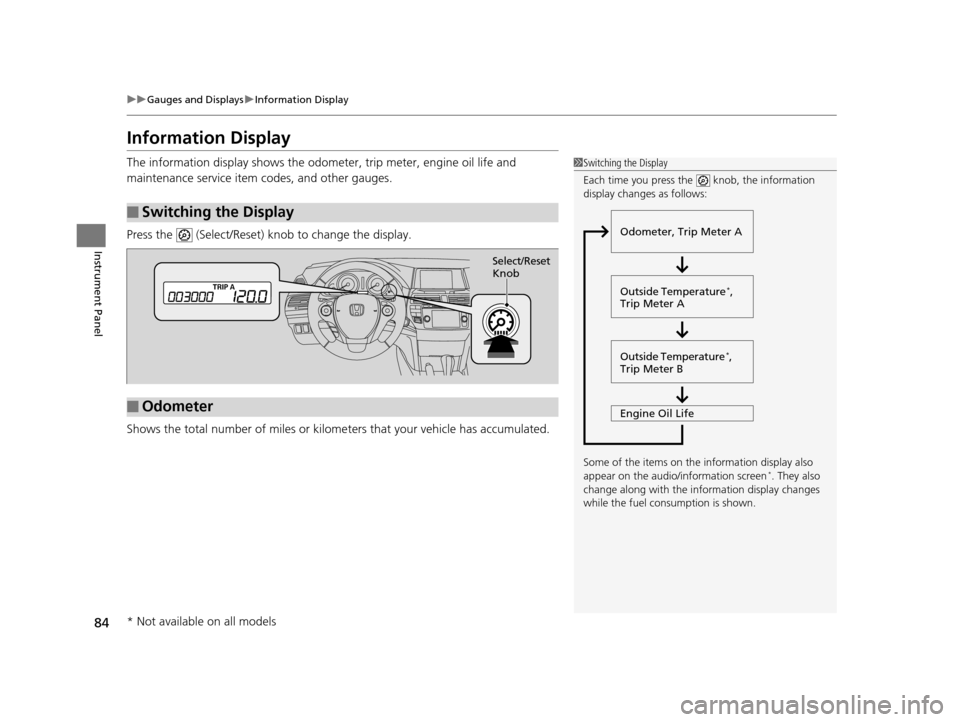
The information display sh ows the odometer, trip meter, engine oil life and
maintenance service item codes, and other gauges.
Press the (Select/Reset) knob to change the display.
Shows the total number of miles or kilome ters that your vehicle has accumulated.
■Switching the Display
1Switching the Display
Each time you press the knob, the information
display changes as follows:
Some of the items on the information display also
appear on the audio/information screen
*. They also
change along with the info rmation display changes
while the fuel consumption is shown.
Outside Temperature*,
Trip Meter B
Engine Oil Life Odometer, Trip Meter A
Outside Temperature
*,
Trip Meter A
■Odometer
Select/Reset
Knob
* Not available on all models
15 CROSSTOUR-31TP66500.book 84 ページ 2014年7月31日 木曜日 午後3時23分
Page 87 of 573
uuGauges and Displays uInformation Display
86
Instrument Panel
Shows the outside temperature in Fahr enheit (U.S.) or Celsius (Canada).
■Adjusting the outside temperature display
Adjust the temperature reading up to ±5°F or ±3°C if the temperature reading
seems incorrect.
1. Turn the ignition switch to ON
(w*1.
2. Press and hold the (Select/Reset) k nob for 10 seconds or more while the
outside temperature is shown on the information display.
u The information display goes into temp erature adjustment mode. The display
starts showing from -5°F to +5°F (U.S.) or -3°C to +3°C (Canada).
3. Release the knob when the ri ght adjustment amount is shown.
u The adjustment is complete.
*1: Models with the smart entry system have an ENGINE START/STOP button instead of an
ignition switch.
■Outside Temperature*1 Outside Temperature*
The temperature sensor is in the front bumper. Road
heat and exhaust from anothe r vehicle can affect the
temperature reading when your vehicle speed is less
than 19 mph (30 km/h).
It may take several minutes for the display to be
updated after the temperature reading has stabilized.
Use the audio/information screen’s customized
features to correct the temperature. 2 Customized Features
* P. 280
Models with audio touch screen
* Not available on all models
15 CROSSTOUR-31TP66500.book 86 ページ 2014年7月31日 木曜日 午後3時23分
Page 89 of 573
88
Controls
Setting the Clock
Clock
You can adjust the time in the clock display with the ignition switch in ON (w*1.
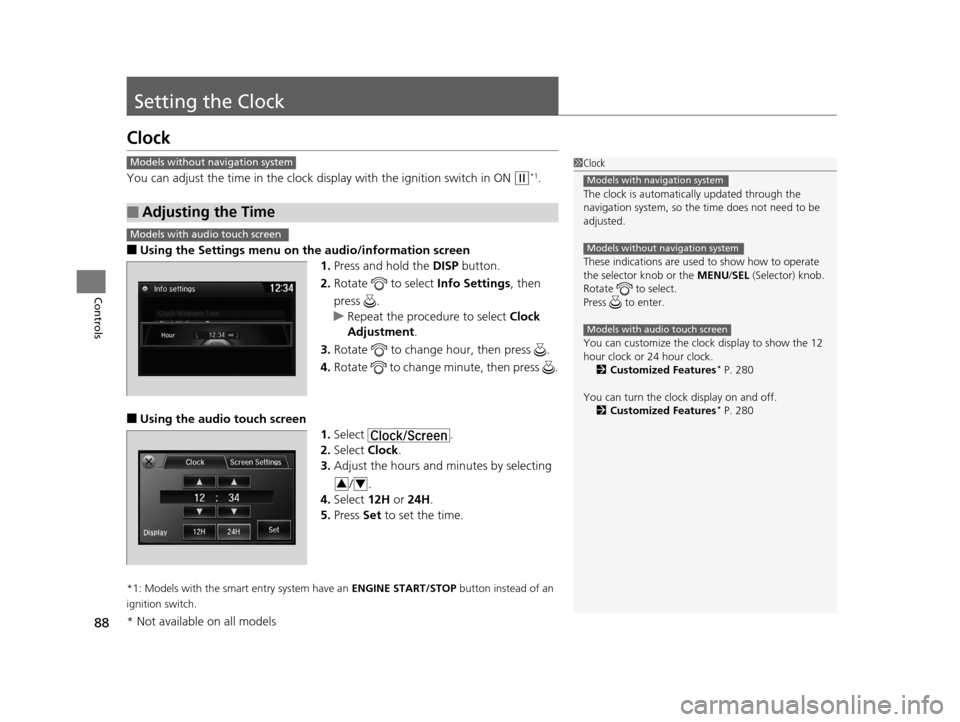
■Using the Settings menu on the audio/information screen
1. Press and hold the DISP button.
2. Rotate to select Info Settings, then
press .
u Repeat the procedure to select Clock
Adjustment .
3. Rotate to change hour, then press .
4. Rotate to change minute, then press .
■Using the audio touch screen
1.Select .
2. Select Clock.
3. Adjust the hours and minutes by selecting
/.
4. Select 12H or 24H .
5. Press Set to set the time.
*1: Models with the smart entry system have an ENGINE START/STOP button instead of an
ignition switch.
■Adjusting the Time
1 Clock
The clock is automatica lly updated through the
navigation system, so the ti me does not need to be
adjusted.
These indications are used to show how to operate
the selector knob or the MENU/SEL (Selector) knob.
Rotate to select.
Press to enter.
You can customize the clock display to show the 12
hour clock or 24 hour clock. 2 Customized Features
* P. 280
You can turn the clock display on and off. 2 Customized Features
* P. 280
Models with navigation system
Models without navigation system
Models with audio touch screen
Models without navigation system
Models with audio touch screen
34
* Not available on all models
15 CROSSTOUR-31TP66500.book 88 ページ 2014年7月31日 木曜日 午後3時23分
Page 90 of 573
Continued89
uuSetting the Clock uClock
Controls
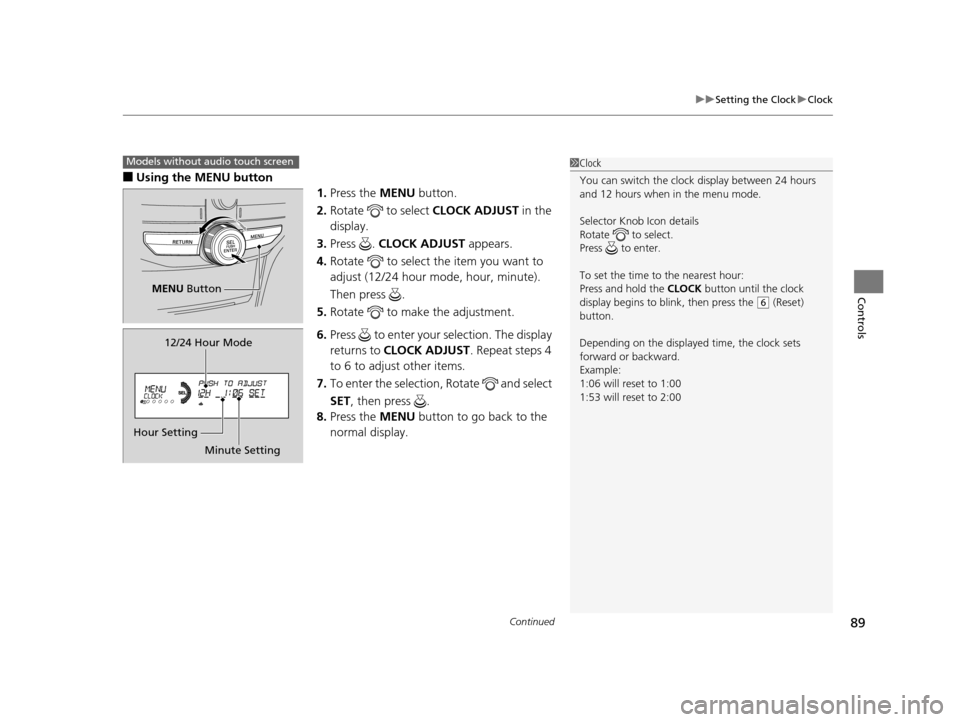
■Using the MENU button
1.Press the MENU button.
2. Rotate to select CLOCK ADJUST in the
display.
3. Press . CLOCK ADJUST appears.
4. Rotate to select the item you want to
adjust (12/24 hour mode, hour, minute).
Then press .
5. Rotate to make the adjustment.
6. Press to enter your selection. The display
returns to CLOCK ADJUST . Repeat steps 4
to 6 to adjust other items.
7. To enter the selection, Rotate and select
SET, then press .
8. Press the MENU button to go back to the
normal display.
1 Clock
You can switch the clock display between 24 hours
and 12 hours when in the menu mode.
Selector Knob Icon details
Rotate to select.
Press to enter.
To set the time to the nearest hour:
Press and hold the CLOCK button until the clock
display begins to blink, then press the
( 6 (Reset)
button.
Depending on the displayed time, the clock sets
forward or backward.
Example:
1:06 will reset to 1:00
1:53 will reset to 2:00
Models without audio touch screen
MENU Button
Minute Setting
Hour Setting 12/24 Hour Mode
15 CROSSTOUR-31TP66500.book 89 ページ 2014年7月31日 木曜日 午後3時23分
Page 95 of 573
94
uuLocking and Unlocking the Doors uLocking/Unlocking the Doors from the Outside
Controls
Locking/Unlocking the Doors from the Outside
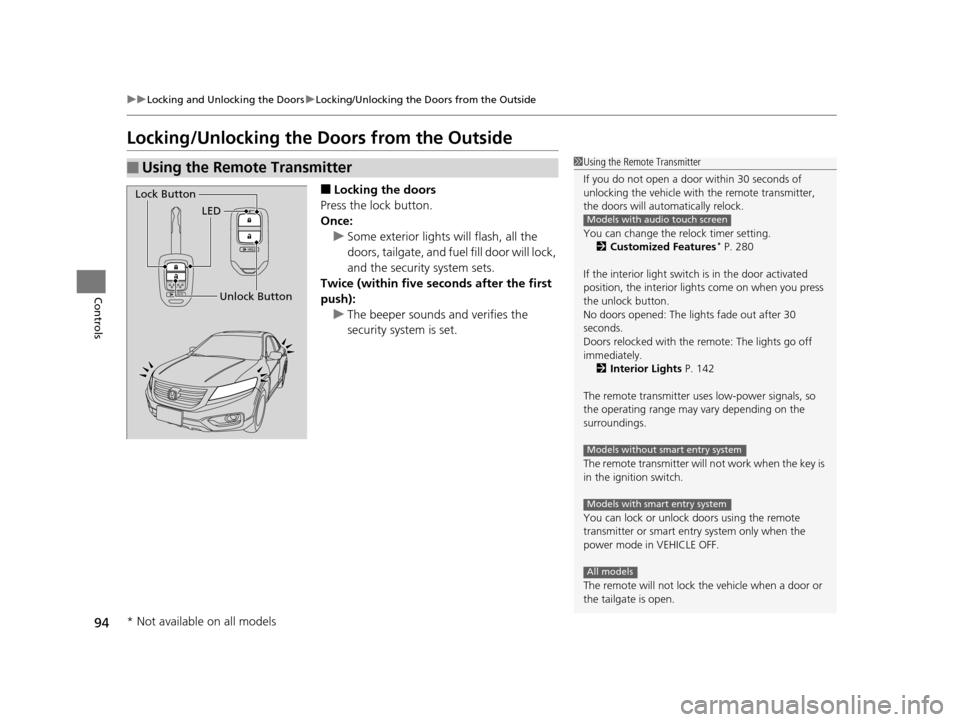
■Locking the doors
Press the lock button.
Once: u Some exterior lights will flash, all the
doors, tailgate, and fuel fill door will lock,
and the security system sets.
Twice (within five se conds after the first
push): u The beeper sounds and verifies the
security system is set.
■Using the Remote Transmitter1Using the Remote Transmitter
If you do not open a door within 30 seconds of
unlocking the vehicle with the remote transmitter,
the doors will automatically relock.
You can change the relock timer setting. 2 Customized Features
* P. 280
If the interior light switch is in the door activated
position, the interior light s come on when you press
the unlock button.
No doors opened: The li ghts fade out after 30
seconds.
Doors relocked with the remote: The lights go off
immediately. 2 Interior Lights P. 142
The remote transmitter us es low-power signals, so
the operating range may vary depending on the
surroundings.
The remote transmitter will not work when the key is
in the ignition switch.
You can lock or unlock doors using the remote
transmitter or smart entry system only when the
power mode in VEHICLE OFF.
The remote will not lock th e vehicle when a door or
the tailgate is open.
Models with audio touch screen
Models without smart entry system
Models with smart entry system
All models
LED
Unlock Button
Lock Button
* Not available on all models
15 CROSSTOUR-31TP66500.book 94 ページ 2014年7月31日 木曜日 午後3時23分
Page 96 of 573
Continued95
uuLocking and Unlocking the Doors uLocking/Unlocking the Doors from the Outside
Controls
■Unlocking the doors
Press the unlock button.
Once: u Some exterior lights flash twice, and th e driver’s door and fuel fill door unlock.
Twice: u The remaining doors and tailgate unlock.1Using the Remote Transmitter
If the distance at which it works varies, the battery is
probably low.
If the LED does not come on when you press a
button, the battery is dead.
2 Replacing the Button Battery P. 507
You can customize the door unlock mode setting. 2 Customized Features
* P. 280
Models with audio touch screen
* Not available on all models
15 CROSSTOUR-31TP66500.book 95 ページ 2014年7月31日 木曜日 午後3時23分
Page 99 of 573
uuLocking and Unlocking the Doors uLocking/Unlocking the Doors from the Outside
98
Controls
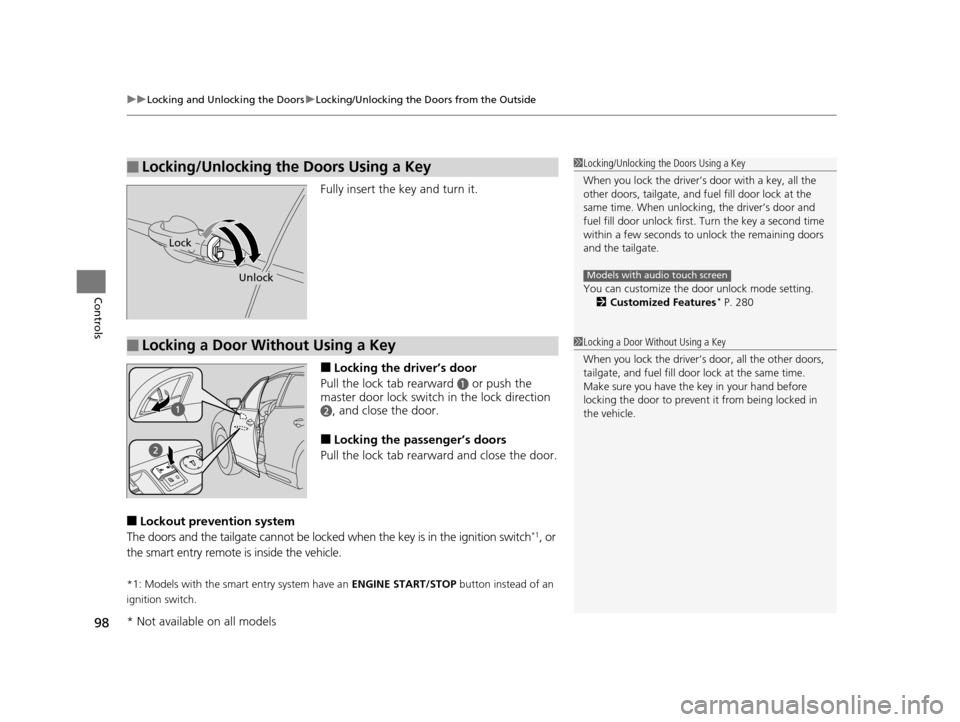
Fully insert the key and turn it.
■Locking the driver’s door
Pull the lock tab rearward
a or push the
master door lock switch in the lock direction
b, and close the door.
■Locking the passenger’s doors
Pull the lock tab rearwa rd and close the door.
■Lockout prevention system
The doors and the tailgate cannot be locked when the key is in the ignition switch*1, or
the smart entry remote is inside the vehicle.
*1: Models with the smart entry system have an ENGINE START/STOP button instead of an
ignition switch.
■Locking/Unlocking the Doors Using a Key1 Locking/Unlocking the Doors Using a Key
When you lock the driver’s door with a key, all the
other doors, tailgate, and fu el fill door lock at the
same time. When unlocki ng, the driver’s door and
fuel fill door unlock first. Turn the key a second time
within a few seconds to unlock the remaining doors
and the tailgate.
You can customize the door unlock mode setting.
2 Customized Features
* P. 280
Models with audio touch screen
Lock
Unlock
■Locking a Door Without Using a Key1Locking a Door Without Using a Key
When you lock the driver’s door, all the other doors,
tailgate, and fuel fill door lock at the same time.
Make sure you have the key in your hand before
locking the door to prevent it from being locked in
the vehicle.
* Not available on all models
15 CROSSTOUR-31TP66500.book 98 ページ 2014年7月31日 木曜日 午後3時23分
Page 102 of 573
101
uuLocking and Unlocking the Doors uAuto Door Locking/Unlocking
Controls
Auto Door Locking/Unlocking
Your vehicle locks all doors and unlocks the driver’s door automatically when a
certain condition is met.
■Drive lock mode
All doors and tailgate lock when the vehicle’s speed reaches about 10 mph (15 km/h).
■Park unlock mode
The driver’s door unlocks when the shift lever is moved into
(P with the brake pedal
depressed.
■Auto Door Locking
■Auto Door Unlocking
1 Auto Door Locking/Unlocking
You can turn off or cha nge to another auto door
locking/unlocking sett ing using the audio/
information screen. 2 Customized Features
* P. 280
You can turn off or cha nge to another auto door
locking/unlocking setting us ing the master door lock
switch. 2 Customizing the Auto Door Locking/
Unlocking Setting
* P. 102
Models with audio/information screen
Models without audio/information screen
* Not available on all models
15 CROSSTOUR-31TP66500.book 101 ページ 2014年7月31日 木曜日 午後3時23分
Page 115 of 573
114
Controls
Operating the Switches Around the Steering Wheel
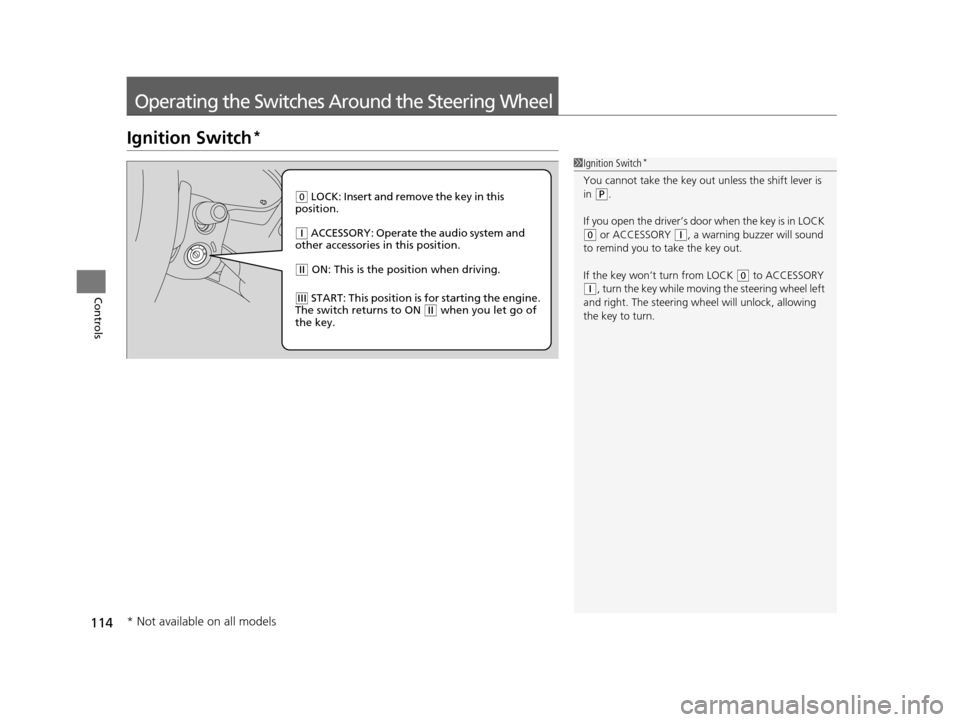
Ignition Switch*
1Ignition Switch*
You cannot take the key out unless the shift lever is
in ( P.
If you open the driver’s door when the key is in LOCK
( 0 or ACCESSORY ( q, a warning buzzer will sound
to remind you to take the key out.
If the key won’t turn from LOCK
( 0 to ACCESSORY
(q, turn the key while moving the steering wheel left
and right. The steering wh eel will unlock, allowing
the key to turn.
( 0 LOCK: Insert and remove the key in this
position.
( q ACCESSORY: Operate the audio system and
other accessories in this position.
( w ON: This is the position when driving.
(e START: This position is for starting the engine.
The switch returns to ON ( w when you let go of
the key.
* Not available on all models
15 CROSSTOUR-31TP66500.book 114 ページ 2014年7月31日 木曜日 午後3時23分
Page 116 of 573
115
uuOperating the Switches Around the Steering Wheel uENGINE START/STOP Button*
Continued
Controls
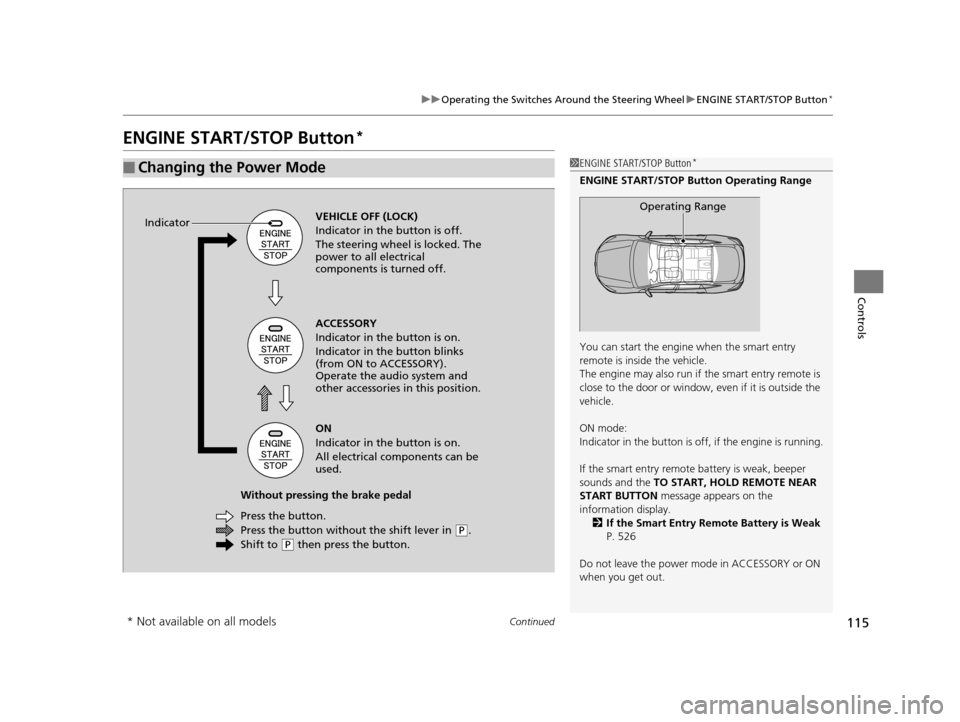
ENGINE START/STOP Button*
■Changing the Power Mode1ENGINE START/STOP Button*
ENGINE START/STOP Button Operating Range
You can start the engine when the smart entry
remote is inside the vehicle.
The engine may also run if the smart entry remote is
close to the door or window, ev en if it is outside the
vehicle.
ON mode:
Indicator in the button is of f, if the engine is running.
If the smart entry remote battery is weak, beeper
sounds and the TO START, HOLD REMOTE NEAR
START BUTTON message appears on the
information display. 2 If the Smart Entry Remote Battery is Weak
P. 526
Do not leave the power mode in ACCESSORY or ON
when you get out.
Operating RangeVEHICLE OFF (LOCK)
Indicator in the button is off.
The steering wheel is locked. The
power to all electrical
components is turned off.
Press the button without the shift lever in
( P.
Shift to
( P then press the button.
Press the button. Without pressing the brake pedal ACCESSORY
Indicator in the button is on.
Indicator in the button blinks
(from ON to ACCESSORY).
Operate the audio system and
other accessories in this position.
ON
Indicator in the button is on.
All electrical components can be
used.
Indicator
* Not available on all models
15 CROSSTOUR-31TP66500.book 115 ページ 2014年7月31日 木曜日 午後3時23分