engine HONDA CRV 2023 Manual PDF
[x] Cancel search | Manufacturer: HONDA, Model Year: 2023, Model line: CRV, Model: HONDA CRV 2023Pages: 719, PDF Size: 13.43 MB
Page 675 of 719
674
Handling the Unexpected
Overheating
How to Handle Overheating
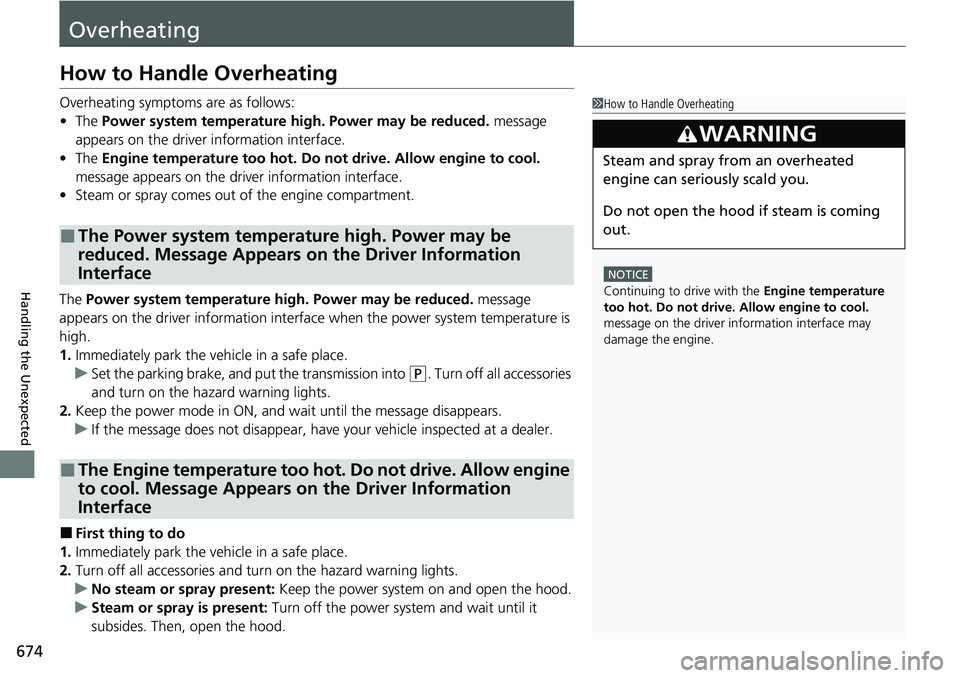
Overheating symptoms are as follows:
•The Power system temperature high. Power may be reduced. message
appears on the driver information interface.
• The Engine temperature too hot. Do not drive. Allow engine to cool.
message appears on the driv er information interface.
• Steam or spray comes out of the engine compartment.
The Power system temperature hi gh. Power may be reduced. message
appears on the driver informa tion interface when the power system temperature is
high.
1. Immediately park the vehicle in a safe place.
u Set the parking brake, and put the transmission into
(P. Turn off all accessories
and turn on the hazard warning lights.
2. Keep the power mode in ON, and wait until the message disappears.
u If the message does not disappear, have your vehicle inspected at a dealer.
■First thing to do
1. Immediately park the vehicle in a safe place.
2. Turn off all accessories and turn on the hazard warning lights.
u No steam or spray present: Keep the power system on and open the hood.
u Steam or spray is present: Turn off the power system and wait until it
subsides. Then, open the hood.
■The Power system temperature high. Power may be
reduced. Message Appears on the Driver Information
Interface
■The Engine temperature too hot. Do not drive. Allow engine
to cool. Message Appears on the Driver Information
Interface
1 How to Handle Overheating
NOTICE
Continuing to drive with the Engine temperature
too hot. Do not drive. Allow engine to cool.
message on the driver information interface may
damage the engine.
3WARNING
Steam and spray from an overheated
engine can seri ously scald you.
Do not open the hood if steam is coming
out.
Page 676 of 719
675
uuOverheating uHow to Handle Overheating
Handling the Unexpected
■Next thing to do
1.Check that the cooling fan is operating and
turn the power system off once the Engine
temperature too hot. Do not drive.
Allow engine to cool. message on the
driver information interface disappears.
u If the cooling fan is not operating,
immediately turn the power system off.
2. Once the engine has cooled down, inspect
the coolant level and check the cooling
system components for leaks.
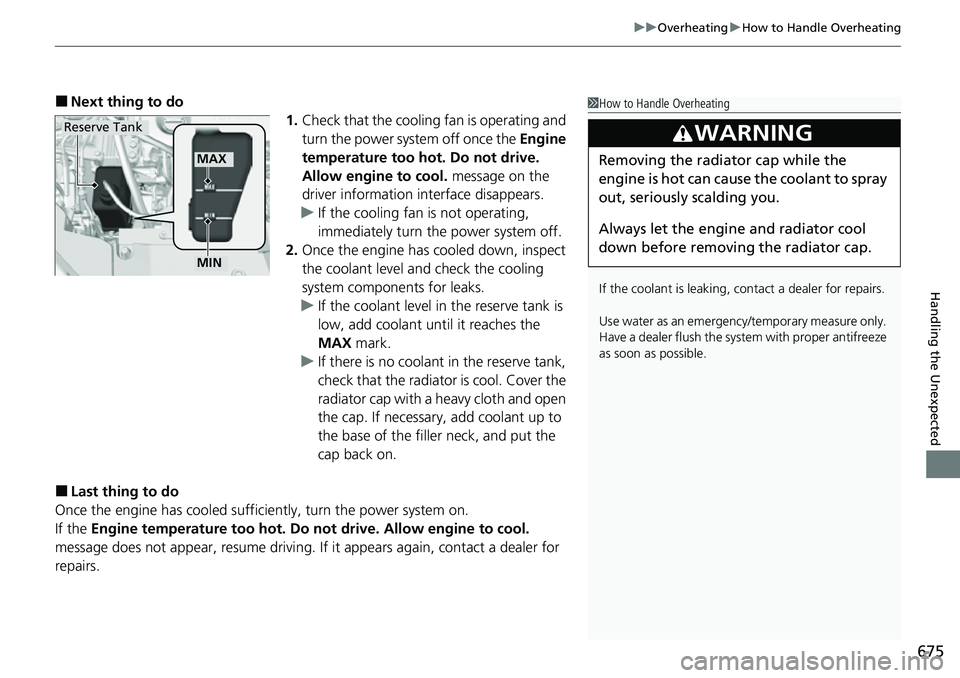
u If the coolant level in the reserve tank is
low, add coolant until it reaches the
MAX mark.
u If there is no coolant in the reserve tank,
check that the radiator is cool. Cover the
radiator cap with a heavy cloth and open
the cap. If necessary, add coolant up to
the base of the filler neck, and put the
cap back on.
■Last thing to do
Once the engine has cooled suffici ently, turn the power system on.
If the Engine temperature too hot. Do no t drive. Allow engine to cool.
message does not appear, resume driving. If it appears again, contact a dealer for
repairs.
1 How to Handle Overheating
If the coolant is leaking, contact a dealer for repairs.
Use water as an emergency/temporary measure only.
Have a dealer flush the system with proper antifreeze
as soon as possible.
3WARNING
Removing the radiator cap while the
engine is hot can cause the coolant to spray
out, seriously scalding you.
Always let the engine and radiator cool
down before removing the radiator cap.MAX
Reserve Tank
MIN
Page 677 of 719
676
Handling the Unexpected
Indicator, Coming On/Blinking
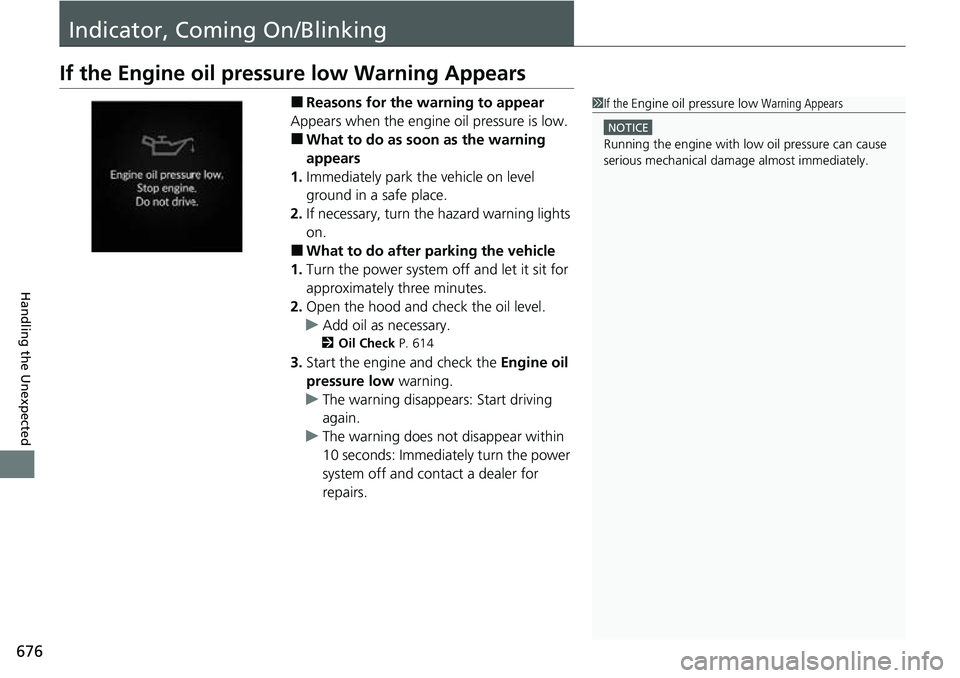
If the Engine oil pressure low Warning Appears
■Reasons for the warning to appear
Appears when the engine oil pressure is low.
■What to do as soon as the warning
appears
1. Immediately park the vehicle on level
ground in a safe place.
2. If necessary, turn the hazard warning lights
on.
■What to do after parking the vehicle
1. Turn the power system off and let it sit for
approximately three minutes.
2. Open the hood and check the oil level.
u Add oil as necessary.
2 Oil Check P. 614
3.Start the engine and check the Engine oil
pressure low warning.
u The warning disappears: Start driving
again.
u The warning does not disappear within
10 seconds: Immediately turn the power
system off and contact a dealer for
repairs.
1If the Engine oil pressure low Warning Appears
NOTICE
Running the engine with low oil pressure can cause
serious mechanical damage almost immediately.
Page 679 of 719
678
uuIndicator, Coming On/BlinkinguIf the Malfunction Indicator Lamp Comes On or Blinks
Handling the Unexpected
If the Malfunction Indicator Lamp Comes On or
Blinks
■Reasons for the indicator lamp to come on or blink
• Comes on when there is a problem with the engine emissions control
system.
• Blinks when engine misfiring is detected.
■What to do when the indicator lamp comes on
• Avoid high speeds and immediately get your vehicle inspected at a
dealer.
• Comes on when there is no petrol in the fuel tank, and goes off after
vehicle is refueled, power mode is turned on, vehicle is driven, and the
power system is turned off multiple times. If it does not go off, have
your vehicle checked by a dealer.
■What to do when the indicator lamp blinks
Park the vehicle in a safe place with no flammable items and wait at least
10 minutes or more with the engine stopped until it cools.
1 If the Malfunction Indicato r Lamp Comes On or Blinks
NOTICE
If you drive with the malf unction indicator lamp on,
the emissions control system and the engine could be
damaged.
If the malfunction indicator lamp blinks again when
restarting the engine, drive to the nearest dealer at
31 mph (50 km/h) or less. Have your vehicle
inspected.
Page 684 of 719
683Continued
Handling the Unexpected
Fuses
Fuse Locations
If any electrical devices are not working, set the power mode to VEHICLE OFF and
check to see if any applicable fuse is blown.
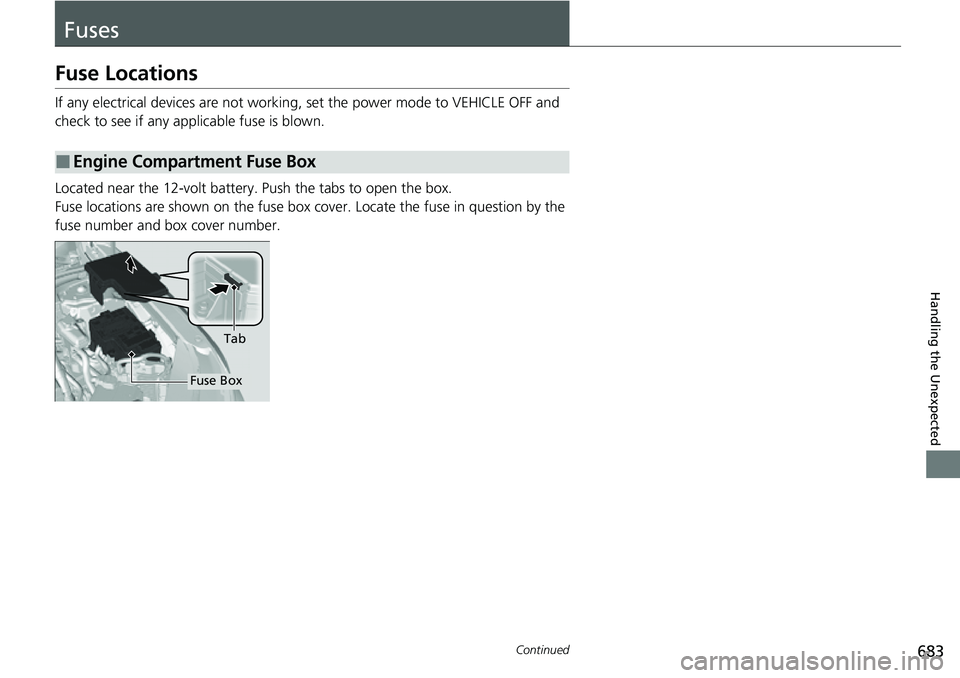
Located near the 12-volt battery. Push the tabs to open the box.
Fuse locations are shown on the fuse box co ver. Locate the fuse in question by the
fuse number and box cover number.
■Engine Compartment Fuse Box
Tab
Fuse Box
Page 688 of 719
687
uuFuses uInspecting and Changing Fuses
Continued
Handling the Unexpected
Inspecting and Changing Fuses
1. Set the power mode to VEHICLE OFF. Turn
headlights and all accessories off.
2. Remove the fuse box cover.
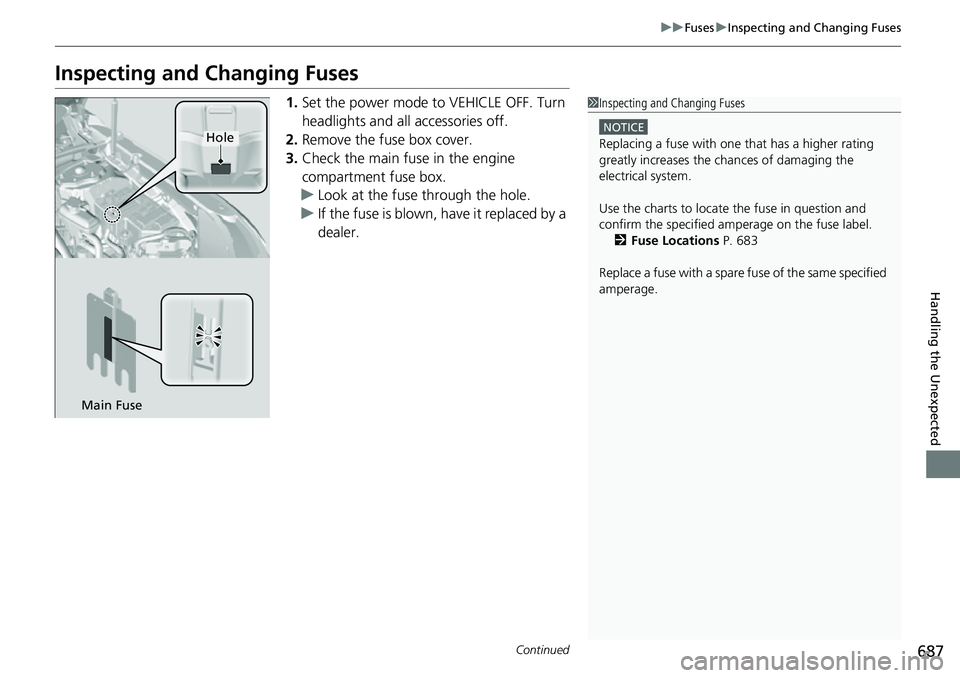
3. Check the main fuse in the engine
compartment fuse box.
u Look at the fuse through the hole.
u If the fuse is blown, have it replaced by a
dealer.1Inspecting and Changing Fuses
NOTICE
Replacing a fuse with on e that has a higher rating
greatly increases the chances of damaging the
electrical system.
Use the charts to locate the fuse in question and
confirm the specified amperage on the fuse label. 2 Fuse Locations P. 683
Replace a fuse with a spare fuse of the same specified
amperage.
Main Fuse
Hole
Page 689 of 719
uuFuses uInspecting and Changing Fuses
688
Handling the Unexpected
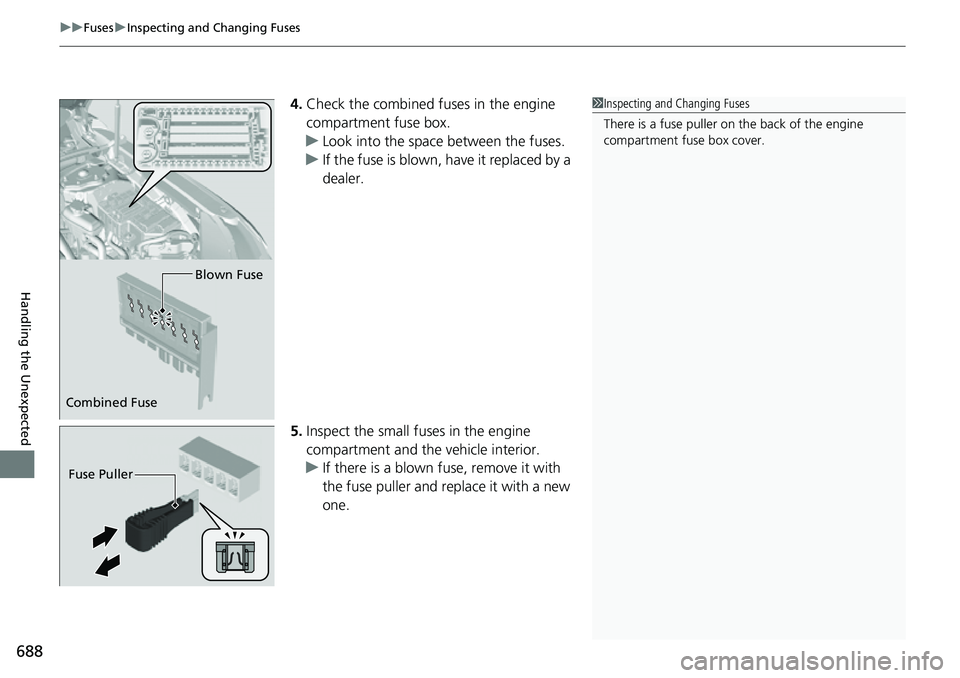
4. Check the combined fuses in the engine
compartment fuse box.
u Look into the space between the fuses.
u If the fuse is blown, have it replaced by a
dealer.
5. Inspect the small fuses in the engine
compartment and the vehicle interior.
u If there is a blown fuse, remove it with
the fuse puller and replace it with a new
one.1Inspecting and Changing Fuses
There is a fuse puller on the back of the engine
compartment fuse box cover.
Combined Fuse Blown Fuse
Fuse Puller
Page 694 of 719
693
Information
This chapter includes your vehicle’s specifications, locations of identification numbers, and other
information required by regulation.
Specifications .................................... 694
Identification Numbers Vehicle Identification Number (VIN), Engine Number, Motor Number, and
Transmission Number ..................... 696
Devices that Emit Radio Waves ....... 697
Reporting Safety Defects ................. 698Emissions Testing
Testing of Readiness Codes.............. 699
Warranty Coverages ........................ 701
Authorized Manuals ......................... 704
Customer Service Information ......... 705
Open Source Licenses Meter Open Source License ............. 706
TCU Open Source License
*.............. 706
Front Sensor Camera Open Source License ....................................... 707
* Not available on all models
Page 695 of 719
694
Information
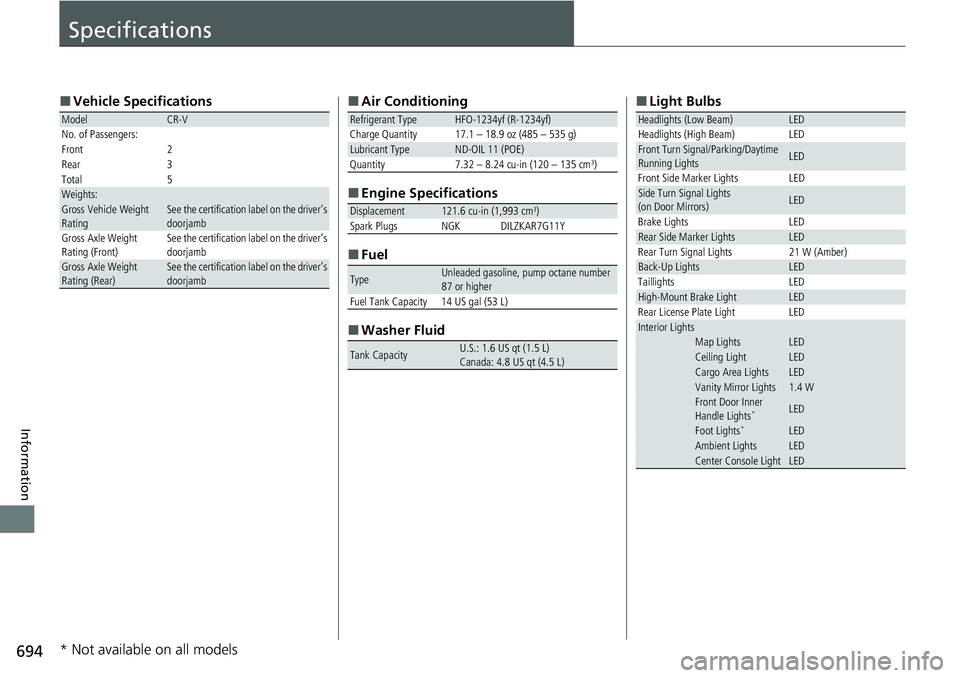
Specifications
■Vehicle Specifications
ModelCR-V
No. of Passengers:
Front 2
Rear 3
Total 5
Weights:Gross Vehicle Weight
Rating See the certification label on the driver’s
doorjamb
Gross Axle Weight
Rating (Front)See the certification label on the driver’s
doorjamb
Gross Axle Weight
Rating (Rear)See the certification label on the driver’s
doorjamb
■ Air Conditioning
■ Engine Specifications
■ Fuel
■ Washer Fluid
Refrigerant Type HFO-1234yf (R-1234yf)
Charge Quantity 17.1 – 18.9 oz (485 – 535 g)
Lubricant TypeND-OIL 11 (POE)
Quantity 7.32 – 8.24 cu-in (120 – 135 cm3)
Displacement121.6 cu-in (1,993 cm3)Spark PlugsNGKDILZKAR7G11Y
TypeUnleaded gasoline, pump octane number
87 or higher
Fuel Tank Capacity 14 US gal (53 L)
Tank CapacityU.S.: 1.6 US qt (1.5 L)
Canada: 4.8 US qt (4.5 L)
■ Light Bulbs
Headlights (Low Beam)LEDHeadlights (High Beam)LEDFront Turn Signal/Parking/Daytime
Running LightsLED
Front Side Marker Lights LED
Side Turn Signal Lights
(on Door Mirrors)LED
Brake Lights LED
Rear Side Marker LightsLED
Rear Turn Signal Lights 21 W (Amber)
Back-Up LightsLED
Taillights LED
High-Mount Brake LightLED
Rear License Plate Light LED
Interior LightsMap LightsLEDCeiling LightLEDCargo Area LightsLEDVanity Mirror Lights1.4 WFront Door Inner
Handle Lights*LED
Foot Lights*LEDAmbient LightsLEDCenter Console LightLED
* Not available on all models
Page 696 of 719
695
uuSpecifications u
Information
■
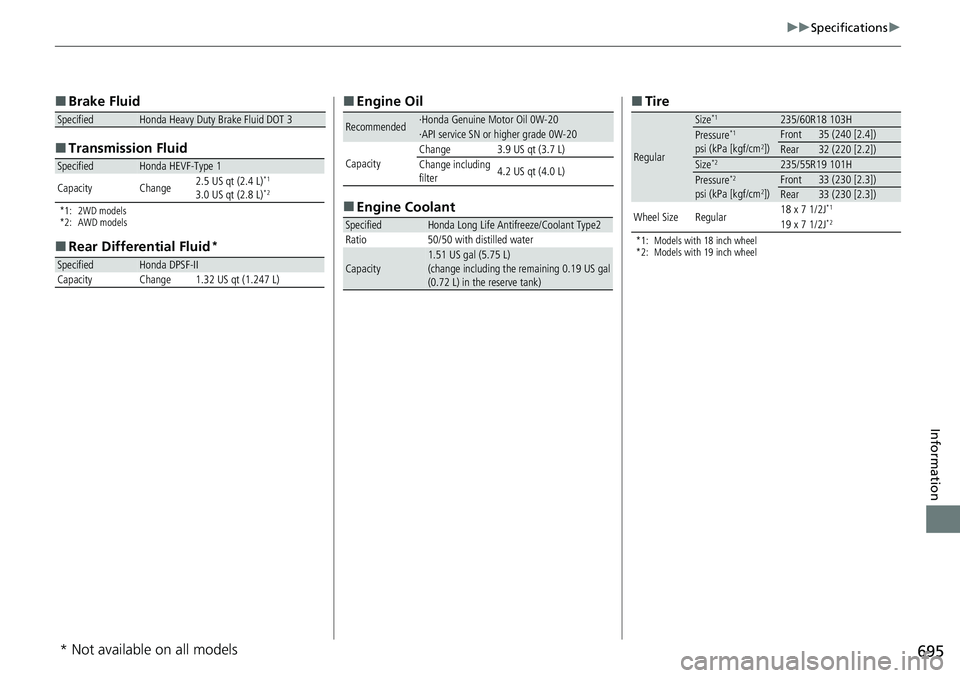
Brake Fluid
■ Transmissi on Fluid
*1: 2WD models
*2: AWD models
■
Rear Differential Fluid*
SpecifiedHonda Heavy Duty Brake Fluid DOT 3
SpecifiedHonda HEVF-Type 1
Capacity Change 2.5 US qt (2.4 L)*1
3.0 US qt (2.8 L)*2
SpecifiedHonda DPSF-II
Capacity Change 1.32 US qt (1.247 L)
■ Engine Oil
■ Engine Coolant
Recommended·Honda Genuine Motor Oil 0W-20·API service SN or higher grade 0W-20
CapacityChange3.9 US qt (3.7 L)
Change including
filter 4.2 US qt (4.0 L)
SpecifiedHonda Long Life Antifreeze/Coolant Type2
Ratio 50/50 with distilled water
Capacity1.51 US gal (5.75 L)
(change including the remaining 0.19 US gal
(0.72 L) in the reserve tank)
■ Tire
*1: Models with 18 inch wheel
*2: Models with 19 inch wheel
Regular
Size*1235/60R18 103HPressure*1
psi (kPa [kgf/cm2])Front35 (240 [2.4])Rear32 (220 [2.2])Size*2235/55R19 101HPressure*2
psi (kPa [kgf/cm2])Front33 (230 [2.3])Rear33 (230 [2.3])
Wheel SizeRegular18 x 7 1/2J*1
19 x 7 1/2J*2
* Not available on all models