remove seats HONDA ELEMENT 2003 1.G Owners Manual
[x] Cancel search | Manufacturer: HONDA, Model Year: 2003, Model line: ELEMENT, Model: HONDA ELEMENT 2003 1.GPages: 338, PDF Size: 4.08 MB
Page 37 of 338
Af ter selecting a proper child seat,
and a good position to install the seat,
there are three main steps in
installing the seat:Make sure the child is properly
strappedinthechildseat
according to the child seat maker’s
instructions. A child who is not
properly secured in a child seat
canbethrownoutof theseatina
crash and be seriously injured.
To provide security during normal
driving maneuvers as well as during
a collision, we recommend that
parents secure a child seat as f irmly
as possible.
When you are not using a child seat,
either remove it and store it in a saf e
place, or make sure it is properly
secured. An unsecured child seat can
be thrown around the vehicle during
a crash or sudden stop and injure
someone.
However, a child seat does not need
to be ‘‘rock solid.’’ In some vehicles
or seating positions, it may be
dif f icult to install a child seat so that
it does not move at all. Some side-to-
side or back-and-f orth movement can
be expected and should not reduce
the child seat’s ef f ectiveness.
If the child seat is not secure, try
installing it in a dif f erent seating
position, or use a dif f erent style of
child seat that can be f irmly secured
in the desired seating position.
All child seats are
designed to be secured to the
vehicle with the lap part of a lap/
shoulder belt. Some child seats
can be secured to the vehicle’s
LATCH anchorage system instead.
A child whose seat is not properly
secured to the vehicle can be
endangered in a crash. See pages , and f or instructions on
howtoproperlysecurechildseats
in this vehicle.
Af ter installing a child
seat, push and pull the seat
f orward and f rom side to side to
verif y that it is secure. 483935
Inst alling a Child Seat
Secure t he child in t he child seat .
Storing a Child Seat
Properly secure t he child seat t o
the vehicle.
Make sure t he child seat is f irmlysecured.
1.
2. 3.
Protecting Children
Driver and Passenger Saf ety33
Page 50 of 338
Since a tether can provide additional
security, we recommend using a
tether whenever one is required or
available. (Tethers are required in
Canada.)Remove the head restraint where
you want to place the child seat.
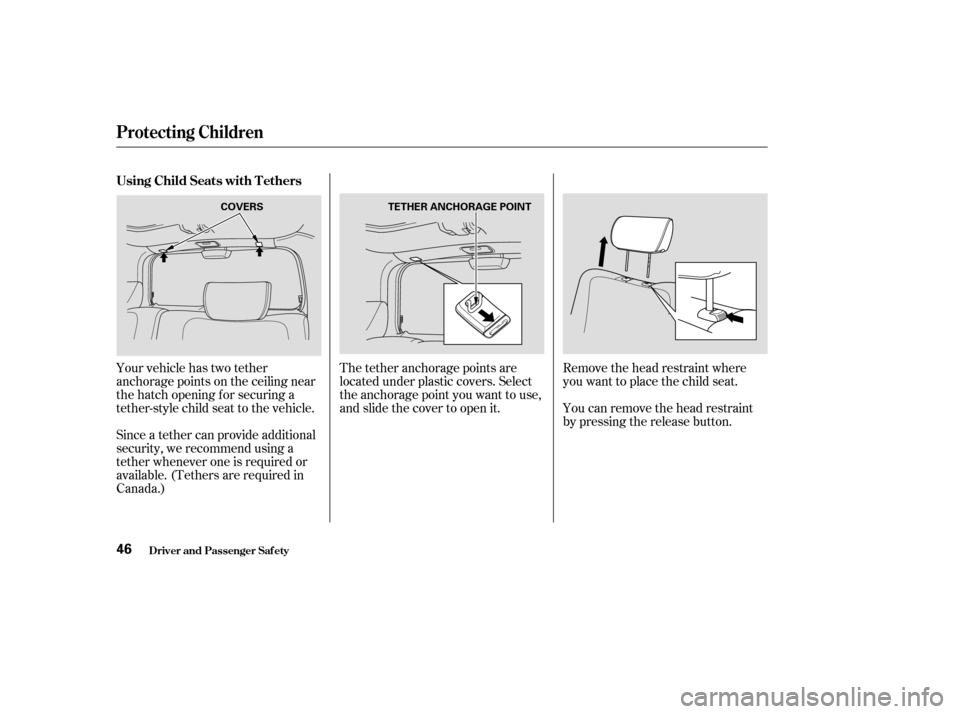
Your vehicle has two tether
anchorage points on the ceiling near
the hatch opening f or securing a
tether-style child seat to the vehicle. The tether anchorage points are
located under plastic covers. Select
the anchorage point you want to use,
and slide the cover to open it. You can remove the head restraint
by pressing the release button.
Using Child Seats with T ethers
Protecting Children
Driver and Passenger Saf ety46
COVERS
TETHER ANCHORAGE POINT
Page 51 of 338
Make sure the removed head
restraints are secured in the cargo
area. Reinstall the head restraints
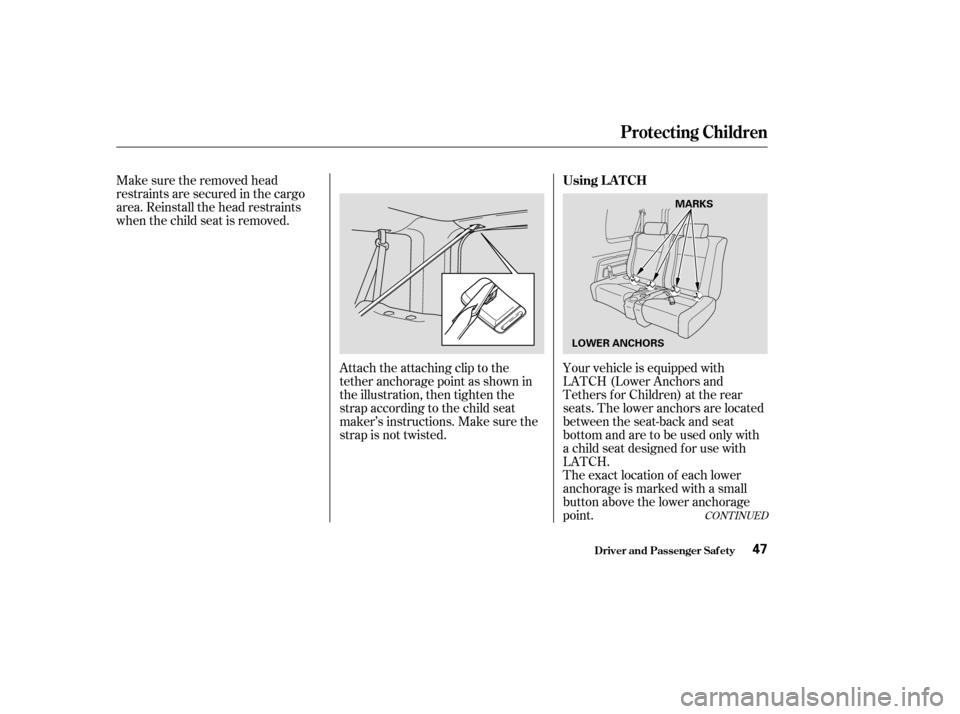
when the child seat is removed.Attach the attaching clip to the
tether anchorage point as shown in
the illustration, then tighten the
strap according to the child seat
maker’s instructions. Make sure the
strap is not twisted.Your vehicle is equipped with
LATCH (Lower Anchors and
Tethers f or Children) at the rear
seats. The lower anchors are located
between the seat-back and seat
bottom and are to be used only with
a child seat designed f or use with
LATCH.
The exact location of each lower
anchorage is marked with a small
button above the lower anchorage
point.
CONT INUED
Driver and Passenger Saf ety
Protecting Children
Using L A T CH
47
LOWER ANCHORSMARKS
Page 53 of 338
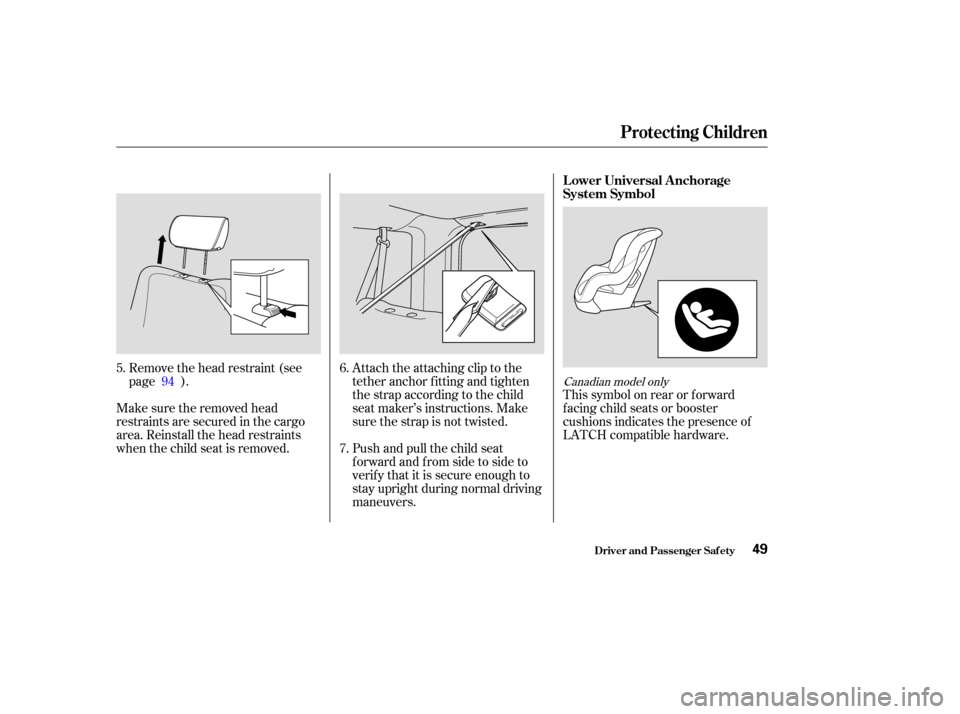
Remove the head restraint (see
page ).
Make sure the removed head
restraints are secured in the cargo
area. Reinstall the head restraints
when the child seat is removed. Attach the attaching clip to the
tether anchor fitting and tighten
the strap according to the child
seat maker’s instructions. Make
sure the strap is not twisted.
Push and pull the child seat
f orward and f rom side to side to
verif y that it is secure enough to
stay upright during normal driving
maneuvers.This symbol on rear or f orward
f acing child seats or booster
cushions indicates the presence of
LATCH compatible hardware.
5.
6.
7.
94
Canadian model only
Protecting Children
Driver and Passenger Saf ety
L ower Universal Anchorage
System Symbol
49
Page 98 of 338
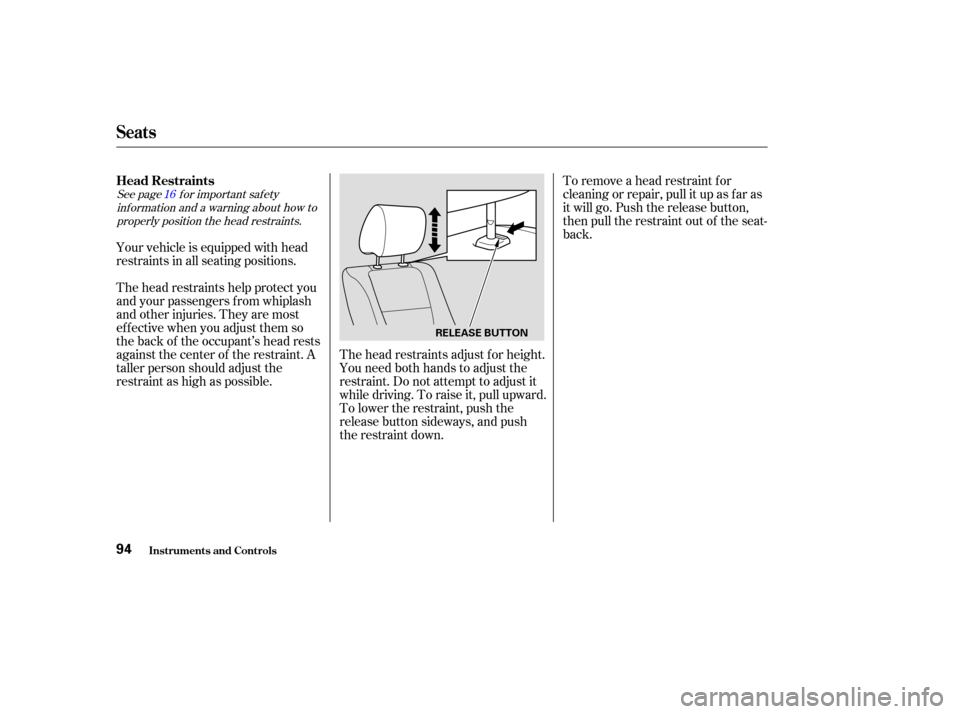
See page f or important saf etyinf ormation and a warning about how toproperly position the head restraints. 16
Your vehicle is equipped with head
restraints in all seating positions.
The head restraints help protect you
and your passengers f rom whiplash
and other injuries. They are most
ef f ective when you adjust them so
the back of the occupant’s head rests
against the center of the restraint. A
taller person should adjust the
restraint as high as possible. To remove a head restraint f or
cleaning or repair, pull it up as f ar as
it will go. Push the release button,
then pull the restraint out of the seat-
back.
The head restraints adjust f or height.
You need both hands to adjust the
restraint. Do not attempt to adjust it
while driving. To raise it, pull upward.
To lower the restraint, push the
release button sideways, and push
the restraint down.
Head Restraints
Seats
Inst rument s and Cont rols94
RELEASE BUTTON
Page 101 of 338
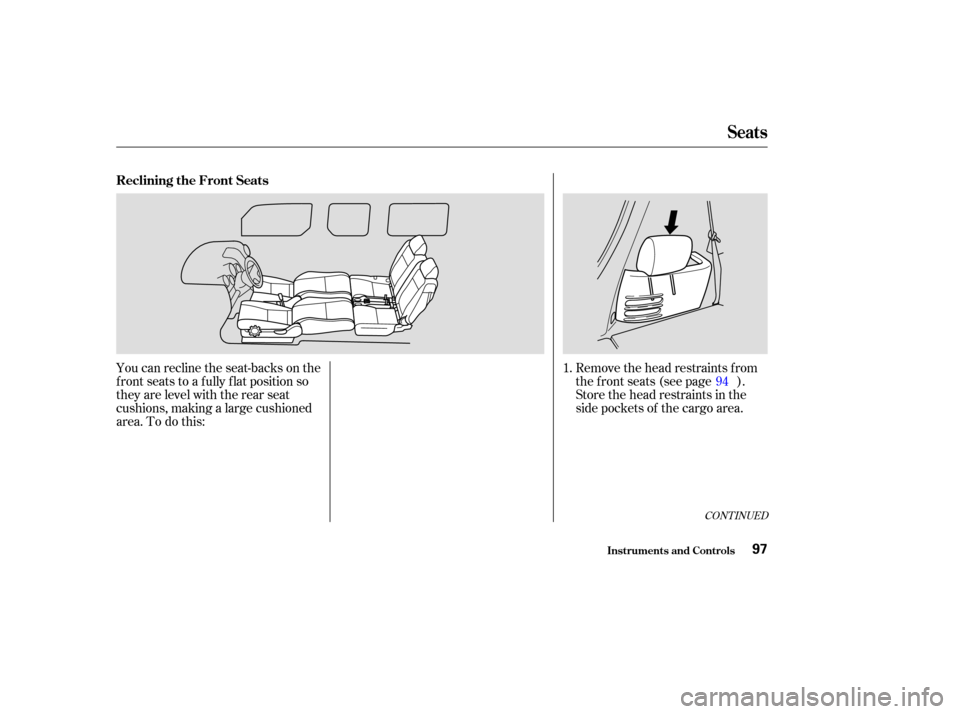
Remove the head restraints f rom
the f ront seats (see page ).
You can recline the seat-backs on the
f ront seats to a f ully f lat position so
they are level with the rear seat
cushions, making a large cushioned
area.Todothis: Store the head restraints in the
side pockets of the cargo area.
1.
94
CONT INUED
Reclining the Front Seats
Seats
Inst rument s and Cont rols97
Page 105 of 338
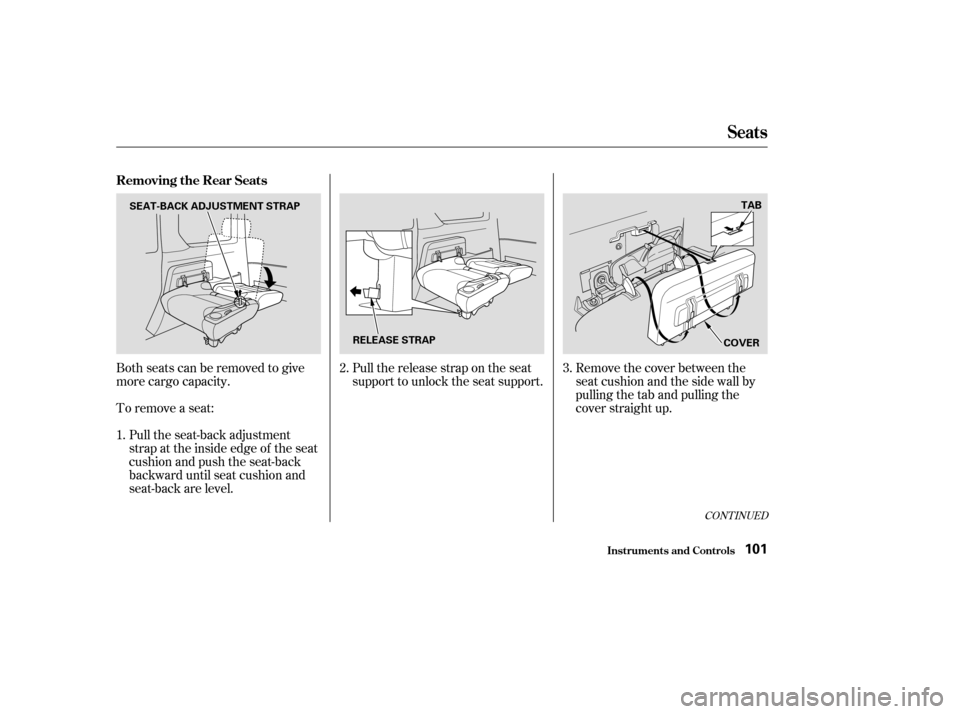
Both seats can be removed to give
more cargo capacity.
To remove a seat:Pull the seat-back adjustment
strap at the inside edge of the seat
cushion and push the seat-back
backward until seat cushion and
seat-back are level. Remove the cover between the
seat cushion and the side wall by
pulling the tab and pulling the
cover straight up.
Pull the release strap on the seat
support to unlock the seat support.
1. 3.
2.
CONT INUED
Removing the Rear Seats
Seats
Inst rument s and Cont rols101
SEAT-BACK ADJUSTMENT STRAP
RELEASE STRAP COVERTAB
Page 106 of 338
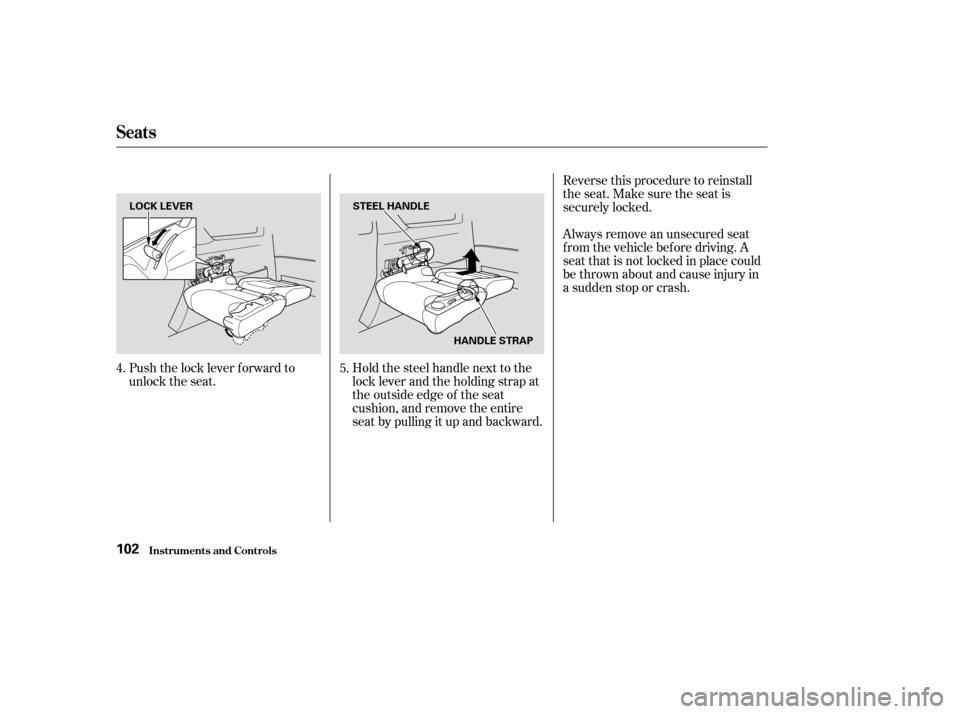
Reverse this procedure to reinstall
the seat. Make sure the seat is
securely locked.
Push the lock lever f orward to
unlock the seat. Hold the steel handle next to the
lock lever and the holding strap at
the outside edge of the seat
cushion, and remove the entire
seat by pulling it up and backward.Always remove an unsecured seat
f rom the vehicle bef ore driving. A
seat that is not locked in place could
be thrown about and cause injury in
a sudden stop or crash.
4. 5.
Seats
Inst rument s and Cont rols102
LOCK LEVER STEEL HANDLE
HANDLE STRAP
Page 112 of 338
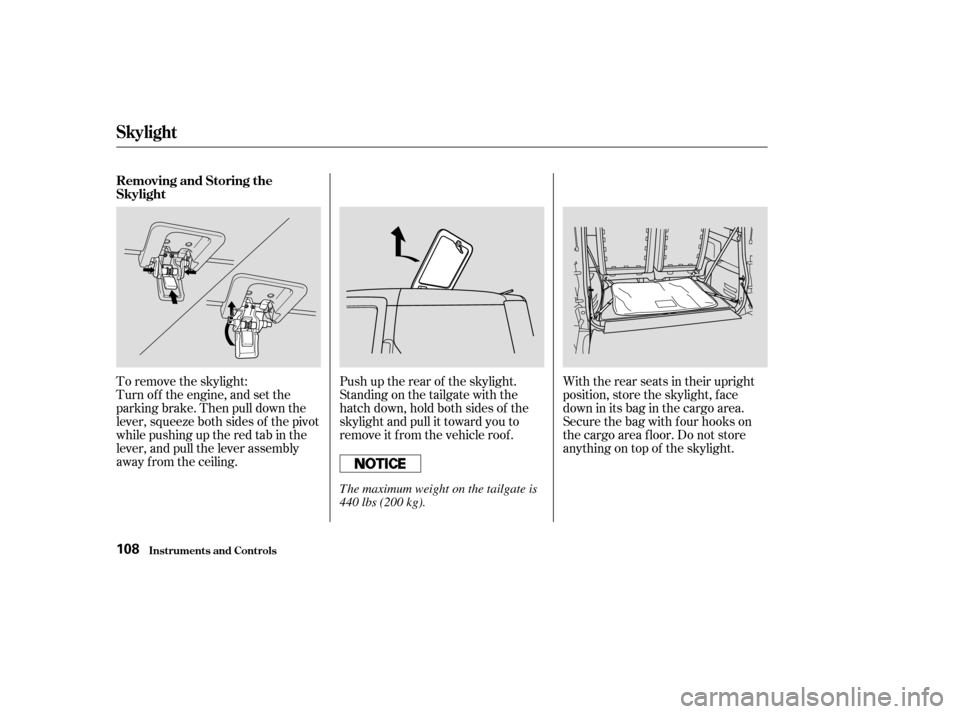
To remove the skylight:
Turn of f the engine, and set the
parkingbrake.Thenpulldownthe
lever, squeeze both sides of the pivot
while pushing up the red tab in the
lever, and pull the lever assembly
away from the ceiling.Push up the rear of the skylight.
Standing on the tailgate with the
hatch down, hold both sides of the
skylight and pull it toward you to
remove it f rom the vehicle roof .
With the rear seats in their upright
position, store the skylight, f ace
down in its bag in the cargo area.
Secure the bag with four hooks on
the cargo area f loor. Do not store
anything on top of the skylight.
Removing and Storing the
Skylight
Skylight
Inst rument s and Cont rols108
The maximum weight on the tailgate is
440 lbs (200 kg).
Page 171 of 338
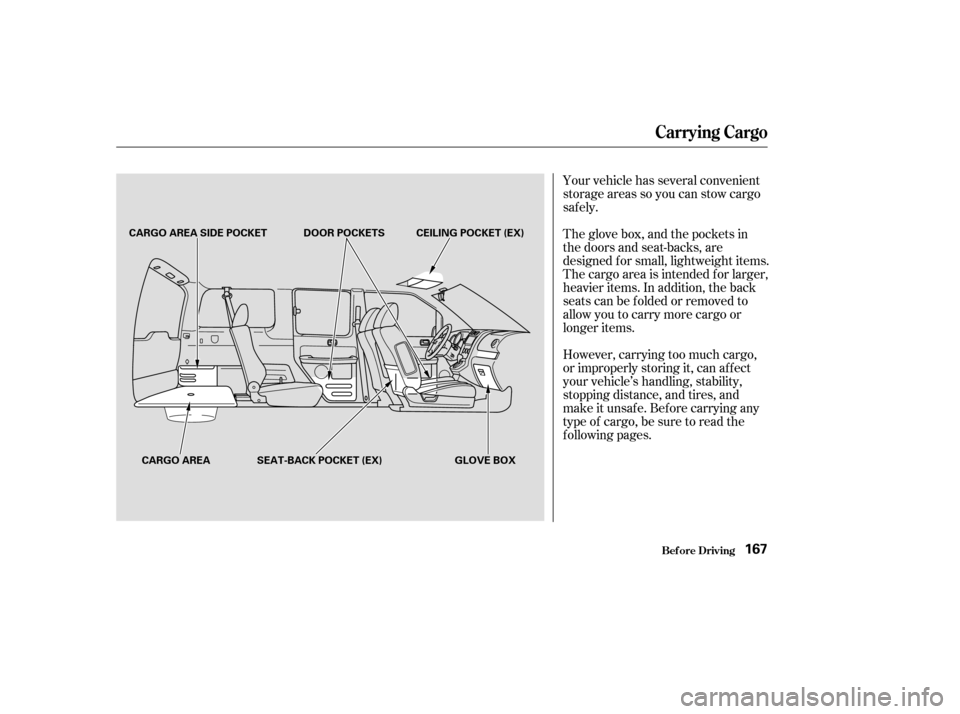
Your vehicle has several convenient
storage areas so you can stow cargo
saf ely.
The glove box, and the pockets in
the doors and seat-backs, are
designed f or small, lightweight items.
The cargo area is intended f or larger,
heavier items. In addition, the back
seats can be folded or removed to
allow you to carry more cargo or
longer items.
However, carrying too much cargo,
or improperly storing it, can af f ect
your vehicle’s handling, stability,
stopping distance, and tires, and
make it unsaf e. Bef ore carrying any
type of cargo, be sure to read the
f ollowing pages.
Carrying Cargo
Bef ore Driving167
CARGO AREA SIDE POCKETGLOVE BOX
CARGO AREA DOOR POCKETS
SEAT-BACK POCKET (EX) CEILING POCKET (EX)