glove box HONDA ELEMENT 2009 1.G Owners Manual
[x] Cancel search | Manufacturer: HONDA, Model Year: 2009, Model line: ELEMENT, Model: HONDA ELEMENT 2009 1.GPages: 345, PDF Size: 18.9 MB
Page 59 of 345
This section gives information about
the controls and displays that
contribute to the daily operation of
your vehicle. All the essential
controls are within easy reach.
Control Locations
..........................
56
Instrument Panel
..........................
57
Instrument Panel Indicators
..........
58
Gauges
..........................................
64
Information Display
..................
65
Odometer
..................................
65
Trip Meter
................................
66
Fuel Gauge
...............................
66
Check Fuel Cap Message
.........
66
Temperature Gauge
..................
67
Maintenance Minder
................
67
Outside Temperature Indicator
...............................
68 Controls Near the Steering
Wheel
.......................................
69
Windshield Wipers and Washers
....................................
70
Turn Signals and Headlights
.........
71
Instrument Panel Brightness
........
72
Hazard Warning Button
................
73
Rear Window Defogger
.................
74
Steering Wheel Adjustment
..........
74
Keys and Locks
.............................
75
Immobilizer System
......................
76
Remote Transmitter
......................
77
Ignition Switch
..............................
79
Door Locks
...................................
80
Power Door Locks
....................
80
Rear Doors
................................
81
Hatch
........................................
81
Tailgate
.....................................
82
Seats
.............................................
83
Seat Adjustments
......................
83
Driver's Seat Height Adjustment
...........................
84
Front Seat Armrests
..................
85
Head Restraints
.........................
85 Reclining the Front Seats
..........
87
Folding the Rear Seats
..............
88
Removing the Rear Seats
..........
90
Power Windows
............................
92
Mirrors
.........................................
93
Adjusting the Power Mirrors
.....
93
Rear Windows
...............................
94
Parking Brake
...............................
94
Interior Lights
...............................
95
Light Control Switch
.................
95
Individual Map Lights
...............
95
Courtesy Light
..........................
96
Ceiling Light
.............................
96
Cargo Area Light
.......................
96
Ignition Switch Light
.................
96
Interior Convenience Items
...........
97
Cooler Box
................................
98
Beverage Holders
.....................
99
Accessory Power Sockets
.......
100
Glove Box
...............................
100
Sun Visor
................................
100
Vanity Mirror
..........................
101
Overhead Console
..................
101
Instruments and Controls
55
Instruments and Controls
2009 Element
Page 79 of 345
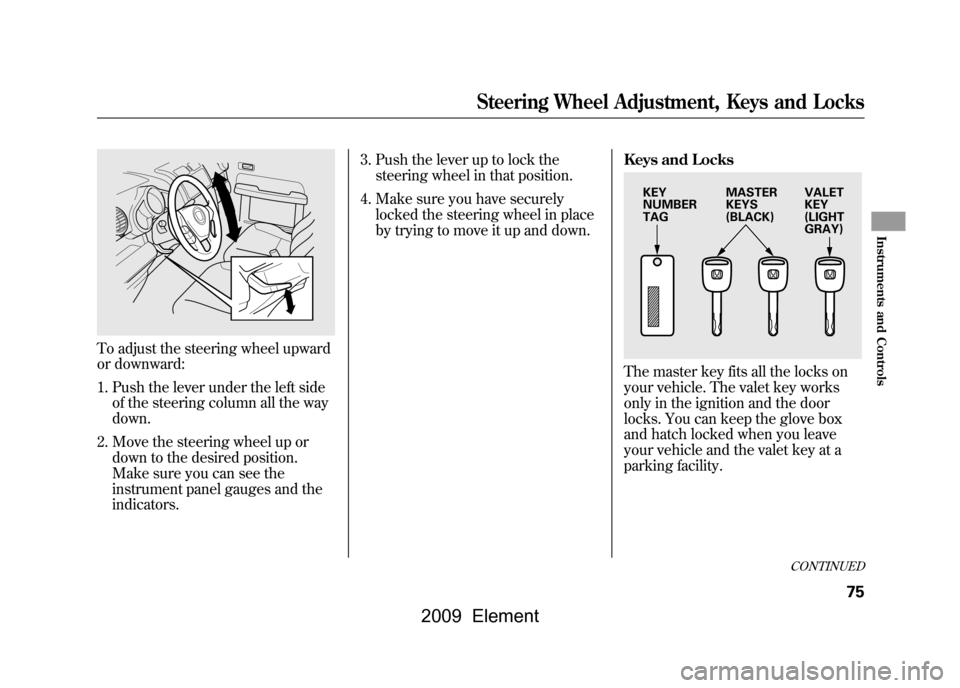
To adjust the steering wheel upward
or downward:1. Push the lever under the left side of the steering column all the way
down.
2. Move the steering wheel up or down to the desired position.
Make sure you can see the
instrument panel gauges and the
indicators. 3. Push the lever up to lock the
steering wheel in that position.
4. Make sure you have securely locked the steering wheel in place
by trying to move it up and down. Keys and Locks
The master key fits all the locks on
your vehicle. The valet key works
only in the ignition and the door
locks. You can keep the glove box
and hatch locked when you leave
your vehicle and the valet key at a
parking facility.
KEY
NUMBER
TAG
MASTER
KEYS
(BLACK)VALET
KEY
(LIGHT
GRAY)
CONTINUED
Steering Wheel Adjustment, Keys and Locks
75
Instruments and Controls
2009 Element
Page 101 of 345
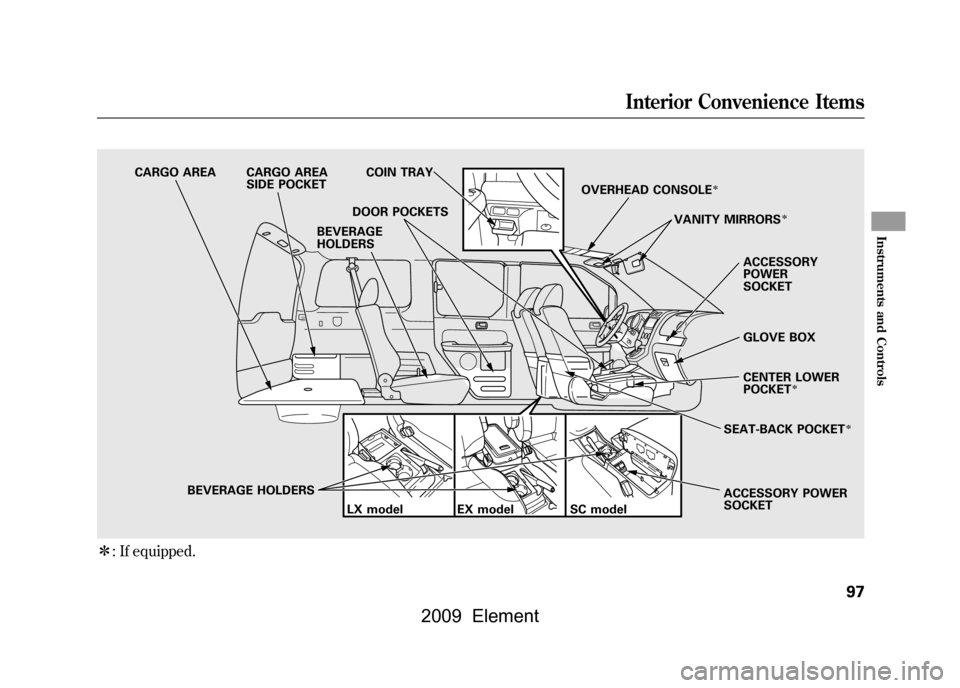
ꭧ: If equipped.
CARGO AREA CARGO AREA
SIDE POCKET COIN TRAY
DOOR POCKETS
BEVERAGE HOLDERS LX model EX model OVERHEAD CONSOLE
ꭧ
ACCESSORY
POWER
SOCKET
GLOVE BOX
CENTER LOWER
POCKET
ꭧ
SEAT-BACK POCKET
ꭧ
ACCESSORY POWER
SOCKET
VANITY MIRRORS
ꭧ
SC model
BEVERAGE
HOLDERS
Interior Convenience Items
97
Instruments and Controls
2009 Element
Page 104 of 345
Accessory Power Sockets
Your vehicle has one, two, or three
accessory power sockets, depending
on the model. All models have a front
accessory power socket on the
dashboard above the glove box.
EX and SC models have an accessory
power socket in the cargo area on
the passenger's side.
The SC model has one additional
socket in the center console.
These sockets are intended to supply
power for 12 volt DC accessories that
are rated 120 watts or less (10 amps).
None of the sockets will power an
automotive type cigarette lighter
element. When more than one
socket is being used, the combined
power rating of the accessories
should be 120 watts or less (10
amps).Glove Box
Open the glove box by pulling the
bottom of the handle. Close it with a
firm push. Lock or unlock the glove
box with the master key.
An open glove box can cause
serious injury to your passenger
in a crash, even if the
passenger is wearing the seat
belt.
Always keep the glove box
closed while driving.
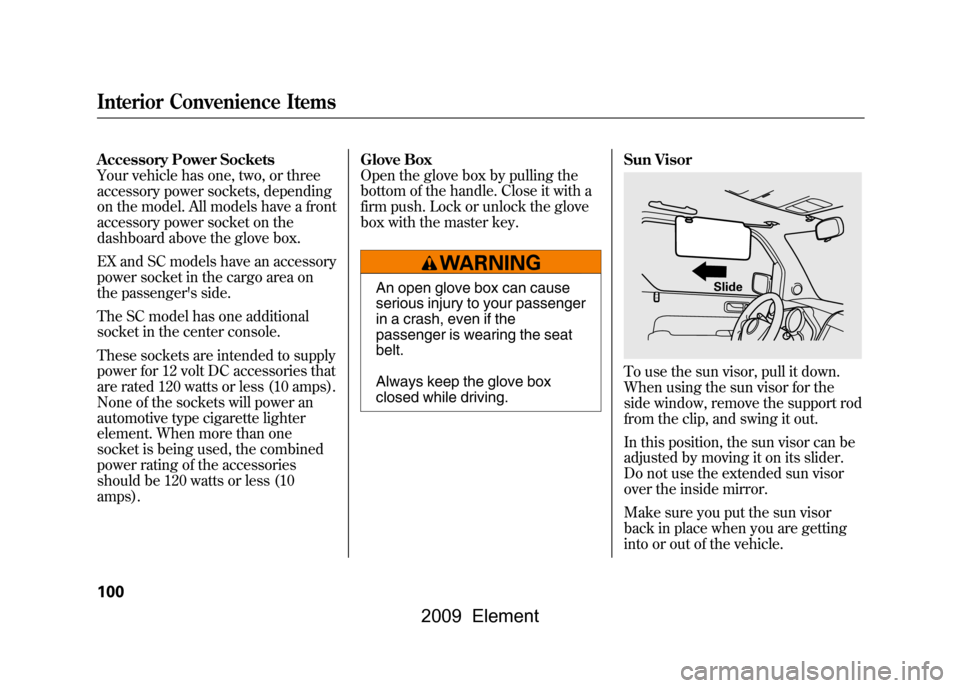
Sun Visor
To use the sun visor, pull it down.
When using the sun visor for the
side window, remove the support rod
from the clip, and swing it out.
In this position, the sun visor can be
adjusted by moving it on its slider.
Do not use the extended sun visor
over the inside mirror.
Make sure you put the sun visor
back in place when you are getting
into or out of the vehicle.
Slide
Interior Convenience Items100
2009 Element
Page 167 of 345

To Play an iPod
ꭂ
This audio system can select and
play the audio files on the iPod
®with
the same controls used for the
in-dash disc player. To play an iPod,
connect it to the USB adapter cable
in the glove box by using your dock
connector. Press the AUDIO button
beside the screen to show the audio
display and touch the AUX icon. The
ignition switch must be in the
ACCESSORY (I) or ON (II) position.
The iPod will also be recharged with
the ignition switch in these positions.
You can also select an icon by
moving the joystick. Move it to left,
right, up, or down to change the
highlighting and scroll through lists,
then press ENT on the top of the
joystick to set your selection. To select the USB mode without
using the icon, press the CD/XM
button repeatedly. The status bar
appears on the bottom of the screen.
The audio system reads and plays
sound files to be playable on the
iPod. The system cannot operate an
iPod as a mass storage device. The
system will only play songs stored on
the iPod with iTunes.
iPod and iTunes are registered
trademarks owned by Apple Inc.
Voice Control SystemYou can select the AUX mode by
using the navigation system voice
control buttons, but cannot operate
the play mode functions.
iPods that are compatible with your
audio system are listed below.
Model
Firmware
ꭧ
iPod 5G Ver. 1.2 or more
iPod classic Ver. 1.0 or more
iPod nano Ver. 1.2 or more
iPod nano 2nd
generation Ver. 1.1.2 or more
iPod nano 3rd
generation Ver. 1.0 or more
iPod touch Ver. 1.1.1 or more
iPhone Ver. 1.1.1 or moreꭧ: Use the latest firmware.
Use only compatible iPods with the
latest firmware. iPods that are not
compatible will not work in this audio
unit.
CONTINUED
Playing an iPod
®(Models with navigation system)
163
Features
2009 Element
Page 168 of 345
NOTE:●Do not connect your iPod using a
HUB.●Do not keep the iPod in the
vehicle. Direct sunlight and high
heat will damage it.●Do not use an extension cable
between the USB adapter cable
equipped with your vehicle and
your dock connector.●We recommend backing up your
data before playing it.
In AAC format, DRM (digital rights
management) files cannot be played.
If the system finds a DRM file, the
audio unit displays UNPLAYABLE,
and then skips to the next file.
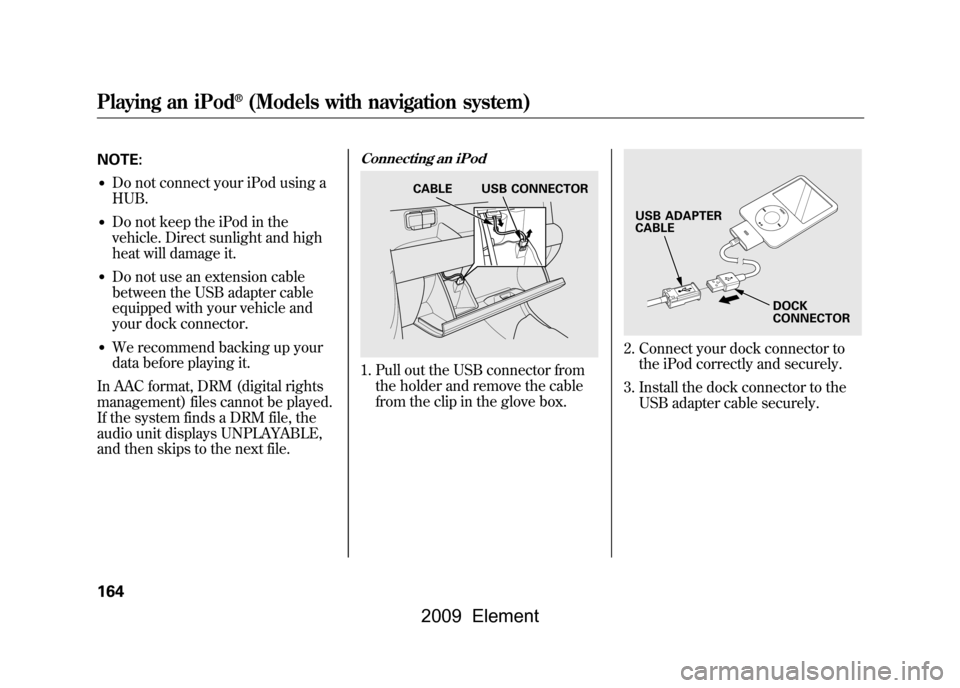
Connecting an iPod1. Pull out the USB connector from the holder and remove the cable
from the clip in the glove box.
2. Connect your dock connector tothe iPod correctly and securely.
3. Install the dock connector to the USB adapter cable securely.
CABLE USB CONNECTOR
USB ADAPTER
CABLE
DOCK
CONNECTOR
Playing an iPod
®(Models with navigation system)
164
2009 Element
Page 178 of 345

To Play a USB Flash Memory
Device
This audio system can select and
play the audio files from a USB flash
memory device with the same
controls used for the in-dash disc
player. To play a USB flash memory
device, connect it to the USB adapter
cable in the glove box. The ignition
switch must be in the ACCESSORY
(I) or ON (II) position. Press the
AUDIO button beside the screen to
show the audio display and touch the
AUX icon.
You can also select an icon by
moving the joystick. Move it to left,
right, up, or down to change the
highlighting and scroll through lists,
then press ENT on the top of the
joystick to set your selection.To select the USB mode without
using the icon, press the CD/XM
button repeatedly. The status bar
appears on the bottom of the screen.
The audio system reads and plays
the audio files on the USB flash
memory device in MP3, WMA or
AAC
ꭧformats. Depending on the
format, the display shows MP3,
WMA or AAC when a USB flash
memory device is playing. The USB
flash memory device limit is up to
700 folders or up to 65535 files.
ꭧ : Only AAC format files recorded
with iTunes are playable on this
audio unit. The recommended USB flash
memory devices are 256 Mbyte or
higher. Some digital audio players
may be compatible as well.
Some USB flash memory device
(such as devices with security lock-
out features, etc.) will not work in
this audio unit.
Playing a USB Flash Memory Device (Models with navigation system)174
2009 Element
Page 181 of 345
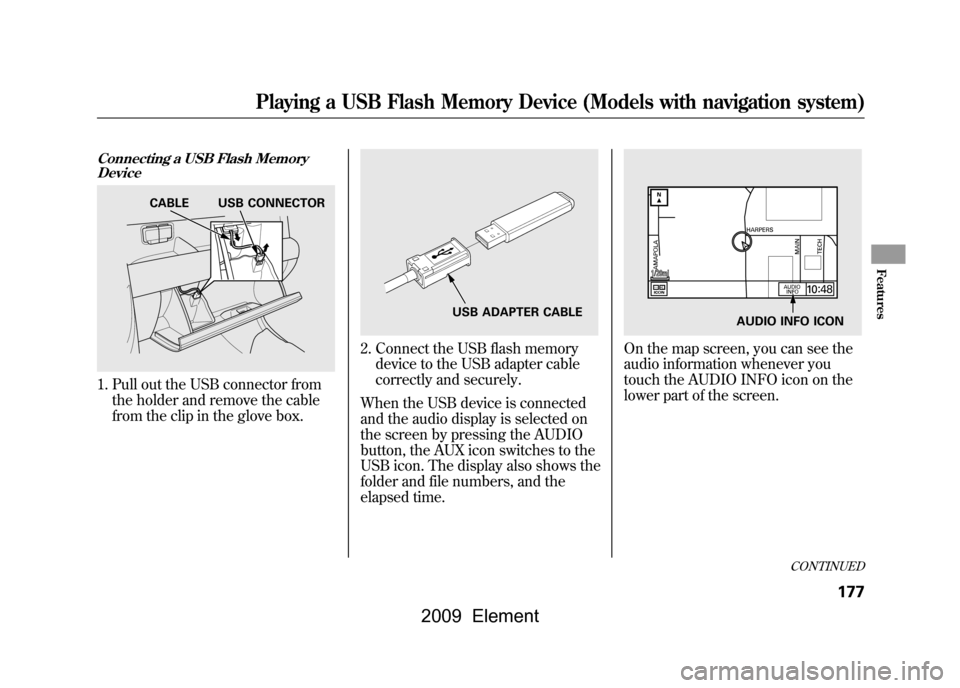
Connecting a USB Flash MemoryDevice1. Pull out the USB connector from
the holder and remove the cable
from the clip in the glove box.
2. Connect the USB flash memorydevice to the USB adapter cable
correctly and securely.
When the USB device is connected
and the audio display is selected on
the screen by pressing the AUDIO
button, the AUX icon switches to the
USB icon. The display also shows the
folder and file numbers, and the
elapsed time.
On the map screen, you can see the
audio information whenever you
touch the AUDIO INFO icon on the
lower part of the screen.
CABLE USB CONNECTOR
USB ADAPTER CABLE
AUDIO INFO ICON
CONTINUED
Playing a USB Flash Memory Device (Models with navigation system)
177
Features
2009 Element
Page 211 of 345
ꭧ: If equipped
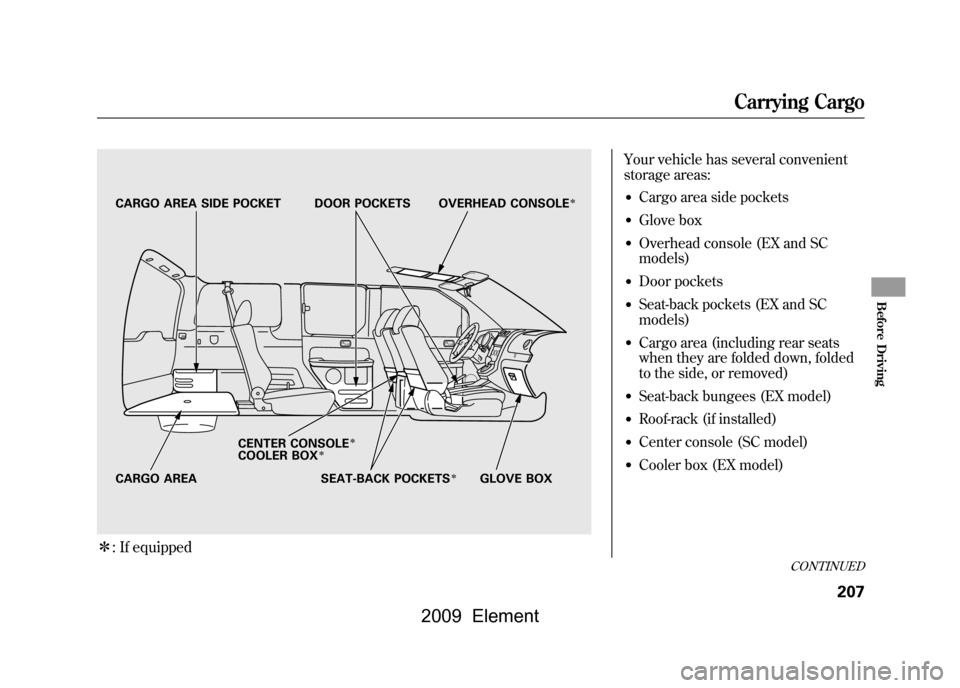
Your vehicle has several convenient
storage areas:●Cargo area side pockets●Glove box●Overhead console (EX and SC
models)●Door pockets●Seat-back pockets (EX and SC
models)●Cargo area (including rear seats
when they are folded down, folded
to the side, or removed)●Seat-back bungees (EX model)●Roof-rack (if installed)●Center console (SC model)●Cooler box (EX model)
CARGO AREA CENTER CONSOLE
ꭧ
COOLER BOX
ꭧSEAT-BACK POCKETS
ꭧ
GLOVE BOX
CARGO AREA SIDE POCKET DOOR POCKETS
OVERHEAD CONSOLE
ꭧ
CONTINUED
Carrying Cargo
207
Before Driving
2009 Element
Page 214 of 345

Carrying Items in the Passenger
Compartment●Store or secure all items that could
be thrown around and hurt
someone during a crash.●Be sure items placed on the floor
behind the front seats cannot roll
under the seats and interfere with
the pedals, the seat operation, or
the proper operation of the sensors
under the seats.●Keep the glove box closed while
driving. If it is open, a passenger
could injure their knees during a
crash or sudden stop.
●If you fold the rear seats down or
up, or remove them, tie down
items that could be thrown about
the vehicle during a crash or
sudden stop. Also, keep all cargo
below the bottom of the windows.
If it is higher, it could interfere
with the proper operation of the
side curtain airbags.
Carrying Cargo in the Cargo Area
or on a Roof Rack●Distribute cargo evenly on the
floor of the cargo area, placing the
heaviest items on the bottom and
as far forward as possible. Tie
down items that could be thrown
about the vehicle during a crash or
sudden stop.
●If you carry large items that
prevent you from closing the
tailgate or the hatch, exhaust gas
can enter the passenger area. To
avoid the possibility of carbon
monoxide poisoning, follow the
instructions on page52.●If you carry any items on a roof
rack, be sure the total weight of
the rack and the items does not
exceed 165 lbs (75 kg).
If you use an accessory roof rack,
the roof rack weight limit may be
lower. Refer to the information that
came with your roof rack.
Carrying Cargo210
2009 Element