transmission oil HONDA ELEMENT 2009 1.G Owners Manual
[x] Cancel search | Manufacturer: HONDA, Model Year: 2009, Model line: ELEMENT, Model: HONDA ELEMENT 2009 1.GPages: 345, PDF Size: 18.9 MB
Page 202 of 345

Break-in Period
Help assure your vehicle's future
reliability and performance by paying
extra attention to how you drive
during the first 600 miles (1,000 km).
During this period:●Avoid full-throttle starts and rapid
acceleration.●Do not change the oil until the
scheduled maintenance time.●Avoid hard braking for the first 200
miles (300 km).●Do not tow a trailer.
You should also follow these
recommendations with an
overhauled or exchanged engine, or
when the brakes are replaced. Fuel Recommendation
Your vehicle is designed to operate
on unleaded gasoline with a pump
octane number of 87 or higher. Use
of a lower octane gasoline can cause
a persistent, heavy metallic rapping
noise that can lead to engine
damage.
On vehicles with manual transmissionYou may hear a knocking noise from
the engine if you drive the vehicle at
low engine speed (below about 1,000
rpm) in a higher gear. To stop this,
raise the engine speed by shifting to
a lower gear.
We recommend using quality
gasoline containing detergent
additives that help prevent fuel
system and engine deposits.In addition, in order to maintain good
performance, fuel economy, and
emissions control, we strongly
recommend, in areas where it is
available, the use of gasoline that
does NOT contain manganese-based
fuel additives such as MMT.
Use of gasoline with these additives
may adversely affect performance,
and cause the malfunction indicator
lamp on your instrument panel to
come on. If this happens, contact
your authorized dealer for service.
Some gasoline today is blended with
oxygenates such as ethanol or
MTBE. Your vehicle is designed to
operate on oxygenated gasoline
containing up to 10% ethanol by
volume and up to 15% MTBE by
volume. Do not use gasoline
containing methanol.
Break-in Period, Fuel Recommendation198
2009 Element
Page 207 of 345
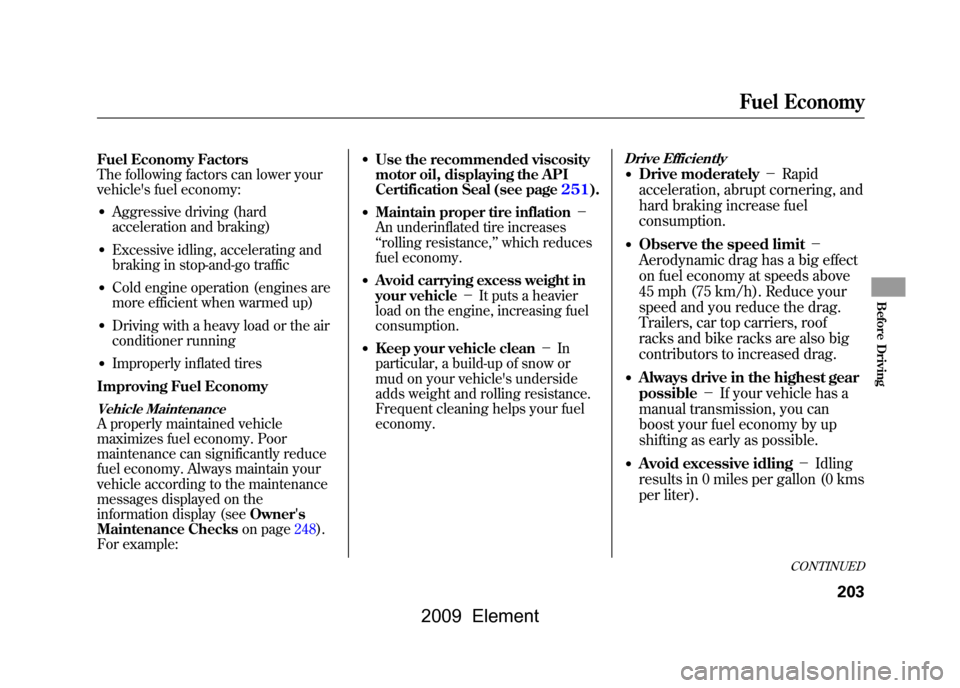
Fuel Economy FactorsThe following factors can lower your
vehicle's fuel economy:●Aggressive driving (hard
acceleration and braking)●Excessive idling, accelerating and
braking in stop-and-go traffic●Cold engine operation (engines are
more efficient when warmed up)●Driving with a heavy load or the air
conditioner running●Improperly inflated tiresImproving Fuel EconomyVehicle MaintenanceA properly maintained vehicle
maximizes fuel economy. Poor
maintenance can significantly reduce
fuel economy. Always maintain your
vehicle according to the maintenance
messages displayed on the
information display (seeOwner's
Maintenance Checks on page248).
For example:
●Use the recommended viscosity
motor oil, displaying the API
Certification Seal (see page251).●Maintain proper tire inflation -
An underinflated tire increases
‘‘ rolling resistance, ’’which reduces
fuel economy.●Avoid carrying excess weight in
your vehicle -It puts a heavier
load on the engine, increasing fuel
consumption.●Keep your vehicle clean -In
particular, a build-up of snow or
mud on your vehicle's underside
adds weight and rolling resistance.
Frequent cleaning helps your fuel
economy.
Drive Efficiently●Drive moderately -Rapid
acceleration, abrupt cornering, and
hard braking increase fuel
consumption.●Observe the speed limit -
Aerodynamic drag has a big effect
on fuel economy at speeds above
45 mph (75 km/h). Reduce your
speed and you reduce the drag.
Trailers, car top carriers, roof
racks and bike racks are also big
contributors to increased drag.●Always drive in the highest gear
possible -If your vehicle has a
manual transmission, you can
boost your fuel economy by up
shifting as early as possible.●Avoid excessive idling -Idling
results in 0 miles per gallon (0 kms
per liter).
CONTINUED
Fuel Economy
203
Before Driving
2009 Element
Page 245 of 345
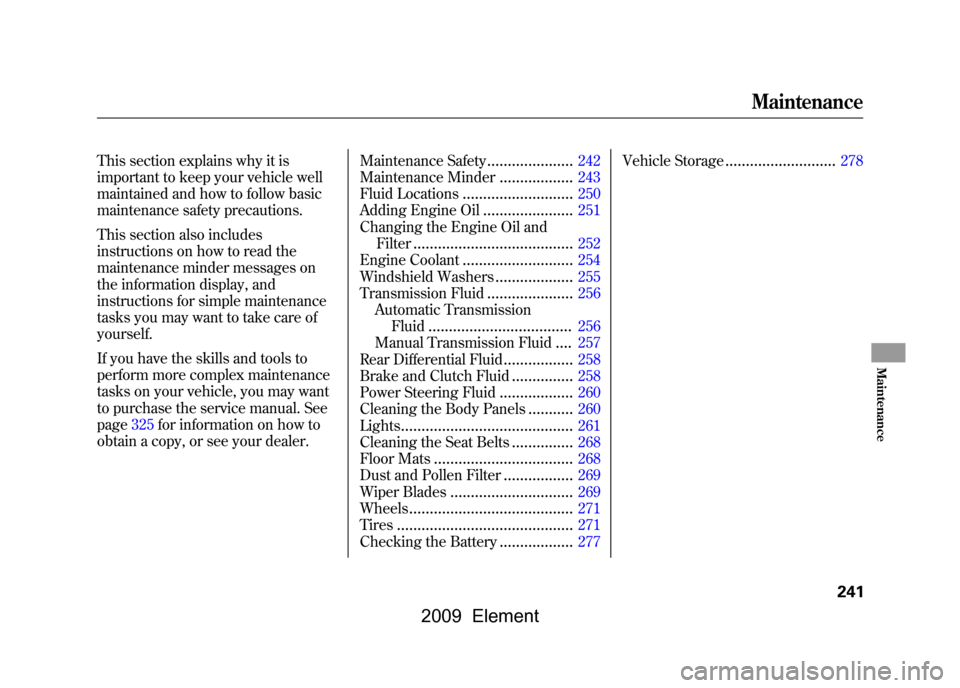
This section explains why it is
important to keep your vehicle well
maintained and how to follow basic
maintenance safety precautions.
This section also includes
instructions on how to read the
maintenance minder messages on
the information display, and
instructions for simple maintenance
tasks you may want to take care of
yourself.
If you have the skills and tools to
perform more complex maintenance
tasks on your vehicle, you may want
to purchase the service manual. See
page325for information on how to
obtain a copy, or see your dealer.Maintenance Safety
.....................
242
Maintenance Minder
..................
243
Fluid Locations
...........................
250
Adding Engine Oil
......................
251
Changing the Engine Oil and Filter
.......................................
252
Engine Coolant
...........................
254
Windshield Washers
...................
255
Transmission Fluid
.....................
256
Automatic Transmission Fluid
...................................
256
Manual Transmission Fluid
....
257
Rear Differential Fluid
.................
258
Brake and Clutch Fluid
...............
258
Power Steering Fluid
..................
260
Cleaning the Body Panels
...........
260
Lights
..........................................
261
Cleaning the Seat Belts
...............
268
Floor Mats
..................................
268
Dust and Pollen Filter
.................
269
Wiper Blades
..............................
269
Wheels
........................................
271
Tires
...........................................
271
Checking the Battery
..................
277 Vehicle Storage
...........................
278
Maintenance
241
Maintenance
2009 Element
Page 252 of 345
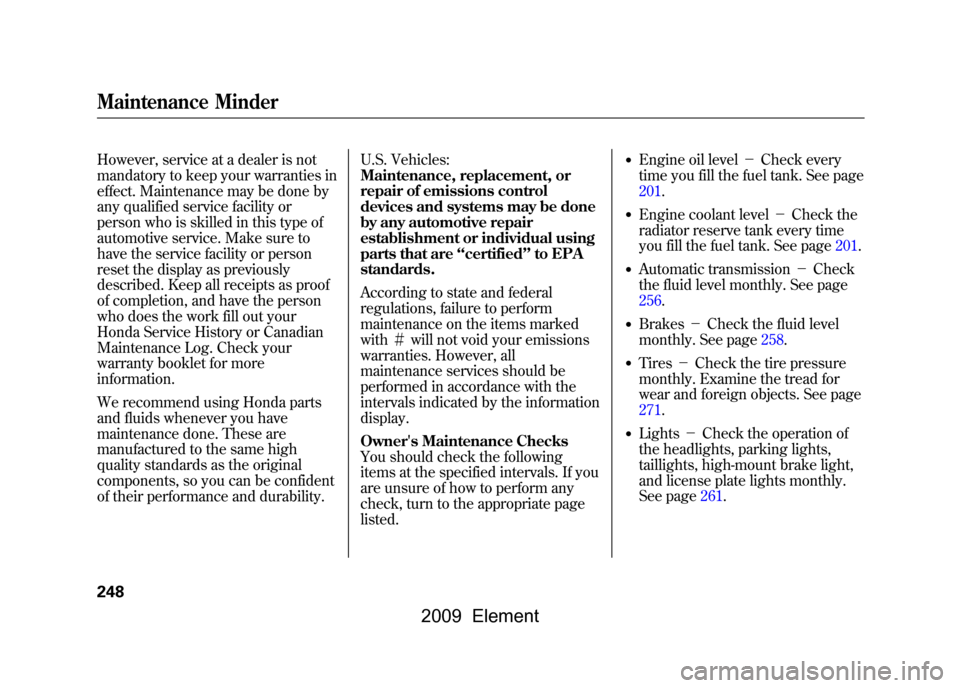
However, service at a dealer is not
mandatory to keep your warranties in
effect. Maintenance may be done by
any qualified service facility or
person who is skilled in this type of
automotive service. Make sure to
have the service facility or person
reset the display as previously
described. Keep all receipts as proof
of completion, and have the person
who does the work fill out your
Honda Service History or Canadian
Maintenance Log. Check your
warranty booklet for more
information.
We recommend using Honda parts
and fluids whenever you have
maintenance done. These are
manufactured to the same high
quality standards as the original
components, so you can be confident
of their performance and durability.U.S. Vehicles:
Maintenance, replacement, or
repair of emissions control
devices and systems may be done
by any automotive repair
establishment or individual using
parts that are
‘‘certified’’to EPA
standards.
According to state and federal
regulations, failure to perform
maintenance on the items marked
with #will not void your emissions
warranties. However, all
maintenance services should be
performed in accordance with the
intervals indicated by the information
display.
Owner's Maintenance Checks
You should check the following
items at the specified intervals. If you
are unsure of how to perform any
check, turn to the appropriate page
listed.
●Engine oil level -Check every
time you fill the fuel tank. See page
201.●Engine coolant level -Check the
radiator reserve tank every time
you fill the fuel tank. See page201.●Automatic transmission -Check
the fluid level monthly. See page
256.●Brakes -Check the fluid level
monthly. See page258.●Tires -Check the tire pressure
monthly. Examine the tread for
wear and foreign objects. See page
271.●Lights -Check the operation of
the headlights, parking lights,
taillights, high-mount brake light,
and license plate lights monthly.
See page261.
Maintenance Minder248
2009 Element
Page 253 of 345
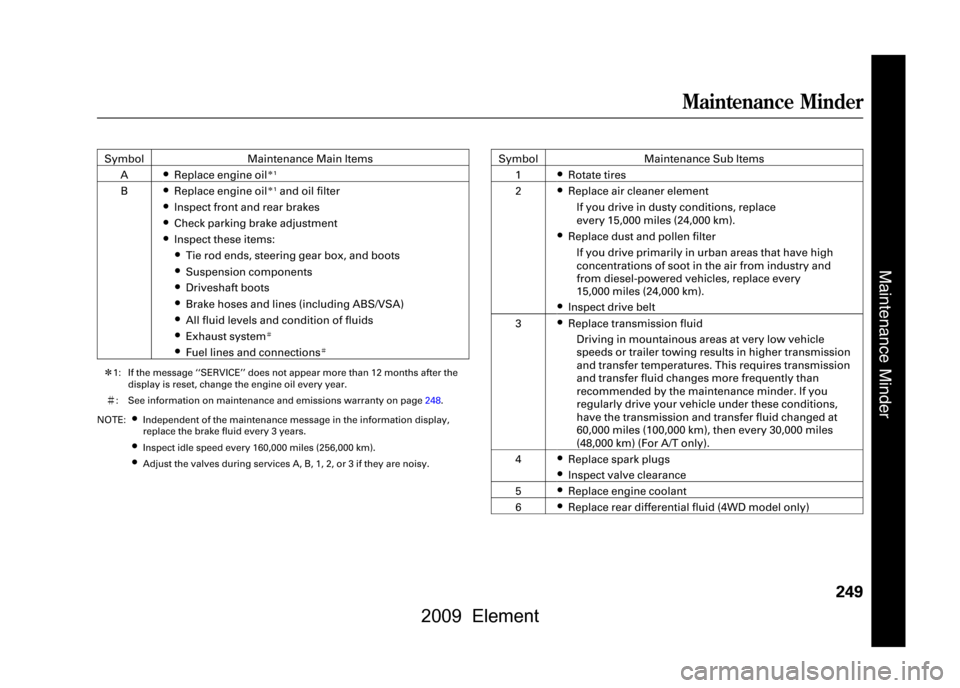
SymbolMaintenance Main Items
A
●Replace engine oil
ꭧ 1
B
●Replace engine oil
ꭧ1and oil filter
●Inspect front and rear brakes●Check parking brake adjustment●Inspect these items:●Tie rod ends, steering gear box, and boots●Suspension components●Driveshaft boots●Brake hoses and lines (including ABS/VSA)●All fluid levels and condition of fluids●Exhaust system
#
●Fuel lines and connections
#
ꭧ 1: If the message ‘‘SERVICE ’’does not appear more than 12 months after the
display is reset, change the engine oil every year.
# : See information on maintenance and emissions warranty on page248.
NOTE:
●Independent of the maintenance message in the information display,
replace the brake fluid every 3 years.●Inspect idle speed every 160,000 miles (2 56,000 km).●Adjust the valves during services A, B, 1, 2, or 3 if they are noisy.
SymbolMaintenance Sub Items
1
●Rotate tires
2●Replace air cleaner element
If you drive in dusty conditions, replace
every 15,000 miles (24,000 km).●Replace dust and pollen filterIf you drive primarily in urban areas that have high
concentrations of soot in the air from industry and
from diesel-powered vehicles, replace every
15,000 miles (24,000 km).●Inspect drive belt
3●Replace transmission fluid Driving in mountainous areas at very low vehicle
speeds or trailer towing results in higher transmiss ion
and transfer temperatures. This requires transmission
and transfer fluid changes more frequently than
recommended by the maintenance minder. If you
regularly drive your vehicle under these conditions,
have the transmission and transfer fluid changed at
60,000 miles (100,000 km), then every 30,000 miles
(48,000 km) (For A/T only).
4●Replace spark plugs●Inspect valve clearance
5●Replace engine coolant
6●Replace rear differential fluid (4WD model only)
Maintenance Minder
Maintenance Minder
249
2009 Element
Page 254 of 345
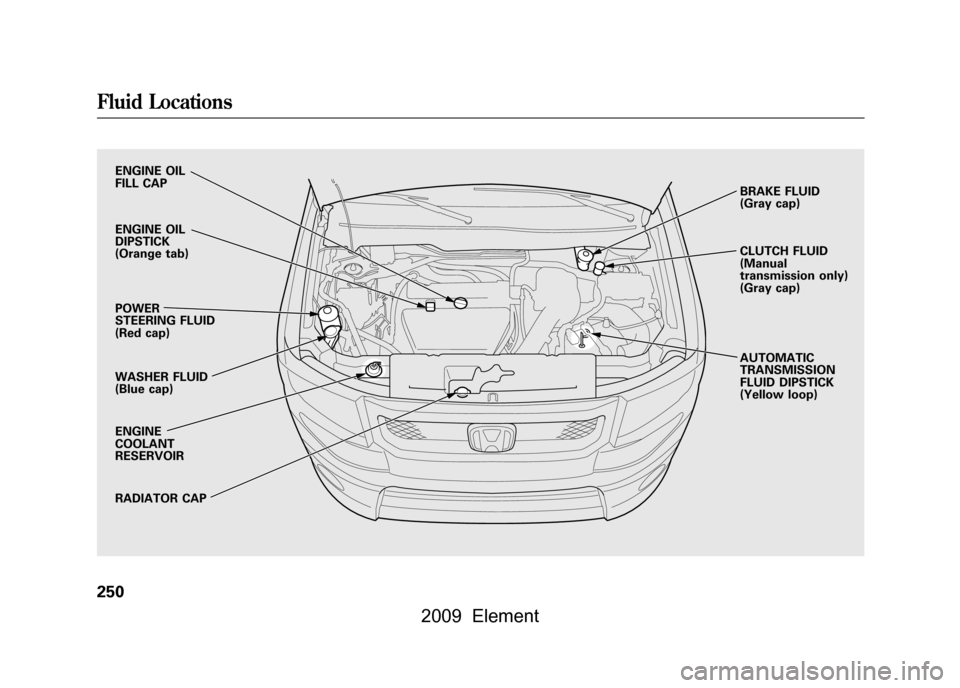
ENGINE OIL
FILL CAP
ENGINE OIL
DIPSTICK
(Orange tab)
POWER
STEERING FLUID
(Red cap)
WASHER FLUID
(Blue cap)
ENGINE
COOLANT
RESERVOIR
RADIATOR CAPBRAKE FLUID
(Gray cap)
CLUTCH FLUID
(Manual
transmission only)
(Gray cap)
AUTOMATIC
TRANSMISSION
FLUID DIPSTICK
(Yellow loop)
Fluid Locations250
2009 Element
Page 256 of 345
Synthetic Oil
You may use a synthetic motor oil if
it meets the same requirements
given for a conventional motor oil, it
displays the API certification seal,
and it is the proper weight. You must
follow the oil and filter change
intervals shown on the maintenance
minder display.
Engine Oil Additives
Your vehicle does not require any oil
additives. Additives may adversely
affect the engine or transmission
performance and durability.Changing the Engine Oil and
Filter
Always change the oil and filter
according to the maintenance
messages shown on the information
display. The oil and filter collect
contaminants that can damage your
engine if they are not removed
regularly.
Changing the oil and filter requires
special tools and access from
underneath the vehicle. The vehicle
should be raised on a service station-
type hydraulic lift for this service.
Unless you have the knowledge and
proper equipment, you should have
this maintenance done by a skilled
technician.
1. Run the engine until it reaches
normal operating temperature,
then shut it off.
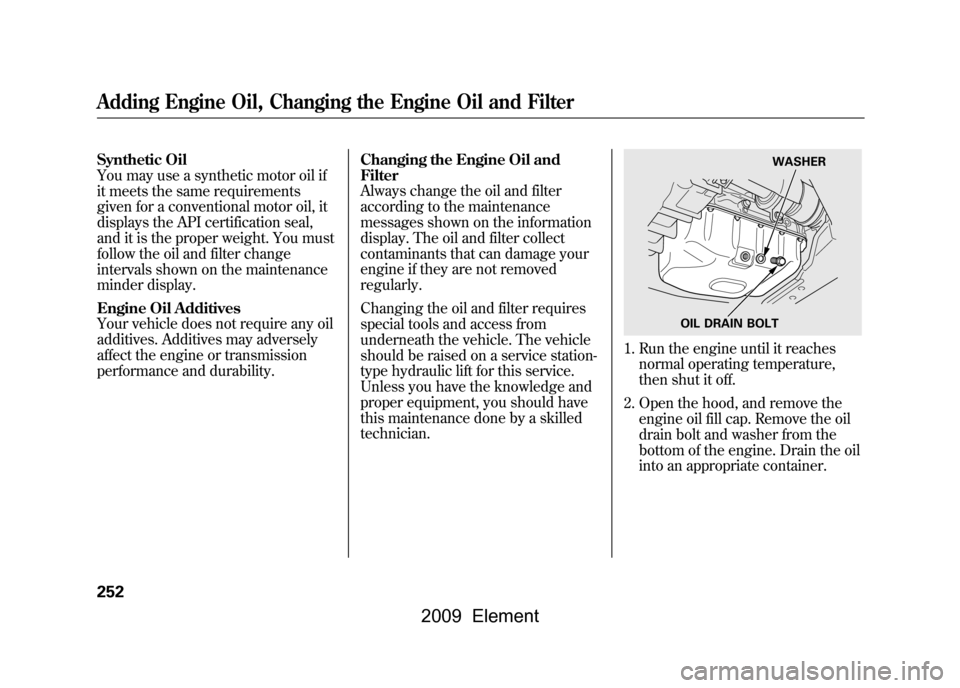
2. Open the hood, and remove the engine oil fill cap. Remove the oil
drain bolt and washer from the
bottom of the engine. Drain the oil
into an appropriate container.
OIL DRAIN BOLT WASHER
Adding Engine Oil, Changing the Engine Oil and Filter252
2009 Element
Page 262 of 345

Put a new washer on the filler bolt,
then reinstall the filler bolt and
tighten it securely.
If Honda MTF is not available, you
may use an SAE 10W-30 or 10W-40
viscosity motor oil with the API
Certification seal that says‘‘FOR
GASOLINE ENGINES ’’as a
temporary replacement. However,
motor oil does not contain the proper
additives, and continued use can
cause stiffer shifting. Replace as soon
as it is convenient.
The transmission should be drained
and refilled with new fluid according
to the maintenance minder (see page
243).
If you are not sure how to check and
add fluid, contact your dealer. Rear Differential Fluid
4WD models onlyThe rear differential should be
drained and refilled with new fluid
according to the time and distance
recommendations shown on the
maintenance minder display. Have
your dealer replace the rear
differential fluid.
Use Honda Dual Pump Fluid II only.
Do not use automatic transmission
fluid (ATF).
Brake and Clutch Fluid
Check the fluid level in the
reservoirs monthly.
There are up to two reservoirs,
depending on the model. They are:
●Brake fluid reservoir (all models)●Clutch fluid reservoir (manual
transmission only)
Replace the brake fluid according to
the time recommendation in the
maintenance minder schedule.
Always use Honda Heavy Duty
Brake Fluid DOT 3. If it is not
available, you should use only DOT 3
or DOT 4 fluid, from a sealed
container, as a temporary
replacement.
Transmission Fluid, Rear Differential Fluid, Brake and Clutch Fluid258
2009 Element
Page 313 of 345

CapacitiesFuel tank Approx.
15.9 US gal (60 L)
Engine oil Change
ꭧ 1
Including filter 4.4 US qt (4.2 L)
Without filter 4.2 US qt (4.0 L)
Total 5.6 US qt (5.3 L)
Capacities
Engine
coolant Automatic
Transmission
Change
ꭧ2
1.35 US gal (5.1 L)
Total 1.90 US gal (7.2 L)
Manual
Transmission Change
ꭧ2
1.37 US gal (5.2 L)
Total 1.93 US gal (7.3 L)
Automatic
transmission
fluid Change
4WD 2.6 US qt (2.5 L)
2WD 2.7 US qt (2.6 L)
Total 4WD 7.6 US qt (7.2 L)
2WD 7.4 US qt (7.0 L)
Manual
transmission
fluid Change
2.0 US qt (1.9 L)
Total
4WD 2.4 US qt (2.3 L)
2WD 2.3 US qt (2.2 L)
Rear
differential
fluid (4WD) Change
1.1 US qt (1.0 L)
Total 1.3 US qt (1.2 L)
Windshield washer reservoir 4.8 US qt (4.5 L)
ꭧ1: Excluding the oil remaining in the engine
ꭧ2: Including the coolant in the reserve tank and that remaining in the engine
Reserve tank capacity:
0.15 US gal (0.55 L)
Specifications
309
Technical Information
2009 Element
Page 331 of 345
A
Accessories andModifications
..........................
205
ACCESSORY (Ignition Key Position)
...................................
79
Accessory Power Sockets
..........
100
Additives, Engine Oil
.................
252
Adjusting the Steering Wheel
......
74
Advanced Airbags
........................
27
Airbag (SRS)
............................
9,22
Air Conditioning System
............
104
Air Pressure, Tires
..............
271,272
Alcohol in Gasoline
....................
198
Antifreeze
...................................
254
Anti-lock Brakes (ABS) Indicator Light
..................
59,225
Operation
................................
225
Anti-theft, Audio System
.............
188
Anti-theft Steering Column Lock
.........................................
79
Audio System
.............................
109
Automatic Seat Belt Tensioners...
20
Automatic Speed Control
...........
193 Automatic Transmission
............
219
Capacity, Fluid
........................
309
Checking Fluid Level
..............
256
Shifting
...................................
219
Shift Lever Position Indicators
............................
219
Shift Lock Release
...................
221
Automatic Transmission Fluid
...
256
Auxiliary Input Jack
...................
192
B
Battery Charging System
Indicator
........................
58,295
Jump Starting
..........................
291
Maintenance
...........................
277
Specifications
..........................
310
Before Driving
...........................
197
Belts, Seat
................................
8,18
Beverage Holders
........................
99
Booster Seats
...............................
50
Brakes
Anti-lock Brakes (ABS)
...........
225
Break-in, New Linings
.............
198 Bulb Replacement
...................
266
Fluid
.......................................
258
Parking
....................................
94
System Design
........................
224
System Indicator
...............
58,297
Wear Indicators
.......................
225
Braking System
..........................
224
Break-in, New Vehicle
................
198
Brightness Control, Instruments
..............................
72
Bulb Replacement Back-up Lights
........................
266
Brake Lights
...........................
266
Daytime Running Lights
.........
262
Front Parking/Turn Signal Lights
..................................
263
Front Side Marker Lights
........
265
Headlights
..............................
261
High-mount Brake Lights
........
267
Rear Bulbs
..............................
266
Rear License Plate Lights
........
267
Side Turn Signal Lights
...........
264
Specifications
..........................
310
Taillights
.................................
266
Turn Signal Lights
..................
266
CONTINUED
Index
I
INDEX
2009 Element