HONDA ELEMENT 2010 1.G Owners Manual
Manufacturer: HONDA, Model Year: 2010, Model line: ELEMENT, Model: HONDA ELEMENT 2010 1.GPages: 342, PDF Size: 5.76 MB
Page 111 of 342
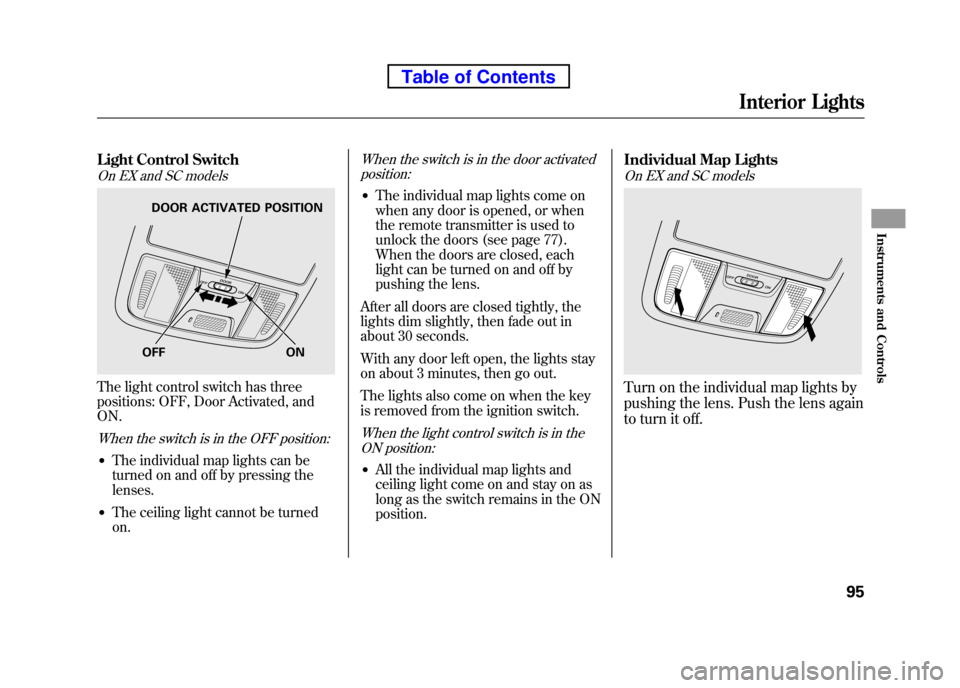
Light Control Switch
On EX and SC models
The light control switch has three
positions: OFF, Door Activated, andON.
When the switch is in the OFF position:
●The individual map lights can be
turned on and off by pressing thelenses.
● The ceiling light cannot be turnedon.
When the switch is in the door activated
position:
● The individual map lights come on
when any door is opened, or when
the remote transmitter is used to
unlock the doors (see page 77).
When the doors are closed, each
light can be turned on and off by
pushing the lens.
After all doors are closed tightly, the
lights dim slightly, then fade out in
about 30 seconds.
With any door left open, the lights stay
on about 3 minutes, then go out.
The lights also come on when the key
is removed from the ignition switch.
When the light control switch is in the ON position:
● All the individual map lights and
ceiling light come on and stay on as
long as the switch remains in the ONposition. Individual Map Lights
On EX and SC models
Turn on the individual map lights by
pushing the lens. Push the lens again
to turn it off.
OFF ON
DOOR ACTIVATED POSITION
Interior Lights
95
Instruments and Controls
Table of Contents
Page 112 of 342
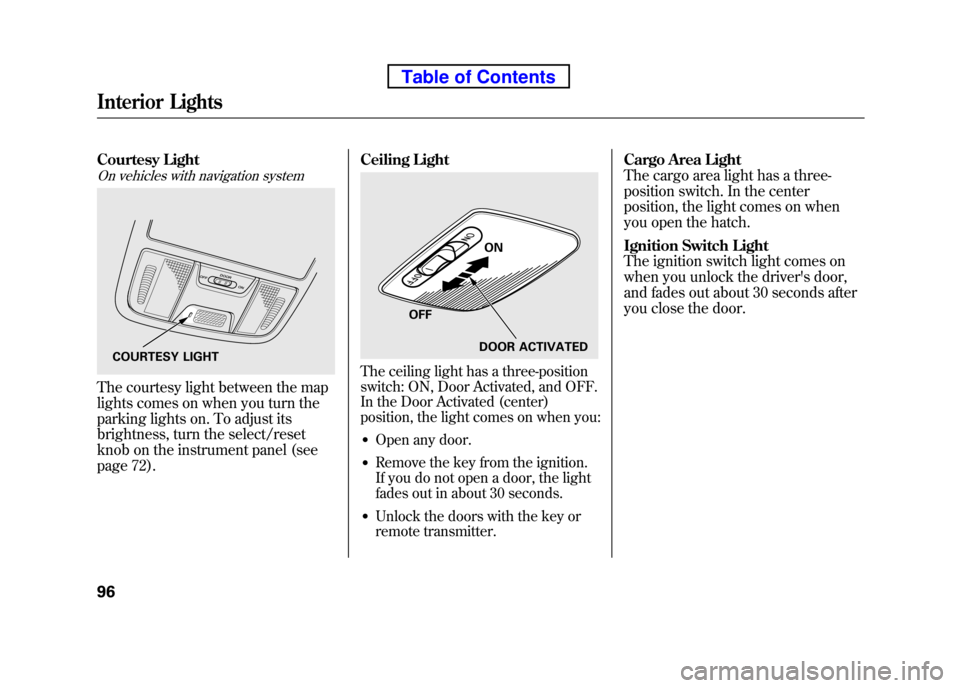
Courtesy Light
On vehicles with navigation system
The courtesy light between the map
lights comes on when you turn the
parking lights on. To adjust its
brightness, turn the select/reset
knob on the instrument panel (see
page 72).Ceiling Light
The ceiling light has a three-position
switch: ON, Door Activated, and OFF.
In the Door Activated (center)
position, the light comes on when you:
● Open any door.
● Remove the key from the ignition.
If you do not open a door, the light
fades out in about 30 seconds.
● Unlock the doors with the key or
remote transmitter. Cargo Area Light
The cargo area light has a three-
position switch. In the center
position, the light comes on when
you open the hatch.
Ignition Switch Light
The ignition switch light comes on
when you unlock the driver's door,
and fades out about 30 seconds after
you close the door.COURTESY LIGHT
ON
OFF DOOR ACTIVATED
Interior Lights
96
Table of Contents
Page 113 of 342
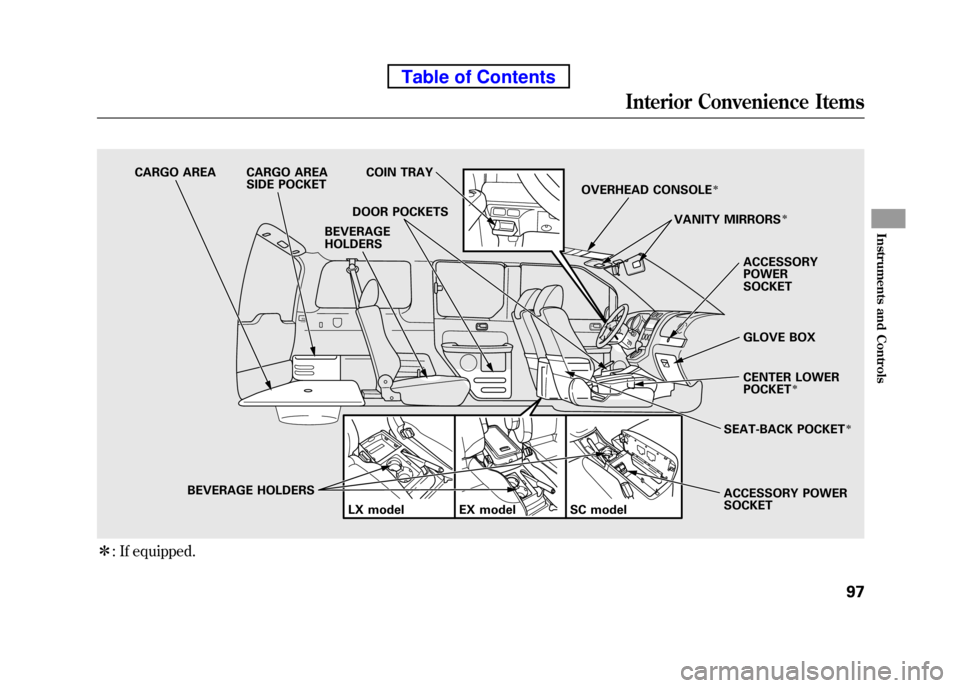
ꭧ: If equipped.
CARGO AREA CARGO AREA
SIDE POCKET COIN TRAY
DOOR POCKETS
BEVERAGE HOLDERS LX model EX model OVERHEAD CONSOLEꭧ
ACCESSORY POWERSOCKET
GLOVE BOX
CENTER LOWER POCKET
ꭧ
SEAT-BACK POCKETꭧ
ACCESSORY POWER SOCKET
VANITY MIRRORS
ꭧ
SC model
BEVERAGE
HOLDERS
Interior Convenience Items
97
Instruments and Controls
Table of Contents
Page 114 of 342
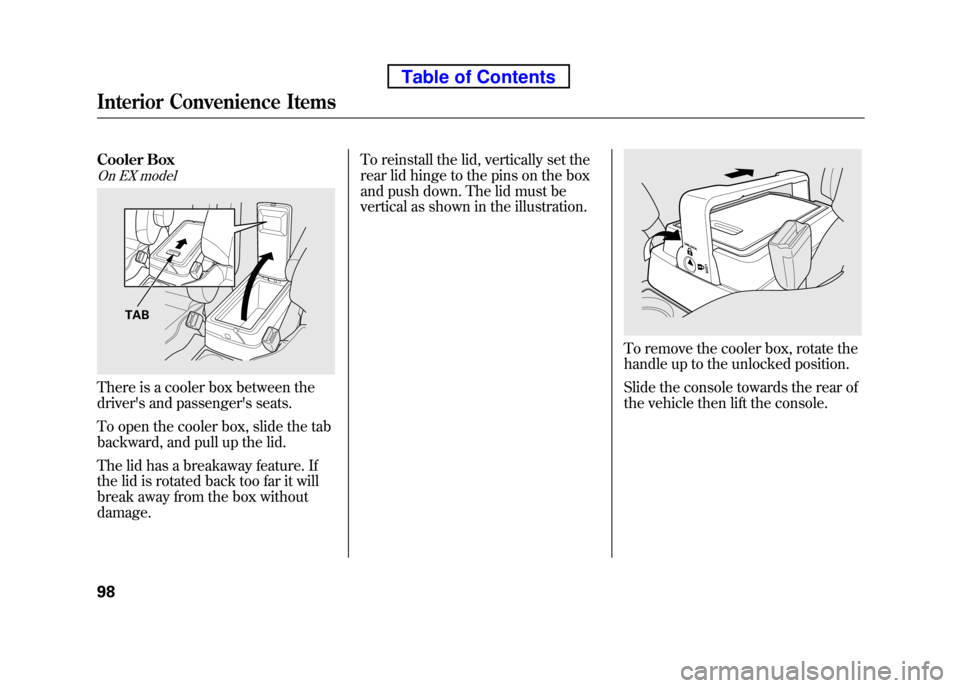
Cooler Box
On EX model
There is a cooler box between the
driver's and passenger's seats.
To open the cooler box, slide the tab
backward, and pull up the lid.
The lid has a breakaway feature. If
the lid is rotated back too far it will
break away from the box withoutdamage.To reinstall the lid, vertically set the
rear lid hinge to the pins on the box
and push down. The lid must be
vertical as shown in the illustration.
To remove the cooler box, rotate the
handle up to the unlocked position.
Slide the console towards the rear of
the vehicle then lift the console.
TAB
Interior Convenience Items
98
Table of Contents
Page 115 of 342
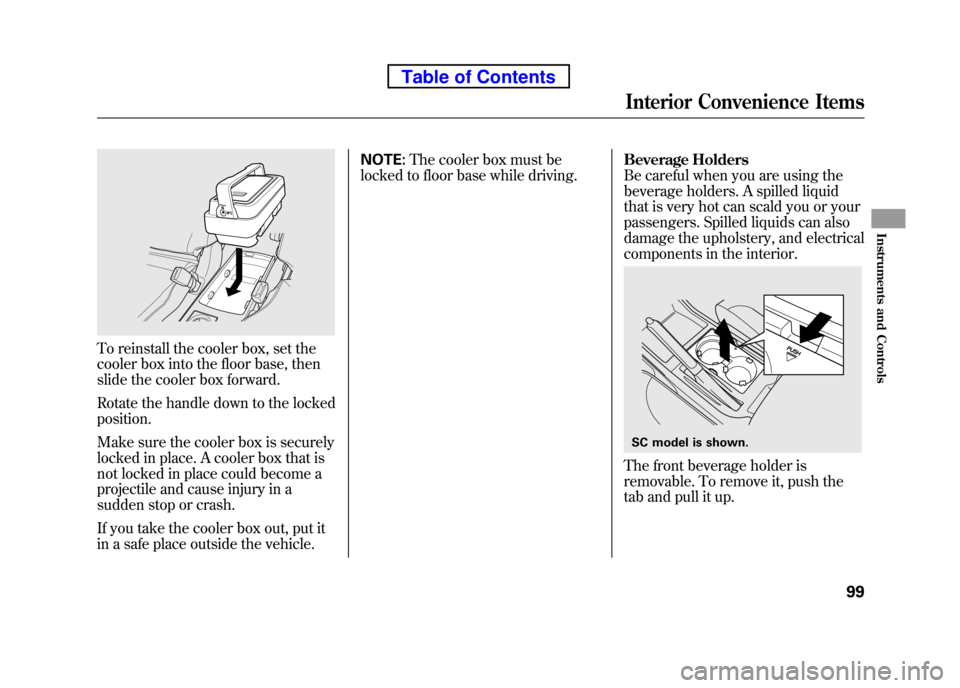
To reinstall the cooler box, set the
cooler box into the floor base, then
slide the cooler box forward.
Rotate the handle down to the locked position.
Make sure the cooler box is securely
locked in place. A cooler box that is
not locked in place could become a
projectile and cause injury in a
sudden stop or crash.
If you take the cooler box out, put it
in a safe place outside the vehicle.NOTE:
The cooler box must be
locked to floor base while driving. Beverage Holders
Be careful when you are using the
beverage holders. A spilled liquid
that is very hot can scald you or your
passengers. Spilled liquids can also
damage the upholstery, and electrical
components in the interior.
The front beverage holder is
removable. To remove it, push the
tab and pull it up.
SC model is shown.
Interior Convenience Items
99
Instruments and Controls
Table of Contents
Page 116 of 342
Accessory Power Sockets
Your vehicle has one, two, or three
accessory power sockets, depending
on the model. All models have a front
accessory power socket on the
dashboard above the glove box.
EX and SC models have an accessory
power socket in the cargo area on
the passenger's side.
The SC model has one additional
socket in the center console.
These sockets are intended to supply
power for 12 volt DC accessories that
are rated 120 watts or less (10 amps).
None of the sockets will power an
automotive type cigarette lighter
element. When more than one
socket is being used, the combined
power rating of the accessories
should be 120 watts or less (10 amps).Glove Box
Open the glove box by pulling the
bottom of the handle. Close it with a
firm push. Lock or unlock the glove
box with the master key.
An open glove box can cause
serious injury to your passenger
in a crash, even if the
passenger is wearing the seat belt.
Always keep the glove box
closed while driving.
Sun Visor
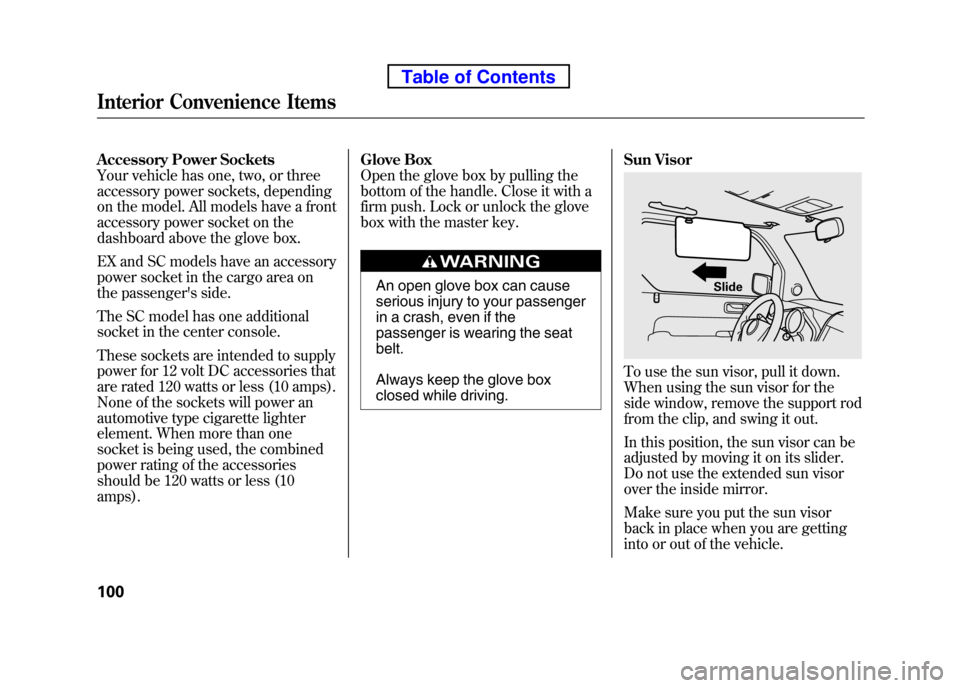
To use the sun visor, pull it down.
When using the sun visor for the
side window, remove the support rod
from the clip, and swing it out.
In this position, the sun visor can be
adjusted by moving it on its slider.
Do not use the extended sun visor
over the inside mirror.
Make sure you put the sun visor
back in place when you are getting
into or out of the vehicle.
Slide
Interior Convenience Items
100
Table of Contents
Page 117 of 342
Vanity Mirror
On EX and SC models
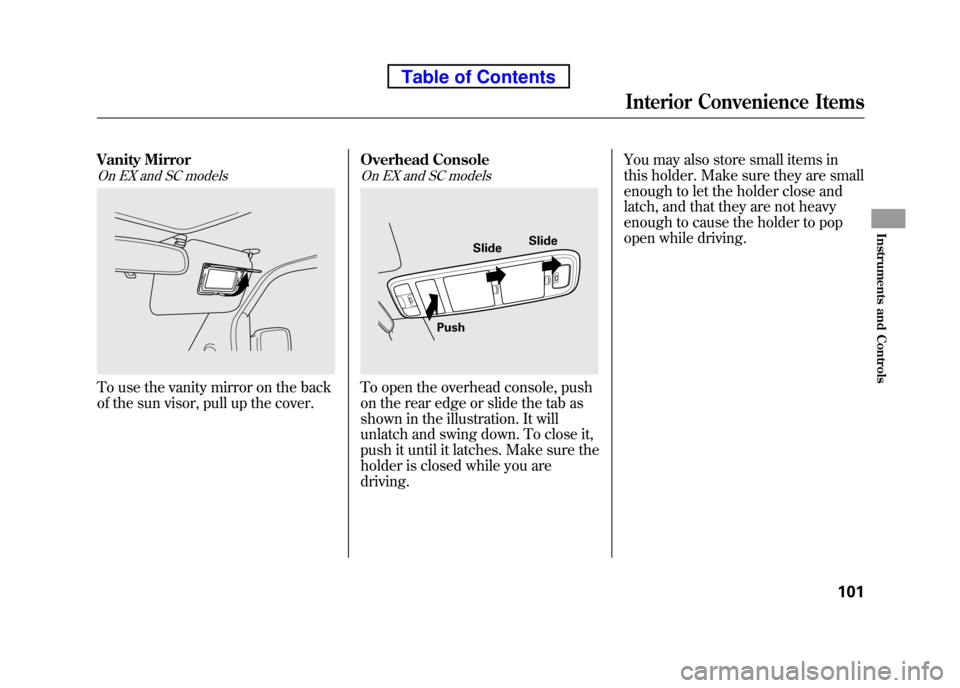
To use the vanity mirror on the back
of the sun visor, pull up the cover.Overhead Console
On EX and SC models
To open the overhead console, push
on the rear edge or slide the tab as
shown in the illustration. It will
unlatch and swing down. To close it,
push it until it latches. Make sure the
holder is closed while you aredriving.You may also store small items in
this holder. Make sure they are small
enough to let the holder close and
latch, and that they are not heavy
enough to cause the holder to pop
open while driving.
Push
Slide
Slide
Interior Convenience Items
101
Instruments and Controls
Table of Contents
Page 118 of 342

102
Table of Contents
Page 119 of 342
The heating and air conditioning
system in your vehicle provides a
comfortable driving environment in all
weather conditions.
The standard audio system has many
features. This section describes those
features and how to use them. (If you
have an optional audio system, refer to
the operating instructions that came
with it.)
On EX and SC models
Your vehicle has an anti-theft audio
system that requires a code number to
enable it.
Vents, Heating, and A/C..............
104
Air Flow Controls .....................105
Ventilation ............................... 106
Using the Heater .....................106
Using the A/C ......................... 106
Dehumidify the Interior ...........
107 To Defog and Defrost
..............107
To Remove Exterior Frost or Ice From the Windows ..............108
To Turn Everything Off ............108
Audio System .............................. 109
Playing the FM/AM Radio (Models without navigation
system) ................................ 110
Playing the XM
®Radio (Models
without navigation system) ......113
Playing a Disc (Models without navigation system) ...................119
Disc Player Error Messages
(Models without navigationsystem) ................................ 125
Disc Changer Error Messages
(Models without navigationsystem) ................................ 126
Playing the FM/AM Radio
(Models with navigationsystem) ................................ 127
Playing the XM
®Radio (Models
with navigation system) ...........
132
Playing a Disc (Models with navigation system) ...................140Disc Player Error Messages
(Models with navigationsystem) ................................ 148
Playing a PC Card (Models with
navigation system) ...................149
PC Card Error Messages (Models with navigation system) ...........161
Playing an iPod
®(Models with
navigation system) ...................162
iPod
®Error Messages (Models
with navigation system) ...........
172
Playing a USB Flash Memory Device (Models with navigation
system) ................................ 173
USB Flash Memory Device Error
Messages (Models with
navigation system) ...............182
Protecting Your Discs ..................183
FM/AM Radio Reception .............186
Radio Theft Protection .................188
Setting the Clock .........................189
Remote Audio Controls ................191
Auxiliary Input Jack .....................
192
Cruise Control ............................. 193
Rearview Camera and Monitor .....196
Features
103
Features
Page 120 of 342
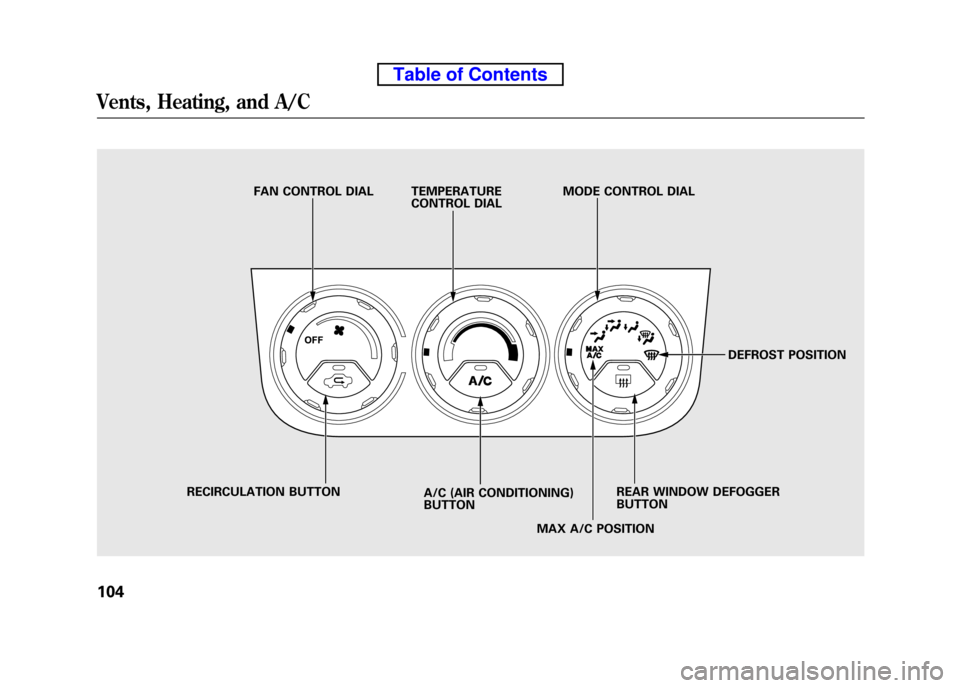
FAN CONTROL DIAL TEMPERATURECONTROL DIALMODE CONTROL DIAL
DEFROST POSITION
REAR WINDOW DEFOGGER BUTTON
MAX A/C POSITION
A/C (AIR CONDITIONING)BUTTON
RECIRCULATION BUTTON
Vents, Heating, and A/C
104
Table of Contents