service interval HONDA ELEMENT 2010 1.G Owners Manual
[x] Cancel search | Manufacturer: HONDA, Model Year: 2010, Model line: ELEMENT, Model: HONDA ELEMENT 2010 1.GPages: 342, PDF Size: 5.76 MB
Page 9 of 342

Wearing a Lap/ShoulderBelt .................................. 14, 19
Seats ............................................ 83
Head Restraints ........................85
Seats, Adjusting the .....................83
Sensors Driver's Seat Position Sensor ...27
Front Passenger's Weight Sensors ................................ 27
Impact Sensors ...................22, 23
Serial Number ............................ 306
Service Intervals .........................243
Service Manual (U.S. only) ........325
Service Station Procedures ........199
Setting the Clock ........................189
Shifting the Automatic Transmission .......................... 219
Shift Lever Position Indicators ...219
Shift Lock Release ......................221
Side Airbags ................................. 28
How the Side Airbag Off
Indicator Works ...................32
How Your Side Airbags Work ..28
Side Curtain Airbags ....................30
How Your Side Curtain Airbags Work .................................... 30Side Marker Lights, Bulb
Replacement in .......................265
Signaling Turns ............................ 60
Snow Tires ................................. 275
Sound System ............................ 109
Spare Tire .................................. 282
Inflating ........................... 271, 282
Specifications .......................... 310
Spark Plugs ................................ 308
Specifications ............................. 308
Speed Control ............................ 193
Speed Limiter ......................218, 221
Speedometer ................................ 64
SRS, Additional Information .........22
Additional Safety Precautions ...34
Airbag Service .......................... 33
Airbag System Components .....22
How the Side Airbag Off Indicator Works ...................32
How the SRS Indicator Works ..31
How Your Front Airbags
Work .................................... 25
How Your Side Airbags Work ..28
How Your Side Curtain Airbags Work .................................... 30
SRS Indicator ......................... 31, 59START (Ignition Key Position)
.....79
Starting the Engine ....................216
In Cold Weather at High Altitude ................................ 216
With a Dead Battery ................291
State Emissions Testing .............319
Steam Coming from Engine .......293
Steering Wheel Adjustment ............................... 74
Anti-theft Column Lock ............79
Buttons ........................... 191, 193
Stereo Sound System .................109
Storing Your Vehicle ..................278
Sun Visor ................................... 100
Supplemental Restraint
System .............................. 9, 22
Servicing .................................. 33
SRS Indicator ...................... 31, 59
System Components ................22
Synthetic Oil .............................. 252
T
Tachometer .................................. 64
CONTINUED
Index
IX
INDEX
Page 75 of 342

If either of you do not fasten your
seat belt while driving, the beeper
will sound and the indicator will flash
again at regular intervals. For more
information, see page 18.
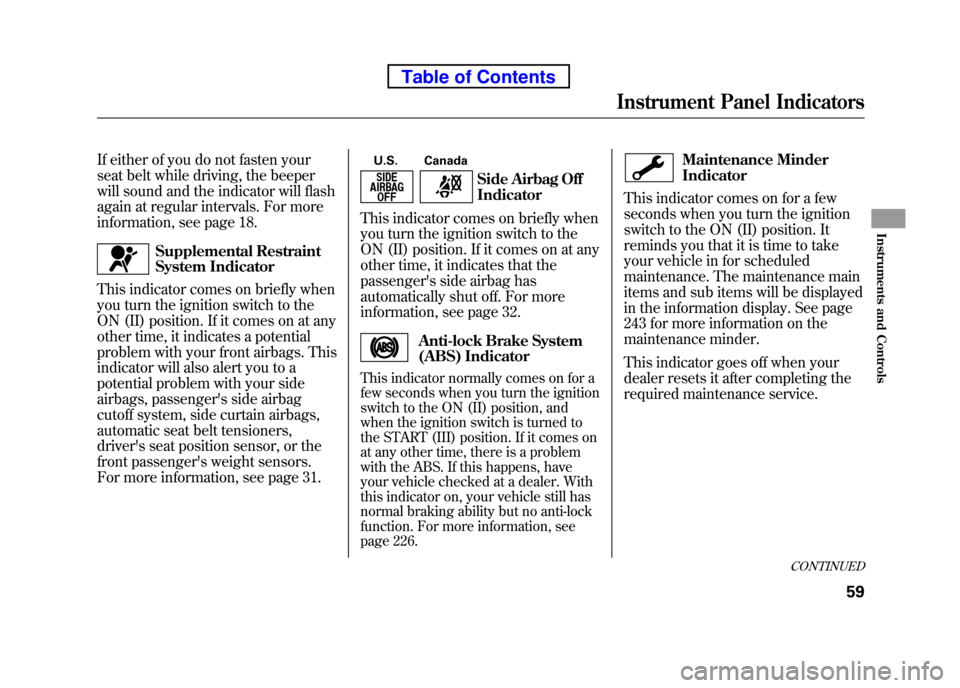
Supplemental Restraint
System Indicator
This indicator comes on briefly when
you turn the ignition switch to the
ON (II) position. If it comes on at any
other time, it indicates a potential
problem with your front airbags. This
indicator will also alert you to a
potential problem with your side
airbags, passenger's side airbag
cutoff system, side curtain airbags,
automatic seat belt tensioners,
driver's seat position sensor, or the
front passenger's weight sensors.
For more information, see page 31. U.S. Canada
Side Airbag Off Indicator
This indicator comes on briefly when
you turn the ignition switch to the
ON (II) position. If it comes on at any
other time, it indicates that the
passenger's side airbag has
automatically shut off. For more
information, see page 32.
Anti-lock Brake System
(ABS) Indicator
This indicator normally comes on for a
few seconds when you turn the ignition
switch to the ON (II) position, and
when the ignition switch is turned to
the START (III) position. If it comes on
at any other time, there is a problem
with the ABS. If this happens, have
your vehicle checked at a dealer. With
this indicator on, your vehicle still has
normal braking ability but no anti-lock
function. For more information, see
page 226.
Maintenance Minder Indicator
This indicator comes on for a few
seconds when you turn the ignition
switch to the ON (II) position. It
reminds you that it is time to take
your vehicle in for scheduled
maintenance. The maintenance main
items and sub items will be displayed
in the information display. See page
243 for more information on the
maintenance minder.
This indicator goes off when your
dealer resets it after completing the
required maintenance service.
CONTINUED
Instrument Panel Indicators
59
Instruments and Controls
Table of Contents
Page 263 of 342

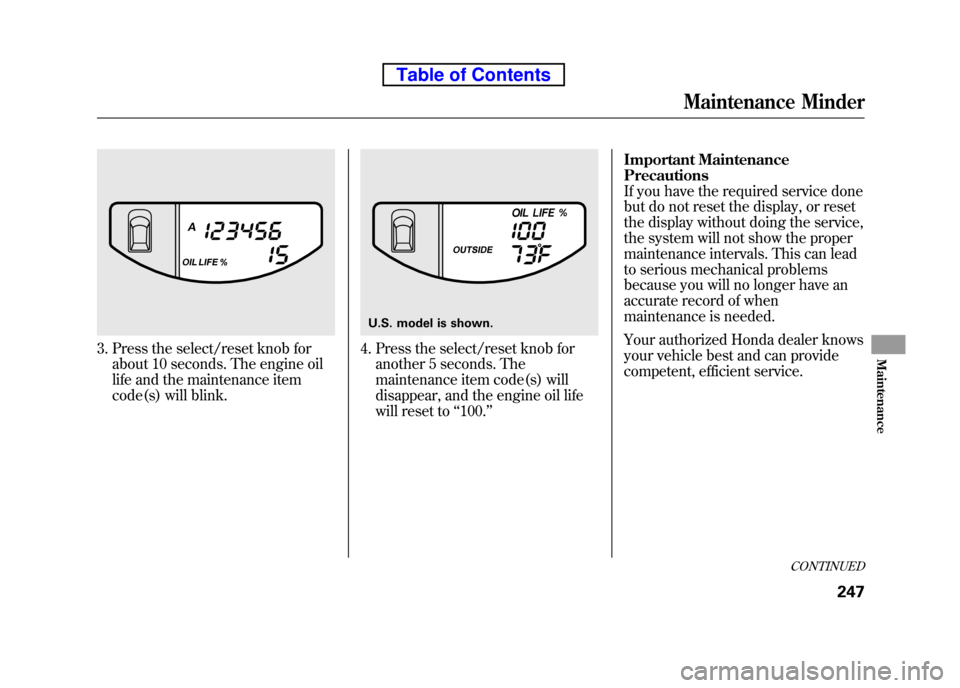
3. Press the select/reset knob forabout 10 seconds. The engine oil
life and the maintenance item
code(s) will blink.4. Press the select/reset knob foranother 5 seconds. The
maintenance item code(s) will
disappear, and the engine oil life
will reset to ‘‘100. ’’ Important MaintenancePrecautions
If you have the required service done
but do not reset the display, or reset
the display without doing the service,
the system will not show the proper
maintenance intervals. This can lead
to serious mechanical problems
because you will no longer have an
accurate record of when
maintenance is needed.
Your authorized Honda dealer knows
your vehicle best and can provide
competent, efficient service.
U.S. model is shown.
CONTINUED
Maintenance Minder
247
Maintenance
Table of Contents
Page 264 of 342

However, service at a dealer is not
mandatory to keep your warranties in
effect. Maintenance may be done by
any qualified service facility or
person who is skilled in this type of
automotive service. Make sure to
have the service facility or person
reset the display as previously
described. Keep all receipts as proof
of completion, and have the person
who does the work fill out your
Honda Service History or Canadian
Maintenance Log. Check your
warranty booklet for moreinformation.
We recommend using Honda parts
and fluids whenever you have
maintenance done. These are
manufactured to the same high
quality standards as the original
components, so you can be confident
of their performance and durability.U.S. Vehicles:
According to state and federal
regulations, failure to perform
maintenance on the items marked with
#will not void your emissions
warranties. However, all
maintenance services should be
performed in accordance with the
intervals indicated by the informationdisplay.
Owner's Maintenance Checks
You should check the following
items at the specified intervals. If you
are unsure of how to perform any
check, turn to the appropriate pagelisted.
● Engine oil level -Check every
time you fill the fuel tank. See page201.
● Engine coolant level -Check the
radiator reserve tank every time
you fill the fuel tank. See page 201. ●
Automatic transmission -Check
the fluid level monthly. See page256.
● Brakes -Check the fluid level
monthly. See page 258.
● Tires -Check the tire pressure
monthly. Examine the tread for
wear and foreign objects. See page271.
● Lights -Check the operation of
the headlights, parking lights,
taillights, high-mount brake light,
and license plate lights monthly.
See page 261.
Maintenance Minder
248
Table of Contents
Page 268 of 342

Synthetic Oil
You may use a synthetic motor oil if
it meets the same requirements
given for a conventional motor oil, it
displays the API Certification Seal,
and it is the proper weight. You must
follow the oil and filter change
intervals shown on the maintenance
minder display.
Engine Oil Additives
Your vehicle does not require any oil
additives. Additives may adversely
affect the engine or transmission
performance and durability.Changing the Engine Oil andFilter
Always change the oil and filter
according to the maintenance
messages shown on the information
display. The oil and filter collect
contaminants that can damage your
engine if they are not removedregularly.
Changing the oil and filter requires
special tools and access from
underneath the vehicle. The vehicle
should be raised on a service station-
type hydraulic lift for this service.
Unless you have the knowledge and
proper equipment, you should have
this maintenance done by a skilledtechnician.
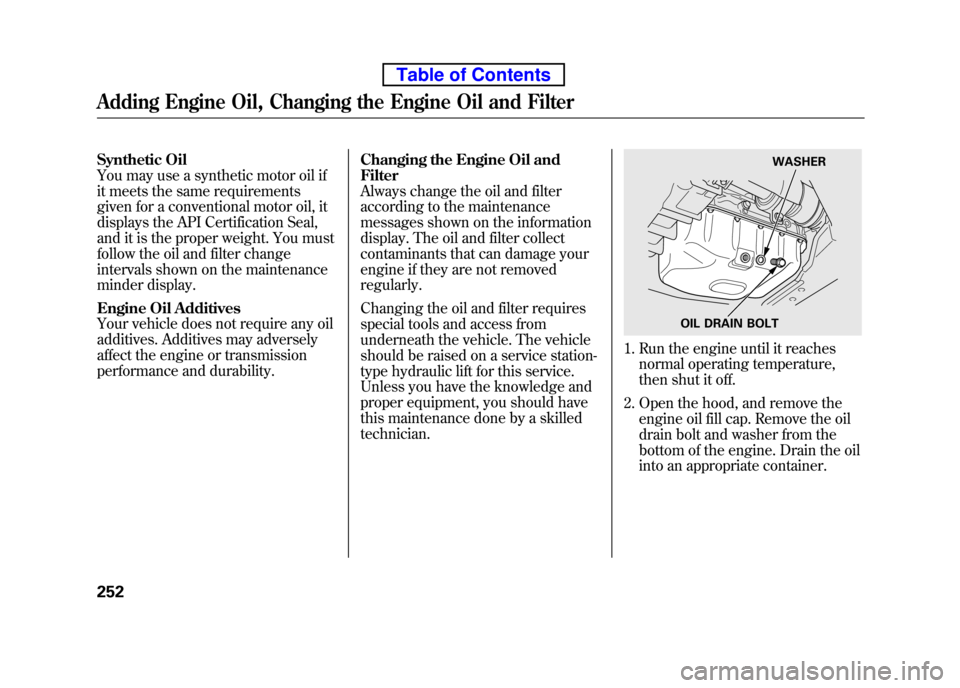
1. Run the engine until it reaches
normal operating temperature,
then shut it off.
2. Open the hood, and remove the engine oil fill cap. Remove the oil
drain bolt and washer from the
bottom of the engine. Drain the oil
into an appropriate container.
OIL DRAIN BOLT WASHER
Adding Engine Oil, Changing the Engine Oil and Filter
252
Table of Contents