open hood HONDA ELEMENT 2011 1.G Owners Manual
[x] Cancel search | Manufacturer: HONDA, Model Year: 2011, Model line: ELEMENT, Model: HONDA ELEMENT 2011 1.GPages: 286, PDF Size: 14.07 MB
Page 147 of 286

Before you begin driving your
vehicle, you should know what
gasoline to use and how to check the
levels of important fluids. You also
need to know how to properly store
cargo or packages. The information
in this section will help you. If you
plan to add any accessories to your
vehicle, please read the information
in this section first.Break-in Period
...........................
142
Fuel Recommendation
................
142
Service Station Procedures
.........
143
Refueling
.................................
143
Opening and Closing the Hood
...................................
144
Oil Check
................................
145
Engine Coolant Check
............
145
Fuel Economy
.............................
146
Accessories and Modifications
..........................
149
Carrying Cargo
...........................
151
Before Driving
141
Before Driving
10/08/06 08:34:41 11 ELEMENT MMC North America Owner's Man 50 31SCV680 enu
Page 150 of 286
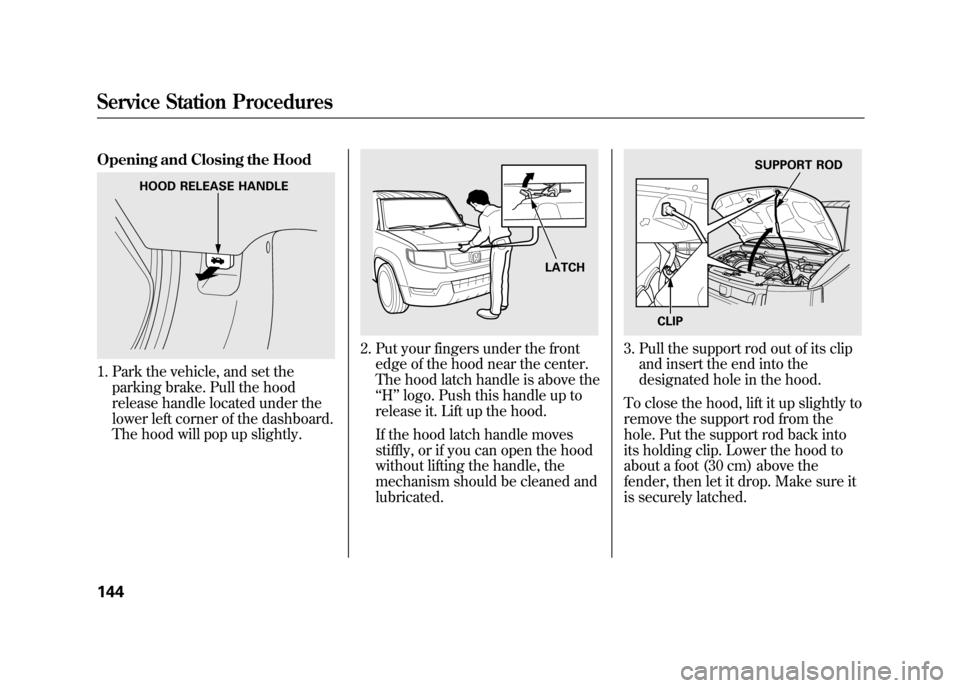
Opening and Closing the Hood1. Park the vehicle, and set theparking brake. Pull the hood
release handle located under the
lower left corner of the dashboard.
The hood will pop up slightly.
2. Put your fingers under the frontedge of the hood near the center.
The hood latch handle is above the
‘‘H ’’logo. Push this handle up to
release it. Lift up the hood.
If the hood latch handle moves
stiffly, or if you can open the hood
without lifting the handle, the
mechanism should be cleaned and
lubricated.
3. Pull the support rod out of its clip and insert the end into the
designated hole in the hood.
To close the hood, lift it up slightly to
remove the support rod from the
hole. Put the support rod back into
its holding clip. Lower the hood to
about a foot (30 cm) above the
fender, then let it drop. Make sure it
is securely latched.
HOOD RELEASE HANDLE
LATCH
SUPPORT ROD
CLIP
Service Station Procedures14410/08/06 08:34:41 11 ELEMENT MMC North America Owner's Man 50 31SCV680 enu
Page 200 of 286
Synthetic Oil
You may use a synthetic motor oil if
it meets the same requirements
given for a conventional motor oil, it
displays the API Certification Seal,
and it is the proper weight. You must
follow the oil and filter change
intervals shown on the Maintenance
Minder display.
Engine Oil Additives
Your vehicle does not require any oil
additives. Additives may adversely
affect the engine or transmission
performance and durability.Changing the Engine Oil and
Filter
Always change the oil and filter
according to the maintenance
messages shown on the information
display. The oil and filter collect
contaminants that can damage your
engine if they are not removed
regularly.
Changing the oil and filter requires
special tools and access from
underneath the vehicle. The vehicle
should be raised on a service station-
type hydraulic lift for this service.
Unless you have the knowledge and
proper equipment, you should have
this maintenance done by a skilled
technician.
1. Run the engine until it reaches
normal operating temperature,
then shut it off.
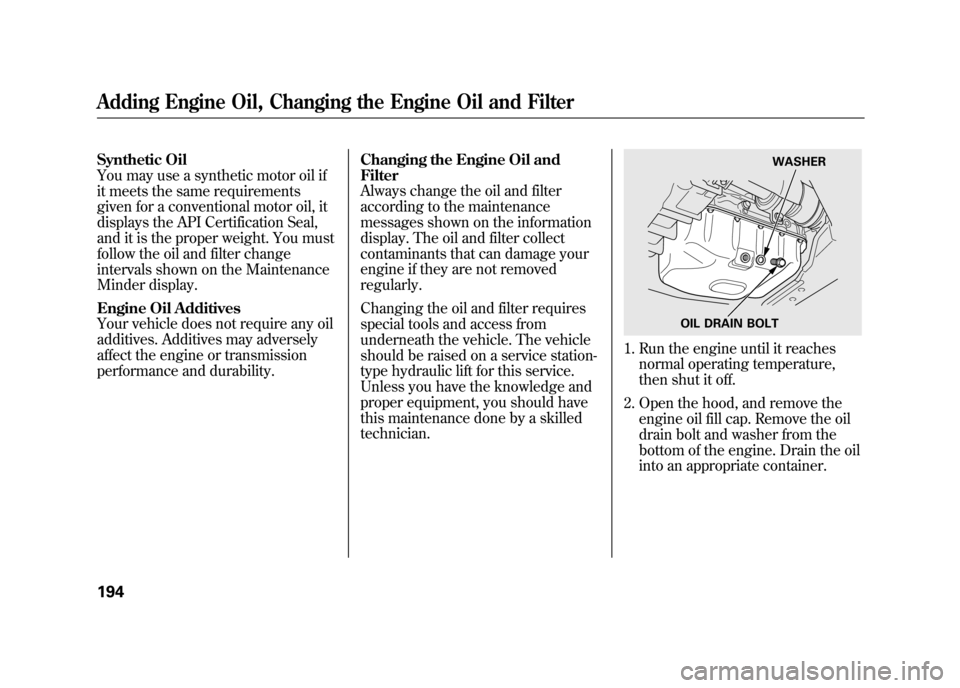
2. Open the hood, and remove the engine oil fill cap. Remove the oil
drain bolt and washer from the
bottom of the engine. Drain the oil
into an appropriate container.
OIL DRAIN BOLT WASHER
Adding Engine Oil, Changing the Engine Oil and Filter19410/08/06 08:34:41 11 ELEMENT MMC North America Owner's Man 50 31SCV680 enu
Page 208 of 286
Replacing a Headlight Bulb
Your vehicle has halogen headlight
bulbs. Handle it by its steel base and
protect the glass from contact with
your skin or hard objects. If you
touch the glass, clean it with
denatured alcohol and a clean cloth.Halogen headlight bulbs get very hot
when lit. Oil, perspiration, or a scratch
on the glass can cause the bulb to
overheat and shatter.
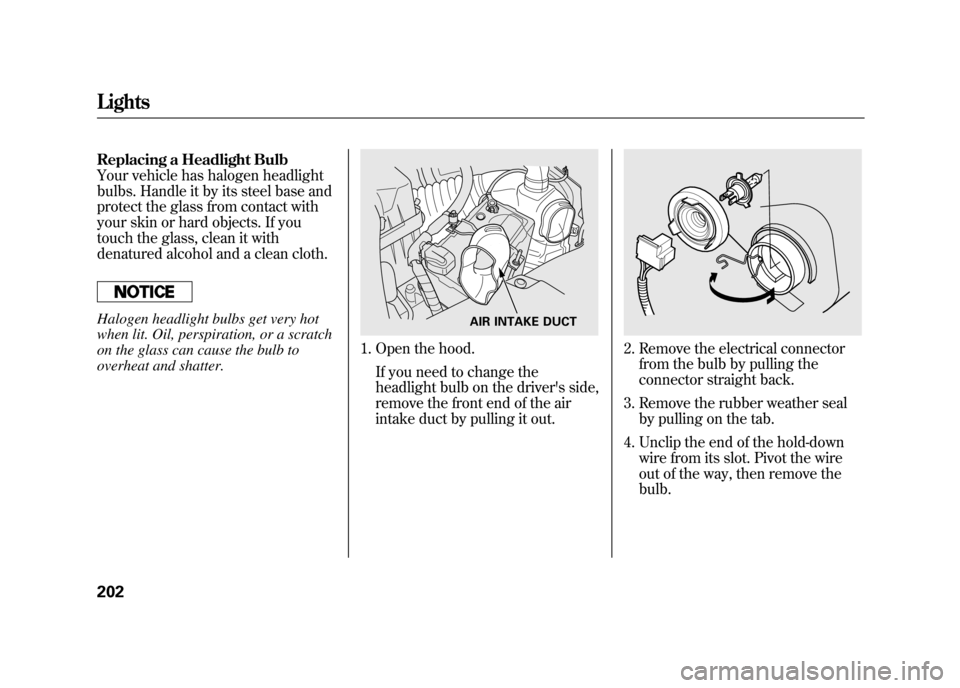
1. Open the hood.If you need to change the
headlight bulb on the driver's side,
remove the front end of the air
intake duct by pulling it out.
2. Remove the electrical connectorfrom the bulb by pulling the
connector straight back.
3. Remove the rubber weather seal by pulling on the tab.
4. Unclip the end of the hold-down wire from its slot. Pivot the wire
out of the way, then remove the
bulb.
AIR INTAKE DUCT
Lights20210/08/06 08:34:41 11 ELEMENT MMC North America Owner's Man 50 31SCV680 enu
Page 209 of 286
5. Install the new bulb into the hole,making sure the tabs are in their
slots. Pivot the hold-down wire
back in place, and clip the end into
the slot.
6. Install the rubber seal over the back of the headlight assembly.
Make sure one of the three arrows
on the rubber seal is facing up; it is
marked ‘‘
’’.
7. Push the electrical connector onto the new bulb. Make sure it is
connected securely. Turn on the
headlights to test the new bulb.
8. (Driver's side) Install the front end of the air
intake duct. Replacing a Daytime Running
Light Bulb
1. Open the hood.
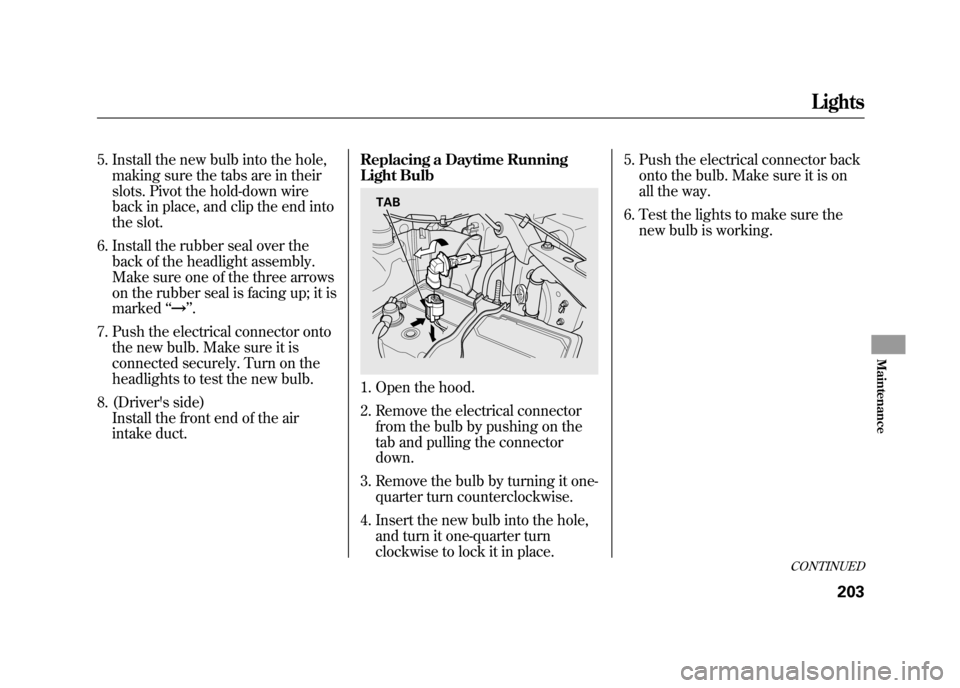
2. Remove the electrical connector
from the bulb by pushing on the
tab and pulling the connector
down.
3. Remove the bulb by turning it one- quarter turn counterclockwise.
4. Insert the new bulb into the hole, and turn it one-quarter turn
clockwise to lock it in place. 5. Push the electrical connector back
onto the bulb. Make sure it is on
all the way.
6. Test the lights to make sure the new bulb is working.
TAB
CONTINUED
Lights
203
Maintenance
10/08/06 08:34:41 11 ELEMENT MMC North America Owner's Man 50 31SCV680 enu
Page 210 of 286
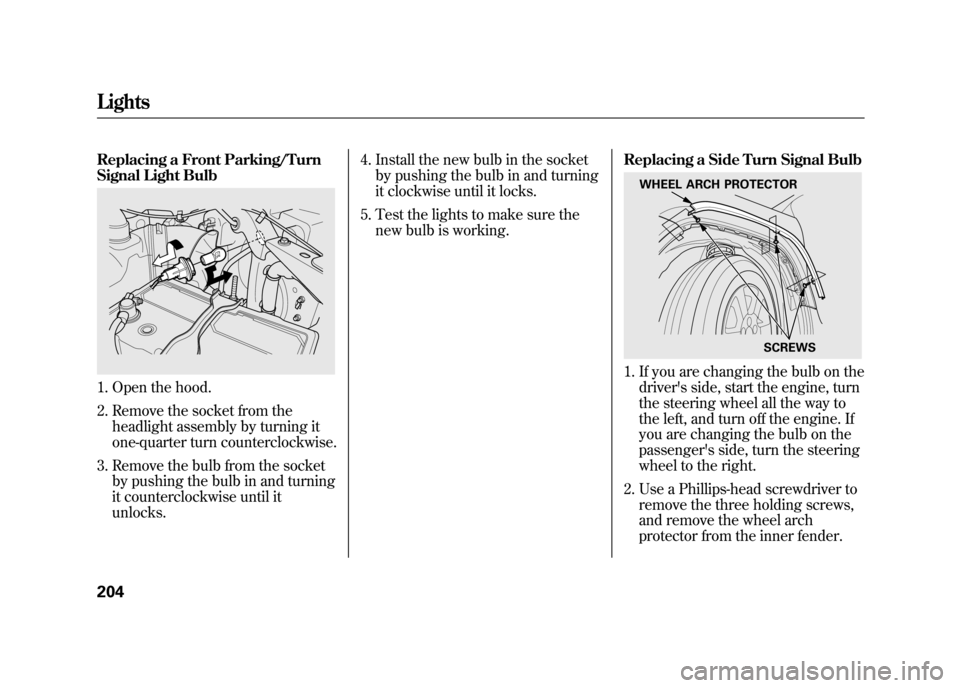
Replacing a Front Parking/Turn
Signal Light Bulb1. Open the hood.
2. Remove the socket from theheadlight assembly by turning it
one-quarter turn counterclockwise.
3. Remove the bulb from the socket by pushing the bulb in and turning
it counterclockwise until it
unlocks. 4. Install the new bulb in the socket
by pushing the bulb in and turning
it clockwise until it locks.
5. Test the lights to make sure the new bulb is working. Replacing a Side Turn Signal Bulb
1. If you are changing the bulb on the
driver's side, start the engine, turn
the steering wheel all the way to
the left, and turn off the engine. If
you are changing the bulb on the
passenger's side, turn the steering
wheel to the right.
2. Use a Phillips-head screwdriver to remove the three holding screws,
and remove the wheel arch
protector from the inner fender.
WHEEL ARCH PROTECTOR
SCREWS
Lights20410/08/06 08:34:41 11 ELEMENT MMC North America Owner's Man 50 31SCV680 enu
Page 212 of 286
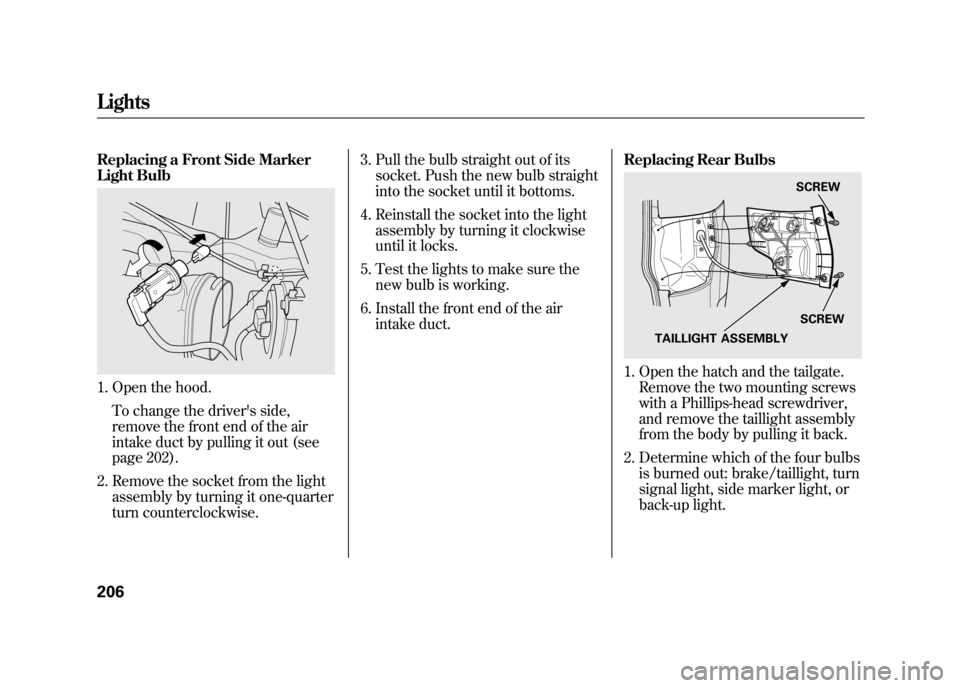
Replacing a Front Side Marker
Light Bulb1. Open the hood.To change the driver's side,
remove the front end of the air
intake duct by pulling it out (see
page 202).
2. Remove the socket from the light assembly by turning it one-quarter
turn counterclockwise. 3. Pull the bulb straight out of its
socket. Push the new bulb straight
into the socket until it bottoms.
4. Reinstall the socket into the light assembly by turning it clockwise
until it locks.
5. Test the lights to make sure the new bulb is working.
6. Install the front end of the air intake duct. Replacing Rear Bulbs
1. Open the hatch and the tailgate.
Remove the two mounting screws
with a Phillips-head screwdriver,
and remove the taillight assembly
from the body by pulling it back.
2. Determine which of the four bulbs is burned out: brake/taillight, turn
signal light, side marker light, or
back-up light.
SCREW
SCREW
TAILLIGHT ASSEMBLY
Lights20610/08/06 08:34:41 11 ELEMENT MMC North America Owner's Man 50 31SCV680 enu
Page 216 of 286
If you remove the driver's floor mat,
make sure to re-anchor it when you
put it back in your vehicle.
If you use non-Honda floor mats,
make sure they fit properly and that
they can be used with the floor mat
anchors. Do not put additional floor
mats on top of the anchored mats.Dust and Pollen Filter
This filter removes the dust and
pollen that is brought in from the
outside through the heating and
cooling system.
Have your dealer replace the filter
when this service is indicated by a
maintenance message on the
information display. It should be
replaced every 15,000 miles
(24,000 km) if you drive primarily in
urban areas that have high
concentrations of soot in the air, or if
the flow from the heating and cooling
system becomes less than usual.Wiper Blades
Check the condition of the wiper
blades at least every 6 months.
Replace them if you find signs of
cracking in the rubber, areas that are
getting hard, or if they leave streaks
and unwiped areas when used.
1. Front:
Raise the wiper arm off the
windshield.
Do not open the hood when the wiper
arms are raised, or you will damage the
hood and the arms.
Rear:
Raise the wiper arm off the hatch
glass and hold it.
Floor Mats, Dust and Pollen Filter, Wiper Blades21010/08/06 08:34:41 11 ELEMENT MMC North America Owner's Man 50 31SCV680 enu
Page 237 of 286
Although this seems like a simple
procedure, you should take several
precautions.
A battery can explode if you do
not follow the correct
procedure, seriously injuring
anyone nearby.
Keep all sparks, open flames,
and smoking materials away
from the battery.
You cannot start your vehicle with an
automatic transmission by pushing
or pulling it.
To Jump Start Your Vehicle:1. Open the hood, and check the physical condition of the battery.
In very cold weather, check the
condition of the electrolyte. If it
seems slushy or frozen, do not try
jump starting until it thaws.If a battery sits in extreme cold, the
electrolyte inside can freeze. Attempting
to jump start with a frozen battery can
cause it to rupture.
2. Turn off all the electricalaccessories: heater, A/C, audio
system, lights, etc. Put the
transmission in Park, and set the
parking brake.
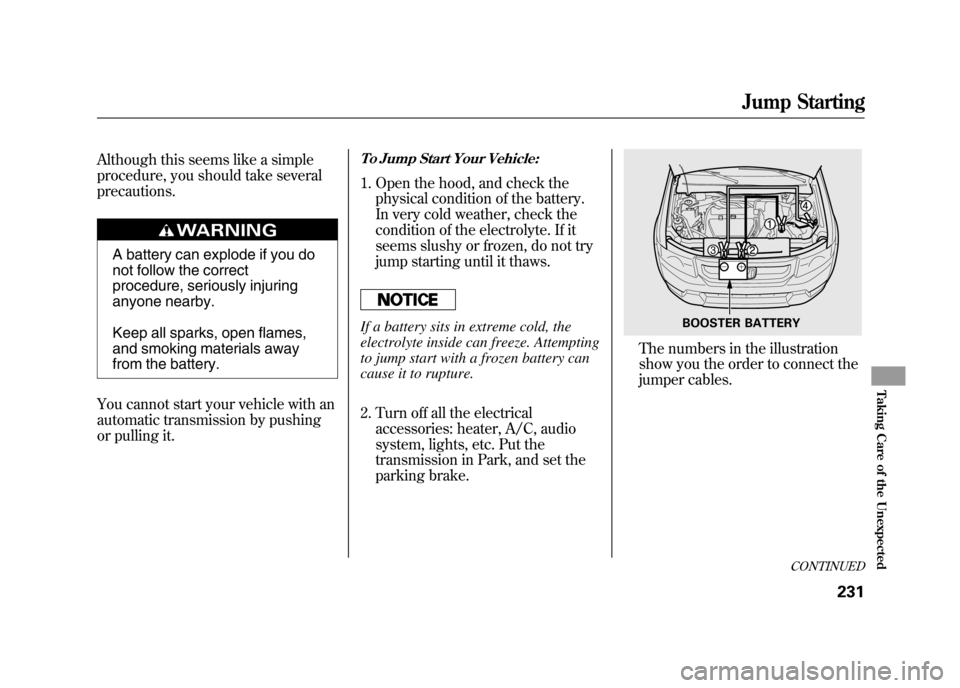
The numbers in the illustration
show you the order to connect the
jumper cables.
BOOSTER BATTERY
CONTINUED
Jump Starting
231
Taking Care of the Unexpected
10/08/06 08:34:41 11 ELEMENT MMC North America Owner's Man 50 31SCV680 enu
Page 239 of 286
The pointer of the vehicle's
temperature gauge should stay in the
midrange. If it climbs to the red
mark, you should determine the
reason (hot day, driving up a steep
hill, etc.).
If the vehicle overheats, you should
take immediate action. The only
indication may be the temperature
gauge climbing to or above the red
mark. Or you may see steam or spray
coming from under the hood.Driving with the temperature gauge
pointer at the red mark can cause
serious damage to the engine.
Steam and spray from an
overheated engine can
seriously scald you.
Do not open the hood if steam
is coming out.
1. Safely pull to the side of the road. Put the transmission in Park, and
set the parking brake. Turn off all
the accessories, and turn on the
hazard lights.
2. If you see steam and/or spray coming from under the hood, turn
off the engine. Wait until you see
no more signs of steam or spray,
then open the hood. 3. If you do not see steam or spray,
leave the engine running and
watch the temperature gauge. If
the high heat is due to
overloading, the engine should
start to cool down almost
immediately. If it does, wait until
the temperature gauge comes
down to the midpoint, then
continue driving.
4. If the temperature gauge stays at the red mark, turn off the engine.
CONTINUED
If the Engine Overheats
233
Taking Care of the Unexpected
10/08/06 08:34:41 11 ELEMENT MMC North America Owner's Man 50 31SCV680 enu