codes HONDA FIT 2007 1.G Owners Manual
[x] Cancel search | Manufacturer: HONDA, Model Year: 2007, Model line: FIT, Model: HONDA FIT 2007 1.GPages: 258, PDF Size: 3.52 MB
Page 171 of 258

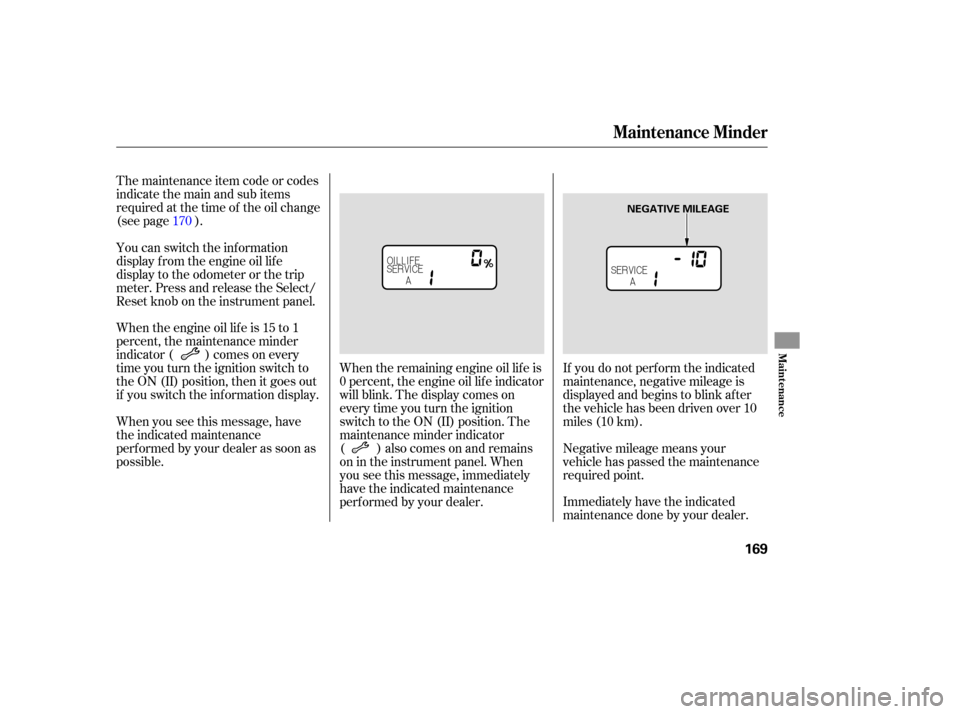
If you do not perform the indicated
maintenance, negative mileage is
displayed and begins to blink after
the vehic le has been driven over 10
miles (10 km).
Immediately have the indicated
maintenance done by your dealer.
Negati
ve mileage means your
vehicle has passed the maintenance
required point.
When
the rem aining engine oil life is
0 percent, the engine oil life indicator
will blink. The display comes on
everytimeyouturntheignition
switch to the ON (II) position. The
maintenance minder indicator
( ) also comes on and remains
on in the instrument panel. When
you see this message, immediately
have the indicated maintenance
performed by your dealer.
The
maintenance item code or codes
indicate the main and sub items
required at the time of the oil change
(see page ).
You can switch the information
display f rom the engine oil lif e
display to the odometer or the trip
meter. Press and release the Select/
Reset knob on the instrument panel.
Whentheengineoillifeis15to1
percent, the maintenance minder
indicator ( ) comes on every
time you turn the ignition switch to
the ON (II) position, then it goes out
if you switch the inf ormation display.
When you see this message, have
the indicated maintenance
perf ormed by your dealer as soon as
possible. 170
Maintenance Minder
Maint enance
169
NEGATIVE MILEAGE
Page 172 of 258

Your dealer will reset the display
after completing the required
maintenance service. You will see
‘‘OIL LIFE 100 %’’ on the information
display the next time you turn the
ignition switch to the ON (II)
position.
If maintenance service is done by
someone other than your dealer,
reset the maintenance minder as
follows:
Turn the ignition switch to the ON
(II) position.
Press the Select/Reset knob
repeatedly until the engine oil life
is displayed.
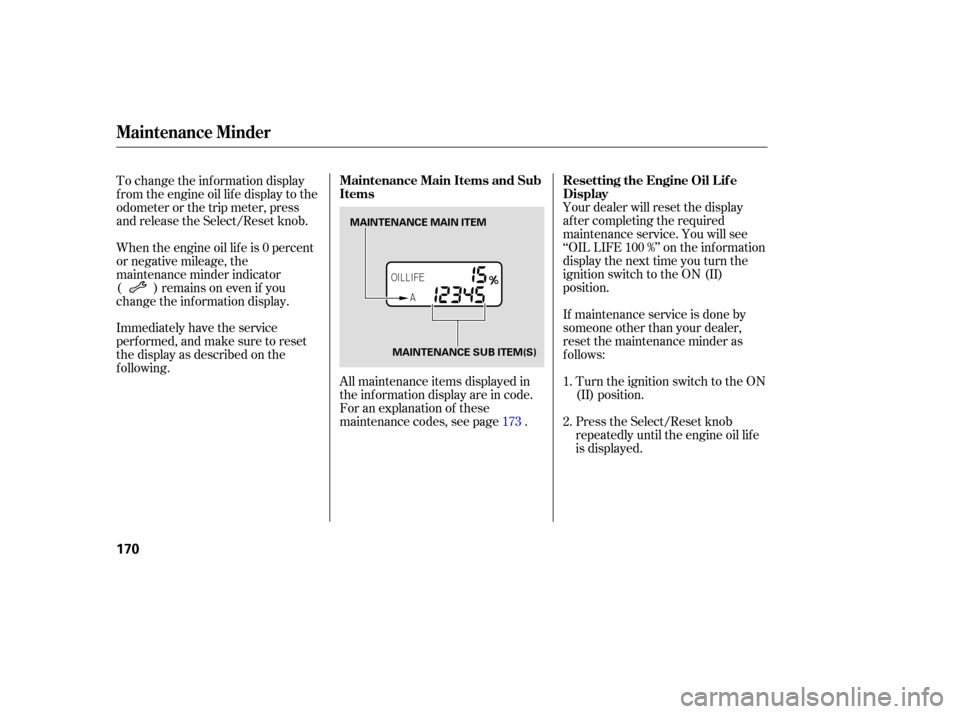
All
maintenance items displayed in
the information display are in code.
For an explanation of these
maintenance codes, see page .
To change the inf ormation display
f rom the engine oil lif e display to the
odometer or the trip meter, press
and release the Select/Reset knob.
When the engine oil lif e is 0 percent
or negative mileage, the
maintenance minder indicator
( )remainsonevenif you
change the inf ormation display.
Immediately have the service
perf ormed, and make sure to reset
the display as described on the
f ollowing.
1.
2.
173
Maintenance Minder
Resetting the Engine Oil Lif e
Display
Maintenance Main Items and Sub
Items
170
MAINTENANCE MAIN ITEM
MAINTENANCE SUB ITEM(S)
Page 176 of 258

Maintenance Record
174
mi
mi
mi
mi
mi
mi
mimi
mi
mi
mi
mi
mi
mi
You or the servicing dealer can record all completed maintenance here. When maintenance is performed, record the mileage, circle the coded item(s)
completed, and write in any other non-coded items (such as brake fluid replacement) below the codes. Keep the receipts for all work done on your
vehicle. Maintenance can also be recorded in your Honda service history booklet.
Mileage
km
km
km
km
km
km
km Signature
Date
Mileage
km
km
km
km
km
km
km Signature
Date
Maintenance
Performed
AB12345
AB12345
AB12345
AB12345
AB12345
AB12345
AB12345 Maintenance
Performed
AB12345
AB12345
AB12345
AB12345
AB12345
AB12345
AB12345
Page 221 of 258

If your vehicle has an automatic
transmission, the malfunction
indicator lamp may also come on
with the ‘‘D’’ indicator.
If
you have recently refueled your
vehicle, the indicator coming on
could be due to a loose or missing
fu el fill cap. You will also see a
‘‘CHECK FUEL CAP’’ message on
the information display. Tighten the
cap until it clicks at least once.
Tightening the cap will not turn the
indicator off immediatel y; it can take
several days of normal driving. If
the indicator comes on repeatedly,
even though it may go off as you
continue driving, have your vehicle
checked by a dealer as soon as
possible.
If
this indicator comes on
while driving, it means one
of the engine’s emissions control
systems may have a problem. Even
though you may feel no difference in
your vehicle’s performance, it can
reduce your fuel economy and cause
increased emissions. Continued
operation may cause serious damag e.
Your vehicle has certain ‘‘readiness
codes’’ that are part of the on-board
diagnostics for the emissions
systems. In some states, part of the
emissions testing is to make sure these
codes are set. If they are not
set, the test cannot be completed.
If the battery in your vehicle has
been disconnected or gone dead,
these codes are erased. It can take
several days of driving under various
conditions to set the codes again.
To check if they are set, turn the
ignition switch to the ON (II)
position, without starting the engine.
The malfunction indicator lamp will
come on for 20 seconds. If it then
goes of f , the readiness codes are set.
If it blinks f ive times, the readiness
codes are not set. If possible, do not
take your vehicle for a state
emissions test until the readiness
codes are set. Ref er to for more
inf ormation (see page ). 240
Malf unction Indicator L amp
Readiness Codes State
Emissions T esting
T aking Care of t he Unexpect ed
219
If you keep driving with the
malf unction indicator lamp on, you can
damage your vehicle’s emissions
controls and engine. Those repairs may
not be covered by your vehicle’s
warranties.
Page 242 of 258

If you take your vehicle f or a state
emissions test shortly af ter the
battery has been disconnected or
gone dead, it may not pass the test.
This is because of certain ‘‘readiness
codes’’ that must be set in the on-
board diagnostics f or the emissions
systems. These codes are erased
when the battery is disconnected,
and set again only after several days
of driving under a variety of
conditions.
If the testing f acility determines that
the readiness codes are not set, you
will be requested to return at a later
date to complete the test. If you must
get the vehicle retested within the
next two or three days, you can
condition the vehicle f or retesting by
doing the f ollowing.Make sure the gas tank is nearly,
but not completely, f ull (around
3/4). Without touching the accelerator
pedal, start the engine, and let it
idle f or 20 seconds.
Select a nearby lightly traveled
major highway where you can
maintain a speed of 50 to 60 mph
(80to97km/h)foratleast20
minutes. Drive on the highway in
D (A/T) or 5th (M/T). Do not usethecruisecontrol.Whentraffic
allows, drive f or 90 seconds
without moving the accelerator
pedal. (Vehicle speed may vary
slightly; this is okay.) If you cannot
do this f or a continuous 90
seconds because of traf f ic
conditions, drive f or at least 30
seconds, then repeat it two more
times (for a total of 90 seconds).
Then drive in city/suburban
traffic for at least 10 minutes.
When traffic conditions allow, let
the vehicle coast f or several
seconds without using the
accelerator pedal or the brake
pedal.
Keep the vehicle in Park
(automatic transmission) or
neutral (manual transmission).
Increase the engine speed to 2,000
rpm,andholditthereuntilthe
temperature gauge rises to at least
1/4of thescale(about3minutes). Make sure the vehicle has been
parked with the engine of f f or 6
hours or more.
Make sure the ambient
temperature is between 40° and
95°F.
If the testing f acility determines the
readiness codes are still not set, see
your dealer.Stop the vehicle, turn of f the
ignition switch, and leave it of f f or
30 minutes.
T esting of Readiness Codes
State Emissions T esting
240
Page 254 of 258

.........................
Meters, Gauges . 59, 66
...................
Methanol in Gasoline . 132
..........................
Mirrors, Adjusting .94
...............
Modif ying Your Vehicle . 138
...................
Neutral Gear Position . 153
..................
New Vehicle Break-in . 132
.....................
Normal Shif t Speeds .150
...................
NOTICE, Explanation of . i
...............
Numbers, Identif ication . 230
...
Octane Requirement, Gasoline . 132
.........................................
Odometer .67
...............................
Odometer, Trip .66
Oil ........................
Change, How to .178
......................
Change, When to .167
......................
Checking Engine .135
..............
Pressure Indicator . 60, 218
Selecting Proper Viscosity ......................................
Chart .177
...........
ON (Ignition Key Position) . 77Onboard Ref ueling Vapor
....................................
Recovery .237
..............................
Outside Mirrors .94
....................
Overheating, Engine .216
....
Owner’s Maintenance Checks . 172
.........................
Oxygenated Fuels .132
...................
Radiator Overheating . 216
.............
Radio/CD Sound System . 105
.................
Radio Thef t Protection . 124
...........................
Readiness Codes .219
..
Rear Lights, Bulb Replacement . 190
..........................
Rear Seat, Folding .90
............................
Rear View Mirror .94
.................
Rear Window Def ogger . 73
.
Rear Window Wiper and Washer . 70
...............
Reclining the Seat Backs . 86
.......
Recommended Shif t Speeds . 150
........................................
Ref ueling .133
.......................
Reminder Indicators .59
..............................
Paddle Shif ters .156
..............
Panel Brightness Control . 73
........................
Park Gear Position .152
...........................................
Parking .160
.................................
Parking Brake .95
Parking Brake and Brake .................
System Indicator . 60, 220
.................................
Parking Lights .71
..
Parking Over Things that Burn . 160
....
Passenger Airbag Of f Indicator . 31
.............................
PGM-FI System .238
...................................
Pollen Filter .194
..........................
Power Door Locks .78
..................
Power Socket Location . 98
..............................
Power Windows .93
.........
Pregnancy, Using Seat Belts . 16
........................
Preparing to Drive .147 .........
Protecting Adults and Teens . 11
...
Additional Safety Precautions . 17
.....
Advice f or Pregnant Women . 16
........................
Protecting Children .34
.......................
Protecting Inf ants .39
.......
Protecting Larger Children . 49
.........
Protecting Small Children . 40
Using Child Seats with .....................................
Tethers .47
.............................
Using LATCH .43
Index
O P
N
R
VI