ECU HONDA FIT 2009 2.G Owners Manual
[x] Cancel search | Manufacturer: HONDA, Model Year: 2009, Model line: FIT, Model: HONDA FIT 2009 2.GPages: 352, PDF Size: 17.67 MB
Page 4 of 352
2009 Fit Online Reference Owner's Manual
Contents
Owner's Identification Form
Introduction .............................................................................................................................\
............................. i
A Few Words About Safety ......................................................................\
........................................................ iii
Your Vehicle at a Glance (main controls) ....................................................\
................................................ 3
Driver and Passenger Safety (seat belts, SRS, and child protection) ......................\
.............................. 5
Instruments and Controls
(indicators, gauges, dashboard, steering wheel, and other convenience items)
............. 57
Features (heating and cooling, audio, steering wheel, security, and cruise control) ................................. 109
Before Driving (fuel, vehicle break-in, and cargo loading) ...........................................\
........................... 197
Driving (engine and transmission operation) .........................................\
....................................................... 213
Maintenance (minder, fluid checking, minor services, and vehicle storage)........................................... 243
Taking Care of the Unexpected (flat tire, dead battery, overheating, and fuses) .............................. 283
Technical Information (vehicle specifications, tires, and emissions controls) ....................................... 315
Warranty and Customer Relations (U. S. and Canada only) (warranty and contact information) ... 331
Index ....................................................................................................................................\
.................................... I
Service Information Summary ( fluid capacities and tire pressures)
\
\
1 00X31-TK6-6003
Page 17 of 352
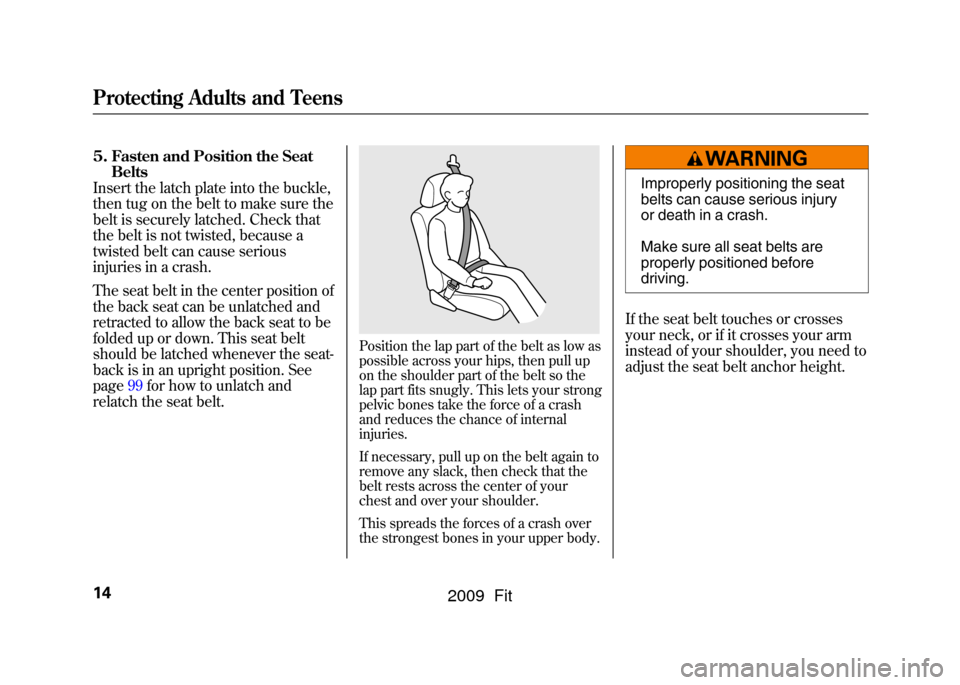
5. Fasten and Position the SeatBelts
Insert the latch plate into the buckle,
then tug on the belt to make sure the
belt is securely latched. Check that
the belt is not twisted, because a
twisted belt can cause serious
injuries in a crash.
The seat belt in the center position of
the back seat can be unlatched and
retracted to allow the back seat to be
folded up or down. This seat belt
should be latched whenever the seat-
back is in an upright position. See
page99for how to unlatch and
relatch the seat belt.
Position the lap part of the belt as low as
possible across your hips, then pull up
on the shoulder part of the belt so the
lap part fits snugly. This lets your strong
pelvic bones take the force of a crash
and reduces the chance of internal
injuries.
If necessary, pull up on the belt again to
remove any slack, then check that the
belt rests across the center of your
chest and over your shoulder.
This spreads the forces of a crash over
the strongest bones in your upper body.
Improperly positioning the seat
belts can cause serious injury
or death in a crash.
Make sure all seat belts are
properly positioned before
driving.
If the seat belt touches or crosses
your neck, or if it crosses your arm
instead of your shoulder, you need to
adjust the seat belt anchor height.
Protecting Adults and Teens14
2009 Fit
Page 22 of 352
Lap/Shoulder Belt
The lap/shoulder belt goes over your
shoulder, across your chest, and
across your hips.
To fasten the belt, insert the latch
plate into the buckle, then tug on the
belt to make sure the buckle is
latched (see page14for how to
properly position the belt).
To unlock the belt, press the red
PRESS button on the buckle. Guide
the belt across your body so that it
retracts completely. After exiting the
vehicle, be sure the belt is out of the
way and will not get closed in the
door.All seat belts have an emergency
locking retractor. In normal driving,
the retractor lets you move freely in
your seat while it keeps some tension
on the belt. During a collision or
sudden stop, the retractor
automatically locks the belt to help
restrain your body.
The seat belts in all positions except
the driver's have a lockable retractor
that must be activated to secure a
child seat (see page45).
If the shoulder part of the belt is
pulled all the way out, the lockable
retractor will activate. The belt will
retract, but it will not allow the
passenger to move freely.
To deactivate the lockable retractor,
unlatch the buckle and let the seat
belt fully retract. To refasten the seat
belt, pull it out only as far as needed.
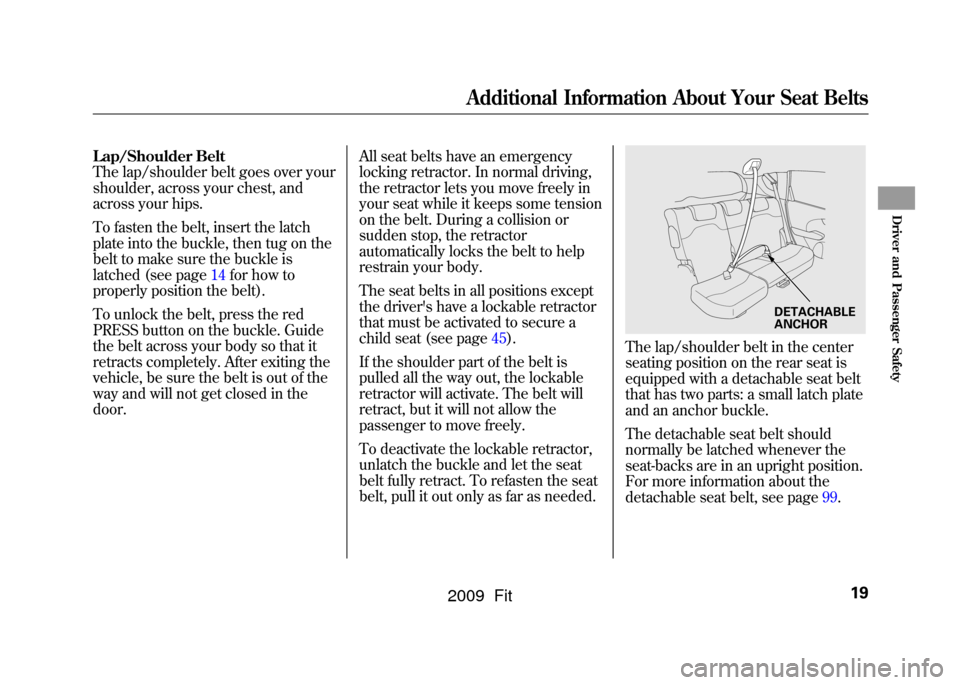
The lap/shoulder belt in the center
seating position on the rear seat is
equipped with a detachable seat belt
that has two parts: a small latch plate
and an anchor buckle.
The detachable seat belt should
normally be latched whenever the
seat-backs are in an upright position.
For more information about the
detachable seat belt, see page99.
DETACHABLE
ANCHOR
Additional Information About Your Seat Belts
19
Driver and Passenger Safety
2009 Fit
Page 37 of 352
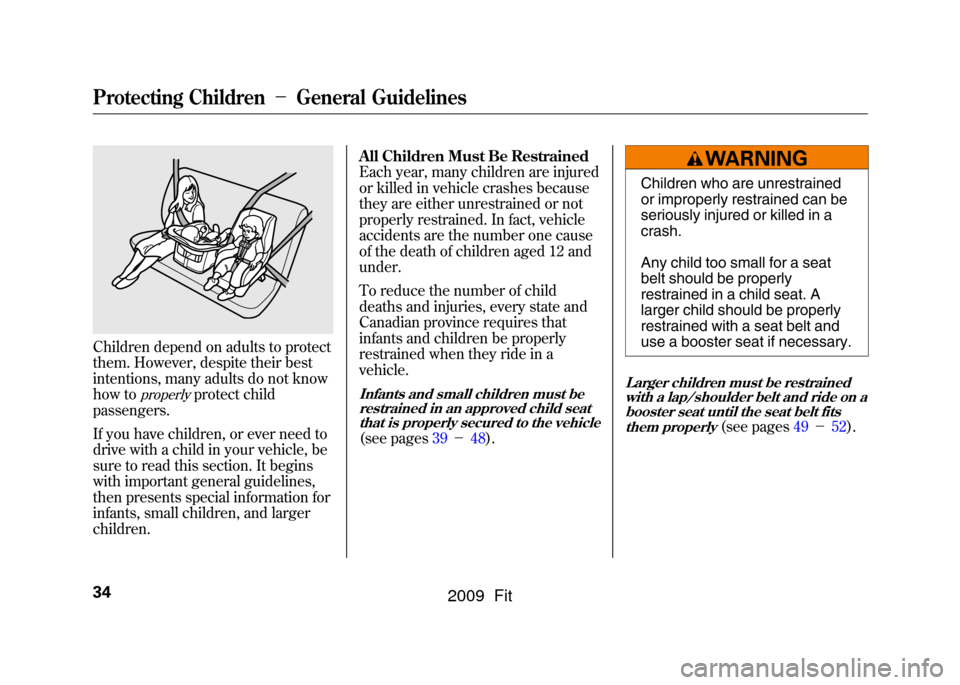
Children depend on adults to protect
them. However, despite their best
intentions, many adults do not know
how to
properly
protect child
passengers.
If you have children, or ever need to
drive with a child in your vehicle, be
sure to read this section. It begins
with important general guidelines,
then presents special information for
infants, small children, and larger
children. All Children Must Be Restrained
Each year, many children are injured
or killed in vehicle crashes because
they are either unrestrained or not
properly restrained. In fact, vehicle
accidents are the number one cause
of the death of children aged 12 and
under.
To reduce the number of child
deaths and injuries, every state and
Canadian province requires that
infants and children be properly
restrained when they ride in a
vehicle.
Infants and small children must be
restrained in an approved child seatthat is properly secured to the vehicle(see pages 39- 48).
Children who are unrestrained
or improperly restrained can be
seriously injured or killed in a
crash.
Any child too small for a seat
belt should be properly
restrained in a child seat. A
larger child should be properly
restrained with a seat belt and
use a booster seat if necessary.
Larger children must be restrained
with a lap/shoulder belt and ride on abooster seat until the seat belt fits
them properly
(see pages 49-52).
Protecting Children -General Guidelines34
2009 Fit
Page 40 of 352
If You Must Drive with Several
Children
Your vehicle has a back seat where
children can be properly restrained.
If you ever have to carry a group of
children, and a child must ride in
front:●Place the largest child in the front
seat, provided the child is large
enough to wear the lap/shoulder
belt properly (see page49).●Move the vehicle seat as far to the
rear as possible (see page93).●Have the child sit upright and well
back in the seat (see page15).●Make sure the seat belt is properly
positioned and secured (see page
14).If a Child Requires Close
Attention
Many parents say they prefer to put
an infant or a small child in the front
passenger seat so they can watch the
child, or because the child requires
attention.
Placing a child in the front seat
exposes the child to hazards in a
frontal collision, and paying close
attention to a child distracts the
driver from the important tasks of
driving, placing both of you at risk.
If a child requires close physical
attention or frequent visual contact,
we strongly recommend that another
adult ride with the child in a back
seat. The back seat is far safer for a
child than the front.
Protecting Children
-General Guidelines
37
Driver and Passenger Safety
2009 Fit
Page 44 of 352
Even with advanced front airbags
that automatically turn the
passenger's front airbag off (see page
31),a back seat is the safest place for
a small child.
If it is necessary to put a forward-
facing child seat in the front, move
the vehicle seat as far to the rear as
possible, and be sure the child seat is
firmly secured to the vehicle and the
child is properly strapped in the seat.
Placing a forward-facing child
seat in the front seat can result
in serious injury or death if the
front airbag inflates.
If you must place a forward-
facing child seat in front, move
the vehicle seat as far back as
possible, and properly restrain
the child.Selecting a Child Seat
When buying a child seat, you need
to choose either a conventional child
seat, or one designed for use with
the lower anchors and tethers for
children (LATCH) system.
Conventional child seats must be
secured to a vehicle with a seat belt,
whereas LATCH-compatible seats
are secured by attaching the seat to
hardware built into the two outer
seating positions in the back seat.
Since LATCH-compatible child seats
are easier to install and reduce the
possibility of improper installation,
we recommend selecting this style.
In seating positions and vehicles not
equipped with LATCH, a LATCH-
compatible child seat can be installed
using a seat belt.
Whatever type of seat you choose, to
provide proper protection, a child
seat should meet three
requirements:
1.
The child seat should meet U.S. or
Canadian Motor Vehicle Safety
Standard 213.
Look for FMVSS
213 or CMVSS 213 on the box.
2.
The child seat should be of the proper type and size to fit the child.Rear-facing for infants, forward-
facing for small children.
3.The child seat should fit the vehicle seating position (or positions)
where it will be used.
Before purchasing a conventional
child seat, or using a previously
purchased one, we recommend that
you test the seat in the specific
vehicle seating position or positions
where the seat will be used.
Protecting Infants and Small Children, Selecting a Child Seat
41
Driver and Passenger Safety
2009 Fit
Page 45 of 352
After selecting a proper child seat
and a good place to install the seat,
there are three main steps in
installing the seat:
1.
Properly secure the child seat tothe vehicle.
All child seats must be
secured to the vehicle with the lap
part of a lap/shoulder belt or with
the LATCH (lower anchors and
tethers for children) system. A
child whose seat is not properly
secured to the vehicle can be
endangered in a crash.
2.
Make sure the child seat is firmly secured.
After installing a child
seat, push and pull the seat
forward and from side-to-side to
verify that it is secure. A child seat secured with a seat
belt should be installed as firmly
as possible. However, it does not
need to be
‘‘rock solid. ’’Some
side-to-side movement can be
expected and should not reduce
the child seat's effectiveness.
If the child seat is not secure, try
installing it in a different seating
position, or use a different style of
child seat that can be firmly
secured. 3.
Secure the child in the child seat.Make sure the child is properly
strapped in the child seat
according to the child seat maker's
instructions. A child who is not
properly secured in a child seat
can be seriously injured in a crash.
The following pages provide
guidelines on how to properly install
a child seat. A forward-facing child
seat is used in all examples, but the
instructions are the same for rear-
facing child seats.
Installing a Child Seat42
2009 Fit
Page 46 of 352
Installing a Child Seat with
LATCH
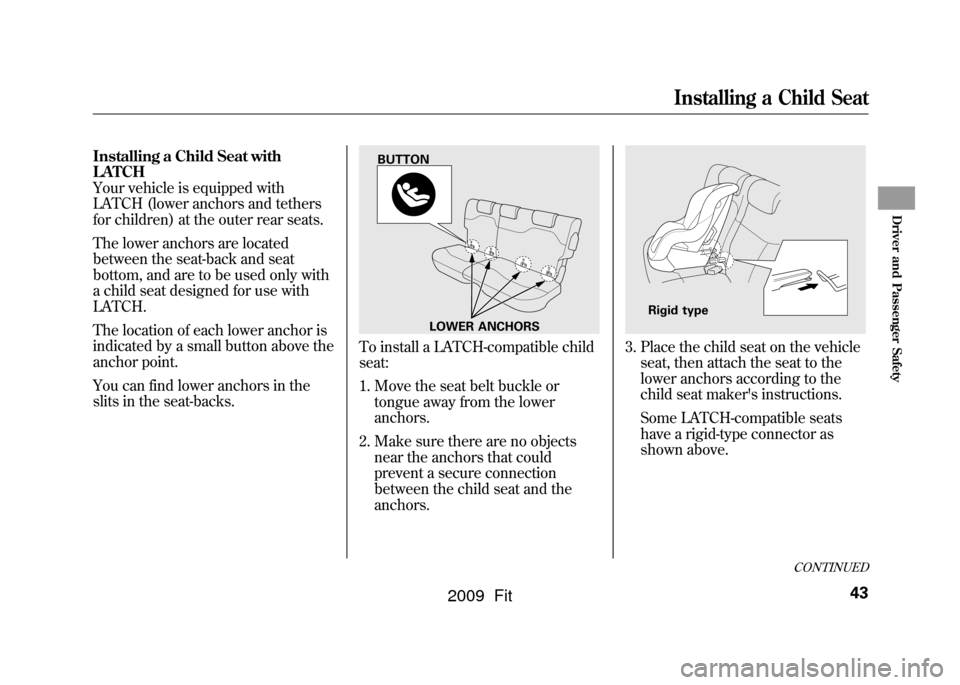
Your vehicle is equipped with
LATCH (lower anchors and tethers
for children) at the outer rear seats.
The lower anchors are located
between the seat-back and seat
bottom, and are to be used only with
a child seat designed for use with
LATCH.
The location of each lower anchor is
indicated by a small button above the
anchor point.
You can find lower anchors in the
slits in the seat-backs.
To install a LATCH-compatible child
seat:
1. Move the seat belt buckle ortongue away from the lower
anchors.
2. Make sure there are no objects near the anchors that could
prevent a secure connection
between the child seat and the
anchors.
3. Place the child seat on the vehicleseat, then attach the seat to the
lower anchors according to the
child seat maker's instructions.
Some LATCH-compatible seats
have a rigid-type connector as
shown above.
LOWER ANCHORS
BUTTON
Rigid type
CONTINUED
Installing a Child Seat
43
Driver and Passenger Safety
2009 Fit
Page 47 of 352
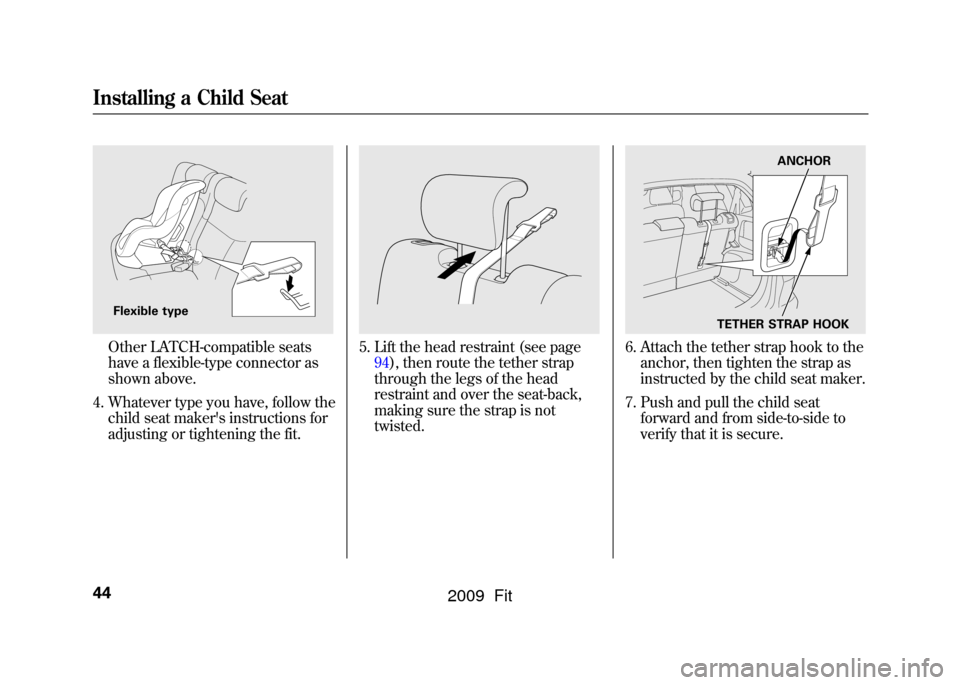
Other LATCH-compatible seats
have a flexible-type connector as
shown above.
4. Whatever type you have, follow the child seat maker's instructions for
adjusting or tightening the fit.
5. Lift the head restraint (see page94),then route the tether strap
through the legs of the head
restraint and over the seat-back,
making sure the strap is not
twisted.
6. Attach the tether strap hook to theanchor, then tighten the strap as
instructed by the child seat maker.
7. Push and pull the child seat forward and from side-to-side to
verify that it is secure.
Flexible type
ANCHOR
TETHER STRAP HOOK
Installing a Child Seat44
2009 Fit
Page 48 of 352
Installing a Child Seat with a Lap/
Shoulder Belt
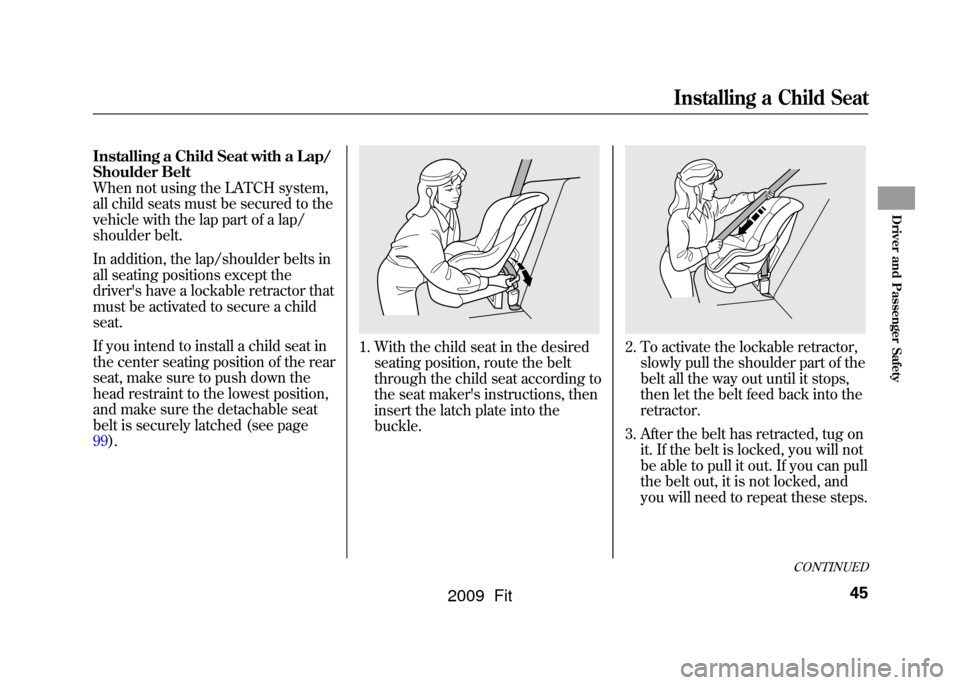
When not using the LATCH system,
all child seats must be secured to the
vehicle with the lap part of a lap/
shoulder belt.
In addition, the lap/shoulder belts in
all seating positions except the
driver's have a lockable retractor that
must be activated to secure a child
seat.
If you intend to install a child seat in
the center seating position of the rear
seat, make sure to push down the
head restraint to the lowest position,
and make sure the detachable seat
belt is securely latched (see page
99).
1. With the child seat in the desiredseating position, route the belt
through the child seat according to
the seat maker's instructions, then
insert the latch plate into the
buckle.
2. To activate the lockable retractor,slowly pull the shoulder part of the
belt all the way out until it stops,
then let the belt feed back into the
retractor.
3. After the belt has retracted, tug on it. If the belt is locked, you will not
be able to pull it out. If you can pull
the belt out, it is not locked, and
you will need to repeat these steps.
CONTINUED
Installing a Child Seat
45
Driver and Passenger Safety
2009 Fit