fuel pressure HONDA FIT 2009 2.G Owners Manual
[x] Cancel search | Manufacturer: HONDA, Model Year: 2009, Model line: FIT, Model: HONDA FIT 2009 2.GPages: 352, PDF Size: 17.67 MB
Page 4 of 352

2009 Fit Online Reference Owner's Manual
Contents
Owner's Identification Form
Introduction .............................................................................................................................\
............................. i
A Few Words About Safety ......................................................................\
........................................................ iii
Your Vehicle at a Glance (main controls) ....................................................\
................................................ 3
Driver and Passenger Safety (seat belts, SRS, and child protection) ......................\
.............................. 5
Instruments and Controls
(indicators, gauges, dashboard, steering wheel, and other convenience items)
............. 57
Features (heating and cooling, audio, steering wheel, security, and cruise control) ................................. 109
Before Driving (fuel, vehicle break-in, and cargo loading) ...........................................\
........................... 197
Driving (engine and transmission operation) .........................................\
....................................................... 213
Maintenance (minder, fluid checking, minor services, and vehicle storage)........................................... 243
Taking Care of the Unexpected (flat tire, dead battery, overheating, and fuses) .............................. 283
Technical Information (vehicle specifications, tires, and emissions controls) ....................................... 315
Warranty and Customer Relations (U. S. and Canada only) (warranty and contact information) ... 331
Index ....................................................................................................................................\
.................................... I
Service Information Summary ( fluid capacities and tire pressures)
\
\
1 00X31-TK6-6003
Page 62 of 352
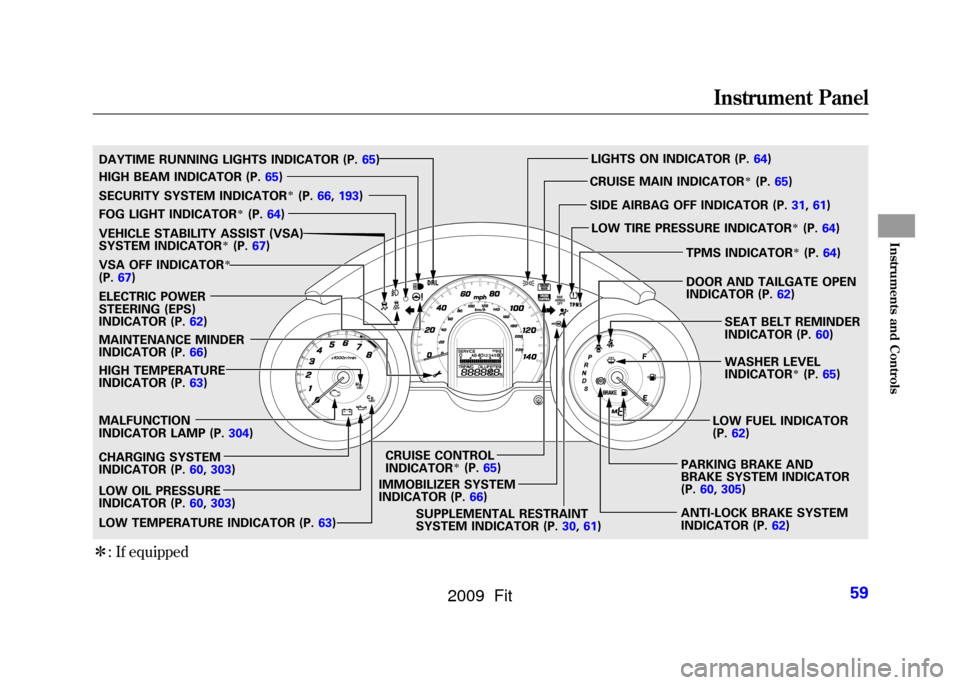
ꭧ: If equippedSECURITY SYSTEM INDICATOR
ꭧ(P. 66, 193)
WASHER LEVEL
INDICATOR
ꭧ(P.65)
MALFUNCTION
INDICATOR LAMP (P. 304)
CHARGING SYSTEM
INDICATOR (P. 60,303)
LOW OIL PRESSURE
INDICATOR (P. 60,303) IMMOBILIZER SYSTEM
INDICATOR (P.
66)
FOG LIGHT INDICATOR
ꭧ(P.
64) LIGHTS ON INDICATOR (P.
64)
SUPPLEMENTAL RESTRAINT
SYSTEM INDICATOR (P. 30,61)
MAINTENANCE MINDER
INDICATOR (P.
66) CRUISE MAIN INDICATOR
ꭧ(P.
65)
CRUISE CONTROL
INDICATOR
ꭧ(P. 65)
LOW TEMPERATURE INDICATOR (P. 63)
ELECTRIC POWER
STEERING (EPS)
INDICATOR (P.
62)
HIGH BEAM INDICATOR (P.
65)
LOW FUEL INDICATOR
(P.62)
TPMS INDICATOR
ꭧ(P.
64)
SEAT BELT REMINDER
INDICATOR (P. 60)
PARKING BRAKE AND
BRAKE SYSTEM INDICATOR
(P. 60, 305)
DAYTIME RUNNING LIGHTS INDICATOR (P.
65)
HIGH TEMPERATURE
INDICATOR (P. 63)
VEHICLE STABILITY ASSIST (VSA)
SYSTEM INDICATOR
ꭧ(P.
67)
VSA OFF INDICATORꭧ
(P. 67) SIDE AIRBAG OFF INDICATOR (P.
31,61)
LOW TIRE PRESSURE INDICATOR
ꭧ(P. 64)
ANTI-LOCK BRAKE SYSTEM
INDICATOR (P. 62)
DOOR AND TAILGATE OPEN
INDICATOR (P.
62)
Instrument Panel
59
Instruments and Controls
2009 Fit
Page 202 of 352
Refueling
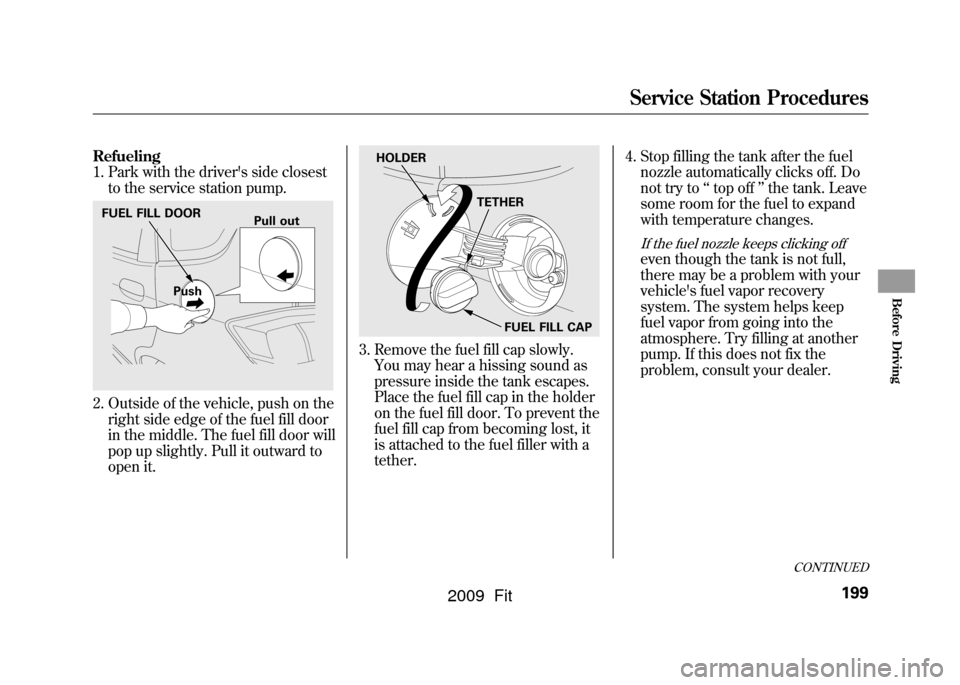
1. Park with the driver's side closestto the service station pump.2. Outside of the vehicle, push on theright side edge of the fuel fill door
in the middle. The fuel fill door will
pop up slightly. Pull it outward to
open it.
3. Remove the fuel fill cap slowly.You may hear a hissing sound as
pressure inside the tank escapes.
Place the fuel fill cap in the holder
on the fuel fill door. To prevent the
fuel fill cap from becoming lost, it
is attached to the fuel filler with a
tether. 4. Stop filling the tank after the fuel
nozzle automatically clicks off. Do
not try to ‘‘top off ’’the tank. Leave
some room for the fuel to expand
with temperature changes.
If the fuel nozzle keeps clicking offeven though the tank is not full,
there may be a problem with your
vehicle's fuel vapor recovery
system. The system helps keep
fuel vapor from going into the
atmosphere. Try filling at another
pump. If this does not fix the
problem, consult your dealer.
FUEL FILL DOOR
Push Pull out
HOLDER
TETHER
FUEL FILL CAP
CONTINUED
Service Station Procedures
199
Before Driving
2009 Fit
Page 219 of 352
1. Apply the parking brake.
2. In cold weather, turn off allelectrical accessories to reduce the
drain on the battery.
3.
Manual transmission:Press the clutch pedal down all the
way. The START (III) position
does not function unless the clutch
pedal is pressed.Automatic transmission:Make sure the shift lever is in
Park. Press on the brake pedal. 4. Without touching the accelerator
pedal, turn the ignition key to the
START (III) position. Do not hold
the key in the START (III) position
for more than 15 seconds at a time.
If the engine does not start right
away, pause for at least 10 seconds
before trying again.
The immobilizer system protects your
vehicle from theft. If an improperly-
coded key (or other device) is used, the
engine's fuel system is disabled. For
more information, see page79.
5. If the engine does not start within15 seconds, or starts but stalls
right away, repeat step 4 with the
accelerator pedal pressed halfway
down. If the engine starts, release
pressure on the accelerator pedal
so the engine does not race. 6. If the engine fails to start, press
the accelerator pedal all the way
down, and hold it there while
starting to clear flooding. If the
engine still does not start, return to
step 5.
The engine is harder to start in cold
weather. Also, the thinner air found at
altitudes above 8,000 feet (2,400
meters) adds to this problem.
Starting the Engine216
2009 Fit
Page 238 of 352

U.S. models onlyYour vehicle is equipped with a tire
pressure monitoring system (TPMS)
that turns on every time you start the
engine and monitors the pressure in
your tires while driving.
Each tire has its own pressure sensor
(not including the spare tire). If the
air pressure of a tire becomes
significantly low, the sensor in that
tire immediately sends a signal that
causes the low tire pressure indicator
to come on.
Low Tire Pressure
Indicator
When the low tire pressure indicator
is on, one or more of your tires is
significantly underinflated. You
should stop and check your tires as
soon as possible, and inflate them to
the proper pressure as indicated on
the vehicle's tire information placard.
If you think you can safely drive a
short distance to a service station,
proceed slowly, and inflate the tire to
the recommended pressure shown
on the driver's doorjamb.
If the tire is flat, or if the tire pressure
is too low to continue driving, replace
the tire with the compact spare tire
(see page284). If you cannot make the low tire
pressure indicator go out after
inflating the tires to the specified
values, have your dealer check the
system as soon as possible.
Driving on a significantly under-
inflated tire causes the tire to
overheat and can lead to tire failure.
Under-inflation also reduces fuel
efficiency and tire tread life, and may
affect the vehicle's handling and
stopping ability.
Because tire pressure varies by
temperature and other conditions,
the low tire pressure indicator may
come on unexpectedly.
CONTINUED
Tire Pressure Monitoring System (TPMS)
235
Driving
2009 Fit
Page 253 of 352

However, service at a dealer is not
mandatory to keep your warranties in
effect. Maintenance may be done by
any qualified service facility or
person who is skilled in this type of
automotive service. Make sure to
have the service facility or person
reset the display as previously
described. Keep all receipts as proof
of completion, and have the person
who does the work fill out your
Honda Service History or Canadian
Maintenance Log. Check your
warranty booklet for more
information.
We recommend using Honda parts
and fluids whenever you have
maintenance done. These are
manufactured to the same high
quality standards as the original
components, so you can be confident
of their performance and durability.U.S. Vehicles:
Maintenance,
replacement, or repair of
emissions control devices and
systems may be done by any
automotive repair establishment
or individual using parts that are
‘‘ certified ’’to EPA standards.
According to state and federal
regulations, failure to perform
maintenance on the items marked
with# will not void your emissions
warranties. However, all
maintenance services should be
performed in accordance with the
intervals indicated by the information
display.
Owner's Maintenance Checks
You should check the following
items at the specified intervals. If you
are unsure of how to perform any
check, turn to the appropriate page
listed.
●Engine oil level -Check every
time you fill the fuel tank. See page
201.●Engine coolant level -Check the
radiator reserve tank every time
you fill the fuel tank. See page202.●Automatic transmission -Check
the fluid level monthly. See page
259.●Brakes -Check the fluid level
monthly. See page 261.●Tires-Check the tire pressure
monthly. Examine the tread for
wear and foreign objects. See page
274.●Lights -Check the operation of
the headlights, parking lights,
taillights, high-mount brake light,
and license plate lights monthly.
See page 262.
Maintenance Minder250
2009 Fit
Page 276 of 352
To safely operate your vehicle, your
tires must be the proper type and
size, in good condition with adequate
tread, and correctly inflated.
The following pages give more
detailed information on how to take
care of your tires and what to do
when they need to be replaced.
Using tires that are excessively
worn or improperly inflated can
cause a crash in which you can
be seriously hurt or killed.
Follow all instructions in this
owner's manual regarding tire
inflation and maintenance.Inflation Guidelines
Keeping the tires properly inflated
provides the best combination of
handling, tread life, and riding
comfort.
●Underinflated tires wear unevenly,
adversely affect handling and fuel
economy, and are more likely to
fail from being overheated.●Overinflated tires can make your
vehicle ride more harshly, are
more prone to damage from road
hazards, and wear unevenly.
The tire pressure monitoring system
(TPMS)
ꭧwarns you when a tire
pressure is low. See page 235for
more information.
ꭧ : If equipped Even though your vehicle is
equipped with TPMS, we
recommend that you visually check
your tires every day. If you think a
tire might be low, check it
immediately with a tire gauge.
Use a gauge to measure the air
pressure in each tire at least once a
month. Even tires that are in good
condition may lose 1 to 2 psi (10 to
20 kPa, 0.1 to 0.2 kgf/cm
2) per
month. Remember to check the
spare tire (if equipped) at the same
time.
Check the air pressures when the
tires are cold. This means the vehicle
has been parked for at least 3 hours,
or driven less than 1 mile (1.6 km).
Add or release air, if needed, to
match the recommended cold tire
pressures.CONTINUED
Tires
273
Maintenance
2009 Fit
Page 318 of 352

The diagrams in this section give you
the dimensions and capacities of
your vehicle and the locations of the
identification numbers. It also
includes information you should
know about your vehicle's tires and
emissions control systems.Identification Numbers
...............
316
Specifications
..............................
318
DOT Tire Quality Grading (U.S. Vehicles)
.............................
321
Uniform Tire Quality Grading
...............................
321
Treadwear
...............................
321
Traction
..................................
321
Temperature
...........................
322
Tire Labeling
..............................
323
Tire Pressure Monitoring System (TPMS) -Required Federal
Explanation
.........................
324
Emissions Controls
.....................
326
The Clean Air Act
....................
326
Crankcase Emissions Control System
................................
326
Evaporative Emissions Control System
................................
326
Onboard Refueling Vapor
Recovery
.............................
326
Exhaust Emissions Controls
...
327
Replacement Parts
..................
327
Three Way Catalytic Converter
................................
328 Emissions Testing
.......................
329
Technical Information
315
Technical Information
2009 Fit
Page 327 of 352

Maximum Tire PressureMax Press-The maximum air
pressure the tire can hold.Maximum Tire LoadMax Load -The maximum load the
tire can carry at maximum air
pressure.
Tire Pressure Monitoring System
(TPMS) -Required Federal
ExplanationU.S. models onlyEach tire, including the spare (if
provided), should be checked
monthly when cold and inflated to
the inflation pressure recommended
by the vehicle manufacturer on the
vehicle placard or tire inflation
pressure label.
(If your vehicle has tires of a different
size than the size indicated on the
vehicle placard or tire inflation
pressure label, you should determine
the proper tire inflation pressure for
those tires.) As an added safety feature, your
vehicle has been equipped with a tire
pressure monitoring system (TPMS)
that illuminates a low tire pressure
telltale
when one or more of your tires is
significantly under-inflated.
Accordingly, when the low tire
pressure telltale illuminates, you
should stop and check your tires as
soon as possible, and inflate them to
the proper pressure.
Driving on a significantly under-
inflated tire causes the tire to
overheat and can lead to tire failure.
Under-inflation also reduces fuel
efficiency and tire tread life, and may
affect the vehicle's handling and
stopping ability.
Please note that the TPMS is not a
substitute for proper tire
maintenance, and it is the driver's
responsibility to maintain correct tire
pressure, even if under-inflation has
not reached the level to trigger
illumination of the TPMS low tire
pressure telltale.
Tire Labeling, Tire Pressure Monitoring System (TPMS)
-Required Federal Explanation324
2009 Fit
Page 340 of 352
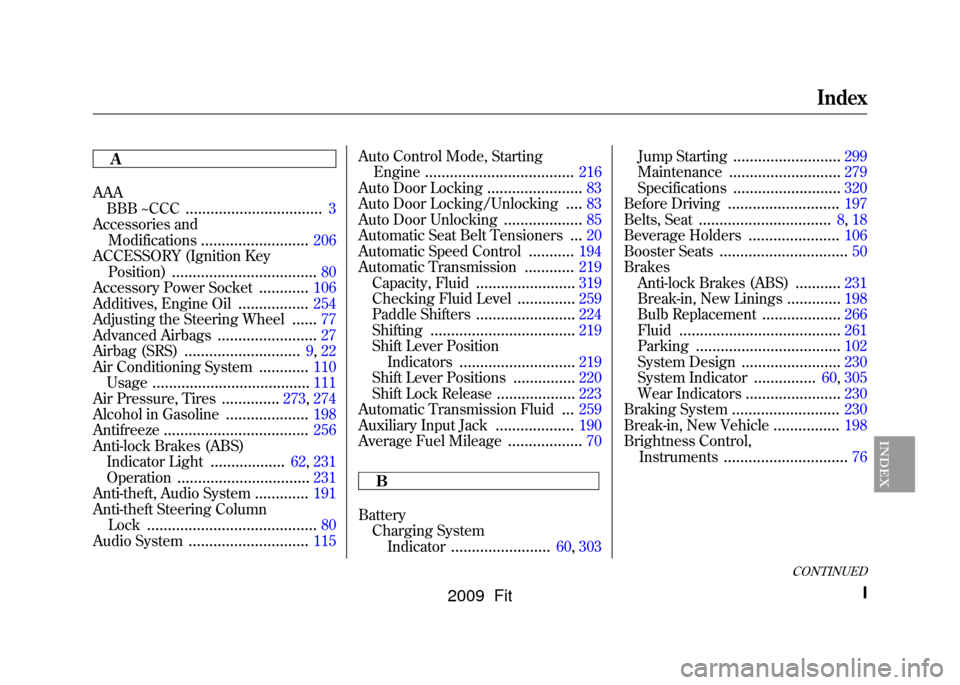
A
AAABBB ~CCC
.................................
3
Accessories and Modifications
..........................
206
ACCESSORY (Ignition Key Position)
...................................
80
Accessory Power Socket
............
106
Additives, Engine Oil
.................
254
Adjusting the Steering Wheel
......
77
Advanced Airbags
........................
27
Airbag (SRS)
............................
9, 22
Air Conditioning System
............
110
Usage
......................................
111
Air Pressure, Tires
..............
273, 274
Alcohol in Gasoline
....................
198
Antifreeze
...................................
256
Anti-lock Brakes (ABS) Indicator Light
..................
62, 231
Operation
................................
231
Anti-theft, Audio System
.............
191
Anti-theft Steering Column Lock
.........................................
80
Audio System
.............................
115 Auto Control Mode, Starting
Engine
....................................
216
Auto Door Locking
.......................
83
Auto Door Locking/Unlocking
....
83
Auto Door Unlocking
...................
85
Automatic Seat Belt Tensioners
...
20
Automatic Speed Control
...........
194
Automatic Transmission
............
219
Capacity, Fluid
........................
319
Checking Fluid Level
..............
259
Paddle Shifters
........................
224
Shifting
...................................
219
Shift Lever Position Indicators
............................
219
Shift Lever Positions
...............
220
Shift Lock Release
...................
223
Automatic Transmission Fluid
...
259
Auxiliary Input Jack
...................
190
Average Fuel Mileage
..................
70
B
Battery Charging System Indicator
........................
60, 303 Jump Starting
..........................
299
Maintenance
...........................
279
Specifications
..........................
320
Before Driving
...........................
197
Belts, Seat
................................
8, 18
Beverage Holders
......................
106
Booster Seats
...............................
50
Brakes Anti-lock Brakes (ABS)
...........
231
Break-in, New Linings
.............
198
Bulb Replacement
...................
266
Fluid
.......................................
261
Parking
...................................
102
System Design
........................
230
System Indicator
...............
60, 305
Wear Indicators
.......................
230
Braking System
..........................
230
Break-in, New Vehicle
................
198
Brightness Control, Instruments
..............................
76
CONTINUED
Index
I
INDEX
2009 Fit