HONDA FIT 2012 2.G Owners Manual
Manufacturer: HONDA, Model Year: 2012, Model line: FIT, Model: HONDA FIT 2012 2.GPages: 286, PDF Size: 9.92 MB
Page 151 of 286
uuBluetooth® HandsFreeLink®
*uHFL Menus
150Features
This command group allows you to change or customize HFL basic settings.■
To set a four-digit passcode to lock the HFL system for security
1.Say “System Setup.”
2.Say “Security.”
3.Follow the HFL prompts and say the four-digit number of your choice.
4.Follow the HFL prompts and confirm the number.
■
To change the security passcode
1.Say “System Setup.”
2.Say “Change Passcode” after the prompts.
3.Say the new four-digit passcode after the HFL prompts.
4.Follow the HFL prompts.
■
To select a ring tone or a prompt as the incoming call notification
1.Say “System Setup.”
2.Say “Call Notification” after the prompts.
3.Say “Ring Tone” or “Prompt” after the prompts. For no audible notification, say
“Off.”
■
System Setup
1System Setup
Press the button before a command.
Once a passcode is set, you are required to enter the
passcode with every new key cycle to use HFL.
If you forget the code, go to your dealer to have the
passcode reset. You can also cancel the passcode by
clearing all the data stored in the HFL system.
2To clear the system P. 151
The default setting of the incoming notification is a
ring tone.
Page 152 of 286
151
uuBluetooth® HandsFreeLink®
*uHFL Menus
Features
■
To activate or deactivate the auto transfer function
The call on your cell phone can be automatically transferred to HFL when you get
into the vehicle and turn on the ignition switch.
1.Say “System Setup.”
2.Say “Auto Transfer” after the prompts. HFL lets you know the current status.
3.Follow the HFL prompts to change the setting.
■
To clear the system
Paired phones, all stored or imported phonebook data, and any passcodes are
erased.
1.Say “System Setup.”
2.Say “Clear” after the prompts.
3.Follow the HFL prompts.
You can set the system language to French or English.
1.Say “Change Language.”
2.Follow the HFL prompts.
If you have not named your paired phone in the selected language, HFL will ask you
to name it in that language.
■
Change Language
1System Setup
Press the button before a command.
You can clear the system when you have forgotten
the passcode and cannot access HFL.
When HFL asks you for the passcode, say “System
Clear.”1Change Language
Press the button before a command.
Page 153 of 286

152
Page 154 of 286
153
Driving
This chapter discusses driving, refueling, and information on items such as accessories.
Before Driving
Driving Preparation .......................... 154
Maximum Load Limit........................ 157
Towing a Trailer
Towing Your Vehicle ........................ 159
When Driving
Starting the Engine .......................... 161
Precautions While Driving................. 163
Automatic Transmission ................... 164
Shifting ............................................ 165
Shifting ............................................ 167
Models with 7 positions ATModels with 5 positions AT
Shifting ............................................ 171
Cruise Control
*............................... 173
VSA
® (Vehicle Stability Assist), aka ESC
(Electronic Stability Control), System ...... 176
TPMS (Tire Pressure Monitoring System) .. 178Tire Pressure Monitoring System (TPMS) -
Required Federal Explanation ......... 179
Braking
Brake System ................................... 181
ABS (Anti-lock Brake System) ........... 183
Brake Assist System.......................... 184Manual transmission models
Parking Your Vehicle
When Stopped ................................ 185
Parking ............................................ 185
Refueling
Fuel Information .............................. 186
How to Refuel ................................. 187
Fuel Economy.................................... 189
Improving Fuel Economy .................. 189
Accessories and Modifications
Accessories ...................................... 190
Modifications................................... 190
* Not available on all models
Page 155 of 286
154Driving
Before DrivingDriving PreparationCheck the following items before you start driving.
•Make sure there are no obstructions on the windows, door mirrors, exterior
lights, or other parts of the vehicle.
uRemove any frost, snow, or ice.
uRemove any snow on the roof, as this can slip down and obstruct your field of
vision while driving. If frozen solid, remove ice once it has softened.
uWhen removing ice from around the wheels, be sure not to damage the wheel
or wheel components.
•Make sure the hood is securely closed.
uIf the hood opens while driving, your front view will be blocked.
•Make sure the tires are in good condition.
uCheck air pressure, check for damage and excessive wear.
2Checking and Maintaining Tires P. 222
•Make sure there are no people or objects behind or around the vehicle.
uThere are blind spots from the inside.■
Exterior Checks
1Exterior Checks
NOTICEWhen doors are frozen shut, use warm water around
the door edges to melt any ice. Do not try to force
them open, as this can damage the rubber trim
around the doors. When done, wipe dry to avoid
further freezing.
Do not pour warm water into the key cylinder.
You will be unable to insert key if the water freezes in
the hole.
Page 156 of 286
Continued
155
uuBefore DrivinguDriving Preparation
Driving
•Store or secure all items on board properly.
uCarrying too much cargo, or improperly storing it, can affect your vehicle’s
handling, stability, stopping distance, and tires, and make it unsafe.
2Maximum Load Limit P. 157
•Do not pile items higher than the seat height.
uThey can block your view and may be thrown forward in the event of sudden
braking.
•Do not place anything in the front seat footwells. Make sure to secure the floor
mat
*.
uAn object or unsecured floor mat can interfere with your brake and accelerator
pedal operation while driving.
•If you have any animals on board, do not let them move around in the vehicle.
uThey may interfere with driving and a crash could occur.
•Securely close and lock all doors and the tailgate.
2Locking/Unlocking the Doors from the Inside P. 82
•Adjust your seating position properly.
uAdjust the head restraint, too.
2Adjusting the Seats P. 103
2Adjusting the Head Restraints P. 105
•Adjust the mirrors and steering wheel properly for your driving.
uAdjust them while sitting in the proper driving position.
2Adjusting the Mirrors P. 102
2Adjusting the Steering Wheel P. 101
■
Interior Checks
1Interior Checks
The headlight aim is set by the factory, and does not
need to be adjusted. However, if you regularly carry
heavy items in the cargo area, have the aiming
readjusted at a dealer or by a qualified technician.
* Not available on all models
Page 157 of 286

156
uuBefore DrivinguDriving Preparation
Driving
•Be sure items placed on the floor behind the front seats cannot roll under the
seats.
uThey can interfere with the driver’s ability to operate the pedals, the operation
of the seats, or the operation of the sensors under the seats.
•Everyone in the vehicle must fasten their seat belt.
2Fastening a Seat Belt P. 29
•Make sure that the indicators in the instrument panel come on when you start the
vehicle, and go off soon after.
uAlways have a dealer check the vehicle if a problem is indicated.
2Indicators P. 64
Page 158 of 286
157
uuBefore DrivinguMaximum Load Limit
Continued
Driving
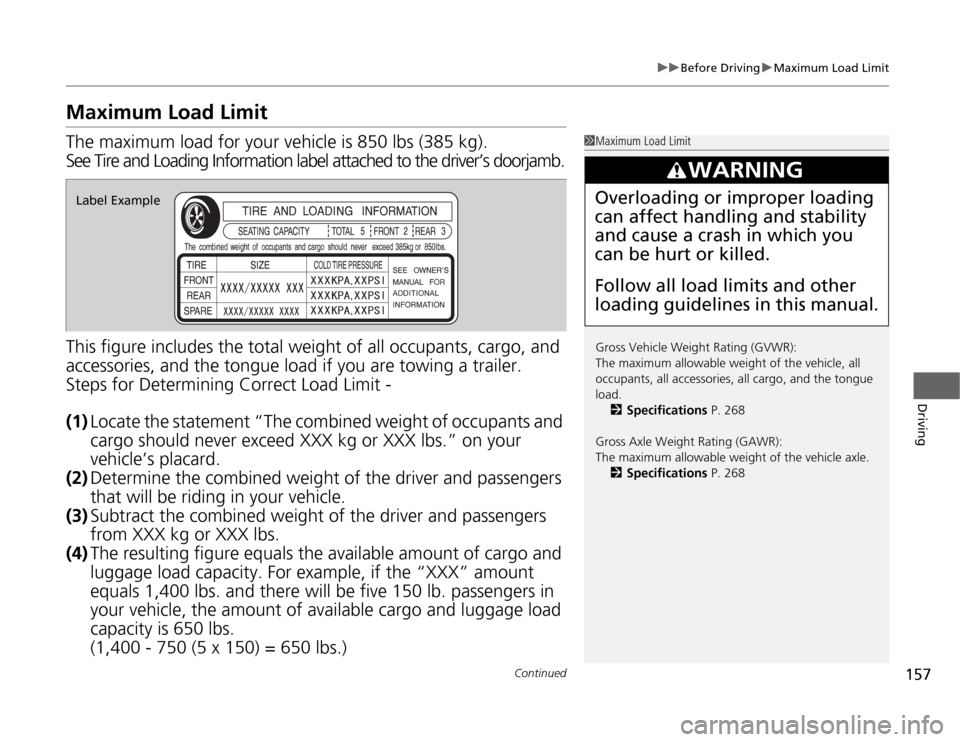
Maximum Load LimitThe maximum load for your vehicle is 850 lbs (385 kg).
See Tire and Loading Information label attached to the driver’s doorjamb.
This figure includes the total weight of all occupants, cargo, and
accessories, and the tongue load if you are towing a trailer.
Steps for Determining Correct Load Limit -
(1)Locate the statement “The combined weight of occupants and
cargo should never exceed XXX kg or XXX lbs.” on your
vehicle’s placard.
(2)Determine the combined weight of the driver and passengers
that will be riding in your vehicle.
(3)Subtract the combined weight of the driver and passengers
from XXX kg or XXX lbs.
(4)The resulting figure equals the available amount of cargo and
luggage load capacity. For example, if the “XXX” amount
equals 1,400 lbs. and there will be five 150 lb. passengers in
your vehicle, the amount of available cargo and luggage load
capacity is 650 lbs.
(1,400 - 750 (5 x 150) = 650 lbs.)
1Maximum Load Limit
Gross Vehicle Weight Rating (GVWR):
The maximum allowable weight of the vehicle, all
occupants, all accessories, all cargo, and the tongue
load.
2Specifications P. 268
Gross Axle Weight Rating (GAWR):
The maximum allowable weight of the vehicle axle.
2Specifications P. 268
3
WARNING
Overloading or improper loading
can affect handling and stability
and cause a crash in which you
can be hurt or killed.
Follow all load limits and other
loading guidelines in this manual.
Label Example
Page 159 of 286
158
uuBefore DrivinguMaximum Load Limit
Driving
(5)Determine the combined weight of luggage and cargo being
loaded on the vehicle. That weight may not safely exceed the
available cargo and luggage load capacity calculated in step 4.
(6)If your vehicle will be towing a trailer, load from your trailer will
be transferred to your vehicle. Consult this manual to
determine how this reduces the available cargo and luggage
load capacity of your vehicle.
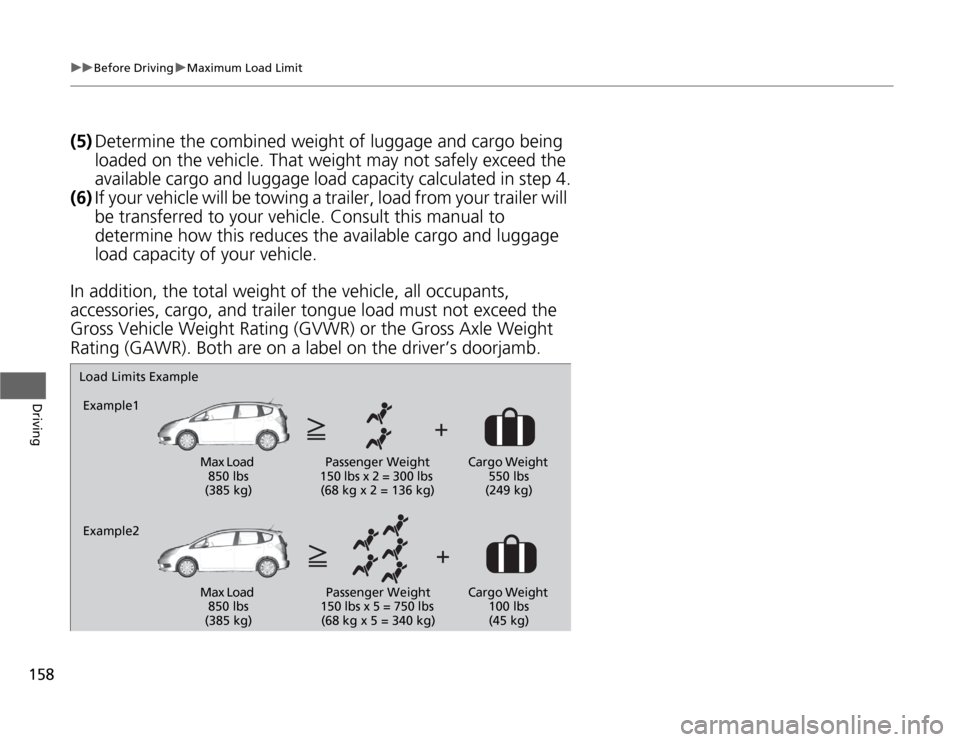
In addition, the total weight of the vehicle, all occupants,
accessories, cargo, and trailer tongue load must not exceed the
Gross Vehicle Weight Rating (GVWR) or the Gross Axle Weight
Rating (GAWR). Both are on a label on the driver’s doorjamb.Load Limits Example
Example1
Max Load
850 lbs
(385 kg)Passenger Weight
150 lbs x 2 = 300 lbs
(68 kg x 2 = 136 kg)Cargo Weight
550 lbs
(249 kg)
Example2
Max Load
850 lbs
(385 kg)Passenger Weight
150 lbs x 5 = 750 lbs
(68 kg x 5 = 340 kg)Cargo Weight
100 lbs
(45 kg)
Page 160 of 286
159
Continued
Driving
Towing a TrailerYour vehicle is not designed to tow a trailer. Attempting to do so can void your
warranties.Towing Your VehicleYour vehicle can be towed behind a motorhome.
Perform the following procedure before towing your vehicle.
1.Check the transmission fluid level.
uMake sure the fluid level is between the upper and lower marks.
2.Start the engine.
3.Depress the brake pedal. Move the shift lever through all its positions.
4.Shift to
(D
and hold for five seconds, then to
(N
. Let the engine run for three
minutes, then turn it off.
5.Release the parking brake.
6.Leave the ignition switch in ACCESSORY
(q
.
uMake sure the steering wheel does not lock.
7.Turn off all the electric devices. Do not use any accessory power sockets.
uThis can prevent the battery from running down.
1.Shift to
(N
.
2.Release the parking brake.
3.Turn the ignition switch to ACCESSORY
(q
.
uMake sure the steering wheel does not lock.
4.Turn off all the electric devices. Do not use any accessory power sockets.
uThis can prevent the battery from running down.
■
When Your Vehicle is Towed Behind a Motorhome
1Towing Your Vehicle
NOTICEFailure to follow the recommended instructions
exactly will result in severe automatic transmission
damage. If you cannot shift the transmission or start
the engine, your vehicle must be transported on a
flat-bed truck or trailer.
Do not exceed 65 mph (100 km/h).
Consult your towing parts sales or rental agency if
any other items are recommended or required for
your towing situation.
If you tow your vehicle behind a motorhome, the
transmission fluid must be changed every 2 years or
30,000 miles (48,000 km), whichever comes first.Automatic transmission modelsAutomatic transmission models
1When Your Vehicle is Towed Behind a Motorhome
NOTICESevere transmission damage will occur if the vehicle is
shifted from
(R
to
(N
and then towed with the drive
wheels on the ground.
Automatic transmission models
Automatic transmission modelsManual transmission models