change wheel HONDA FIT 2017 3.G Quick Guide
[x] Cancel search | Manufacturer: HONDA, Model Year: 2017, Model line: FIT, Model: HONDA FIT 2017 3.GPages: 76, PDF Size: 8.56 MB
Page 23 of 76
38 || 39
V
EHICLE CONTROLSVEHICLE CONTROLS
Reclining the seat-back too far can result in serious injury or death in\
a crash.
Adjust the seat-back to an upright position, and sit well back in the se\
at.
WARNING
Adjusting the Seats
Make seat adjustments before driving to ensure the best comfort and safe\
ty.
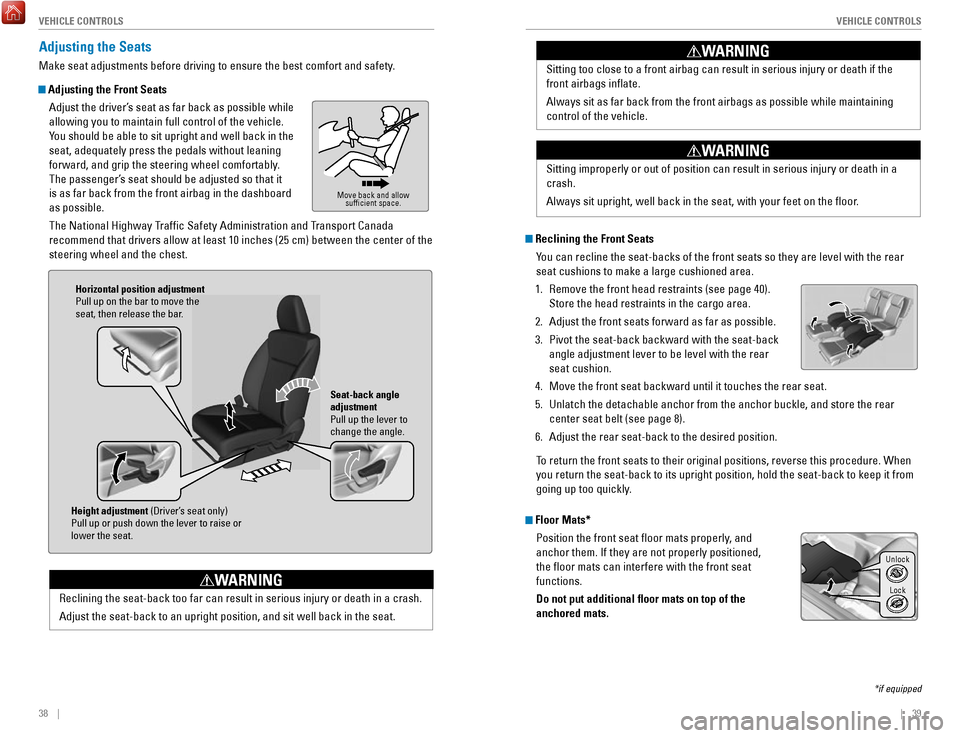
Adjusting the Front Seats
Adjust the driver’s seat as far back as possible while
allowing you to maintain full control of the vehicle.
You should be able to sit upright and well back in the
seat, adequately press the pedals without leaning
forward, and grip the steering wheel comfortably.
The passenger’s seat should be adjusted so that it
is as far back from the front airbag in the dashboard
as possible.
The National Highway Traffic Safety Administration and Transport Canada
recommend that drivers allow at least 10 inches (25 cm) between the ce\
nter of the
steering wheel and the chest.
Move back and allow sufficient space.
Height adjustment (Driver’s seat only)
Pull up or push down the lever to raise or
lower the seat. Seat-back angle
adjustment
Pull up the lever to
change the angle.
Horizontal position adjustment
Pull up on the bar to move the
seat, then release the bar.
Sitting improperly or out of position can result in serious injury or de\
ath in a
crash.
Always sit upright, well back in the seat, with your feet on the floor\
.
WARNING
Floor Mats*
Position the front seat floor mats properly, and
anchor them. If they are not properly positioned,
the floor mats can interfere with the front seat
functions.
Do not put additional floor mats on top of the
anchored mats.
Unlock
Lock
Sitting too close to a front airbag can result in serious injury or deat\
h if the
front airbags inflate.
Always sit as far back from the front airbags as possible while maintain\
ing
control of the vehicle.
WARNING
Reclining the Front SeatsYou can recline the seat-backs of the front seats so they are level with \
the rear
seat cushions to make a large cushioned area.
1.
Remove the front head restraints (see page 40).
Store the head restraints in the cargo area.
2.
Adjust the front seats forward as far as possible.
3.
Pivot the seat-back backward with the seat-back
angle adjustment lever to be level with the rear
seat cushion.
4.
Move the front seat backward until it touches the rear seat.
5.
Unlatch the detachable anchor from the anchor buckle, and store the rear\
center seat belt (see page 8).
6.
Adjust the rear seat-back to the desired position.
To return the front seats to their original positions, reverse this proce\
dure. When you return the seat-back to its upright position, hold the seat-back to \
keep it from
going up too quickly
.
*if equipped
Page 25 of 76
42 || 43
V
EHICLE CONTROLSVEHICLE CONTROLS
Adjusting the Mirrors
Adjust the angle of the mirrors for the best visibility when you are sit\
ting in the
correct driving position.
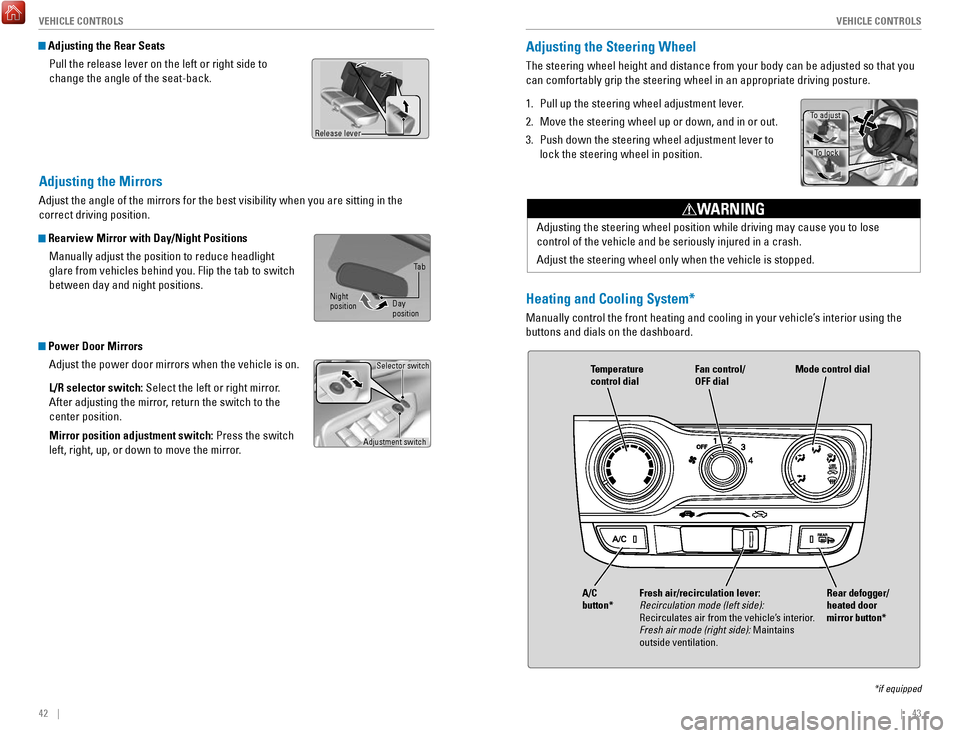
Rearview Mirror with Day/Night Positions
Manually adjust the position to reduce headlight
glare from vehicles behind you. Flip the tab to switch
between day and night positions.
Power Door MirrorsAdjust the power door mirrors when the vehicle is on.
L/R selector switch: Select the left or right mirror.
After adjusting the mirror, return the switch to the
center position.
Mirror position adjustment switch: Press the switch
left, right, up, or down to move the mirror.
Adjustment switch Selector switch
Adjusting the Rear Seats
Pull the release lever on the left or right side to
change the angle of the seat-back.
Release lever
Adjusting the Steering Wheel
The steering wheel height and distance from your body can be adjusted so\
that you
can comfortably grip the steering wheel in an appropriate driving postur\
e.
1.
Pull up the steering wheel adjustment lever.
2.
Move the steering wheel up or down, and in or out.
3.
Push down the steering wheel adjustment lever to
lock the steering wheel in position.
Adjusting the steering wheel position while driving may cause you to los\
e
control of the vehicle and be seriously injured in a crash.
Adjust the steering wheel only when the vehicle is stopped.
WARNING
To adjust To lock
Night
position Ta b
Day
positionHeating and Cooling System*
Manually control the front heating and cooling in your vehicle’s interior using the
buttons and dials on the dashboard.
Fan control/
OFF dial
A/C
button* Temperature
control dial
Fresh air/recirculation lever:
Recirculation mode (left side):
Recirculates air from the vehicle’s interior.
Fresh air mode (right side): Maintains
outside ventilation. Rear defogger/
heated door
mirror button*Mode control dial
*if equipped
Page 28 of 76
48 || 49
AUDIO AND CONNECTIVITY
AUDIO AND CONNECTIVITY
*if equipped
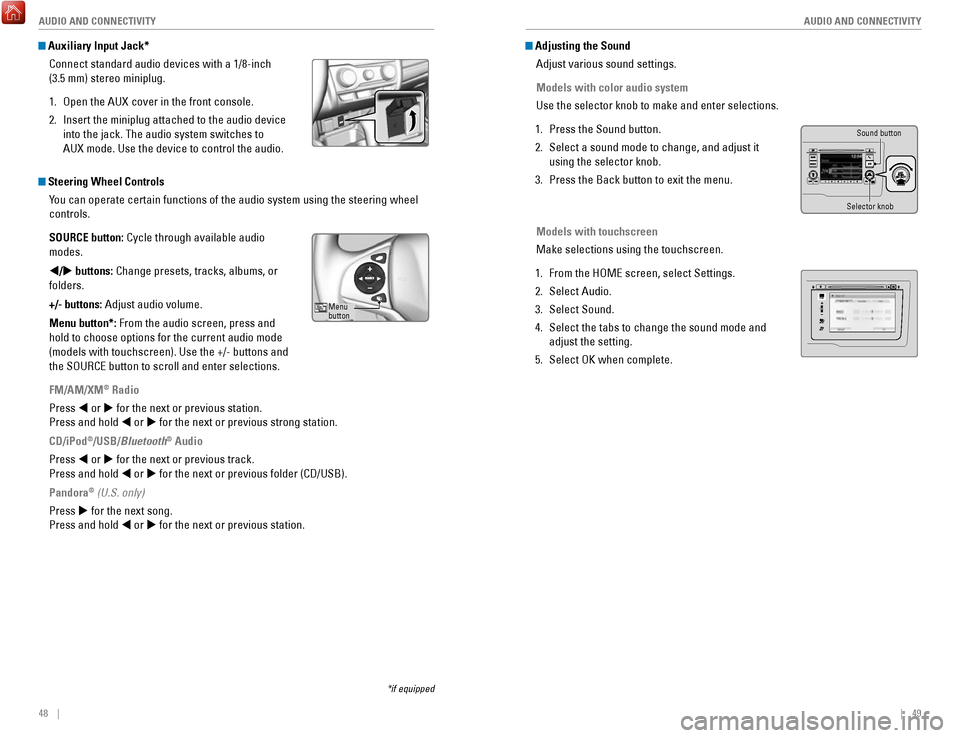
Auxiliary Input Jack*
Connect standard audio devices with a 1/8-inch
(3.5 mm) stereo miniplug.
1.
Open the AUX cover in the front console.
2.
Insert the miniplug attached to the audio device
into the jack. The audio system switches to
AUX
mode. Use the device to control the audio.
Steering Wheel Controls You can operate certain functions of the audio system using the steering \
wheel
controls.
SOURCE button: Cycle through available audio
modes.
t/u buttons: Change presets, tracks, albums, or
folders.
+/- buttons: Adjust audio volume.
Menu button*: From the audio screen, press and
hold to choose options for the current audio mode
(models with touchscreen). Use the +/- buttons and
the SOURCE button to scroll and enter selections.
FM/AM/XM
® Radio
Press t or u for the next or previous station.
Press and hold t or u for the next or previous strong station.
CD/iPod
®/USB/Bluetooth® Audio
Press t or u for the next or previous track.
Press and hold t or u for the next or previous folder (CD/USB).
Pandora
® (U.S. only)
Press u for the next song.
Press and hold t or u for the next or previous station.
Adjusting the Sound Adjust various sound settings.
Models with color audio system
Use the selector knob to make and enter selections.
1.
Press the Sound button.
2.
Select a sound mode to change, and adjust it
using the selector knob.
3.
Press the Back button to exit the menu.
Models with touchscreen
Make selections using the touchscreen.
1.
From the HOME screen, select Settings.
2.
Select Audio.
3.
Select Sound.
4.
Select the tabs to change the sound mode and
adjust the setting.
5.
Select OK when complete.
Menu
button
Selector knob Sound button
VO
LHOME
MENU
BA CK
Page 48 of 76
88 || 89
DRIVING
DRIVING
Changing the Power Mode*
Use the ENGINE START/STOP button to cycle through power modes or start the
engine.
Accessory or On mode: Press ENGINE START/STOP
once without pressing the brake pedal for Accessory
mode. Press it again for On mode.
Starting the engine: Press and hold the brake pedal
(and the clutch for manual transmission), then press
ENGINE START/STOP. Keep your foot firmly on the
brake pedal when starting the engine.
Turning the vehicle off: Shift to Park (P) (or apply the parking brake for manual
transmission), then press ENGINE START/STOP. If you press the button and the
shift lever is not in Park (P), the vehicle goes into Accessory mode.
*if equipped
Shifting
Change the shift position based on your driving needs.
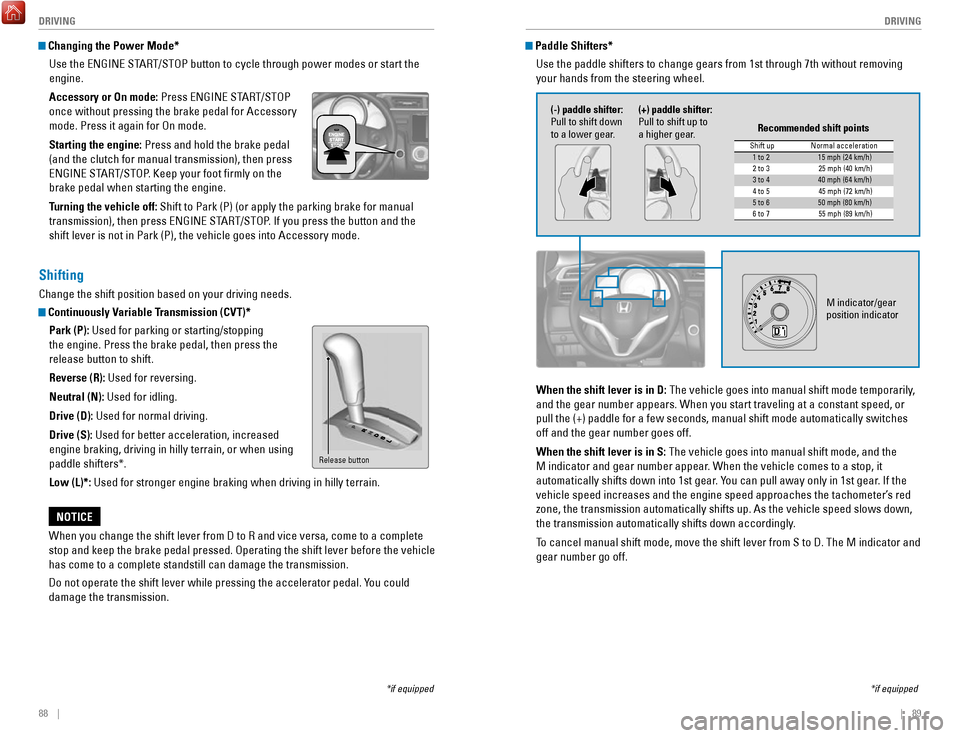
Continuously Variable Transmission (CVT)*Park (P): Used for parking or starting/stopping
the engine. Press the brake pedal, then press the
release button to shift.
Reverse (R): Used for reversing.
Neutral (N): Used for idling.
Drive (D): Used for normal driving.
Drive (S): Used for better acceleration, increased
engine braking, driving in hilly terrain, or when using
paddle shifters*.
Low (L)*: Used for stronger engine braking when driving in hilly terrain.
When you change the shift lever from D to R and vice versa, come to a co\
mplete
stop and keep the brake pedal pressed. Operating the shift lever before \
the vehicle
has come to a complete standstill can damage the transmission.
Do not operate the shift lever while pressing the accelerator pedal. You could
damage the transmission.
NOTICE
Release button
Paddle Shifters* Use the paddle shifters to change gears from 1st through 7th without rem\
oving
your hands from the steering wheel.
*if equipped
When the shift lever is in D: The vehicle goes into manual shift mode temporarily,
and the gear number appears. When you start traveling at a constant spee\
d, or
pull the (+) paddle for a few seconds, manual shift mode automatically\
switches
off and the gear number goes off.
When the shift lever is in S: The vehicle goes into manual shift mode, and the
M indicator and gear number appear. When the vehicle comes to a stop, it
automatically shifts down into 1st gear. You can pull away only in 1st gear. If the
vehicle speed increases and the engine speed approaches the tachometer’\
s red
zone, the transmission automatically shifts up. As the vehicle speed slows down,
the transmission automatically shifts down accordingly.
To cancel manual shift mode, move the shift lever from S to D. The M indi\
cator and
gear number go off.
M indicator/gear
position indicator
Shift up Normal acceleration1 to 215 mph (24 km/h)
2 to 32 5 mph (40 km/h)
3 to 440 mph (64 km/h)
4 to 54 5 mph (72 km/h)
5 to 650 mph (80 km/h)
6 to 75 5 mph (89 km/h)
Recommended shift points
(-) paddle shifter:
Pull to shift down
to a lower gear. (+) paddle shifter:
Pull to shift up to
a higher gear.
Page 49 of 76
90 || 91
DRIVING
DRIVING
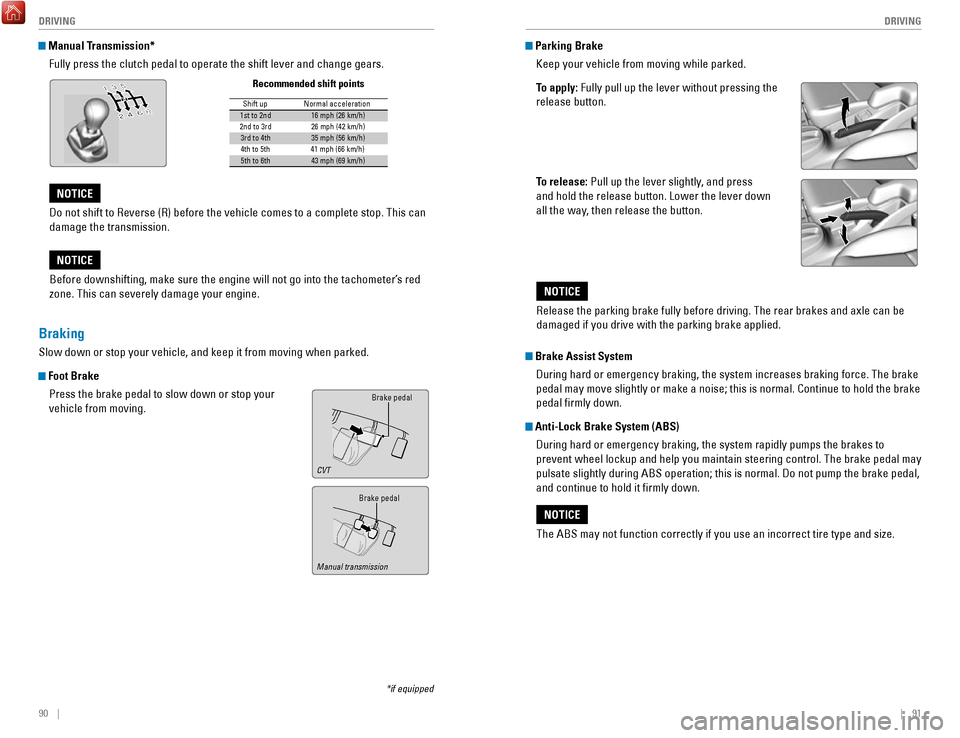
Manual Transmission*
Fully press the clutch pedal to operate the shift lever and change gears\
.
Do not shift to Reverse (R) before the vehicle comes to a complete sto\
p. This can
damage the transmission.
NOTICE
Before downshifting, make sure the engine will not go into the tachomete\
r’s red
zone. This can severely damage your engine.
NOTICE
Shift up Normal acceleratio n1st to 2n d16 mph (26 km/h)
2nd to 3rd 26 mph (42 km/h)
3rd to 4th35 mph (56 km/h)
4th to 5th 41 mph (66 km/h)
5th to 6th43 mph (69 km/h)
Recommended shift points
*if equipped
Braking
Slow down or stop your vehicle, and keep it from moving when parked.
Foot Brake
Press the brake pedal to slow down or stop your
vehicle from moving.
Brake pedal
Brake pedal
CVT
Manual transmission
Parking Brake
Keep your vehicle from moving while parked.
To apply: Fully pull up the lever without pressing the
release button.
To release: Pull up the lever slightly, and press
and hold the release button. Lower the lever down
all the way, then release the button.
The ABS may not function correctly if you use an incorrect tire type and\
size.
NOTICE
Brake Assist System During hard or emergency braking, the system increases braking force. The brake
pedal may move slightly or make a noise; this is normal. Continue to hol\
d the brake
pedal firmly down.
Anti-Lock Brake System (ABS) During hard or emergency braking, the system rapidly pumps the brakes to
prevent wheel lockup and help you maintain steering control. The brake p\
edal may
pulsate slightly during ABS operation; this is normal. Do not pump the b\
rake pedal,
and continue to hold it firmly down.
Release the parking brake fully before driving. The rear brakes and axle\
can be
damaged if you drive with the parking brake applied.
NOTICE
Page 52 of 76
96 || 97
DRIVING
DRIVING
The rear camera view is restricted. You cannot see the corner ends of the bumper or what is
underneath the bumper. Its unique lens also makes objects appear closer or farther than they \
actually are.
Visually confirm that it is safe to drive before backing up. Certain c\
onditions (such as weather,
lighting, and high temperatures) may also restrict the rear view. Do not rely on the rearview display,
which does not give you all information about conditions at the rear of \
your vehicle.
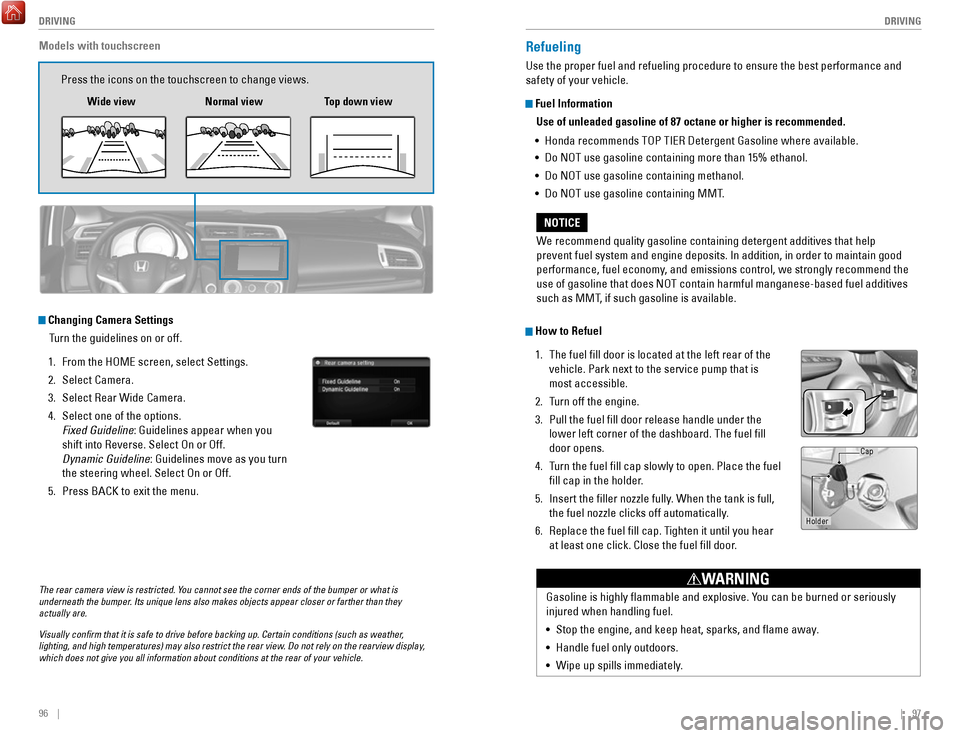
Changing Camera Settings
Turn the guidelines on or off.
1.
From the HOME screen, select Settings.
2.
Select Camera.
3.
Select Rear Wide Camera.
4.
Select one of the options.
Fixed Guideline: Guidelines appear when you
shift into Reverse. Select On or Off.
Dynamic Guideline
: Guidelines move as you turn
the steering wheel. Select On or Off.
5.
Press BACK to exit the menu.
Models with touchscreen
Press the icons on the touchscreen to change views.
Wide view Normal view Top down view
Refueling
Use the proper fuel and refueling procedure to ensure the best performan\
ce and
safety of your vehicle.
Fuel Information
Use of unleaded gasoline of 87 octane or higher is recommended.
•
Honda recommends TOP TIER Detergent Gasoline where available.
•
Do NOT use gasoline containing more than 15% ethanol.
•
Do NOT use gasoline containing methanol.
•
Do NOT use gasoline containing MMT.
How to Refuel
1.
The fuel fill door is located at the left rear of the
vehicle. Park next to the service pump that is
most accessible.
2.
Turn off the engine.
3.
Pull the fuel fill door release handle under the
lower left corner of the dashboard. The fuel fill
door opens.
4.
Turn the fuel fill cap slowly to open. Place the fuel
fill cap in the holder.
5.
Insert the filler nozzle fully. When the tank is full,
the fuel nozzle clicks off automatically.
6.
Replace the fuel fill cap. Tighten it until you hear
at least one click. Close the fuel fill door.
W
e recommend quality gasoline containing detergent additives that help
prevent fuel system and engine deposits. In addition, in order to mainta\
in good
performance, fuel economy, and emissions control, we strongly recommend the
use of gasoline that does NOT contain harmful manganese-based fuel addit\
ives
such as MMT, if such gasoline is available.
NOTICE
Gasoline is highly flammable and explosive. You can be burned or seriously
injured when handling fuel.
•
Stop the engine, and keep heat, sparks, and flame away.
•
Handle fuel only outdoors.
•
Wipe up spills immediately.
WARNING
Holder Cap
Page 54 of 76
100 || 101
HANDLING THE UNEXPECTED
HANDLING THE UNEXPECTED
Overheating
If the high temperature indicator comes on, the engine suddenly loses po\
wer, or
steam or spray comes out from under the hood, your engine is overheating\
.
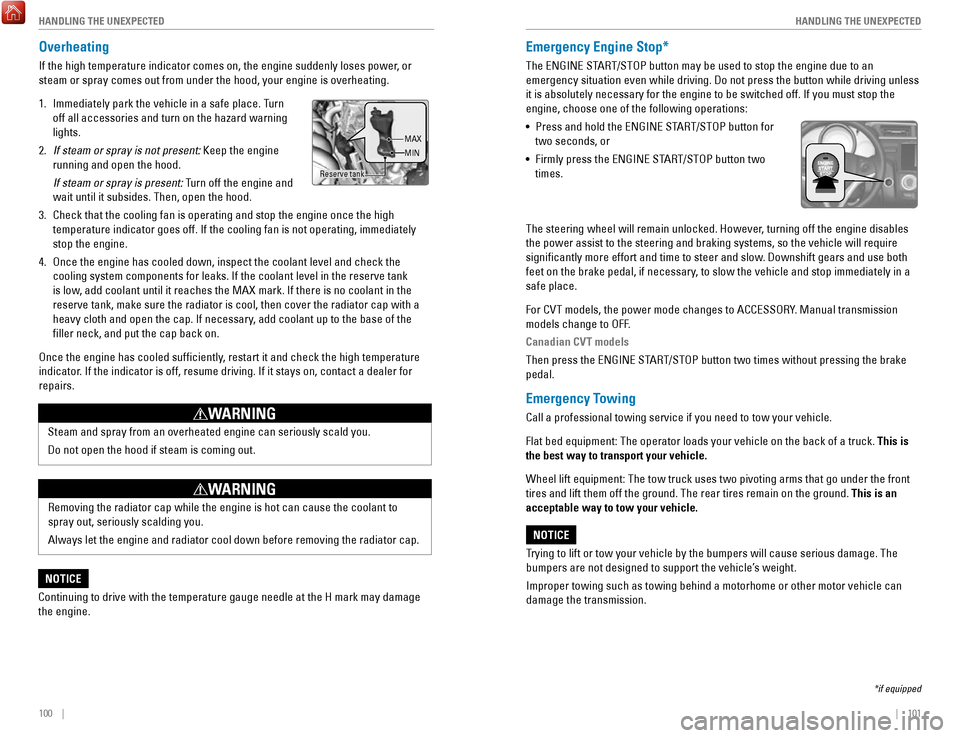
1.
Immediately park the vehicle in a safe place. Turn
off all accessories and turn on the hazard warning
lights.
2.
If steam or spray is not present: Keep the engine
running and open the hood.
If steam or spray is present: Turn off the engine and
wait until it subsides. Then, open the hood.
3.
Check that the cooling fan is operating and stop the engine once the hig\
h
temperature indicator goes off. If the cooling fan is not operating, imm\
ediately
stop the engine.
4.
Once the engine has cooled down, inspect the coolant level and check the\
cooling system components for leaks. If the coolant level in the reserve\
tank
is low, add coolant until it reaches the MAX mark. If there is no coolant in t\
he
reserve tank, make sure the radiator is cool, then cover the radiator ca\
p
with a
heavy cloth and open the cap. If necessary, add coolant up to the base of the
filler neck, and put the cap back on.
Once the engine has cooled sufficiently, restart it and check the high temperature
indicator. If the indicator is off, resume driving. If it stays on, contact a dealer for
repairs.
Steam and spray from an overheated engine can seriously scald you.
Do not open the hood if steam is coming out.
WARNING
Removing the radiator cap while the engine is hot can cause the coolant \
to
spray out, seriously scalding you.
Always let the engine and radiator cool down before removing the radiato\
r cap.
WARNING
Continuing to drive with the temperature gauge needle at the H mark may \
damage
the engine.
NOTICE
Reserve tank MAX
MIN
Emergency Engine Stop*
The ENGINE START/STOP button may be used to stop the engine due to an
emergency situation even while driving. Do not press the button while driving unless
it is absolutely necessary for the engine to be switched off. If you mus\
t stop the
engine, choose one of the following operations:
•
Press and hold the ENGINE START/STOP button for
two seconds, or
•
Firmly press the ENGINE START/STOP button two
times.
The steering wheel will remain unlocked. However, turning off the engine disables
the power assist to the steering and braking systems, so the vehicle wil\
l
require
significantly more effort and time to steer and slow. Downshift gears and use both
feet on the brake pedal, if necessary, to slow the vehicle and stop immediately in a
safe place.
For CVT models, the power mode changes to ACCESSORY. Manual transmission
models change to OFF.
Canadian CVT models
Then press the ENGINE START/STOP button two times without pressing the brake
pedal.
Emergency Towing
Call a professional towing service if you need to tow your vehicle.
Flat bed equipment: The operator loads your vehicle on the back of a tru\
ck. This is
the best way to transport your vehicle.
Wheel lift equipment: The tow truck uses two pivoting arms that go under\
the front
tires and lift them off the ground. The rear tires remain on the ground.\
This is an
acceptable way to tow your vehicle.
Trying to lift or tow your vehicle by the bumpers will cause serious dama\
ge. The
bumpers are not designed to support the vehicle’s weight.
Improper towing such as towing behind a motorhome or other motor vehicle\
can
damage the transmission.
NOTICE
*if equipped
Page 55 of 76
102 || 103
HANDLING THE UNEXPECTED
HANDLING THE UNEXPECTED
Tire Pressure Monitoring System (TPMS)
Monitors the tire pressure while you are driving. Available on U.S. models only.
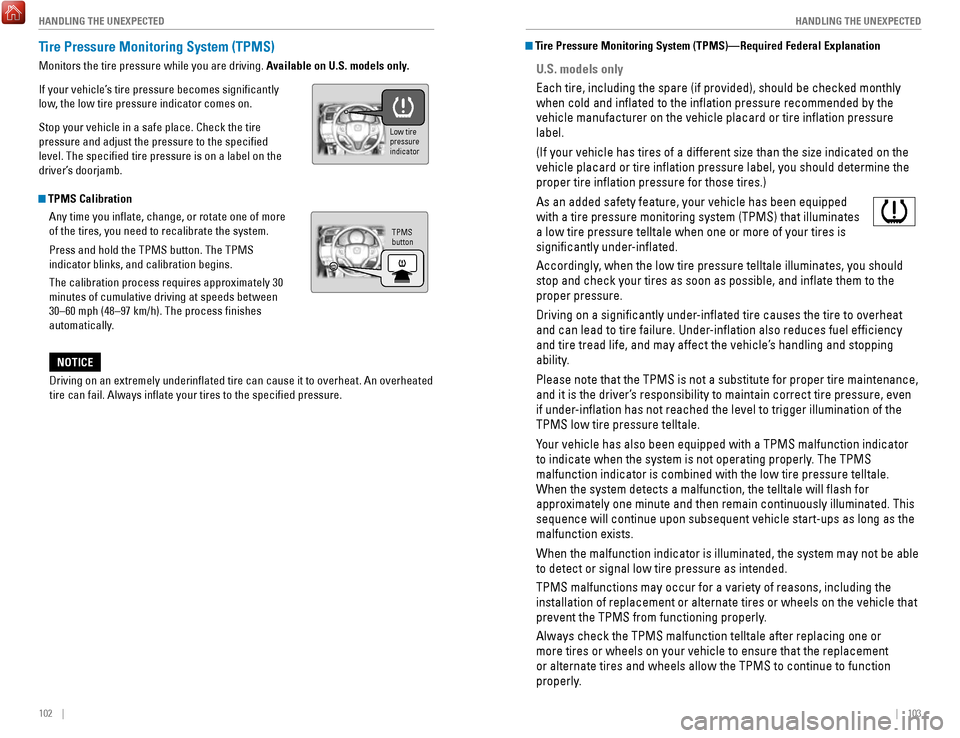
If your vehicle’s tire pressure becomes significantly
low, the low tire pressure indicator comes on.
Stop your vehicle in a safe place. Check the tire
pressure and adjust the pressure to the specified
level. The specified tire pressure is on a label on the
driver’s doorjamb.
TPMS Calibration
Any time you inflate, change, or rotate one of more
of the tires, you need to recalibrate the system.
Press and hold the TPMS button. The TPMS
indicator blinks, and calibration begins.
The calibration process requires approximately 30
minutes of cumulative driving at speeds between
30–60 mph (48–97 km/h). The process finishes
automatically.
Driving on an extremely underinflated tire can cause it to overheat. A\
n overheated
tire can fail. Always inflate your tires to the specified pressure.
NOTICE
TPMS
button
Low tire
pressure
indicator
Tire Pressure Monitoring System (TPMS)—Required Federal Explanation
U.S. models only
Each tire, including the spare (if provided), should be checked monthl\
y
when cold and inflated to the inflation pressure recommended by the \
vehicle manufacturer on the vehicle placard or tire inflation pressure\
label.
(If your vehicle has tires of a different size than the size indicated \
on the
vehicle placard or tire inflation pressure label, you should determine\
the
proper tire inflation pressure for those tires.)
As an added safety feature, your vehicle has been equipped
with a tire pressure monitoring system (TPMS) that illuminates
a low tire pressure telltale when one or more of your tires is
significantly under-inflated.
Accordingly, when the low tire pressure telltale illuminates, you should
stop and check your tires as soon as possible, and inflate them to the\
proper pressure.
Driving on a significantly under-inflated tire causes the tire to overheat
and can lead to tire failure. Under-inflation also reduces fuel efficiency
and tire tread life, and may affect the vehicle’s handling and stopping
ability.
Please note that the TPMS is not a substitute for proper tire maintenanc\
e,
and it is the driver’s responsibility to maintain correct tire pressure, even
if under-inflation has not reached the level to trigger illumination of the
TPMS low tire pressure telltale.
Your vehicle has also been equipped with a TPMS malfunction indicator
to indicate when the system is not operating properly. The TPMS
malfunction indicator is combined with the low tire pressure telltale.
When the system detects a malfunction, the telltale will flash for
approximately one minute and then remain continuously illuminated. This \
sequence will continue upon subsequent vehicle start-ups as long as the \
malfunction exists.
When the malfunction indicator is illuminated, the system may not be abl\
e
to detect or signal low tire pressure as intended.
TPMS malfunctions may occur for a variety of reasons, including the
installation of replacement or alternate tires or wheels on the vehicle \
that
prevent the TPMS from functioning properly.
Always check the TPMS malfunction telltale after replacing one or
more tires or wheels on your vehicle to ensure that the replacement
or alternate tires and wheels allow the TPMS to continue to function
properly.
Page 56 of 76
104 || 105
HANDLING THE UNEXPECTED
HANDLING THE UNEXPECTED
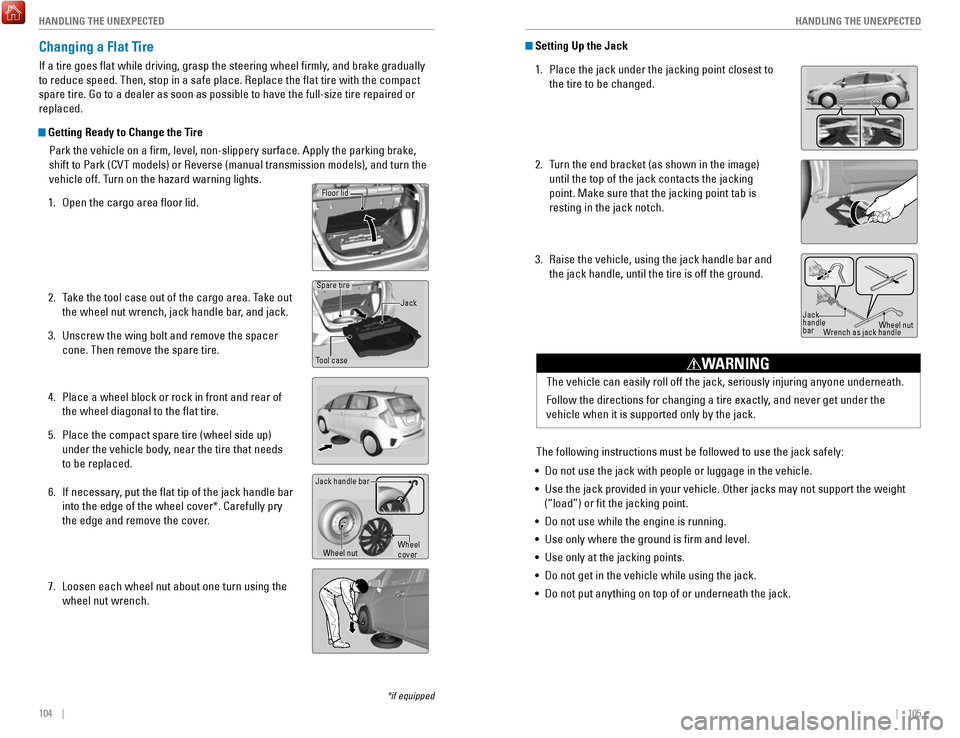
Changing a Flat Tire
If a tire goes flat while driving, grasp the steering wheel firmly, and brake gradually
to reduce speed. Then, stop in a safe place. Replace the flat tire wit\
h the compact
spare tire. Go to a dealer as soon as possible to have the full-size tir\
e repaired or
replaced.
Getting Ready to Change the Tire
Park the vehicle on a firm, level, non-slippery surface. Apply the par\
king brake,
shift to Park (CVT models) or Reverse (manual transmission models), \
and turn the
vehicle off. Turn on the hazard warning lights.
1.
Open the cargo area floor lid.
2.
Take the tool case out of the cargo area. Take out
the wheel nut wrench, jack handle bar
, and jack.
3.
Unscrew the wing bolt and remove the spacer
cone. Then remove the spare tire.
4.
Place a wheel block or rock in front and rear of
the wheel diagonal to the flat tire.
5.
Place the compact spare tire (wheel side up)
under the vehicle body, near the tire that needs
to be replaced.
6.
If necessary, put the flat tip of the jack handle bar
into the edge of the wheel cover*. Carefully pry
the edge and remove the cover.
7.
Loosen each wheel nut about one turn using the
wheel nut wrench.
Tool case Spare tire
Jack
Wheel nut
Jack handle bar
Wheel
cover
Floor lid
Setting Up the Jack1.
Place the jack under the jacking point closest to
the tire to be changed.
2.
Turn the end bracket (as shown in the image)
until the top of the jack contacts the jacking
point. Make sure that the jacking point tab is
resting in the jack notch.
3.
Raise the vehicle, using the jack handle bar and
the jack handle, until the tire is off the ground.
The following instructions must be followed to use the jack safely:
•
Do not use the jack with people or luggage in the vehicle.
•
Use the jack provided in your vehicle. Other jacks may not support the w\
eight
(“load”) or fit the jacking point.
•
Do not use while the engine is running.
•
Use only where the ground is firm and level.
•
Use only at the jacking points.
•
Do not get in the vehicle while using the jack.
•
Do not put anything on top of or underneath the jack. The vehicle can easily roll off the jack, seriously injuring anyone unde\
rneath.
Follow the directions for changing a tire exactly, and never get under the
vehicle when it is supported only by the jack.
WARNING
Jack
handle
bar
Wheel nut
Wrench as jack handle
*if equipped
Page 66 of 76
124 || 125
MAINTENANCE
MAINTENANCE
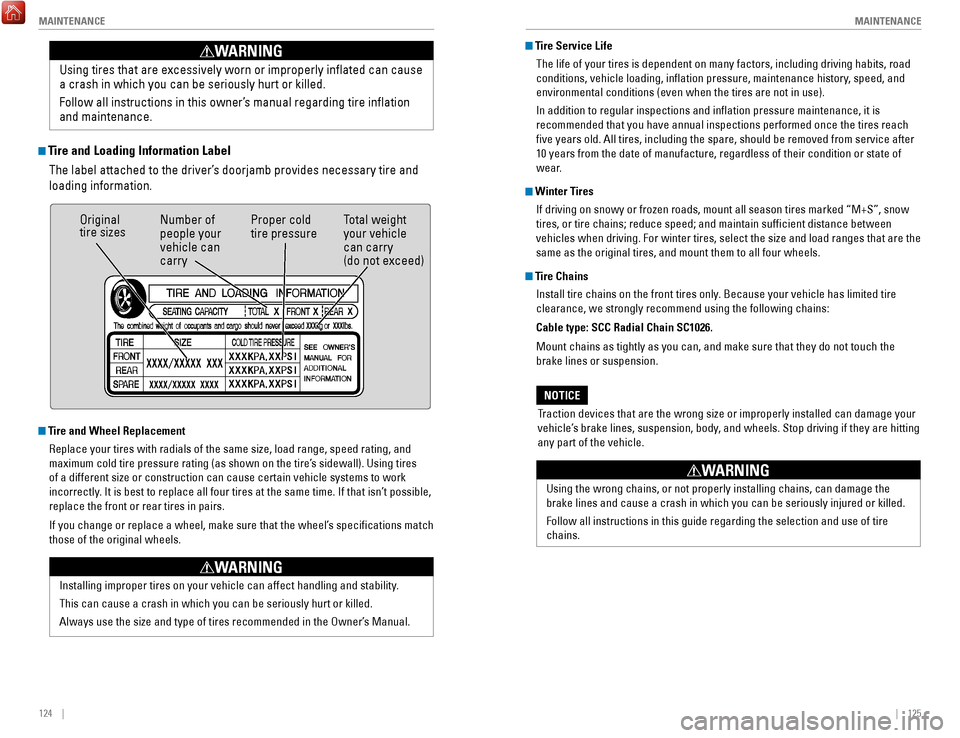
Tire and Loading Information Label
The label attached to the driver’s doorjamb provides necessary tire and
loading information. Using tires that are excessively worn or improperly inflated can cause\
a crash in which you can be seriously hurt or killed.
Follow all instructions in this owner’s manual regarding tire inflation
and maintenance
.
WARNING
Original
tire sizes
Number of
people your
vehicle can
carry Proper cold
tire pressure
Total weight
your vehicle
can carry
(do not exceed)
Tire and Wheel Replacement
Replace your tires with radials of the same size, load range, speed rati\
ng, and
maximum cold tire pressure rating (as shown on the tire’s sidewall). Using tires
of a different size or construction can cause certain vehicle systems to\
work
incorrectly. It is best to replace all four tires at the same time. If that isn’\
t possible,
replace the front or rear tires in pairs.
If you change or replace a wheel, make sure that the wheel’s specifications match
those of the original wheels.
Installing improper tires on your vehicle can affect handling and stabil\
ity.
This can cause a crash in which you can be seriously hurt or killed.
Always use the size and type of tires recommended in the Owner’s Manual.
WARNING
Tire Service LifeThe life of your tires is dependent on many factors, including driving h\
abits, road
conditions, vehicle loading, inflation pressure, maintenance history, speed, and
environmental conditions (even when the tires are not in use).
In addition to regular inspections and inflation pressure maintenance,\
it is
recommended that you have annual inspections performed once the tires re\
ach
five years old. All tires, including the spare, should be removed from\
service after
10 years from the date of manufacture, regardless of their condition or \
state of
wear.
Winter TiresIf driving on snowy or frozen roads, mount all season tires marked “M\
+S”, snow
tires, or tire chains; reduce speed; and maintain sufficient distance \
between
vehicles when driving. For winter tires, select the size and load ranges\
that are the
same as the original tires, and mount them to all four wheels.
Tire ChainsInstall tire chains on the front tires only. Because your vehicle has limited tire
clearance, we strongly recommend using the following chains:
Cable type: SCC Radial Chain SC1026.
Mount chains as tightly as you can, and make sure that they do not touch\
the
brake lines or suspension.
Traction devices that are the wrong size or improperly installed can dama\
ge your
vehicle’s brake lines, suspension, body, and wheels. Stop driving if they are hitting
any part of the vehicle.
NOTICE
Using the wrong chains, or not properly installing chains, can damage th\
e
brake lines and cause a crash in which you can be seriously injured or k\
illed.
Follow all instructions in this guide regarding the selection and use of\
tire
chains.
WARNING