start stop button HONDA FIT 2017 3.G Quick Guide
[x] Cancel search | Manufacturer: HONDA, Model Year: 2017, Model line: FIT, Model: HONDA FIT 2017 3.GPages: 76, PDF Size: 8.56 MB
Page 4 of 76
| 1
V
ISUAL INDEX
Quickly locate items in the vehicle’s interior.
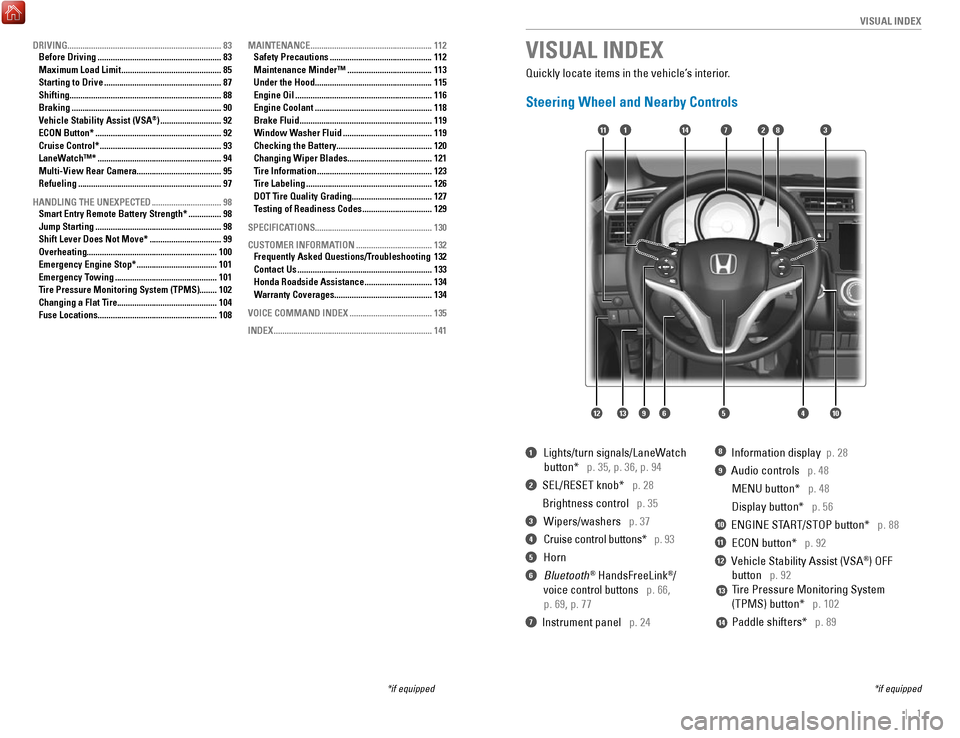
Steering Wheel and Nearby Controls
1 Lights/turn signals/LaneWatch
button* p. 35, p. 36, p. 94
2 SEL/RESET knob* p. 28
Brightness control p. 35
3 Wipers/washers p. 37
4 Cruise control buttons* p. 93
5 Horn
6 Bluetooth® HandsFreeLink®/
voice control buttons p. 66,
p. 69, p. 77
7 Instrument panel p. 24
8 Information display p. 28
9 Audio controls p. 48
MENU button* p. 48
Display button* p. 56
10 ENGINE START/STOP button* p. 88
11 ECON button* p. 92
12 Vehicle Stability Assist (VSA®) OFF
button p. 92
Tire Pressure Monitoring System
(TPMS) button* p. 102
Paddle shifters* p. 89
VISUAL INDEX
*if equipped
*if equipped
7
125641013
14111283
13
14
9
DRIVING....................................................................... 83
Before Driving ......................................................... 83
Maximum Load Limit .............................................. 85
Starting to Drive ...................................................... 87
Shifting ...................................................................... 88
Braking ..................................................................... 90
Vehicle Stability Assist (VSA®) ............................ 92
ECON Button* .......................................................... 92
Cruise Control* ........................................................ 93
LaneWatch™* ......................................................... 94
Multi-View Rear Camera.......................................
95
Refueling
.................................................................. 97
HANDLING THE UNEXPECTED
................................ 98
Smart Entry Remote Battery Strength* ............... 98
Jump Starting .......................................................... 98
Shift Lever Does Not Move* ................................. 99
Overheating ............................................................ 100
Emergency Engine Stop* ..................................... 101
Emergency Towing ............................................... 101
Tire Pressure Monitoring System (TPMS)........
102
Changing a Flat Tire.............................................. 104
Fuse Locations
....................................................... 108MAINTENANCE
........................................................
112
Safety Precautions ............................................... 112
Maintenance Minder™ ....................................... 113
Under the Hood ...................................................... 115
Engine Oil ............................................................... 116
Engine Coolant ...................................................... 118
Brake Fluid ............................................................. 119
Window Washer Fluid ......................................... 119
Checking the Battery ............................................ 120
Changing Wiper Blades ....................................... 121
Tire Information ..................................................... 123
Tire Labeling .......................................................... 126
DOT Tire Quality Grading
..................................... 127
Testing of Readiness Codes
................................ 129
SPECIFICATIONS
...................................................... 130
CUSTOMER INFORMATION
................................... 132
Frequently Asked Questions/Troubleshooting 132
Contact Us .............................................................. 133
Honda Roadside Assistance ............................... 134
Warranty Coverages ............................................. 134
VOICE COMMAND INDEX
...................................... 135
INDEX
........................................................................\
. 141
Page 48 of 76
88 || 89
DRIVING
DRIVING
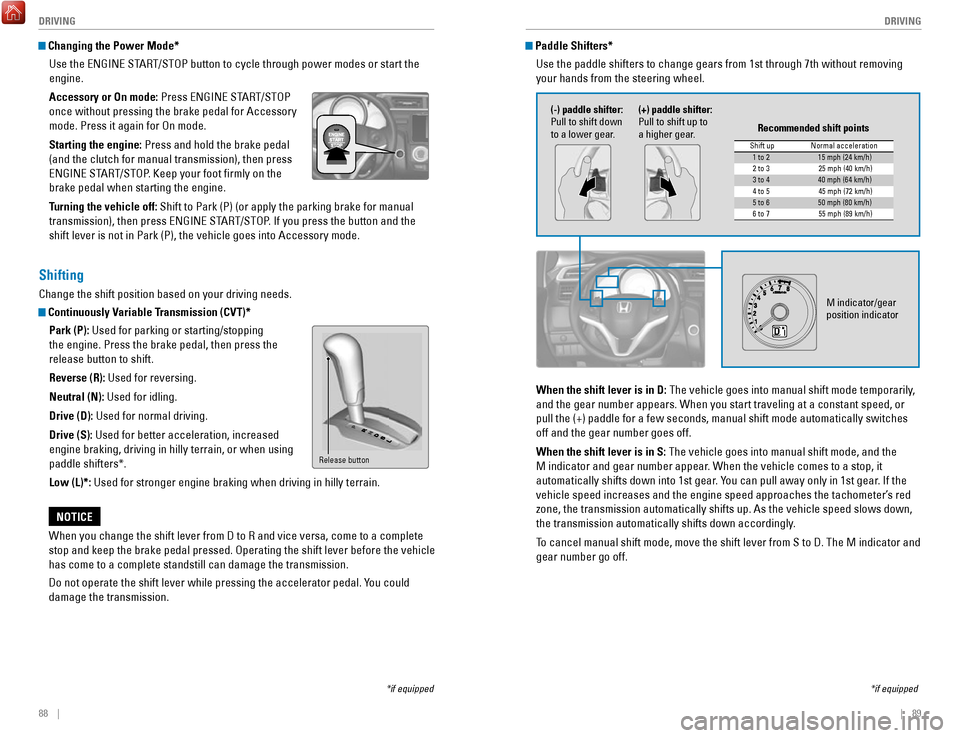
Changing the Power Mode*
Use the ENGINE START/STOP button to cycle through power modes or start the
engine.
Accessory or On mode: Press ENGINE START/STOP
once without pressing the brake pedal for Accessory
mode. Press it again for On mode.
Starting the engine: Press and hold the brake pedal
(and the clutch for manual transmission), then press
ENGINE START/STOP. Keep your foot firmly on the
brake pedal when starting the engine.
Turning the vehicle off: Shift to Park (P) (or apply the parking brake for manual
transmission), then press ENGINE START/STOP. If you press the button and the
shift lever is not in Park (P), the vehicle goes into Accessory mode.
*if equipped
Shifting
Change the shift position based on your driving needs.
Continuously Variable Transmission (CVT)*Park (P): Used for parking or starting/stopping
the engine. Press the brake pedal, then press the
release button to shift.
Reverse (R): Used for reversing.
Neutral (N): Used for idling.
Drive (D): Used for normal driving.
Drive (S): Used for better acceleration, increased
engine braking, driving in hilly terrain, or when using
paddle shifters*.
Low (L)*: Used for stronger engine braking when driving in hilly terrain.
When you change the shift lever from D to R and vice versa, come to a co\
mplete
stop and keep the brake pedal pressed. Operating the shift lever before \
the vehicle
has come to a complete standstill can damage the transmission.
Do not operate the shift lever while pressing the accelerator pedal. You could
damage the transmission.
NOTICE
Release button
Paddle Shifters* Use the paddle shifters to change gears from 1st through 7th without rem\
oving
your hands from the steering wheel.
*if equipped
When the shift lever is in D: The vehicle goes into manual shift mode temporarily,
and the gear number appears. When you start traveling at a constant spee\
d, or
pull the (+) paddle for a few seconds, manual shift mode automatically\
switches
off and the gear number goes off.
When the shift lever is in S: The vehicle goes into manual shift mode, and the
M indicator and gear number appear. When the vehicle comes to a stop, it
automatically shifts down into 1st gear. You can pull away only in 1st gear. If the
vehicle speed increases and the engine speed approaches the tachometer’\
s red
zone, the transmission automatically shifts up. As the vehicle speed slows down,
the transmission automatically shifts down accordingly.
To cancel manual shift mode, move the shift lever from S to D. The M indi\
cator and
gear number go off.
M indicator/gear
position indicator
Shift up Normal acceleration1 to 215 mph (24 km/h)
2 to 32 5 mph (40 km/h)
3 to 440 mph (64 km/h)
4 to 54 5 mph (72 km/h)
5 to 650 mph (80 km/h)
6 to 75 5 mph (89 km/h)
Recommended shift points
(-) paddle shifter:
Pull to shift down
to a lower gear. (+) paddle shifter:
Pull to shift up to
a higher gear.
Page 50 of 76
92 || 93
DRIVING
DRIVING
Vehicle Stability Assist (VSA®)
Also known as Electronic Stability Control (ESC), VSA helps to stabili\
ze the vehicle
during cornering if the vehicle turns more or less than what was intende\
d. It
assists in maintaining traction on slippery surfaces by regulating engin\
e output and
selectively applying the brakes.
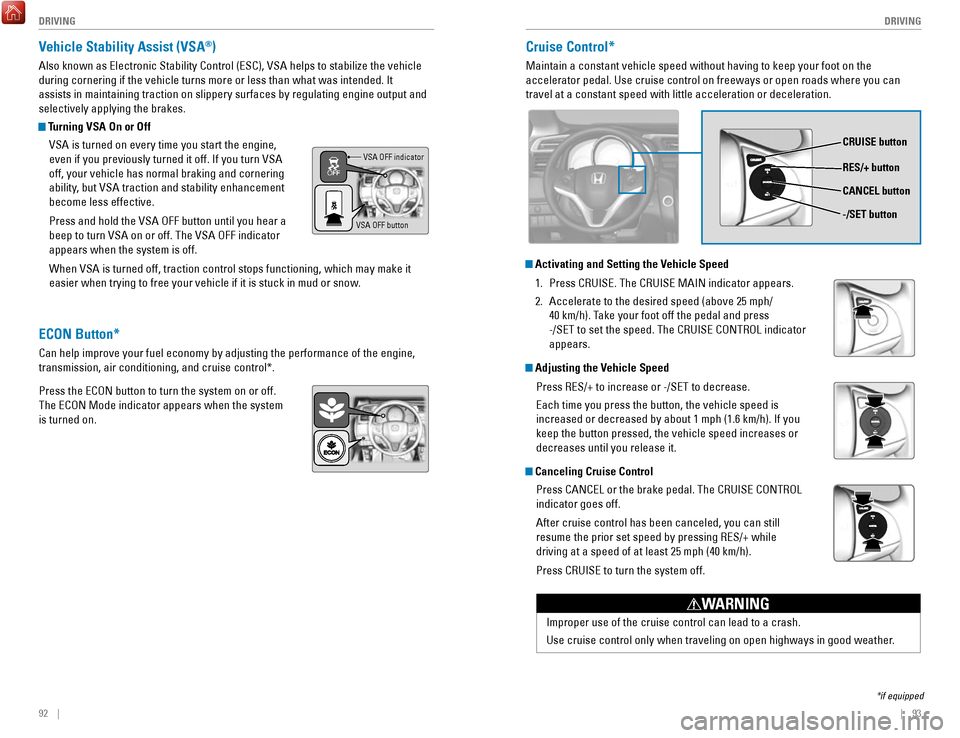
Turning VSA On or Off
VSA is turned on every time you start the engine,
even if you previously turned it off. If you turn VSA
off, your vehicle has normal braking and cornering
ability, but VSA traction and stability enhancement
become less effective.
Press and hold the VSA OFF button until you hear a
beep to turn VSA on or off. The VSA OFF indicator
appears when the system is off.
When VSA is turned off, traction control stops functioning, which may ma\
ke it
easier when trying to free your vehicle if it is stuck in mud or snow.
VSA OFF indicator
VSA OFF button
Cruise Control*
Maintain a constant vehicle speed without having to keep your foot on th\
e
accelerator pedal. Use cruise control on freeways or open roads where yo\
u can
travel at a constant speed with little acceleration or deceleration.
CRUISE button
RES/+ button
-/SET button CANCEL button
Improper use of the cruise control can lead to a crash.
Use cruise control only when traveling on open highways in good weather.
WARNING
Activating and Setting the Vehicle Speed 1.
Press CRUISE. The CRUISE MAIN indicator appears.
2.
Accelerate to the desired speed (above 25 mph/
40 km/h). Take your foot off the pedal and press
-/SET to set the speed. The CRUISE CONTROL indicator
appears.
Adjusting the Vehicle Speed
Press RES/+ to increase or -/SET to decrease.
Each time you press the button, the vehicle speed is
increased or decreased by about 1 mph (1.6 km/h). If you
keep the button pressed, the vehicle speed increases or
decreases until you release it.
Canceling Cruise ControlPress CANCEL or the brake pedal. The CRUISE CONTROL
indicator goes off.
After cruise control has been canceled, you can still
resume the prior set speed by pressing RES/+ while
driving at a speed of at least 25 mph (40 km/h).
Press CRUISE to turn the system off.
ECON Button*
Can help improve your fuel economy by adjusting the performance of the e\
ngine,
transmission, air conditioning, and cruise control*.
Press the ECON button to turn the system on or off.
The ECON Mode indicator appears when the system
is turned on.
*if equipped
Page 53 of 76
98 || 99
HANDLING THE UNEXPECTED
HANDLING THE UNEXPECTED
Learn about what to do in critical or emergency situations.
Smart Entry Remote Battery Strength*
If the battery life in your remote transmitter is weak, follow the below\
steps to start
the engine.
1.
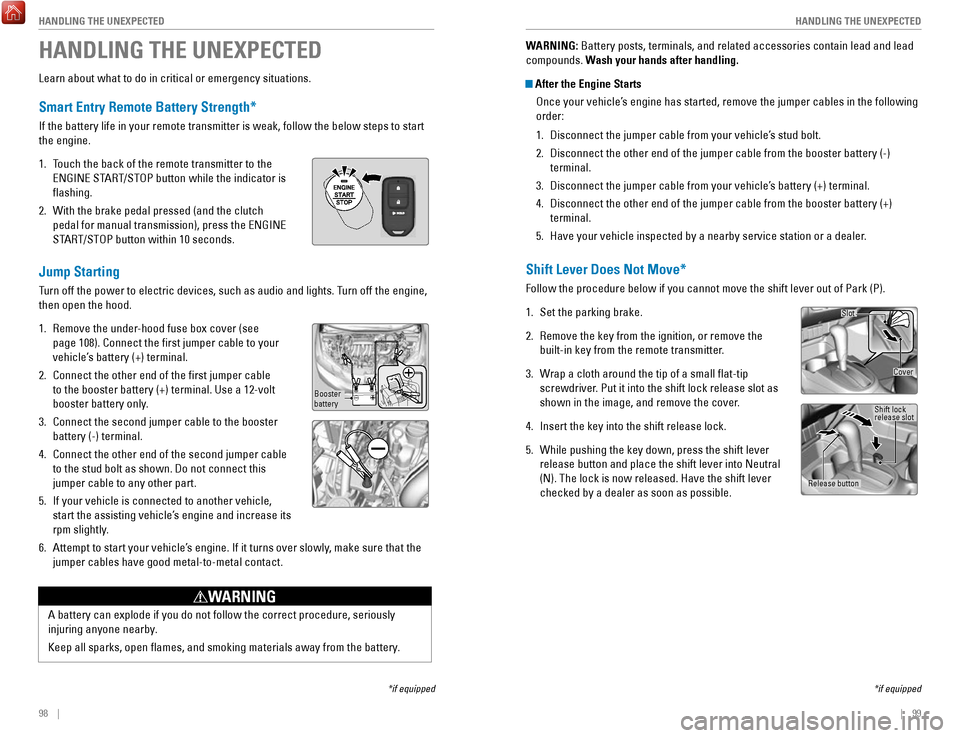
Touch the back of the remote transmitter to the
ENGINE START/STOP button while the indicator is
flashing.
2.
With the brake pedal pressed (and the clutch
pedal for manual transmission), press the ENGINE
START/STOP button within 10 seconds.
Jump Starting
Turn off the power to electric devices, such as audio and lights. Turn off the engine,
then open the hood.
1.
Remove the under-hood fuse box cover (see
page 108). Connect the first jumper cable to your
vehicle’s battery (+) terminal.
2.
Connect the other end of the first jumper cable
to the booster battery (+) terminal. Use a 12-volt
booster battery only.
3.
Connect the second jumper cable to the booster
battery (-) terminal.
4.
Connect the other end of the second jumper cable
to the stud bolt as shown. Do not connect this
jumper cable to any other part.
5.
If your vehicle is connected to another vehicle,
start the assisting vehicle’s engine and increase its
rpm slightly.
6.
Attempt to start your vehicle’s engine. If it turns over slowly, make sure that the
jumper cables have good metal-to-metal contact.
HANDLING THE UNEXPECTED
*if equipped
A battery can explode if you do not follow the correct procedure, seriou\
sly
injuring anyone nearby.
Keep all sparks, open flames, and smoking materials away from the batt\
ery.
WARNING
Booster
battery
WARNING: Battery posts, terminals, and related accessories contain lead and lead\
compounds. Wash your hands after handling.
After the Engine Starts Once your vehicle’s engine has started, remove the jumper cables in the following
order:
1.
Disconnect the jumper cable from your vehicle’s stud bolt.
2.
Disconnect the other end of the jumper cable from the booster battery (\
-)
terminal.
3.
Disconnect the jumper cable from your vehicle’s battery (+) terminal.
4.
Disconnect the other end of the jumper cable from the booster battery (\
+)
terminal.
5.
Have your vehicle inspected by a nearby service station or a dealer.
Shift Lever Does Not Move*
Follow the procedure below if you cannot move the shift lever out of Par\
k (P).
1.
Set the parking brake.
2.
Remove the key from the ignition, or remove the
built-in key from the remote transmitter.
3.
Wrap a cloth around the tip of a small flat-tip
screwdriver. Put it into the shift lock release slot as
shown in the image, and remove the cover
.
4.
Insert the key into the shift release lock.
5.
While pushing the key down, press the shift lever
release button and place the shift lever into Neutral
(N). The lock is now released. Have the shift lever
checked by a dealer as soon as possible.
*if equipped
Slot
Release button Shift lock
release slot
Cover
Page 54 of 76
100 || 101
HANDLING THE UNEXPECTED
HANDLING THE UNEXPECTED
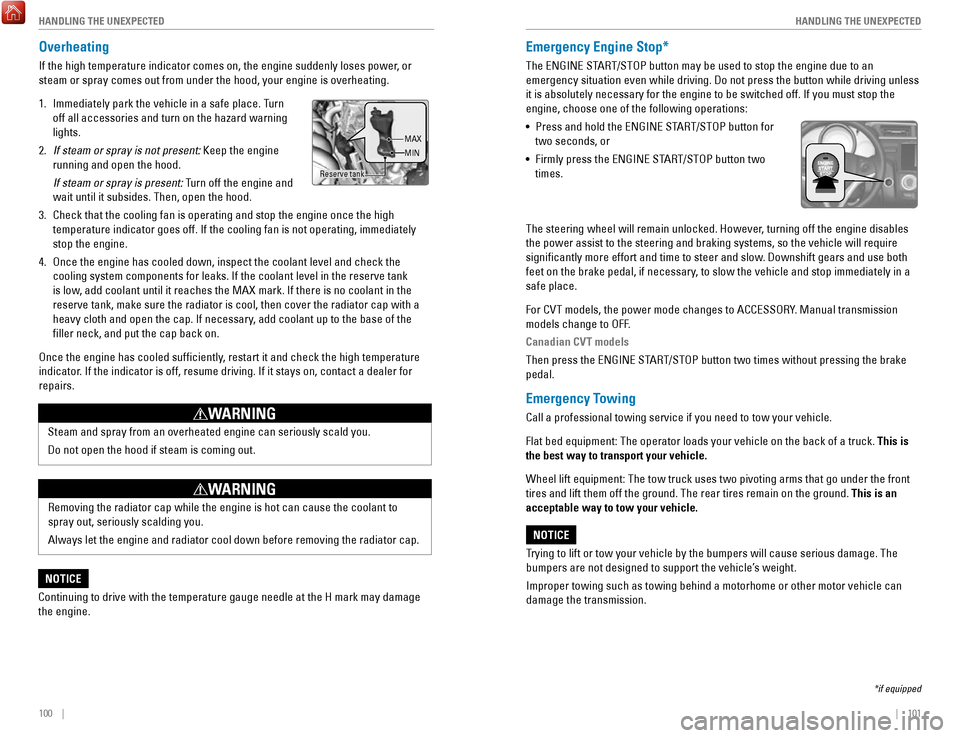
Overheating
If the high temperature indicator comes on, the engine suddenly loses po\
wer, or
steam or spray comes out from under the hood, your engine is overheating\
.
1.
Immediately park the vehicle in a safe place. Turn
off all accessories and turn on the hazard warning
lights.
2.
If steam or spray is not present: Keep the engine
running and open the hood.
If steam or spray is present: Turn off the engine and
wait until it subsides. Then, open the hood.
3.
Check that the cooling fan is operating and stop the engine once the hig\
h
temperature indicator goes off. If the cooling fan is not operating, imm\
ediately
stop the engine.
4.
Once the engine has cooled down, inspect the coolant level and check the\
cooling system components for leaks. If the coolant level in the reserve\
tank
is low, add coolant until it reaches the MAX mark. If there is no coolant in t\
he
reserve tank, make sure the radiator is cool, then cover the radiator ca\
p
with a
heavy cloth and open the cap. If necessary, add coolant up to the base of the
filler neck, and put the cap back on.
Once the engine has cooled sufficiently, restart it and check the high temperature
indicator. If the indicator is off, resume driving. If it stays on, contact a dealer for
repairs.
Steam and spray from an overheated engine can seriously scald you.
Do not open the hood if steam is coming out.
WARNING
Removing the radiator cap while the engine is hot can cause the coolant \
to
spray out, seriously scalding you.
Always let the engine and radiator cool down before removing the radiato\
r cap.
WARNING
Continuing to drive with the temperature gauge needle at the H mark may \
damage
the engine.
NOTICE
Reserve tank MAX
MIN
Emergency Engine Stop*
The ENGINE START/STOP button may be used to stop the engine due to an
emergency situation even while driving. Do not press the button while driving unless
it is absolutely necessary for the engine to be switched off. If you mus\
t stop the
engine, choose one of the following operations:
•
Press and hold the ENGINE START/STOP button for
two seconds, or
•
Firmly press the ENGINE START/STOP button two
times.
The steering wheel will remain unlocked. However, turning off the engine disables
the power assist to the steering and braking systems, so the vehicle wil\
l
require
significantly more effort and time to steer and slow. Downshift gears and use both
feet on the brake pedal, if necessary, to slow the vehicle and stop immediately in a
safe place.
For CVT models, the power mode changes to ACCESSORY. Manual transmission
models change to OFF.
Canadian CVT models
Then press the ENGINE START/STOP button two times without pressing the brake
pedal.
Emergency Towing
Call a professional towing service if you need to tow your vehicle.
Flat bed equipment: The operator loads your vehicle on the back of a tru\
ck. This is
the best way to transport your vehicle.
Wheel lift equipment: The tow truck uses two pivoting arms that go under\
the front
tires and lift them off the ground. The rear tires remain on the ground.\
This is an
acceptable way to tow your vehicle.
Trying to lift or tow your vehicle by the bumpers will cause serious dama\
ge. The
bumpers are not designed to support the vehicle’s weight.
Improper towing such as towing behind a motorhome or other motor vehicle\
can
damage the transmission.
NOTICE
*if equipped
Page 55 of 76
102 || 103
HANDLING THE UNEXPECTED
HANDLING THE UNEXPECTED
Tire Pressure Monitoring System (TPMS)
Monitors the tire pressure while you are driving. Available on U.S. models only.
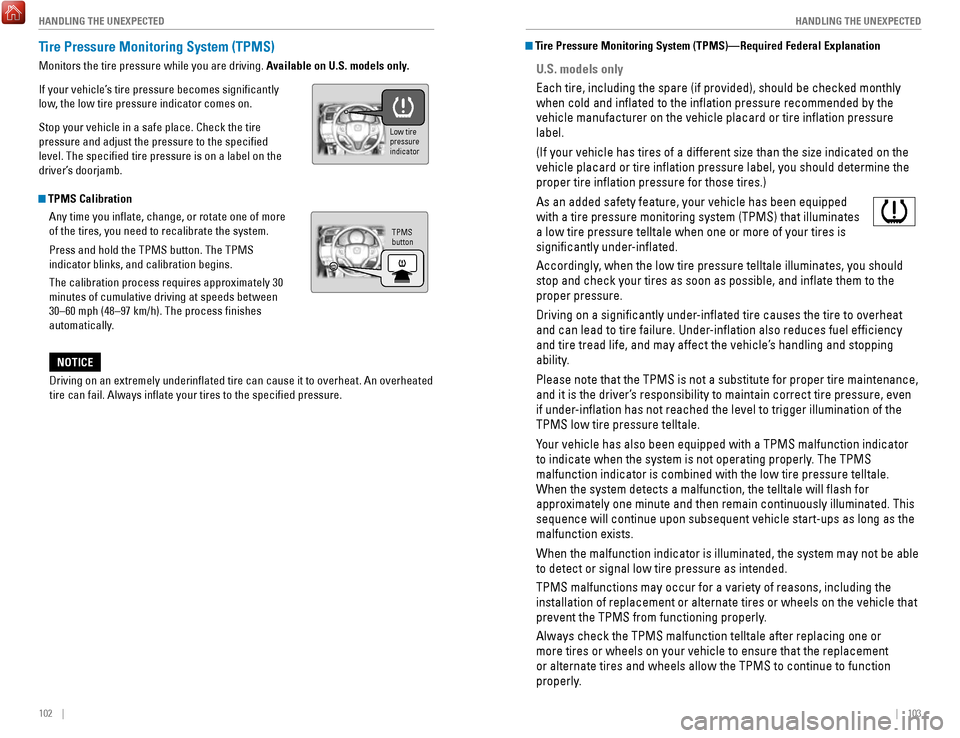
If your vehicle’s tire pressure becomes significantly
low, the low tire pressure indicator comes on.
Stop your vehicle in a safe place. Check the tire
pressure and adjust the pressure to the specified
level. The specified tire pressure is on a label on the
driver’s doorjamb.
TPMS Calibration
Any time you inflate, change, or rotate one of more
of the tires, you need to recalibrate the system.
Press and hold the TPMS button. The TPMS
indicator blinks, and calibration begins.
The calibration process requires approximately 30
minutes of cumulative driving at speeds between
30–60 mph (48–97 km/h). The process finishes
automatically.
Driving on an extremely underinflated tire can cause it to overheat. A\
n overheated
tire can fail. Always inflate your tires to the specified pressure.
NOTICE
TPMS
button
Low tire
pressure
indicator
Tire Pressure Monitoring System (TPMS)—Required Federal Explanation
U.S. models only
Each tire, including the spare (if provided), should be checked monthl\
y
when cold and inflated to the inflation pressure recommended by the \
vehicle manufacturer on the vehicle placard or tire inflation pressure\
label.
(If your vehicle has tires of a different size than the size indicated \
on the
vehicle placard or tire inflation pressure label, you should determine\
the
proper tire inflation pressure for those tires.)
As an added safety feature, your vehicle has been equipped
with a tire pressure monitoring system (TPMS) that illuminates
a low tire pressure telltale when one or more of your tires is
significantly under-inflated.
Accordingly, when the low tire pressure telltale illuminates, you should
stop and check your tires as soon as possible, and inflate them to the\
proper pressure.
Driving on a significantly under-inflated tire causes the tire to overheat
and can lead to tire failure. Under-inflation also reduces fuel efficiency
and tire tread life, and may affect the vehicle’s handling and stopping
ability.
Please note that the TPMS is not a substitute for proper tire maintenanc\
e,
and it is the driver’s responsibility to maintain correct tire pressure, even
if under-inflation has not reached the level to trigger illumination of the
TPMS low tire pressure telltale.
Your vehicle has also been equipped with a TPMS malfunction indicator
to indicate when the system is not operating properly. The TPMS
malfunction indicator is combined with the low tire pressure telltale.
When the system detects a malfunction, the telltale will flash for
approximately one minute and then remain continuously illuminated. This \
sequence will continue upon subsequent vehicle start-ups as long as the \
malfunction exists.
When the malfunction indicator is illuminated, the system may not be abl\
e
to detect or signal low tire pressure as intended.
TPMS malfunctions may occur for a variety of reasons, including the
installation of replacement or alternate tires or wheels on the vehicle \
that
prevent the TPMS from functioning properly.
Always check the TPMS malfunction telltale after replacing one or
more tires or wheels on your vehicle to ensure that the replacement
or alternate tires and wheels allow the TPMS to continue to function
properly.
Page 58 of 76
108 || 109
HANDLING THE UNEXPECTED
HANDLING THE UNEXPECTED
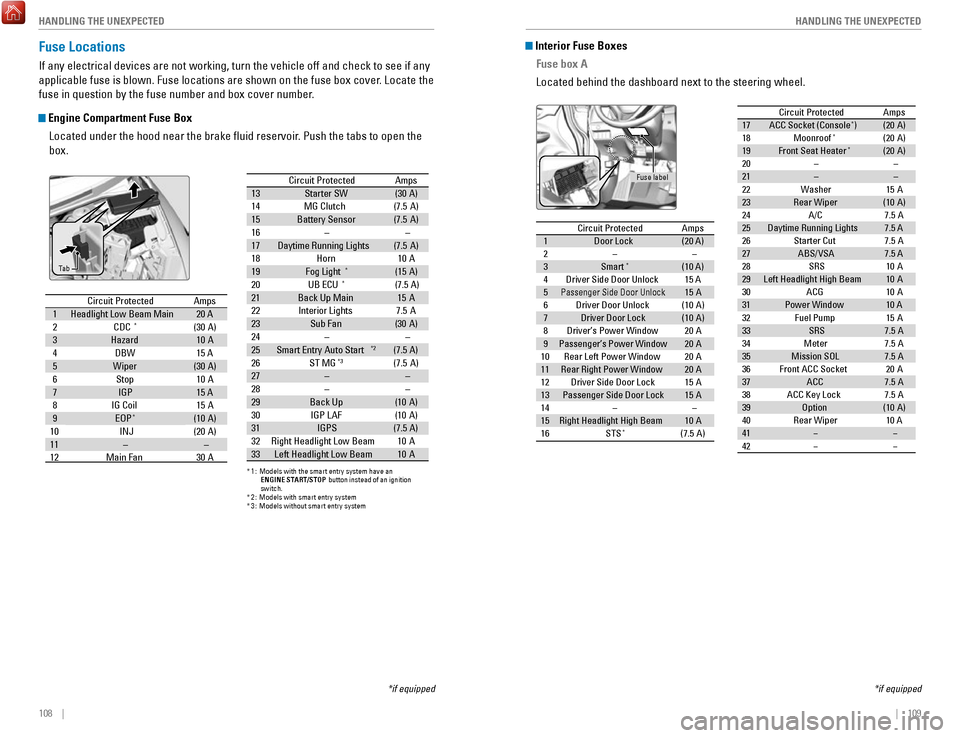
Fuse Locations
If any electrical devices are not working, turn the vehicle off and chec\
k to see if any
applicable fuse is blown. Fuse locations are shown on the fuse box cover\
. Locate the
fuse in question by the fuse number and box cover number.
Engine Compartment Fuse Box
Located under the hood near the brake fluid reservoir. Push the tabs to open the
box.
Circuit Protecte dAmps
2
1Headlight Low Beam Main 20 A
CDC*(30 A)
3
Hazard10 A
4
DBW15 A
5
Wiper(30 A)
6
Stop10 A
7
IG P15 A
8
IG Coi l15A
9
EOP*(10 A)
10 INJ
(20 A)
11
––
12Main Fan30 A 13
Starter SW(30 A)
14
MG Clutch(7.5 A)
15
Battery Senso r(7.5A )
16
––
17 Daytime Running Lights (7.5 A)
18
Horn10 A
19
(15 A)
20Fog Light*
*1 :M odels with the smart entry system have an
*
* ENGINE START/STO
P button instead of an ignition
switch .
2: Mo dels with smart entry system
3:Mo dels without smart entry system
Amps
21Back Up Main
Circuit Protecte d
15A
22
7.5 A
Interior Lights
23
Sub Fa n
24 (3
0A )––
26
25 Smart Entry Auto Start*2(7.5 A)
ST MG*3(7.5A)
27
––
28––
29Back Up(1 0A )
30
IGP LAF(1 0A )
31
IGPS(7.5 A)
32 Right Headlight Low Beam 10A
33 Left Headlight Low Beam 10A
UB ECU
*(7.5 A)
*if equipped
Ta b
Circuit Protecte
dAmps1Door Lock(20 A)2––3Smart*(10 A)4Driver Side Door Unlock15 A5Passenger Side Door Unlock15 A6Driver Door Unlock(10 A)7Driver Door Lock(10 A)8Driver’s Power Window20A9Passenger’s Power Window20A10Rear Left Power Window20A11Rear Right Power Window20A12Driver Side Door Lock15A13Passenger Side Door Lock15A14––15Right Headlight High Beam10A16STS*(7.5A )
17 ACC Socket (Console*) (20 A)
18 Moonroof*(20 A)
19 Front Seat Heater*(20 A)
20 – –
Circuit Protected Amps
21 – –
22 Washer 15A
23 Rear Wiper (10A )
24 A/C 7.5A
25 Daytime Running Lights 7.5 A
26 Starter Cut 7.5A
27 ABS/VSA 7.5 A
28 SRS 10A
29 Left Headlight High Beam 10A
30 ACG 10A
31 Power Window 10 A
32 Fuel Pump 15A
33 SRS 7.5A
34 Meter 7.5A
35 Mission SOL 7.5A
36 Front ACC Socket 20A
37 ACC 7.5A
38 ACC Key Lock 7.5A
39 Option (10A )
40 Rear Wiper 10 A
41 � �
42 � �
Interior Fuse Boxes
Fuse box A
Located behind the dashboard next to the steering wheel.
*if equipped
Fuse label
Circuit Protecte dAmps
1 Door Lock (20 A)
2 – –
3 Smart
*(10 A)
4 Driver Side Door Unlock 15 A
5
Passenger Side Door Unlock15 A
6 Driver Door Unlock (10 A)
7 Driver Door Lock (10 A)
8 Driver’s Power Window 20A
9 Passenger’s Power Window 20A
10 Rear Left Power Window 20A
11 Rear Right Power Window 20A
12 Driver Side Door Lock 15A
13 Passenger Side Door Lock 15A
14 – –
15 Right Headlight High Beam 10A
16 STS
*(7.5A )
17ACC Socket (Console*)(20 A)18Moonroof*(20 A)19Front Seat Heater*(20 A)20––
Circuit Protecte dAmps
21––22Washer15A23Rear Wiper(10A )24A/C7.5A25Daytime Running Lights7.5 A26Starter Cut7.5A27ABS/VSA7.5 A28SRS10A29Left Headlight High Beam10A30ACG10A31Power Window10 A32Fuel Pump15 A33SRS7.5A34Meter7.5A35Mission SOL7.5A36Front ACC Socket20A37ACC7.5A38ACC Key Lock7.5A39Option(10A )40Rear Wiper10 A41��42��
Page 70 of 76
132 || 133
CUSTOMER INFORMATION
CUSTOMER INFORMATION
Learn about information specific to you as a Honda customer and how to\
get help.
Frequently Asked Questions/Troubleshooting
Below are some frequently asked questions and troubleshooting items that\
you may
have about the vehicle.
Q:
How do I set the vehicle clock?
A:
For vehicles without navigation, see page 45. For vehicles with navigati\
on, the
time is automatically set using GPS signals.
Q:
Why doesn’t the vehicle start when I press the ENGINE START/STOP button?*
A:
The brake pedal must be pressed to start the engine.
Q:
What is the AUTO* setting on my headlight lever?
A:
When in the AUTO position, the vehicle’s exterior lights will automatically turn
on or off depending on the ambient lighting.
Q:
Why won’t the driver’s door unlock when I grab the door handle, even though
the keyless access remote is within range?*
A:
If you pull the handle too quickly, the system may not have time to confirm the
door is unlocked. Wait to hear a beep to confirm the door is unlocked. If you are
wearing gloves, the system may be slow to respond.
Q:
After my battery was disconnected or went dead, the audio system is aski\
ng for
a code. Where do I find this?
A:
In most cases, you do not need to enter a code. Turn on the vehicle and the
audio system, and press and hold the power button until the system react\
ivates.
Q:
Why can’t I operate Pandora® through the audio system?
A:
Audio may be streaming through Bluetooth® Audio. Make sure Pandora mode
is selected and the phone cable is properly connected to the USB adapter\
.
Some phones may prompt you to “Allow” a connection.
Q:
Is my phone compatible with Bluetooth features?
A:
Visit handsfreelink.com (U.S.) or
handsfreelink.ca (Canada) to check phone
compatibility for Bluetooth® Audio, Bluetooth® HandsFreeLink®, and SMS text
messaging.
Q:
Every time I press the Talk button, the system gives me voice prompts. Can I turn
these off?*
A:
From the Home screen, select Settings. Select the Voice Recog tab, then select
Voice Prompt. Select Off.
CUSTOMER INFORMATION
*if equipped
Contact Us
Honda dealer personnel are trained professionals. They should be able to\
answer
all your questions. If you encounter a problem that your dealership does\
not solve
to your satisfaction, please discuss it with the dealership’s service manager or
general manager. If you are dissatisfied with the decision made by the dealership’\
s
management, contact Honda Automobile Customer Service.
U.S. owners
American Honda Motor Co., Inc.
Honda Automobile Customer Service
1919 Torrance Blvd.
Mail Stop 500-2N-7A
Torrance, CA 90501-2746
Tel: (800) 999-1009
In Puerto Rico and
the U.S. Virgin Islands
Bella International
P.O. Box 190816
San Juan, PR 00919-0816
Tel: (787) 620-7546
When you call or write, please give us the following information:
•
Vehicle Identification Number
•
Date of purchase
•
Odometer reading of your vehicle
•
Your name, address, and telephone number
•
A detailed description of the problem
•
Name of the dealer who sold the vehicle to you
Q:
Why can’t I select an item using the selector knob or touchscreen*?
A:
To prevent driver distraction, certain items are limited or inoperable wh\
ile the
vehicle is moving. Use voice commands or pull over to select the items.
Q:
Where can I find the vehicle identification number (VIN)?
A:
Check the label on the driver’s doorjamb.
*if equipped
Canadian owners
Honda Canada, Inc.
Customer Relations
180 Honda Blvd.
Markham, ON
L6C 0H9
Tel: (888) 946-6329
Fax: (877) 939-0909
e-mail: [email protected]
Page 75 of 76
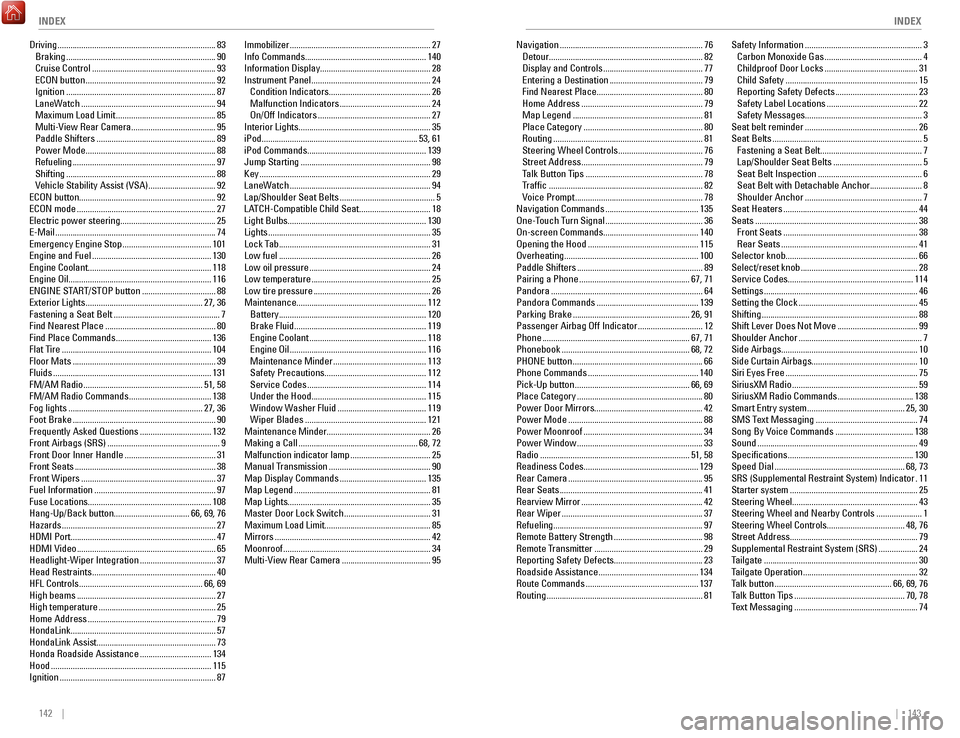
142 || 143
INDEX
INDEX
Driving ........................................................................\
. 83
Braking ..................................................................... 90
Cruise Control ......................................................... 93
ECON button ............................................................ 92
Ignition ..................................................................... 87
LaneWatch .............................................................. 94
Maximum Load Limit .............................................. 85
Multi-View Rear Camera ....................................... 95
Paddle Shifters ....................................................... 89
Power Mode ............................................................ 88
Refueling .................................................................. 97
Shifting ..................................................................... 88
Vehicle Stability Assist (VSA) ............................... 92
ECON button...............................................................
92
ECON mode
................................................................ 27
Electric power steering............................................
25
E-Mail
........................................................................\
.. 74
Emergency Engine Stop ......................................... 101
Engine and Fuel ....................................................... 130
Engine Coolant.........................................................
118
Engine Oil.................................................................. 116 ENGINE START/STOP button
.................................. 88
Exterior Lights ...................................................... 27,
36
Fastening a Seat Belt
................................................. 7
Find Nearest Place ................................................... 80
Find Place Commands ............................................ 136
Flat Tire ..................................................................... 104
Floor Mats .................................................................. 39
Fluids ........................................................................\
. 131
FM/AM Radio ....................................................... 51,
58
FM/AM Radio Commands
...................................... 138
Fog lights .............................................................. 27,
36
Foot Brake
.................................................................. 90
Frequently Asked Questions ................................. 132
Front Airbags (SRS) .................................................... 9
Front Door Inner Handle .......................................... 31
Front Seats ................................................................. 38
Front Wipers .............................................................. 37
Fuel Information ........................................................ 97
Fuse Locations.........................................................
108
Hang-Up/Back button................................... 66, 69, 76
Hazards
....................................................................... 27
HDMI Port...................................................................
47
HDMI Video
................................................................ 65
Headlight-Wiper Integration ................................... 37
Head Restraints ......................................................... 40
HFL Controls ......................................................... 66,
69
High beams
................................................................ 27
High temperature ...................................................... 25
Home Address ........................................................... 79
HondaLink...................................................................
57
HondaLink Assist....................................................... 73 Honda Roadside Assistance
................................. 134
Hood ........................................................................\
.. 115
Ignition ........................................................................\
87Immobilizer
.................................................................
27
Info Commands........................................................ 140
Information Display................................................... 28
Instrument Panel
....................................................... 24
Condition Indicators ............................................... 26
Malfunction Indicators .......................................... 24
On/Off Indicators .................................................... 27
Interior Lights.............................................................
35
iPod........................................................................\
53, 61 iPod Commands....................................................... 139Jump Starting
............................................................ 98
Key ........................................................................\
....... 29
LaneWatch ................................................................. 94
Lap/Shoulder Seat Belts ............................................ 5
LATCH-Compatible Child Seat ................................. 18
Light Bulbs................................................................
130
Lights
........................................................................\
... 35
Lock Tab ...................................................................... 31
Low fuel ...................................................................... 26
Low oil pressure ........................................................ 24
Low temperature ....................................................... 25
Low tire pressure ...................................................... 26
Maintenance............................................................
112
Battery
.................................................................... 120
Brake Fluid ............................................................. 119
Engine Coolant ...................................................... 118
Engine Oil ............................................................... 116
Maintenance Minder ........................................... 113
Safety Precautions ............................................... 112
Service Codes ....................................................... 114
Under the Hood ..................................................... 115
Window Washer Fluid ......................................... 119
Wiper Blades ........................................................ 121
Maintenance Minder................................................
26
Making a Call
....................................................... 68,
72
Malfunction indicator lamp
..................................... 25
Manual Transmission ............................................... 90
Map Display Commands ........................................ 135
Map Legend ............................................................... 81
Map Lights..................................................................
35
Master Door Lock Switch
........................................ 31
Maximum Load Limit................................................. 85
Mirrors
........................................................................\
42
Moonroof .................................................................... 34
Multi-View Rear Camera ......................................... 95Navigation
..................................................................
76
Detour ....................................................................... 82
Display and Controls .............................................. 77
Entering a Destination ........................................... 79
Find Nearest Place ................................................. 80
Home Address ........................................................ 79
Map Legend ............................................................ 81
Place Category ....................................................... 80
Routing ..................................................................... 81
Steering Wheel Controls ....................................... 76
Street Address ........................................................ 79
Talk Button T
ips
......................................................78
Traffic ....................................................................... 82
Voice Prompt ........................................................... 78
Navigation Commands ........................................... 135
One-Touch Turn Signal ............................................. 36
On-screen Commands............................................ 140
Opening the Hood
................................................... 115
Overheating..............................................................
100
Paddle Shifters
.......................................................... 89
Pairing a Phone ................................................... 67,
71
Pandora
...................................................................... 64
Pandora Commands ............................................... 139
Parking Brake ...................................................... 26,
91
Passenger Airbag Off Indicator
.............................. 12
Phone .................................................................... 67,
71
Phonebook
........................................................... 68, 72
PHONE button ............................................................ 66
Phone Commands ................................................... 140
Pick-Up button ..................................................... 66,
69
Place Category
.......................................................... 80
Power Door Mirrors..................................................
42
Power Mode
.............................................................. 88
Power Moonroof ....................................................... 34
Power Window .......................................................... 33
Radio ..................................................................... 51,
58
Readiness Codes..................................................... 129 Rear Camera
.............................................................. 95
Rear Seats .................................................................. 41
Rearview Mirror ........................................................ 42
Rear Wiper ................................................................. 37
Refueling.....................................................................
97
Remote Battery Strength
......................................... 98
Remote Transmitter .................................................. 29
Reporting Safety Defects.........................................
23
Roadside Assistance
.............................................. 134
Route Commands .................................................... 137
Routing ........................................................................\
81Safety Information
......................................................
3
Carbon Monoxide Gas ............................................. 4
Childproof Door Locks ........................................... 31
Child Safety ............................................................. 15
Reporting Safety Defects ...................................... 23
Safety Label Locations .......................................... 22
Safety Messages ...................................................... 3
Seat belt reminder .................................................... 26
Seat Belts ..................................................................... 5
Fastening a Seat Belt ............................................... 7
Lap/Shoulder Seat Belts ......................................... 5
Seat Belt Inspection ................................................ 6
Seat Belt with Detachable Anchor........................ 8
Shoulder Anchor
...................................................... 7
Seat Heaters .............................................................. 44
Seats ........................................................................\
... 38
Front Seats .............................................................. 38
Rear Seats ............................................................... 41
Selector knob.............................................................
66
Select/reset knob
...................................................... 28
Service Codes..........................................................
114
Settings
....................................................................... 46
Setting the Clock ....................................................... 45
Shifting ........................................................................\
88
Shift Lever Does Not Move ..................................... 99
Shoulder Anchor ......................................................... 7
Side Airbags............................................................... 10
Side Curtain Airbags................................................. 10
Siri Eyes Free
............................................................. 75
SiriusXM Radio .......................................................... 59
SiriusXM Radio Commands ................................... 138
Smart Entry system ............................................. 25,
30
SMS Text Messaging
............................................... 74
Song By Voice Commands .................................... 138
Sound ........................................................................\
.. 49
Specifications .......................................................... 130
Speed Dial ............................................................ 68,
73
SRS (Supplemental Restraint System) Indicator
. 11
Starter system ........................................................... 25
Steering Wheel..........................................................
43
Steering Wheel and Nearby Controls
..................... 1
Steering Wheel Controls....................................
48, 76
Street Address........................................................... 79 Supplemental Restraint System (SRS)
.................. 24
Tailgate ....................................................................... 30
Tailgate Operation ..................................................... 32
Talk button ...................................................... 66,
69, 76
Talk Button Tips
................................................... 70,
78
Text Messaging
......................................................... 74