tow HONDA FIT 2017 3.G Quick Guide
[x] Cancel search | Manufacturer: HONDA, Model Year: 2017, Model line: FIT, Model: HONDA FIT 2017 3.GPages: 76, PDF Size: 8.56 MB
Page 3 of 76
Honda Automobile Customer Service
Your authorized Honda dealer should be able to answer any questions you h\
ave
about your vehicle. However, if you are dissatisfied with the information you receive,
you can call Honda Automobile Customer Service (see page 133).
Honda Roadside Assistance
24-hour emergency road service is available to you in the United States \
and Canada
throughout your 3-year/36,000-mile warranty term. Services include jump starting,
flat tire and lockout assistance, towing, and more (limitations apply\
). This Owner’s Guide is intended to help you quickly get acquainted with your
2017 Honda Fit. It provides basic information and instructions on technology and
convenience features, as well as emergency procedures and how to get ass\
istance.
This guide is for vehicles sold in the United States and Canada. It cove\
rs all Fit
models, so you may find descriptions of features and equipment that ar\
e not in your
vehicle. Images throughout this guide are from U.S. vehicles and represe\
nt features
and equipment that are available on some, but not all, models.
This guide is not intended to be a substitute for the Owner’s Manual. The Owner
Information CD enclosed in your glove box kit includes the Owner’s Manual,
Navigation Manual, and vehicle and tire warranties in electronic format.\
This
information can be viewed on a computer (PC
or Mac platform) and saved or printed
for your reference. You can also visit
owners.honda.com (U.S.) or myhonda.ca
(Canada) to view the complete and most current information.
If you are the first registered owner of your vehicle, you may request\
a complimentary
printed copy of the Owner’s Manual, Navigation Manual, or Vehicle Warranty within
the first six months of vehicle purchase. To request a copy, visit owners.honda.com
(U.S.) and create or log in to your account. In Canada, please request\
a copy from
your Honda dealer.
American Honda Motor Company strives to be proactive in protecting our
environment and natural resources. By using electronic delivery for a co\
nsiderable
portion of the information typically found in a vehicle owner’s manual, we are further
reducing our impact on the environment.
INTRODUCTION TABLE OF CONTENTS
Call (800) 999-1009 (U.S.) or (888) 946-6329 (Canada)
Call (866) 864-5211 (U.S.) or (800) 465-7587 (Canada)
*if equipped
VISUAL INDEX
..............................................................
1
Steering Wheel and Nearby Controls ................... 1
Dashboard and Other Controls ............................... 2
SAFETY INFORMATION
.............................................. 3
Important Safety Information .................................. 3
Seat Belts ................................................................... 5
Airbags ........................................................................\
9
Child Safety .............................................................. 15
Safety Label Locations ........................................... 22
Reporting Safety Defects....................................... 23
INSTRUMENT PANEL
................................................ 24
Malfunction Indicators .......................................... 24
Condition Indicators ............................................... 26
On/Off Indicators ..................................................... 27
Information Display ................................................ 28
VEHICLE CONTROLS
.................................................. 29
Using the Key or Remote Transmitter .................. 29
Smart Entry System* ............................................... 30
Door Operation ........................................................ 31
Tailgate Operation .................................................. 32
Power Window Operation .................................... 33
Power Moonroof Operation* ............................... 34
Interior and Exterior Lights ................................... 35
One-Touch T
urn Signal
..........................................
36
Wiper Operation ...................................................... 37
Adjusting the Seats ................................................ 38
Rear Seats ............................................................... 41
Adjusting the Mirrors ............................................. 42
Adjusting the Steering Wheel .............................. 43
Heating and Cooling System* ..............................
43
Climate Control System*
...................................... 44
Seat Heaters* .......................................................... 44
Setting the Clock ..................................................... 45
Customized Features .............................................. 46AUDIO AND CONNECTIVITY
....................................
47
Basic Audio Operation ........................................... 47
Models with color audio system ......................... 50
Color Audio System* ........................................... 50
FM/AM Radio ........................................................ 51
Compact Disc (CD) ............................................... 52
iPod® ...................................................................... 53
USB Flash Drive .................................................... 54
Bluetooth® Audio ................................................. 55
Models with touchscreen ..................................... 56
Touchscreen Operation* ..................................... 56
HondaLink™ ......................................................... 57
FM/AM Radio ....................................................... 58
SiriusXM® Radio* ................................................ 59
Compact Disc (CD) .............................................. 60
iPod® ...................................................................... 61
USB Flash Drive .................................................... 62
Bluetooth® Audio ................................................. 63
Pandora® ............................................................... 64
HDMI Video ........................................................... 65
BLUETOOTH
® HANDSFREELINK® (HFL) ................. 66
Models with color audio system ......................... 66
Basic HFL Operation ............................................... 66
Pairing a Phone ....................................................... 67
Making a Call .......................................................... 68
Models with touchscreen ..................................... 69
Basic HFL Operation ............................................... 69
Pairing a Phone ....................................................... 71
Making a Call .......................................................... 72
HondaLink™ Assist ................................................ 73
SMS Text Messaging and E-Mail* ...................... 74
Siri® Eyes Free ......................................................... 75
NAVIGATION*
............................................................. 76
Basic Navigation Operation ................................. 76
Entering a Destination ........................................... 79
Routing ...................................................................... 81
Page 4 of 76
| 1
V
ISUAL INDEX
Quickly locate items in the vehicle’s interior.
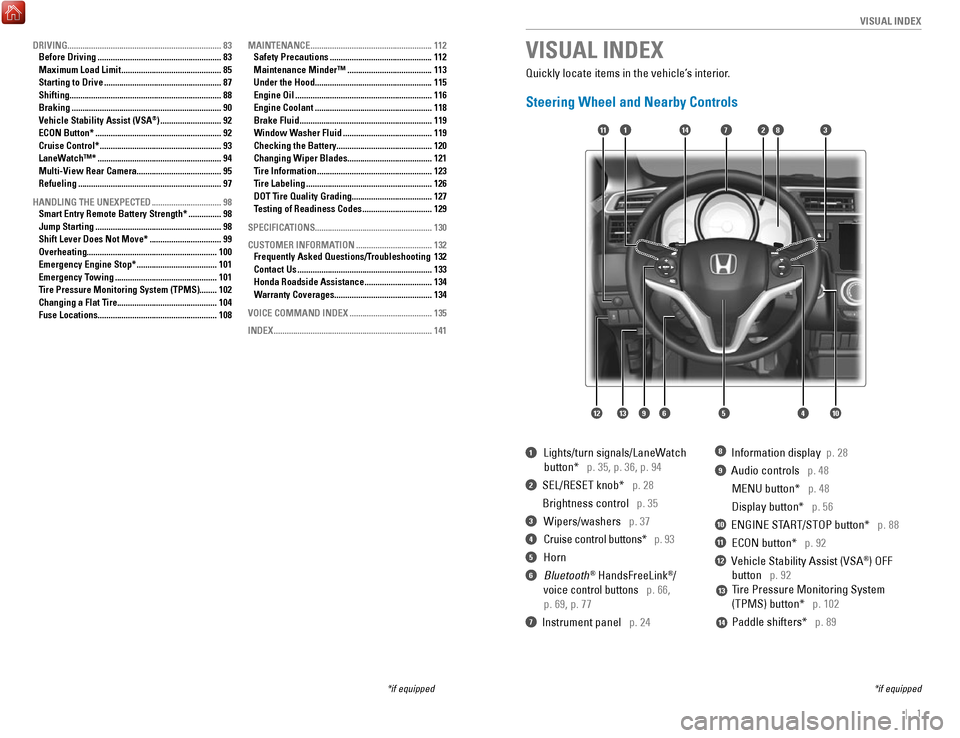
Steering Wheel and Nearby Controls
1 Lights/turn signals/LaneWatch
button* p. 35, p. 36, p. 94
2 SEL/RESET knob* p. 28
Brightness control p. 35
3 Wipers/washers p. 37
4 Cruise control buttons* p. 93
5 Horn
6 Bluetooth® HandsFreeLink®/
voice control buttons p. 66,
p. 69, p. 77
7 Instrument panel p. 24
8 Information display p. 28
9 Audio controls p. 48
MENU button* p. 48
Display button* p. 56
10 ENGINE START/STOP button* p. 88
11 ECON button* p. 92
12 Vehicle Stability Assist (VSA®) OFF
button p. 92
Tire Pressure Monitoring System
(TPMS) button* p. 102
Paddle shifters* p. 89
VISUAL INDEX
*if equipped
*if equipped
7
125641013
14111283
13
14
9
DRIVING....................................................................... 83
Before Driving ......................................................... 83
Maximum Load Limit .............................................. 85
Starting to Drive ...................................................... 87
Shifting ...................................................................... 88
Braking ..................................................................... 90
Vehicle Stability Assist (VSA®) ............................ 92
ECON Button* .......................................................... 92
Cruise Control* ........................................................ 93
LaneWatch™* ......................................................... 94
Multi-View Rear Camera.......................................
95
Refueling
.................................................................. 97
HANDLING THE UNEXPECTED
................................ 98
Smart Entry Remote Battery Strength* ............... 98
Jump Starting .......................................................... 98
Shift Lever Does Not Move* ................................. 99
Overheating ............................................................ 100
Emergency Engine Stop* ..................................... 101
Emergency Towing ............................................... 101
Tire Pressure Monitoring System (TPMS)........
102
Changing a Flat Tire.............................................. 104
Fuse Locations
....................................................... 108MAINTENANCE
........................................................
112
Safety Precautions ............................................... 112
Maintenance Minder™ ....................................... 113
Under the Hood ...................................................... 115
Engine Oil ............................................................... 116
Engine Coolant ...................................................... 118
Brake Fluid ............................................................. 119
Window Washer Fluid ......................................... 119
Checking the Battery ............................................ 120
Changing Wiper Blades ....................................... 121
Tire Information ..................................................... 123
Tire Labeling .......................................................... 126
DOT Tire Quality Grading
..................................... 127
Testing of Readiness Codes
................................ 129
SPECIFICATIONS
...................................................... 130
CUSTOMER INFORMATION
................................... 132
Frequently Asked Questions/Troubleshooting 132
Contact Us .............................................................. 133
Honda Roadside Assistance ............................... 134
Warranty Coverages ............................................. 134
VOICE COMMAND INDEX
...................................... 135
INDEX
........................................................................\
. 141
Page 46 of 76
84 || 85
DRIVING
DRIVING
Improper accessories or modifications can affect your vehicle’s handling, and
stability, and performance, and cause a crash in which you can be seriously hurt
or killed.
Follow all instructions in the vehicle owner’s guide regarding accessories and
modifications.
WARNING
In addition:
•
During the first 600 miles (1,000 km) of operation, avoid sudden acc\
eleration or
full throttle operation so as not to damage the engine or powertrain.
•
Avoid hard braking for the first 200 miles (300 km). You should also follow this
when the brake pads are replaced.
Maximum Load Limit
Carrying too much cargo or improperly storing it can affect your vehicle\
’s handling,
stability, stopping distance, and tires, and make it unsafe.
The maximum load for your vehicle is 850 lbs (385 kg). See the Tire and Loading
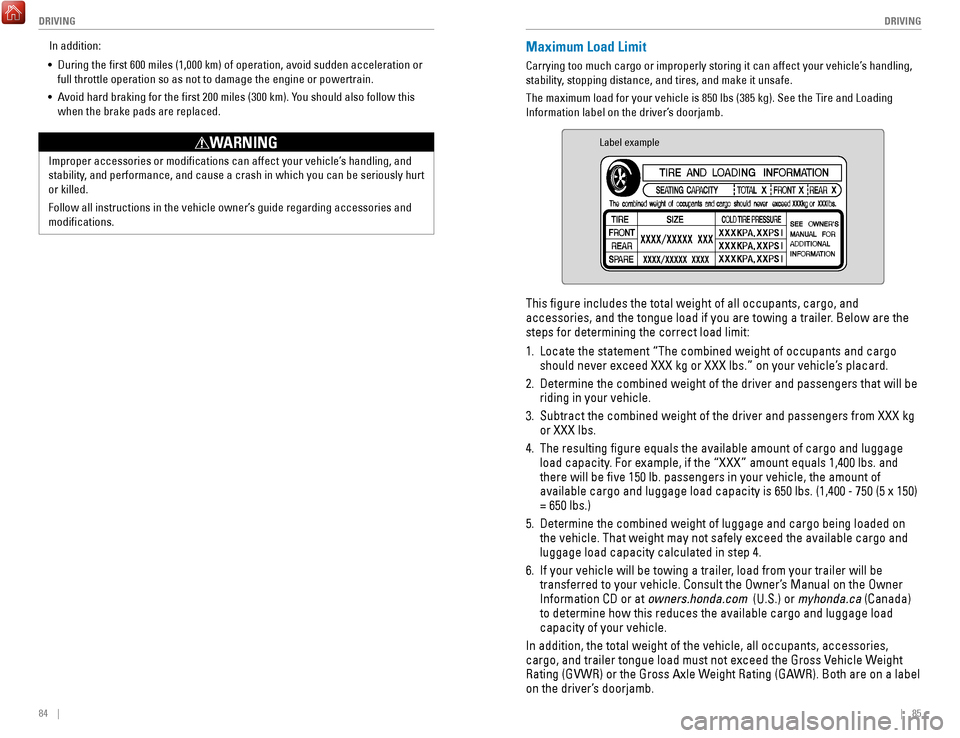
Information label on the driver’s doorjamb.
Label example
This figure includes the total weight of all occupants, cargo, and
accessories, and the tongue load if you are towing a trailer. Below are the
steps for determining the correct load limit:
1.
Locate the statement “The combined weight of occupants and cargo
should never exceed XXX kg or XXX lbs.” on your vehicle’s placard.
2.
Determine the combined weight of the driver and passengers that will be \
riding in your vehicle.
3.
Subtract the combined weight of the driver and passengers from XXX kg
or XXX lbs.
4.
The resulting figure equals the available amount of cargo and luggage \
load capacity. For example, if the “XXX” amount equals 1,400 lbs. and
there will be five 150 lb. passengers in your vehicle, the amount of
available cargo and luggage load capacity is 650 lbs. (1,400 - 750 (5 \
x 150)
= 650 lbs.)
5.
Determine the combined weight of luggage and cargo being loaded on
the vehicle. That weight may not safely exceed the available cargo and
luggage load capacity calculated in step 4.
6.
If your vehicle will be towing a trailer, load from your trailer will be
transferred to your vehicle. Consult the Owner’s Manual on the Owner
Information CD or at
owners.honda.com (U.S.) or myhonda.ca (Canada)
to determine how this reduces the available cargo and luggage load
capacity of your vehicle.
In addition, the total weight of the vehicle, all occupants, accessories\
,
cargo, and trailer tongue load must not exceed the Gross Vehicle Weight
Rating (GVWR) or the Gross Axle Weight Rating (GAWR). Both are on a label
on the driver’s doorjamb.
Page 47 of 76
86 || 87
DRIVING
DRIVING
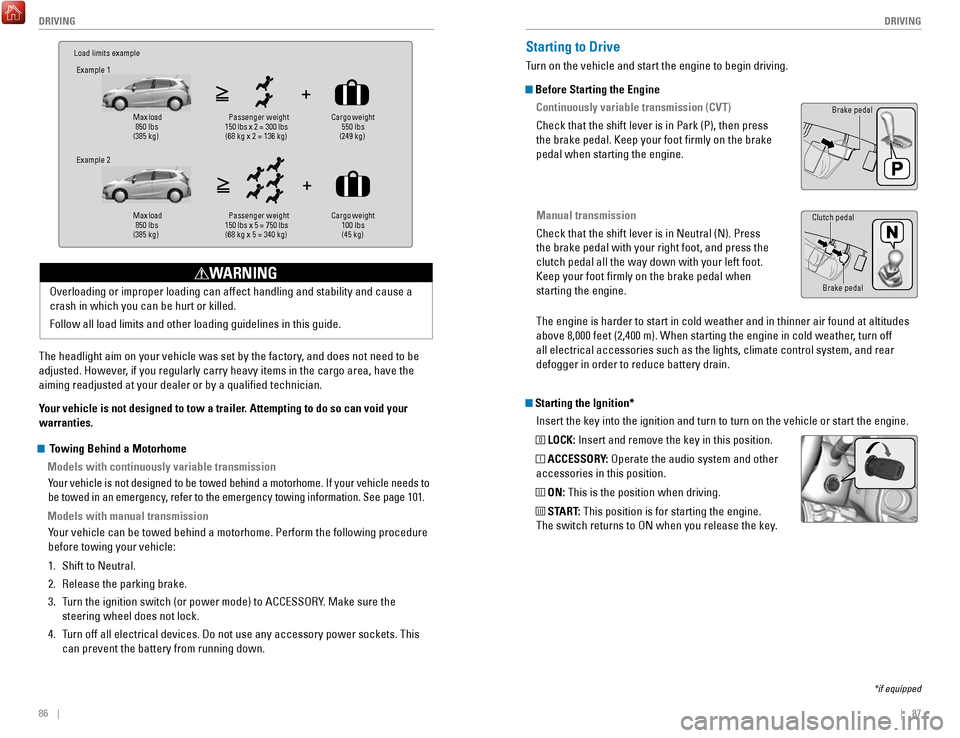
Load limits example
Example 1
Max load
850 lbs
(385 kg) Pass
enger weight
150 lbs x 2 = 300 lbs (68 kg x 2 = 136 kg) Cargo weight
550 lbs
(249 kg)
Example 2
Max load
850 lbs
(385 kg) Pa
ssenger w eight
150 lbs x 5 = 750 lbs (68 kg x 5 = 340 kg) Cargo weight
100 lbs
(45 kg)
The headlight aim on your vehicle was set by the factory, and does not need to be
adjusted. However, if you regularly carry heavy items in the cargo area, have the
aiming readjusted at your dealer or by a qualified technician.
Your vehicle is not designed to tow a trailer. Attempting to do so can void your
warranties. Overloading or improper loading can affect handling and stability and ca\
use a
crash in which you can be hurt or killed.
Follow all load limits and other loading guidelines in this guide.
WARNING
Starting the Ignition*
Insert the key into the ignition and turn to turn on the vehicle or star\
t the engine.
0 LOCK: Insert and remove the key in this position.
I ACCESSORY: Operate the audio system and other
accessories in this position.
II ON: This is the position when driving.
III START: This position is for starting the engine.
The switch returns to ON when you release the key.
Starting to Drive
Turn on the vehicle and start the engine to begin driving.
Before Starting the Engine
Continuously variable transmission (CVT)
Check that the shift lever is in Park (P), then press
the brake pedal. Keep your foot firmly on the brake
pedal when starting the engine.
Manual transmission
Check that the shift lever is in Neutral (N). Press
the brake pedal with your right foot, and press the
clutch pedal all the way down with your left foot.
Keep your foot firmly on the brake pedal when
starting the engine.
Brake pedal
The engine is harder to start in cold weather and in thinner air found a\
t altitudes
above 8,000 feet (2,400 m). When starting the engine in cold weather, turn off
all electrical accessories such as the lights, climate control system, a\
nd rear
defogger in order to reduce battery drain.
*if equipped
Brake pedal
Clutch pedal
Towing Behind a Motorhome
Models with continuously variable transmission
Your vehicle is not designed to be towed behind a motorhome. If your vehi\
cle needs to
be towed in an emergency, refer to the emergency towing information. See page 101.
Models with manual transmissionYour vehicle can be towed behind a motorhome. Perform the following proce\
dure
before towing your vehicle:
1.
Shift to Neutral.
2.
Release the parking brake.
3.
Turn the ignition switch (or power mode) to ACCESSORY. Make sure the
steering wheel does not lock.
4.
Turn off all electrical devices. Do not use any accessory power sockets. This
can prevent the battery from running down.
Page 54 of 76
100 || 101
HANDLING THE UNEXPECTED
HANDLING THE UNEXPECTED
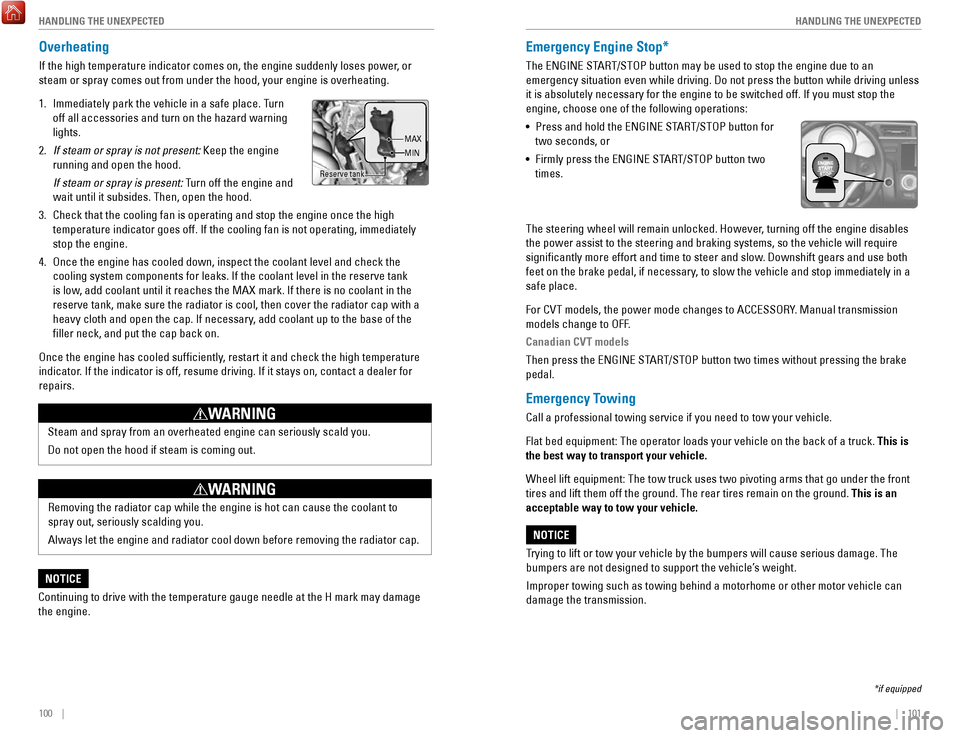
Overheating
If the high temperature indicator comes on, the engine suddenly loses po\
wer, or
steam or spray comes out from under the hood, your engine is overheating\
.
1.
Immediately park the vehicle in a safe place. Turn
off all accessories and turn on the hazard warning
lights.
2.
If steam or spray is not present: Keep the engine
running and open the hood.
If steam or spray is present: Turn off the engine and
wait until it subsides. Then, open the hood.
3.
Check that the cooling fan is operating and stop the engine once the hig\
h
temperature indicator goes off. If the cooling fan is not operating, imm\
ediately
stop the engine.
4.
Once the engine has cooled down, inspect the coolant level and check the\
cooling system components for leaks. If the coolant level in the reserve\
tank
is low, add coolant until it reaches the MAX mark. If there is no coolant in t\
he
reserve tank, make sure the radiator is cool, then cover the radiator ca\
p
with a
heavy cloth and open the cap. If necessary, add coolant up to the base of the
filler neck, and put the cap back on.
Once the engine has cooled sufficiently, restart it and check the high temperature
indicator. If the indicator is off, resume driving. If it stays on, contact a dealer for
repairs.
Steam and spray from an overheated engine can seriously scald you.
Do not open the hood if steam is coming out.
WARNING
Removing the radiator cap while the engine is hot can cause the coolant \
to
spray out, seriously scalding you.
Always let the engine and radiator cool down before removing the radiato\
r cap.
WARNING
Continuing to drive with the temperature gauge needle at the H mark may \
damage
the engine.
NOTICE
Reserve tank MAX
MIN
Emergency Engine Stop*
The ENGINE START/STOP button may be used to stop the engine due to an
emergency situation even while driving. Do not press the button while driving unless
it is absolutely necessary for the engine to be switched off. If you mus\
t stop the
engine, choose one of the following operations:
•
Press and hold the ENGINE START/STOP button for
two seconds, or
•
Firmly press the ENGINE START/STOP button two
times.
The steering wheel will remain unlocked. However, turning off the engine disables
the power assist to the steering and braking systems, so the vehicle wil\
l
require
significantly more effort and time to steer and slow. Downshift gears and use both
feet on the brake pedal, if necessary, to slow the vehicle and stop immediately in a
safe place.
For CVT models, the power mode changes to ACCESSORY. Manual transmission
models change to OFF.
Canadian CVT models
Then press the ENGINE START/STOP button two times without pressing the brake
pedal.
Emergency Towing
Call a professional towing service if you need to tow your vehicle.
Flat bed equipment: The operator loads your vehicle on the back of a tru\
ck. This is
the best way to transport your vehicle.
Wheel lift equipment: The tow truck uses two pivoting arms that go under\
the front
tires and lift them off the ground. The rear tires remain on the ground.\
This is an
acceptable way to tow your vehicle.
Trying to lift or tow your vehicle by the bumpers will cause serious dama\
ge. The
bumpers are not designed to support the vehicle’s weight.
Improper towing such as towing behind a motorhome or other motor vehicle\
can
damage the transmission.
NOTICE
*if equipped
Page 60 of 76
112 || 113
MAINTENANCE
MAINTENANCE
Safety Precautions
Some of the most important safety precautions are listed below; however, we cannot
warn you of every conceivable hazard that can arise in performing mainte\
nance.
Only you can decide whether or not you should perform a given task.
Maintenance Safety
•
To reduce the possibility of fire or explosion, keep cigarettes, sparks\
, and flames
away from the battery and all fuel-related parts.
•
Never leave rags, towels, or other flammable objects under the hood. H\
eat from
the engine and exhaust can ignite them, causing a fire.
•
To clean parts, use a commercially available degreaser or parts cleaner, not
gasoline.
•
Wear eye protection and protective clothing when working with the battery\
or
compressed air.
•
Do not run the engine in confined spaces where carbon monoxide gas can\
accumulate.
Vehicle Safety
•
The vehicle must be stationary, and parked on level ground with the parking
brake set and the engine off.
•
Be aware that hot parts can burn you.
•
Be aware that moving parts can injure you.
Improperly maintaining this vehicle or failing to correct a problem befo\
re
driving can cause a crash in which you can be seriously hurt or killed. \
Always follow the inspection and maintenance recommendations according
to the schedules in this guide.
WARNING
Failure to properly follow maintenance instructions and precautions can \
cause you to be seriously hurt or killed.
Always follow the procedures and precautions in this guide.
WARNING
Learn about basic maintenance that you can perform on the vehicle yourse\
lf, as well
as information about how to best maintain the vehicle.
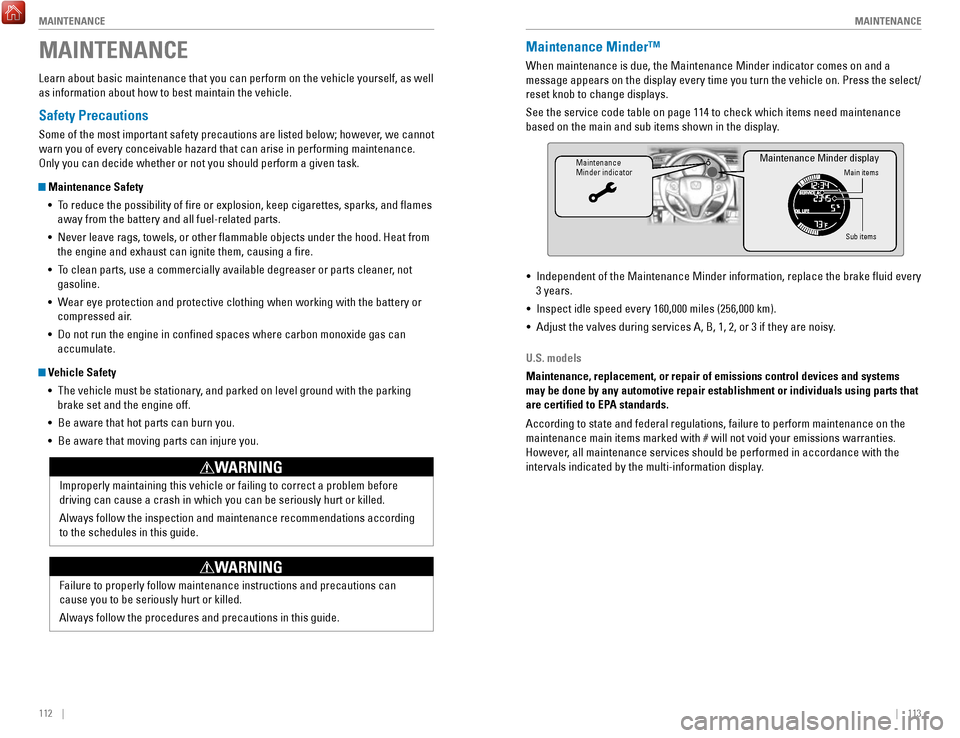
MAINTENANCEMaintenance Minder™
When maintenance is due, the Maintenance Minder indicator comes on and a\
message appears on the display every time you turn the vehicle on. Press\
the select/
reset knob to change displays.
See the service code table on page 114 to check which items need mainten\
ance
based on the main and sub items shown in the display.
Maintenance
Minder indicatorMain items
Sub items
Maintenance Minder display
• Independent of the Maintenance Minder information, replace the brake fl\
uid every
3 years.
•
Inspect idle speed every 160,000 miles (256,000 km).
•
Adjust the valves during services A, B, 1, 2, or 3 if they are noisy.
U.S. models
Maintenance, replacement, or repair of emissions control devices and sys\
tems
may be done by any automotive repair establishment or individuals using \
parts that
are certified to EPA standards.
According to state and federal regulations, failure to perform maintenan\
ce on the
maintenance main items marked with # will not void your emissions war
ranties.
However, all maintenance services should be performed in accordance with the
intervals indicated by the multi-information display.
Page 61 of 76
114 || 115
MAINTENANCE
MAINTENANCE
Maintenance Minder Service Codes
These codes indicate what services are due on your vehicle.
*1: If a message SERVICE does not appear more than 12 months after the display is reset, changethe engine oil every year.
#: See information on maintenance and emissions warranty.
CODEMaintenance Main Items
A
�Replace engine oi l*1
B�Replace engine oil and oil �lter
�Inspect front and rear brakes/service as necessary
�Check parking brake adjustment
�Inspect tie rod ends, steering gearbox, and boots
�Inspect suspension component s
�Inspect driveshaft boots
�Inspect brake hoses and lines (Including ABS/VSA)
�Inspect all �uid levels and condition of �uids
�Inspect exhaust system#
�Inspect fuel lines and connections#
*2:If you drive in dusty conditions, replace the air cleaner element every \
15,000 miles (24,000 km).*3:If you drive primarily in urban areas with high concentrations of soot i\
n the air from industryand diesel-powered vehicles, replace the dust and pollen �lter every \
15,000 miles (24,000 km).
CODEMaintenance Sub Items
1
�Rotate tires
2�Replace air cleaner element*2
�Replace dust and pollen �lte r*3
�Inspect drive belt
3
�Replace transmission �uid
4�Replace spark plugs
�Inspect valve clearance
5
�Replace engine coolan t
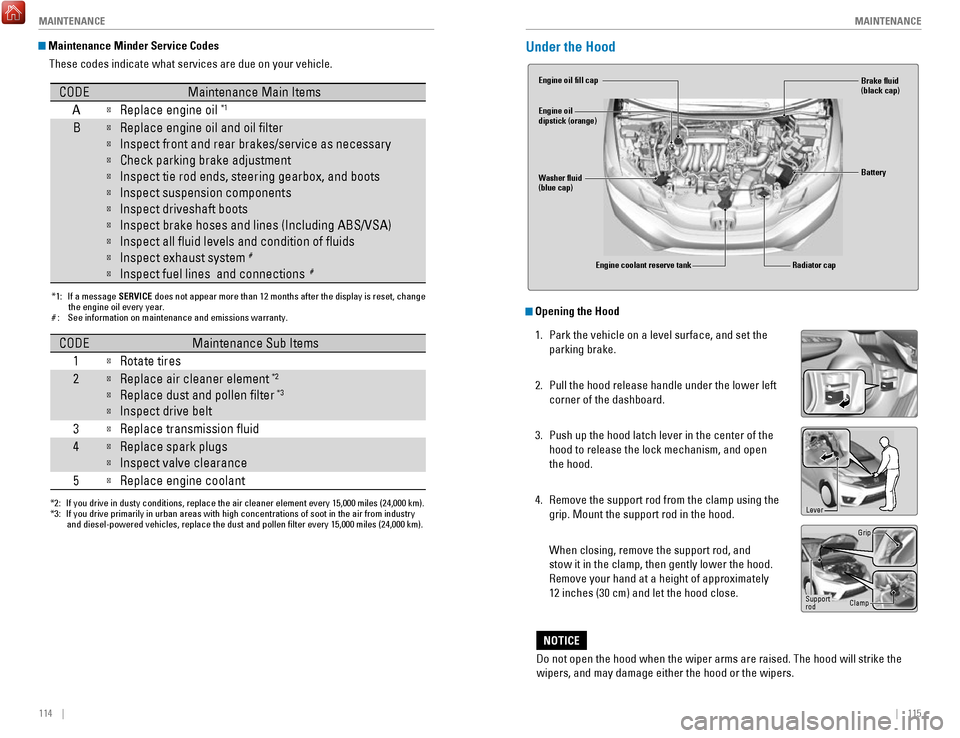
Under the Hood
Opening the Hood
1.
Park the vehicle on a level surface, and set the
parking brake.
2.
Pull the hood release handle under the lower left
corner of the dashboard.
3.
Push up the hood latch lever in the center of the
hood to release the lock mechanism, and open
the hood.
4.
Remove the support rod from the clamp using the
grip. Mount the support rod in the hood.
When closing, remove the support rod, and
stow it in the clamp, then gently lower the hood.
Remove your hand at a height of approximately
12 inches (30 cm) and let the hood close.
Do not open the hood when the wiper arms are raised. The hood will strik\
e the
wipers, and may damage either the hood or the wipers.
NOTICE
Engine coolant reserve tank
Washer fluid
(blue cap) Engine oil fill cap
Engine oil
dipstick (orange)
Brake fluid
(black cap)
Battery
Radiator cap
Lever
Support
rod Grip
Clamp
Page 62 of 76
116 || 117
MAINTENANCE
MAINTENANCE
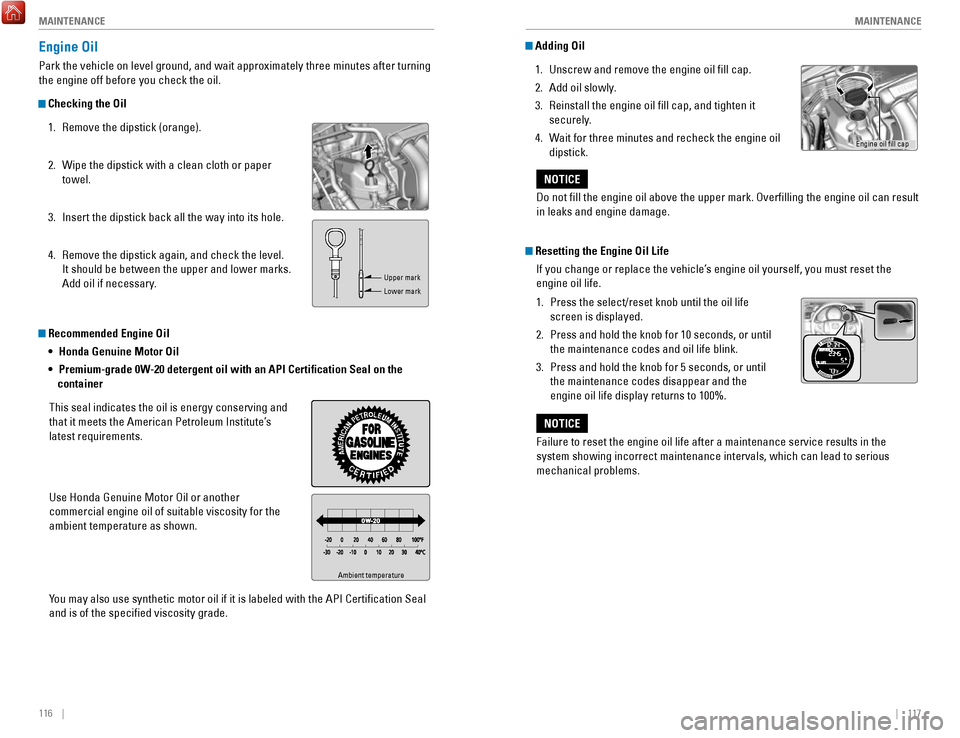
Recommended Engine Oil
• Honda Genuine Motor Oil
•
Premium-grade 0W-20 detergent oil with an API Certification Seal on the
container
This seal indicates the oil is energy conserving and
that it meets the American Petroleum Institute’s
latest requirements.
Use Honda Genuine Motor Oil or another
commercial engine oil of suitable viscosity for the
ambient temperature as shown.
Y
ou may also use synthetic motor oil if it is labeled with the API Certifi\
cation Seal
and is of the specified viscosity grade.
Engine Oil
Park the vehicle on level ground, and wait approximately three minutes after turning
the engine off before you check the oil.
Checking the Oil
1.
Remove the dipstick (orange).
2.
Wipe the dipstick with a clean cloth or paper
towel.
3.
Insert the dipstick back all the way into its hole.
4.
Remove the dipstick again, and check the level.
It should be between the upper and lower marks.
Add oil if necessary.
Ambient temperature
Upper mark
Lower mark
Adding Oil 1.
Unscrew and remove the engine oil fill cap.
2.
Add oil slowly.
3.
Reinstall the engine oil fill cap, and tighten it
securely.
4.
Wait for three minutes and recheck the engine oil
dipstick.
Resetting the Engine Oil Life If you change or replace the vehicle’s engine oil yourself, you must reset the
engine oil life.
1.
Press the select/reset knob until the oil life
screen is displayed.
2.
Press and hold the knob for 10 seconds, or until
the maintenance codes and oil life blink.
3.
Press and hold the knob for 5 seconds, or until
the maintenance codes disappear and the
engine oil life display returns to 100%.
Do not fill the engine oil above the upper mark. Overfilling the eng\
ine oil can result
in leaks and engine damage.
NOTICE
Failure to reset the engine oil life after a maintenance service results\
in the
system showing incorrect maintenance intervals, which can lead to seriou\
s
mechanical problems.
NOTICE
Engine oil fill cap
Page 64 of 76
120 || 121
MAINTENANCE
MAINTENANCE
The battery gives off explosive hydrogen gas during normal operation.
A spark or flame can cause the battery to explode with enough force to\
kill or
seriously hurt you.
When conducting any battery maintenance, wear protective clothing and a \
face shield, or have a skilled technician do it.
WARNING
Checking the Battery
The battery condition is monitored by a sensor on the negative terminal.\
If there is a
problem with the battery, the charging system indicator appears (see page 24). Have
your vehicle checked by a dealer.
Check the battery terminals for corrosion monthly.
For jump starting, see page 98.
WARNING: Battery posts, terminals, and related accessories contain lead and lead\
compounds. Wash your hands after handling.
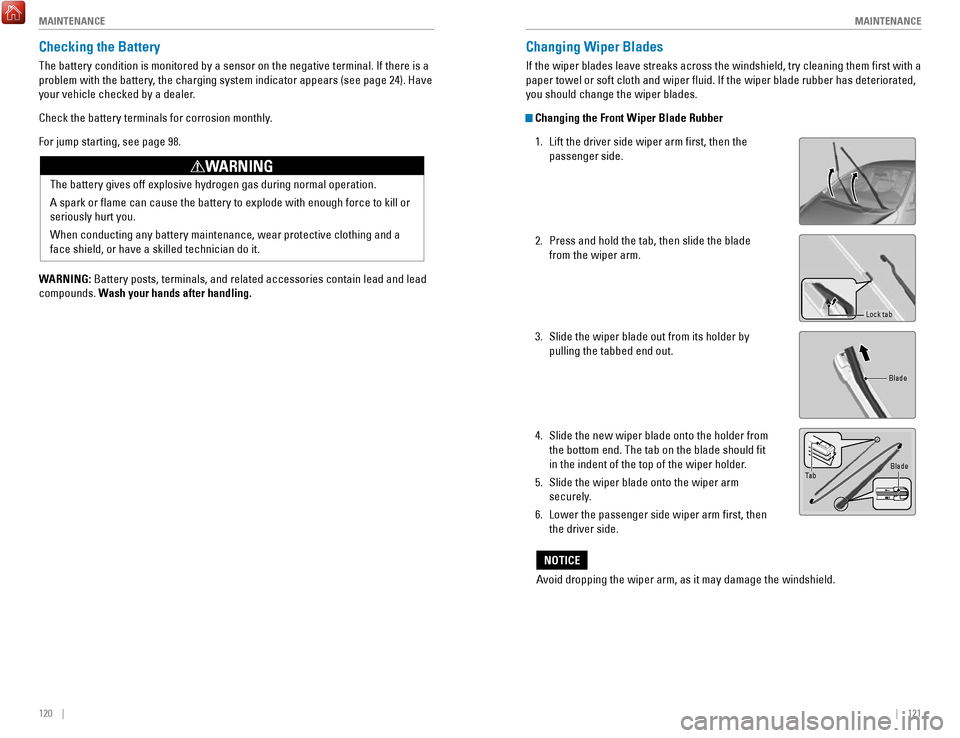
Changing Wiper Blades
If the wiper blades leave streaks across the windshield, try cleaning th\
em first with a
paper towel or soft cloth and wiper fluid. If the wiper blade rubber h\
as deteriorated,
you should change the wiper blades.
Changing the Front Wiper Blade Rubber
1.
Lift the driver side wiper arm first, then the
passenger side.
2.
Press and hold the tab, then slide the blade
from the wiper arm.
3.
Slide the wiper blade out from its holder by
pulling the tabbed end out.
4.
Slide the new wiper blade onto the holder from
the bottom end. The tab on the blade should fit
in the indent of the top of the wiper holder.
5.
Slide the wiper blade onto the wiper arm
securely.
6.
Lower the passenger side wiper arm first, then
the driver side.
Lock tab
Blade
Ta b Blade
Avoid dropping the wiper arm, as it may damage the windshield.
NOTICE
Page 71 of 76
134 || 135
VOICE COMMAND INDEX
CUSTOMER INFORMATION
Honda Roadside Assistance
24-hour emergency road service is available to you in the United States \
and Canada
throughout your 3-year/36,000-mile warranty term. Services include jump starting,
flat tire and lockout assistance, towing, and more (limitations apply\
).
Call (866) 864-5211 (U.S.) or (800) 465-7587 (Canada).
Warranty Coverages
Below is a brief summary of the warranties covering your new vehicle.
New Vehicle Limited Warranty: Covers your new vehicle, except for the emissions
control system and accessories, against defects in materials and workman\
ship.
Emissions Control Systems Defects Warranty and Emissions Performance
Warranty: Covers your vehicle’s emissions control systems. Time, mileage, and
coverage are conditional.
Seat Belt Limited Warranty: Covers seat belts that fail to function properly.
Rust Perforation Limited Warranty: Covers all exterior body panels that rust through
from the inside.
Accessory Limited Warranty: Covers Honda accessories.
Replacement Parts Limited Warranty: Covers all Honda replacement parts against
defects in materials and workmanship.
Replacement Battery Limited Warranty: Provides prorated coverage for a
replacement battery purchased from a Honda dealer.
Replacement Muffler Lifetime Limited Warranty: Covers a replacement muffler for
the duration of the ownership.
Restrictions and exclusions apply to all these warranties. See the Warranty Manual
on the Owner Information CD or at owners.honda.com (U.S.) or myhonda.ca
(Canada) for complete descriptions of each warranty, including time, mileage, and
other conditional limitations.
Your vehicle’s original tires are covered by their manufacturer. Tire warranty
information can be found on the Owner Information CD or at owners.honda.com
(U.S.) or myhonda.ca (Canada). Learn about all available voice commands to help you operate the vehicle\
. Available
on vehicles with navigation.
Press the Talk button before you say a command. To view a list of available
commands in the vehicle, say “Voice help.” Select a category to hear the commands
read aloud. General Commands
The system accepts these commands on any screen.
Navigation CommandsThe system accepts these commands on the map/guidance screen.
General Commands
•
Display map
•
Display navigation
•
Go home 1 (or 2)
Map Display Commands
•
Voice help
•
Display menu
•
Display setting
•
Display navigation
•
Display information •
Display audio
•
Display phone
•
Back/Cancel
•
What is today’s date?
•
What time is it?
•
Display current location
•
Display/Hide (specify icon type):
− AT M
− gas station
− restaurant
− post office
− grocery store
− lodging (hotel, motel)
− parking garage
− parking lot
− school
− hospital
− freeway exit information
− traffic*
− traffic speeds*
− traffic icons*
•
Display north up
•
Display heading up
•
Display 3D map
•
Display zoom in
•
Display zoom out
VOICE COMMAND INDEX
*U.S. models only
EPA Contact Information
An owner may obtain further information
concerning emission warranties or report
violations of the terms of the emission
warranties by contacting: U.S. Environmental Protection Agency
Office of Transportation and Air Quality
Compliance Division,
Light-Duty Vehicles Group
Attn: Warranty Complaints
2000 Traverwood Drive
Ann Arbor, MI 48105
Email: [email protected]