air HONDA HR-V 2017 2.G Owner's Guide
[x] Cancel search | Manufacturer: HONDA, Model Year: 2017, Model line: HR-V, Model: HONDA HR-V 2017 2.GPages: 489, PDF Size: 29.22 MB
Page 59 of 489

uuChild Safety uProtecting Child Passengers
58
Safe Driving
• Any child who is too small to wear a seat belt correctly must be restrained in an
approved child seat that is properly secu red to the vehicle using either the seat
belt or the lower anchor s of the LATCH system.
• Never hold a child on your lap because it is impossible to protect them in the
event of a collision.
• Never put a seat belt over yourself and a child. During a crash, the belt would
likely press deep into the child an d cause serious or fatal injuries.
• Never let two children use the same seat belt. Both children could be very
seriously injured in a crash.
• Do not allow children to operate the doors, windows or seat adjustments.
• Do not leave children in the vehicle unattended, especially in hot weather when
the inside of the vehicle can get hot enough to kill them. They could also activate
vehicle controls causing it to move unexpectedly.1 Protecting Child Passengers
To deactivate a lockable retractor, release the buckle
and allow the seat belt to wind up all the way.
To remind you of the pa ssenger’s front airbag
hazards and child safety, your vehicle has warning
labels on the dashboard (U.S. models) and on the
front visors. Please read and follow the instructions
on these labels. 2 Safety Labels P. 70
3WARNING
Allowing a child to play with a seat belt or
wrap one around their neck can result in
serious injury or death.
Instruct children not to play with any seat
belt and make sure any unused seat belt a
child can reach is buckled, fully retracted,
and locked.
17 HR-V HDMC-31T7A6100.book 58 ページ 2016年7月20日 水曜日 午前9時50分
Page 60 of 489
59
uuChild Safety uSafety of Infants and Small Children
Continued
Safe Driving
Safety of Infants and Small Children
An infant must be properly restrained in a rear-facing, reclining child seat until the
infant reaches the seat manufacturer’s weig ht or height limit for the seat, and the
infant is at least one year old. Many ex perts recommend use of a rear-facing seat for
a child up to two years old if the child’s he ight and weight are appropriate for a rear-
facing seat.
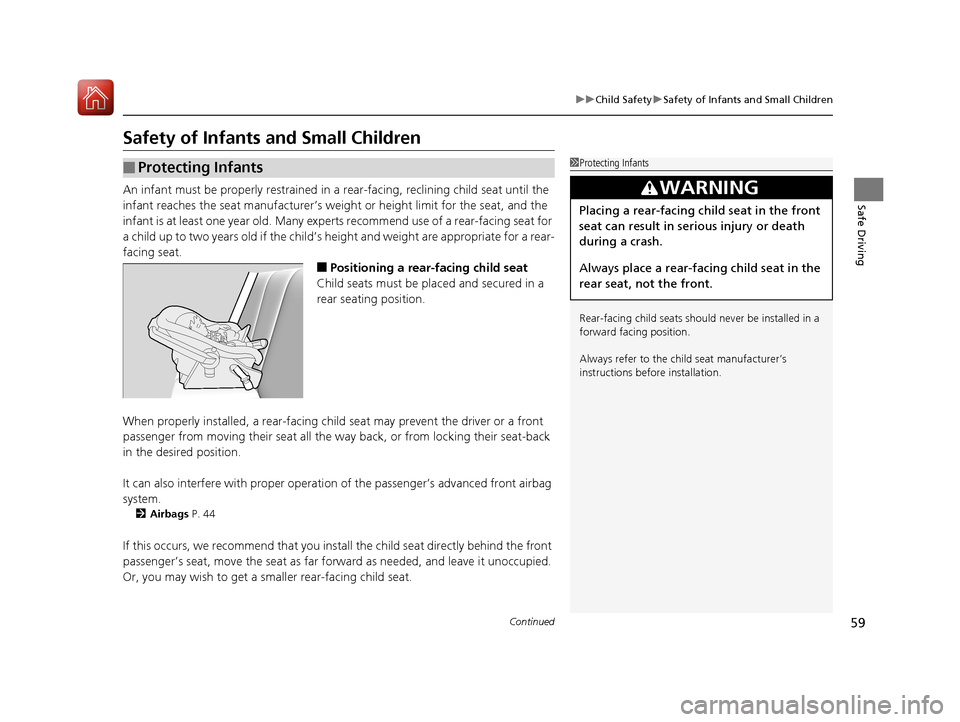
■Positioning a rear-facing child seat
Child seats must be placed and secured in a
rear seating position.
When properly installed, a rear-facing child seat may prevent the driver or a front
passenger from moving their seat all the wa y back, or from locking their seat-back
in the desired position.
It can also interfere with proper operation of the passenger’s advanced front airbag
system.
2 Airbags P. 44
If this occurs, we recommend that you insta ll the child seat directly behind the front
passenger’s seat, move the seat as far fo rward as needed, and leave it unoccupied.
Or, you may wish to get a smaller rear-facing child seat.
■Protecting Infants1 Protecting Infants
Rear-facing child seats should never be installed in a
forward facing position.
Always refer to the child seat manufacturer’s
instructions before installation.
3WARNING
Placing a rear-facing child seat in the front
seat can result in serious injury or death
during a crash.
Always place a rear-fac ing child seat in the
rear seat, not the front.
17 HR-V HDMC-31T7A6100.book 59 ページ 2016年7月20日 水曜日 午前9時50分
Page 61 of 489

uuChild Safety uSafety of Infants and Small Children
60
Safe DrivingIf a child is at least one year old and has exceeded the weight an d height limitations
of a rearward facing child seat, the child should be properly restrained in a firmly
secured forward facing child seat until they exceed the weight and height limitations
for the forward facing child seat.
■Forward-facing child seat placement
We strongly recommend placing a forward-
facing child seat in a rear seating position.
Placing a forward-facing child seat in the front seat can be hazardous, even with
advanced front airbags that automatically turn the passenger’s front airbag off. A
rear seat is the safest place for a child.
■Protecting Smaller Children1 Protecting Smaller Children
Educate yourself about th e laws and regulations
regarding child seat use wh ere you are driving, and
follow the child seat manufacturer’s instructions.
Many experts recommend us e of a rear-facing seat
for a child up to two years old if the child’s height and
weight are appropriate for a rear-facing seat.
3WARNING
Placing a forward-facing child seat in the
front seat can result in serious injury or
death if the front airbag inflates.
If you must place a forward-facing child
seat in front, move the vehicle seat as far
back as possible, and properly restrain the
child.
17 HR-V HDMC-31T7A6100.book 60 ページ 2016年7月20日 水曜日 午前9時50分
Page 68 of 489
67
uuChild Safety uSafety of Larger Children
Continued
Safe Driving
Safety of Larger Children
The following pages give instructions on ho w to check proper seat belt fit, what kind
of booster seat to use if one is needed, and important precautions for a child who
must sit in front.
When a child is too big for a child seat, secure the child in a rear seat using the lap/
shoulder seat belt. Have the child sit upri ght and all the way back, then answer the
following questions.
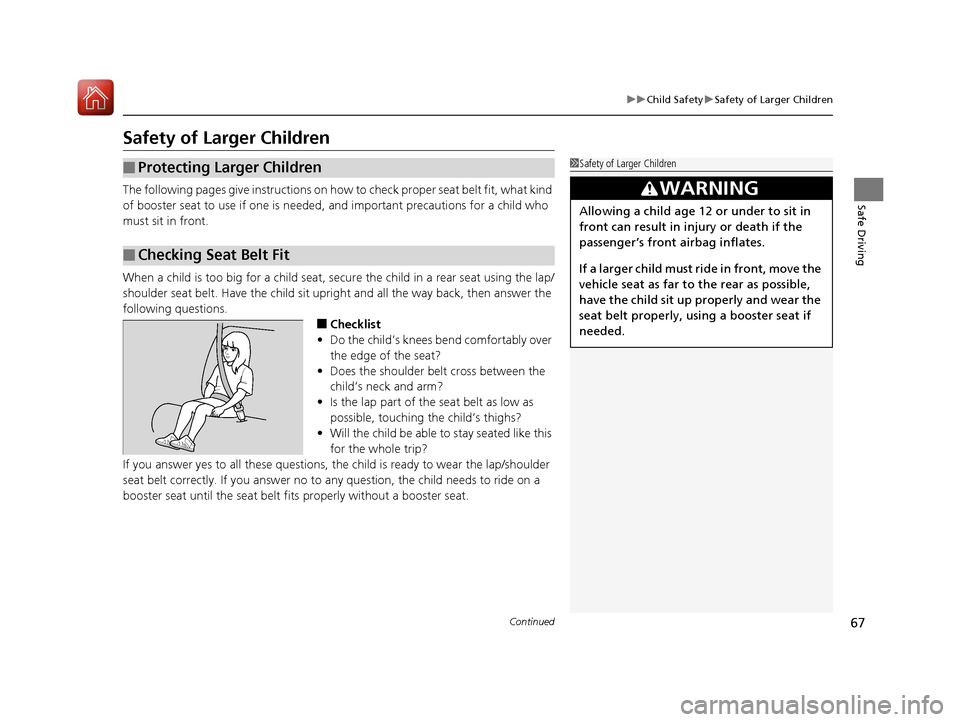
■Checklist
• Do the child’s knees bend comfortably over
the edge of the seat?
• Does the shoulder belt cross between the
child’s neck and arm?
• Is the lap part of the seat belt as low as
possible, touching the child’s thighs?
• Will the child be able to stay seated like this
for the whole trip?
If you answer yes to all these questions, th e child is ready to wear the lap/shoulder
seat belt correctly. If you answer no to any question, the child needs to ride on a
booster seat until the seat belt fits properly without a booster seat.
■Protecting Larger Children
■Checking Seat Belt Fit
1 Safety of Larger Children
3WARNING
Allowing a child age 12 or under to sit in
front can result in injury or death if the
passenger’s front airbag inflates.
If a larger child must ri de in front, move the
vehicle seat as far to the rear as possible,
have the child sit up properly and wear the
seat belt properly, using a booster seat if
needed.
17 HR-V HDMC-31T7A6100.book 67 ページ 2016年7月20日 水曜日 午前9時50分
Page 70 of 489

69
Safe Driving
Exhaust Gas Hazard
Carbon Monoxide Gas
The engine exhaust from this vehicle contains carbon monoxide, a colorless,
odorless, and highly toxic gas. As long as you properly maintain your vehicle, carbon
monoxide gas will not get into the interior.
■Have the exhaust system in spected for leaks whenever
• The exhaust system is making an unusual noise.
• The exhaust system may have been damaged.
• The vehicle is raised for an oil change.
When you operate a vehicle with the tailga te open, airflow can pull exhaust gas into
the interior and create a hazardous conditio n. If you must drive with the tailgate
open, open all the windows and set the heating and cooling system
*/climate control
system* as shown below.
1. Select the fresh air mode.
2. Select the mode.
3. Set the fan speed to high.
4. Set the temperature control to a comfortable setting.
Adjust the heating and cooling system
*/climate control system* in the same manner
if you sit in your parked vehicle with the engine running.
1 Carbon Monoxide Gas
An enclosed area such as a garage can quickly fill up
with carbon monoxide gas.
Do not run the engine with the garage door closed.
Even when the garage door is open, drive out of the
garage immediat ely after starting the engine.
3WARNING
Carbon monoxide gas is toxic.
Breathing it can cause unconsciousness and
even kill you.
Avoid any enclosed areas or activities that
expose you to carbon monoxide.
* Not available on all models
17 HR-V HDMC-31T7A6100.book 69 ページ 2016年7月20日 水曜日 午前9時50分
Page 78 of 489
77
uuIndicators u
Continued
Instrument Panel
*1:Models with the smart entry system have an ENGINE START/STOP button instead of an ignition switch.
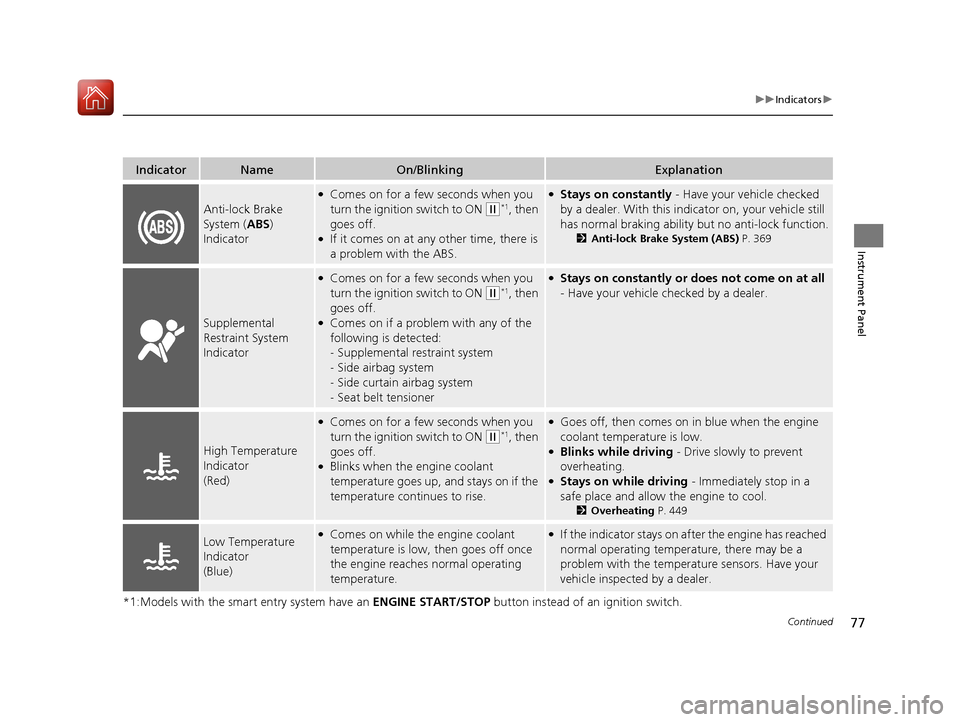
IndicatorNameOn/BlinkingExplanation
Anti-lock Brake
System (ABS)
Indicator
●Comes on for a few seconds when you
turn the ignition switch to ON
(w*1, then
goes off.
●If it comes on at any other time, there is
a problem with the ABS.
●Stays on constantly - Have your vehicle checked
by a dealer. With this indicator on, your vehicle still
has normal braking ability but no anti-lock function.
2 Anti-lock Brake System (ABS) P. 369
Supplemental
Restraint System
Indicator
●Comes on for a few seconds when you
turn the ignition switch to ON
(w*1, then
goes off.
●Comes on if a problem with any of the
following is detected:
- Supplemental restraint system
- Side airbag system
- Side curtain airbag system
- Seat belt tensioner
●Stays on constantly or does not come on at all
- Have your vehicle checked by a dealer.
High Temperature
Indicator
(Red)
●Comes on for a few seconds when you
turn the ignition switch to ON
(w*1, then
goes off.
●Blinks when the engine coolant
temperature goes up, and stays on if the
temperature continues to rise.
●Goes off, then comes on in blue when the engine
coolant temperature is low.
●Blinks while driving - Drive slowly to prevent
overheating.
●Stays on while driving - Immediately stop in a
safe place and allow the engine to cool.
2 Overheating P. 449
Low Temperature
Indicator
(Blue)●Comes on while the engine coolant
temperature is low, then goes off once
the engine reaches normal operating
temperature.●If the indicator stays on after the engine has reached
normal operating temperature, there may be a
problem with the temperature sensors. Have your
vehicle inspected by a dealer.
17 HR-V HDMC-31T7A6100.book 77 ページ 2016年7月20日 水曜日 午前9時50分
Page 80 of 489

79
uuIndicators u
Continued
Instrument Panel
*1:Models with the smart entry system have an ENGINE START/STOP button instead of an ignition switch.
IndicatorNameOn/BlinkingExplanation
Low Tire Pressure/
TPMS Indicator
●Comes on for a few seconds when you
turn the ignition switch to ON
(w*1, then
goes off.
●May come on briefly if the ignition switch
is turned to ON
(w*1 and the vehicle is
not moved within 45 seconds, to indicate
the calibration process is not yet
complete.
●Comes on and stays on when:
- One or more tires’ pressures are
determined to be significantly low.
- The system has not been calibrated.
●Comes on while driving - Stop in a safe place,
check tire pressures, and inflate the tire(s) if
necessary.
●Stays on after the tires are inflated to the
recommended pressures - The system needs to be
calibrated.
2 TPMS Calibration P. 359
●Blinks for about one minute, and then
stays on if there is a problem with the
TPMS, or when a compact spare tire is
temporarily installed.●Blinks and remains on - Have your vehicle
checked by a dealer. If th e vehicle is fitted with a
compact spare, get your regular tire repaired or
replaced and put back on your vehicle as soon as
you can.
Smart Entry System
Indicator*
●Comes on for a few seconds when you
set the power mode to ON, then goes
off.
●Comes on as soon as a problem is
detected in the smart entry system or
push button starting system.
●Stays on constantly or does not come on at all
- Have your vehicle checked by a dealer.
U.S.
models
only
* Not available on all models
17 HR-V HDMC-31T7A6100.book 79 ページ 2016年7月20日 水曜日 午前9時50分
Page 141 of 489
140
Controls
Adjusting the Seats
Front Seats
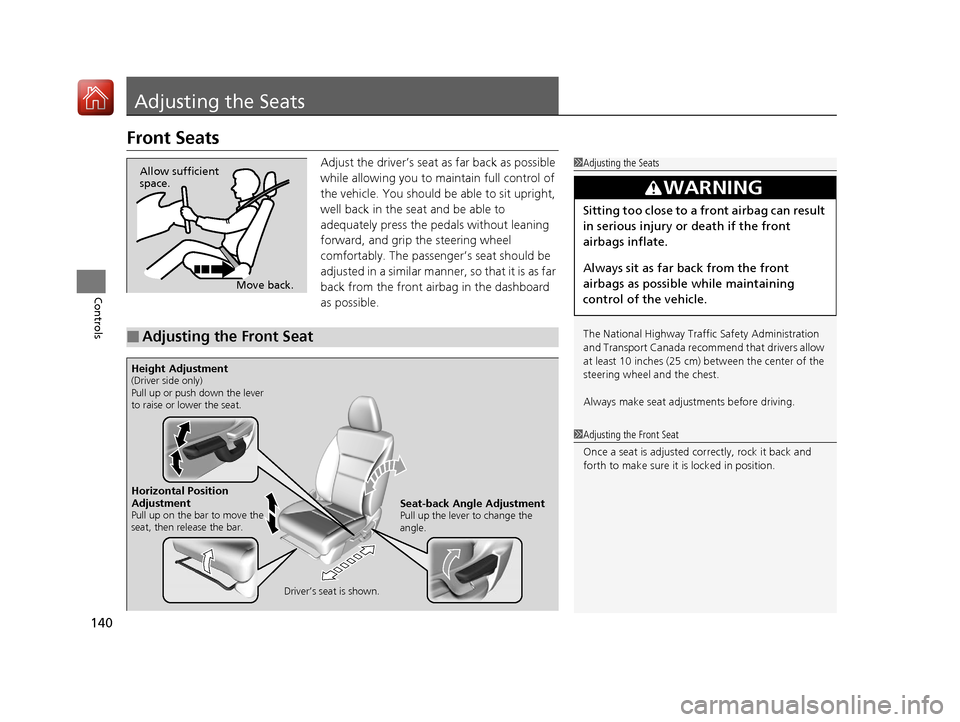
Adjust the driver’s seat as far back as possible
while allowing you to maintain full control of
the vehicle. You should be able to sit upright,
well back in the seat and be able to
adequately press the pedals without leaning
forward, and grip the steering wheel
comfortably. The passenger’s seat should be
adjusted in a similar manner, so that it is as far
back from the front airbag in the dashboard
as possible.1Adjusting the Seats
The National Highway Traffic Safety Administration
and Transport Cana da recommend that drivers allow
at least 10 inches (25 cm) between the center of the
steering wheel and the chest.
Always make seat adjustments before driving.
3WARNING
Sitting too close to a front airbag can result
in serious injury or death if the front
airbags inflate.
Always sit as far back from the front
airbags as possible while maintaining
control of the vehicle.
Move back.
Allow sufficient
space.
■Adjusting the Front Seat
1
Adjusting the Front Seat
Once a seat is adjusted co rrectly, rock it back and
forth to make sure it is locked in position.
Horizontal Position
Adjustment
Pull up on the bar to move the
seat, then release the bar.
Driver’s seat is shown.Seat-back Angle AdjustmentPull up the lever to change the
angle.
Height Adjustment(Driver side only)
Pull up or push down the lever
to raise or lower the seat.
17 HR-V HDMC-31T7A6100.book 140 ページ 2016年7月20日 水曜日 午前9時50分
Page 142 of 489
141
uuAdjusting the Seats uFront Seats
Controls
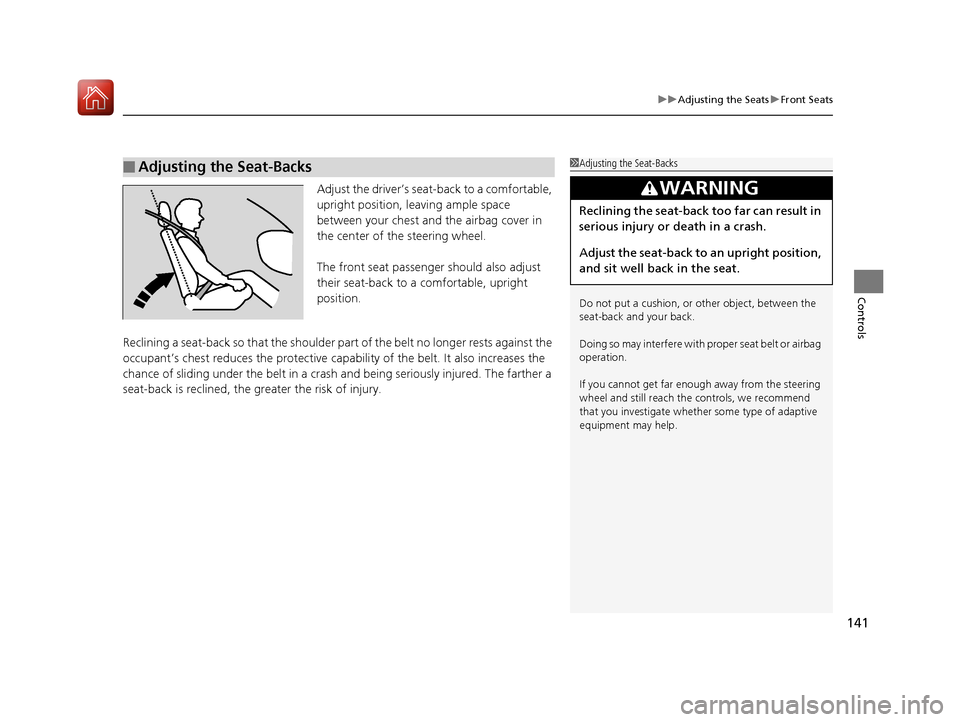
Adjust the driver’s seat -back to a comfortable,
upright position, leaving ample space
between your chest and the airbag cover in
the center of the steering wheel.
The front seat passenger should also adjust
their seat-back to a comfortable, upright
position.
Reclining a seat-back so that the shoulder part of the belt no longer rests against the
occupant’s chest reduces the protective capa bility of the belt. It also increases the
chance of sliding under the belt in a crash and being seriously injured. The farther a
seat-back is reclined, the gr eater the risk of injury.
■Adjusting the Seat-Backs1Adjusting the Seat-Backs
Do not put a cushion, or other object, between the
seat-back and your back.
Doing so may interfere with proper seat belt or airbag
operation.
If you cannot get far e nough away from the steering
wheel and still reach th e controls, we recommend
that you investigate whether some type of adaptive
equipment may help.
3WARNING
Reclining the seat-back too far can result in
serious injury or death in a crash.
Adjust the seat-back to an upright position,
and sit well back in the seat.
17 HR-V HDMC-31T7A6100.book 141 ページ 2016年7月20日 水曜日 午前9時50分
Page 145 of 489
uuAdjusting the Seats uHead Restraints
144
Controls
Head restraints can be removed for cleaning or repair.
To remove a head restraint:
Pull the restraint up as far as it will go. Then push the release button, and pull the
restraint up and out.
To reinstall a head restraint:
Insert the legs back in place, then adjust the head restraint to an appropriate height
while pressing the release button. Pull up on the restraint to make sure it is locked
in position.
■Removing and Reinstalling the Head Restraints1Removing and Reinstalling the Head Restraints
To remove and install the rear outer head restraint,
recline the seat-back slightly forward as the space
between the ceili ng and the seat-back is limited.
3WARNING
Failure to reinstall, or correctly reinstall, the
head restraints can result in severe injury
during a crash.
Always replace the he ad restraints before
driving.
17 HR-V HDMC-31T7A6100.book 144 ページ 2016年7月20日 水曜日 午前9時50分