ECU HONDA HR-V 2018 (in English) User Guide
[x] Cancel search | Manufacturer: HONDA, Model Year: 2018, Model line: HR-V, Model: HONDA HR-V 2018Pages: 503, PDF Size: 32.79 MB
Page 64 of 503
uuChild Safety uSafety of Infants and Small Children
62
Safe DrivingA LATCH-compatible child seat can be installe d in either of the two outer rear seats.
A child seat is attached to the lower anchors with either the rigid or flexible type of
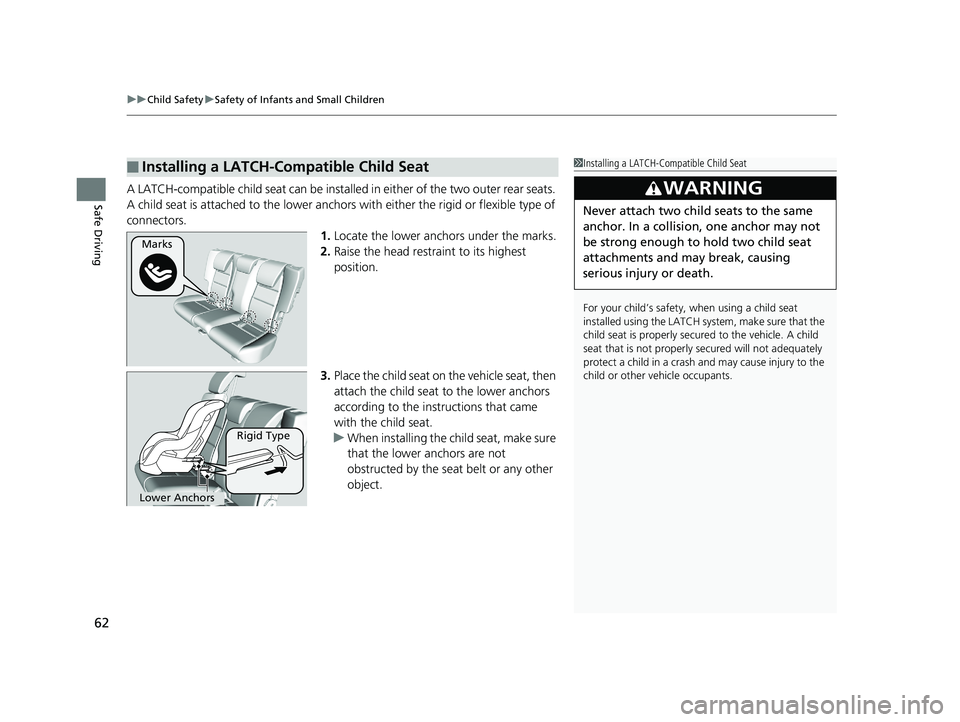
connectors. 1.Locate the lower anchors under the marks.
2. Raise the head restraint to its highest
position.
3. Place the child seat on the vehicle seat, then
attach the child seat to the lower anchors
according to the instructions that came
with the child seat.
u When installing the child seat, make sure
that the lower anchors are not
obstructed by the seat belt or any other
object.
■Installing a LATCH-Compatible Child Seat1Installing a LATCH-Compatible Child Seat
For your child’s safety, when using a child seat
installed using the LATCH system, make sure that the
child seat is properly secured to the vehicle. A child
seat that is not properly secured will not adequately
protect a child in a crash and may cause injury to the
child or other vehicle occupants.
3WARNING
Never attach two child seats to the same
anchor. In a collision, one anchor may not
be strong enough to hold two child seat
attachments and may break, causing
serious injury or death.
Marks
Rigid Type
Lower Anchors
18 HR-V-31T7A6200.book 62 ページ 2017年6月30日 金曜日 午後1時23分
Page 65 of 503
Continued63
uuChild Safety uSafety of Infants and Small Children
Safe Driving
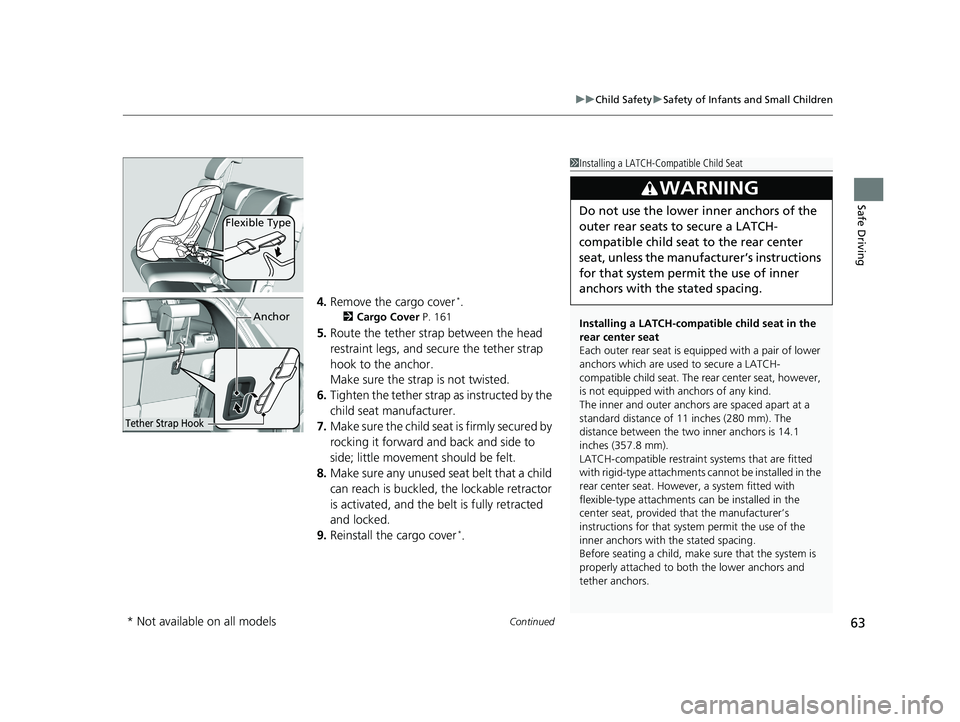
4. Remove the cargo cover*.
2 Cargo Cover P. 161
5.Route the tether strap between the head
restraint legs, and secure the tether strap
hook to the anchor.
Make sure the strap is not twisted.
6. Tighten the tether strap as instructed by the
child seat manufacturer.
7. Make sure the child seat is firmly secured by
rocking it forward and back and side to
side; little movement should be felt.
8. Make sure any unused seat belt that a child
can reach is buckled, the lockable retractor
is activated, and the be lt is fully retracted
and locked.
9. Reinstall the cargo cover
*.
Flexible Type
1Installing a LATCH-Compatible Child Seat
Installing a LATCH-compatible child seat in the
rear center seat
Each outer rear seat is equi pped with a pair of lower
anchors which are used to secure a LATCH-
compatible child seat. The rear center seat, however,
is not equipped with anchors of any kind.
The inner and outer anchors are spaced apart at a
standard distance of 11 inches (280 mm). The
distance between the two inner anchors is 14.1
inches (357.8 mm).
LATCH-compatible restraint systems that are fitted
with rigid-type attachments cannot be installed in the
rear center seat. However, a system fitted with
flexible-type attachments can be installed in the
center seat, provided that the manufacturer’s
instructions for that system permit the use of the
inner anchors with the stated spacing.
Before seating a child, make sure that the system is
properly attached to both the lower anchors and
tether anchors.
3WARNING
Do not use the lower inner anchors of the
outer rear seats to secure a LATCH-
compatible child seat to the rear center
seat, unless the manufacturer’s instructions
for that system permit the use of inner
anchors with the stated spacing.
Anchor
Tether Strap Hook
* Not available on all models
18 HR-V-31T7A6200.book 63 ページ 2017年6月30日 金曜日 午後1時23分
Page 66 of 503
uuChild Safety uSafety of Infants and Small Children
64
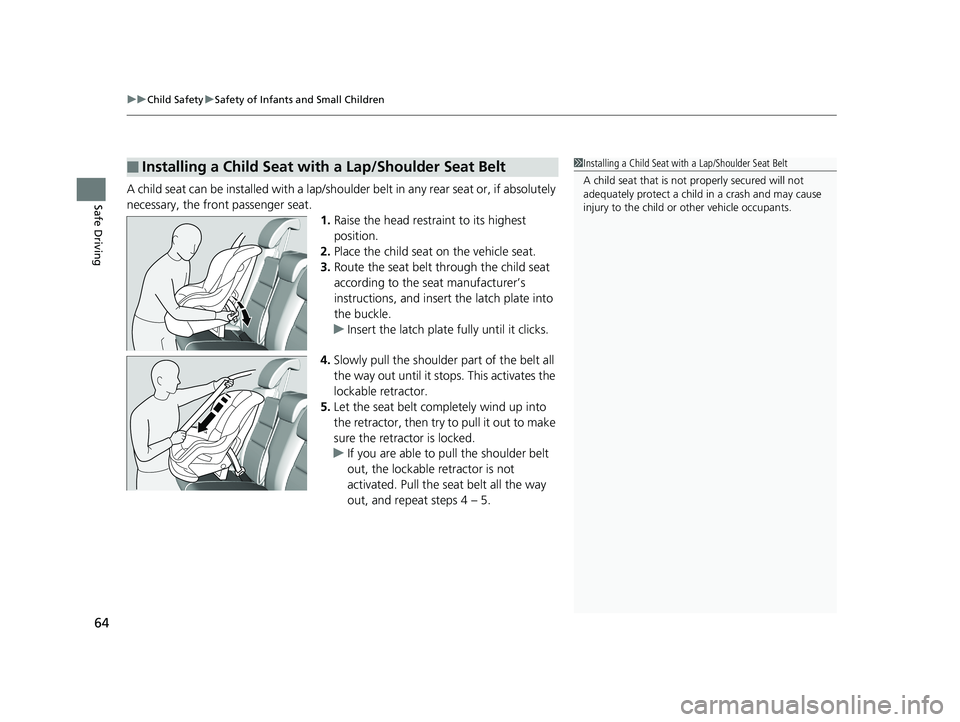
Safe DrivingA child seat can be installed with a lap/should er belt in any rear seat or, if absolutely
necessary, the front passenger seat. 1.Raise the head restraint to its highest
position.
2. Place the child seat on the vehicle seat.
3. Route the seat belt through the child seat
according to the seat manufacturer’s
instructions, and insert the latch plate into
the buckle.
u Insert the latch plate fully until it clicks.
4. Slowly pull the shoulder part of the belt all
the way out until it stops. This activates the
lockable retractor.
5. Let the seat belt completely wind up into
the retractor, then try to pull it out to make
sure the retractor is locked.
u If you are able to pull the shoulder belt
out, the lockable retractor is not
activated. Pull the seat belt all the way
out, and repeat steps 4 – 5.
■Installing a Child Seat with a Lap/Shoulder Seat Belt1Installing a Child Seat with a Lap/Shoulder Seat Belt
A child seat that is not properly secured will not
adequately protect a child in a crash and may cause
injury to the child or other vehicle occupants.
18 HR-V-31T7A6200.book 64 ページ 2017年6月30日 金曜日 午後1時23分
Page 67 of 503
Continued65
uuChild Safety uSafety of Infants and Small Children
Safe Driving
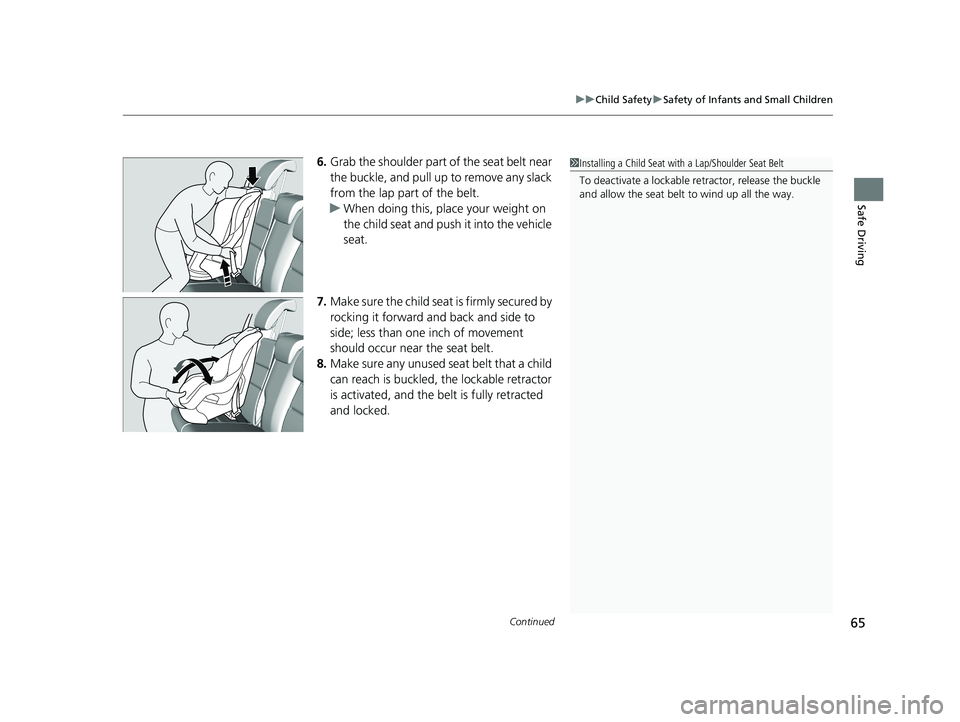
6. Grab the shoulder part of the seat belt near
the buckle, and pull up to remove any slack
from the lap part of the belt.
u When doing this, place your weight on
the child seat and push it into the vehicle
seat.
7. Make sure the child seat is firmly secured by
rocking it forward and back and side to
side; less than one inch of movement
should occur near the seat belt.
8. Make sure any unused seat belt that a child
can reach is buckled, the lockable retractor
is activated, and the be lt is fully retracted
and locked.1 Installing a Child Seat with a Lap/Shoulder Seat Belt
To deactivate a lockable retractor, release the buckle
and allow the seat belt to wind up all the way.
18 HR-V-31T7A6200.book 65 ページ 2017年6月30日 金曜日 午後1時23分
Page 68 of 503
uuChild Safety uSafety of Infants and Small Children
66
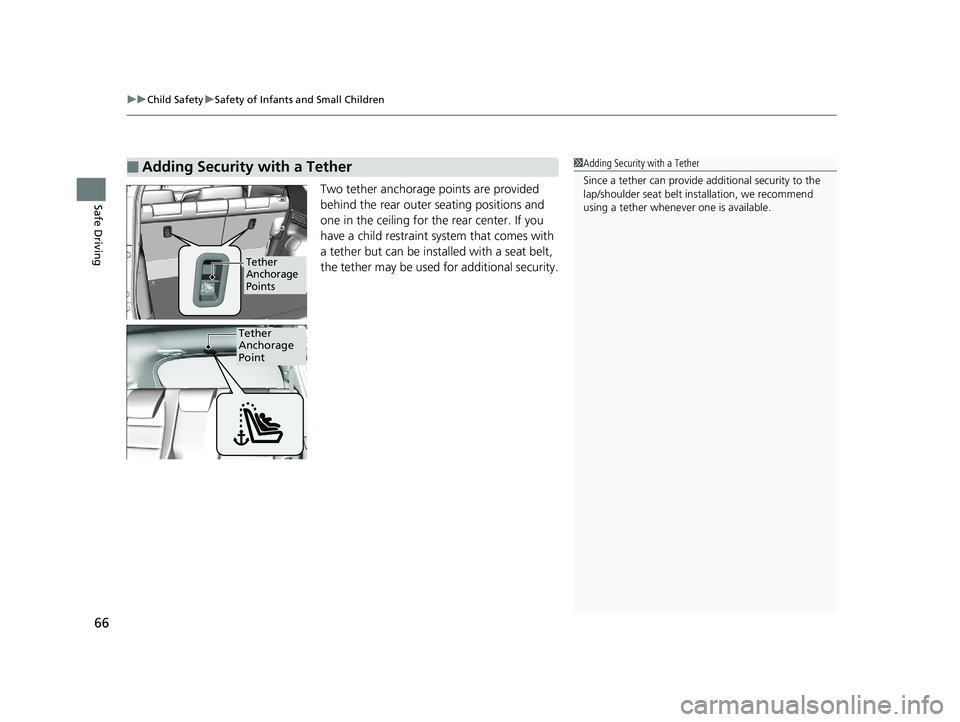
Safe DrivingTwo tether anchorage points are provided
behind the rear outer seating positions and
one in the ceiling for the rear center. If you
have a child restraint system that comes with
a tether but can be installed with a seat belt,
the tether may be used for additional security.
■Adding Security with a Tether1Adding Security with a Tether
Since a tether can provide additional security to the
lap/shoulder seat belt in stallation, we recommend
using a tether whenever one is available.
Tether
Anchorage
Points
Tether
Anchorage
Point
18 HR-V-31T7A6200.book 66 ページ 2017年6月30日 金曜日 午後1時23分
Page 69 of 503
67
uuChild Safety uSafety of Infants and Small Children
Safe Driving
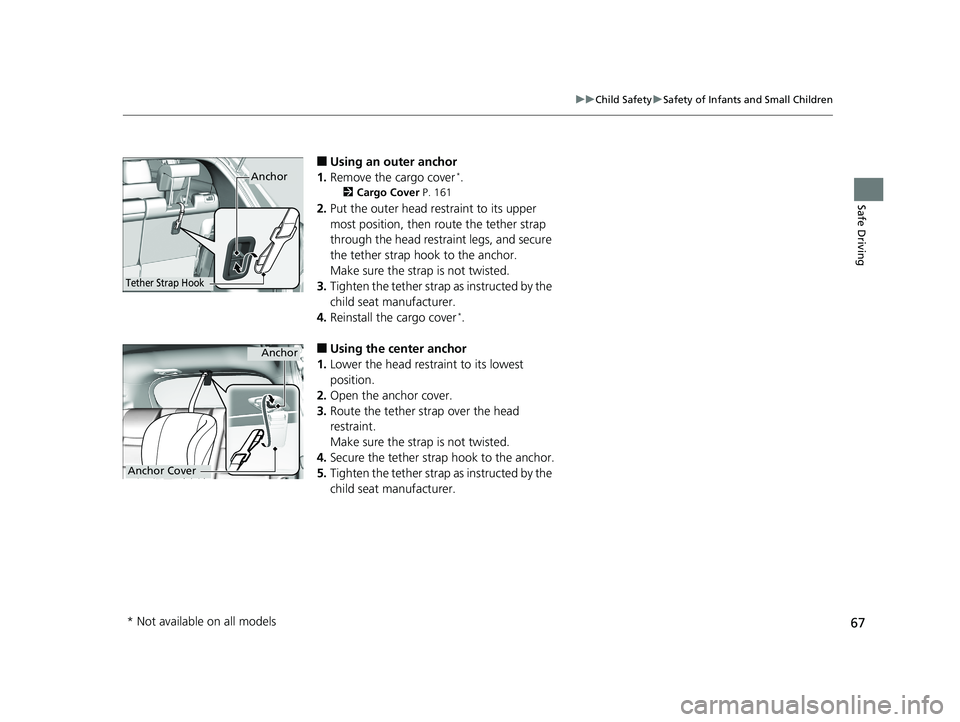
■Using an outer anchor
1. Remove the cargo cover*.
2 Cargo Cover P. 161
2.Put the outer head restraint to its upper
most position, then route the tether strap
through the head restraint legs, and secure
the tether strap hook to the anchor.
Make sure the strap is not twisted.
3. Tighten the tether strap as instructed by the
child seat manufacturer.
4. Reinstall the cargo cover
*.
■Using the center anchor
1. Lower the head restraint to its lowest
position.
2. Open the anchor cover.
3. Route the tether strap over the head
restraint.
Make sure the strap is not twisted.
4. Secure the tether strap hook to the anchor.
5. Tighten the tether strap as instructed by the
child seat manufacturer.
Anchor
Tether Strap Hook
Anchor
Anchor Cover
* Not available on all models
18 HR-V-31T7A6200.book 67 ページ 2017年6月30日 金曜日 午後1時23分
Page 70 of 503
68
uuChild Safety uSafety of Larger Children
Safe Driving
Safety of Larger Children
The following pages give instructions on how to check proper seat belt fit, what kind
of booster seat to use if one is needed, and important precautions for a child who
must sit in front.
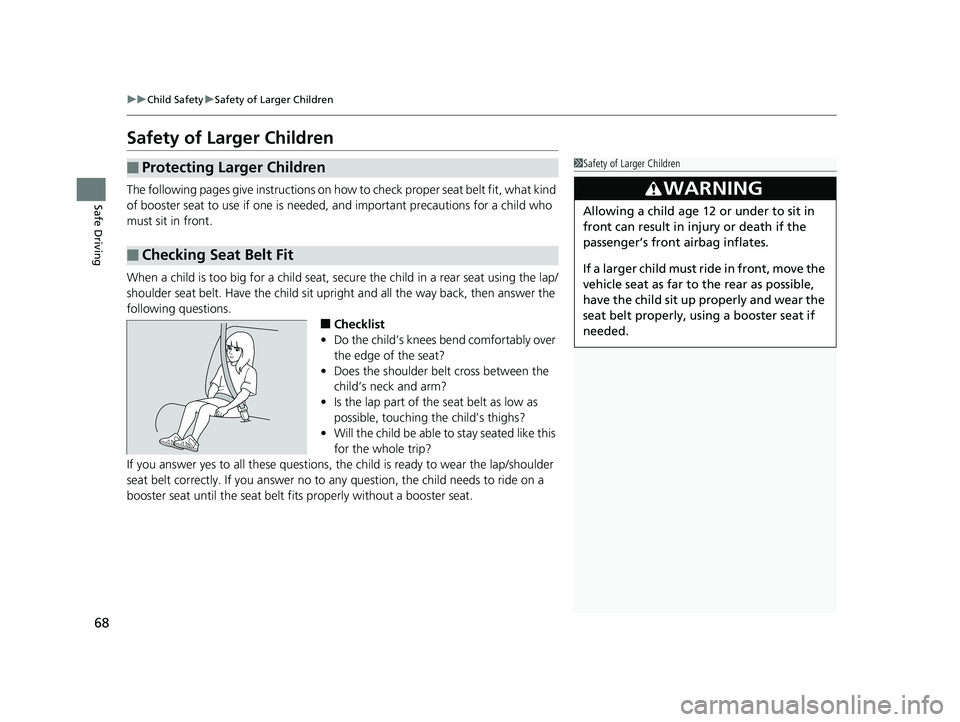
When a child is too big for a child seat, secure the child in a rear seat using the lap/
shoulder seat belt. Have the child sit upright and all the way back, then answer the
following questions.
■Checklist
• Do the child’s knees bend comfortably over
the edge of the seat?
• Does the shoulder belt cross between the
child’s neck and arm?
• Is the lap part of the seat belt as low as
possible, touching the child’s thighs?
• Will the child be able to stay seated like this
for the whole trip?
If you answer yes to all thes e questions, the child is read y to wear the lap/shoulder
seat belt correctly. If you answer no to any question, the child needs to ride on a
booster seat until the seat belt fits properly without a booster seat.
■Protecting Larger Children
■Checking Seat Belt Fit
1 Safety of Larger Children
3WARNING
Allowing a child age 12 or under to sit in
front can result in injury or death if the
passenger’s front airbag inflates.
If a larger child must ri de in front, move the
vehicle seat as far to the rear as possible,
have the child sit up properly and wear the
seat belt properly, using a booster seat if
needed.
18 HR-V-31T7A6200.book 68 ページ 2017年6月30日 金曜日 午後1時23分
Page 71 of 503
69
uuChild Safety uSafety of Larger Children
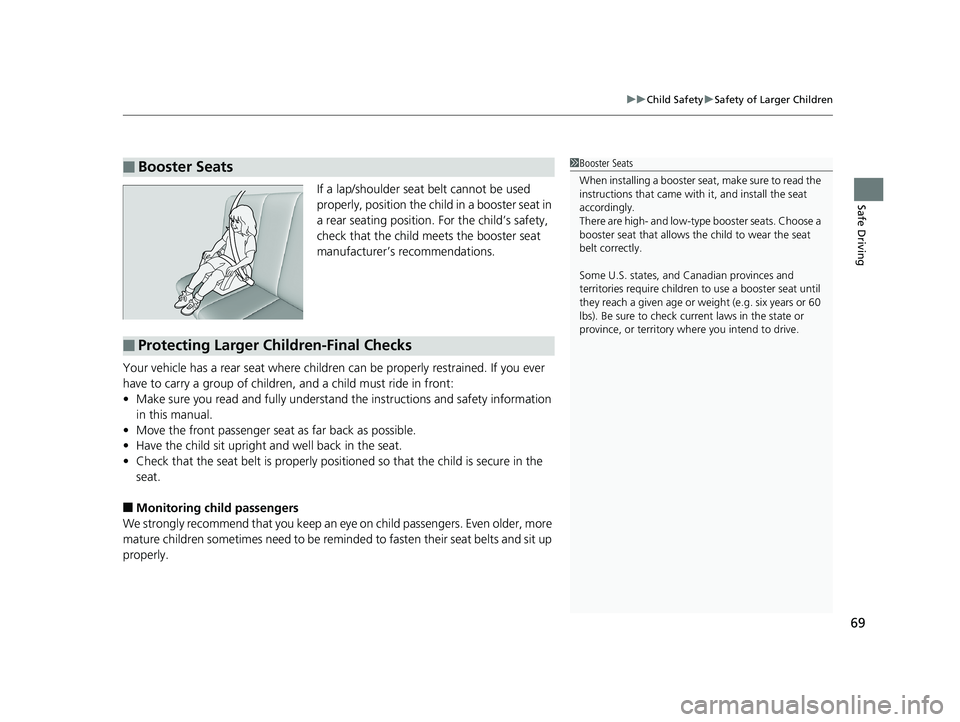
Safe DrivingIf a lap/shoulder seat belt cannot be used
properly, position the child in a booster seat in
a rear seating position. For the child’s safety,
check that the child meets the booster seat
manufacturer’s recommendations.
Your vehicle has a rear seat where children can be properly restrained. If you ever
have to carry a group of children, and a child must ride in front:
• Make sure you read and fully understand the instructions and safety information
in this manual.
• Move the front passenger seat as far back as possible.
• Have the child sit upright and well back in the seat.
• Check that the seat belt is properly positi oned so that the child is secure in the
seat.
■Monitoring child passengers
We strongly recommend that you keep an ey e on child passengers. Even older, more
mature children sometimes need to be remi nded to fasten their seat belts and sit up
properly.
■Booster Seats1 Booster Seats
When installing a booster seat, make sure to read the
instructions that came with it, and install the seat
accordingly.
There are high- and low-type booster seats. Choose a
booster seat that allows the child to wear the seat
belt correctly.
Some U.S. states, and Canadian provinces and
territories require children to use a booster seat until
they reach a given age or we ight (e.g. six years or 60
lbs). Be sure to check current laws in the state or
province, or territory where you intend to drive.
■Protecting Larger Children-Final Checks
18 HR-V-31T7A6200.book 69 ページ 2017年6月30日 金曜日 午後1時23分
Page 86 of 503
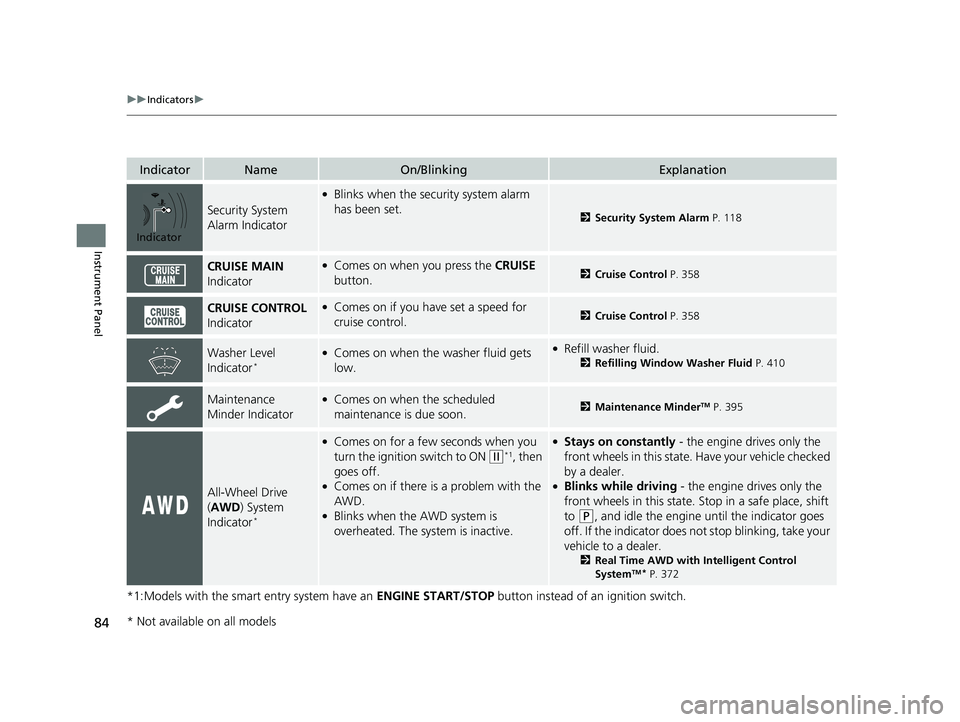
84
uuIndicators u
Instrument Panel
*1:Models with the smart entry system have an ENGINE START/STOP button instead of an ignition switch.
IndicatorNameOn/BlinkingExplanation
Security System
Alarm Indicator
●Blinks when the security system alarm
has been set.
2Security System Alarm P. 118
CRUISE MAIN
Indicator●Comes on when you press the CRUISE
button.2 Cruise Control P. 358
CRUISE CONTROL
Indicator●Comes on if you have set a speed for
cruise control.2 Cruise Control P. 358
Washer Level
Indicator*●Comes on when the washer fluid gets
low.●Refill washer fluid.
2Refilling Window Washer Fluid P. 410
Maintenance
Minder Indicator●Comes on when the scheduled
maintenance is due soon.2Maintenance MinderTM P. 395
All-Wheel Drive
(AWD ) System
Indicator
*
●Comes on for a few seconds when you
turn the ignition switch to ON
(w*1, then
goes off.
●Comes on if there is a problem with the
AWD.
●Blinks when the AWD system is
overheated. The system is inactive.
●Stays on constantly - the engine drives only the
front wheels in this state. Have your vehicle checked
by a dealer.
●Blinks while driving - the engine drives only the
front wheels in this state. Stop in a safe place, shift
to
(P, and idle the engine until the indicator goes
off. If the indicator does not stop blinking, take your
vehicle to a dealer.
2 Real Time AWD with Intelligent Control
SystemTM* P. 372
Indicator
* Not available on all models
18 HR-V-31T7A6200.book 84 ページ 2017年6月30日 金曜日 午後1時23分
Page 97 of 503

95
Controls
This chapter explains how to operate the various controls necessary for driving.
Clock.................................................................... 96
Locking and Unlocking the Doors
Key Types and Functions................................... 98
Low Smart Entry Remote Signal Strength
*...... 100Locking/Unlocking the Doors from the Outside ... 101Locking/Unlocking the Doors from the Inside .. 107
Childproof Door Locks .................................... 110
Auto Door Locking/Unlocking ......................... 111
Customizing the Auto Door Locking/Unlocking Setting ......................................................... 112
Opening and Closing the Tailgate .................. 115
Using the Tailgate Release Button ................... 116
Security System Immobilizer System......................................... 118
Security System Alarm .................................... 118
Opening and Closing the Windows ................ 121
Opening and Closing the Moonroof
*............. 123
Operating the Switches Around the Steering
Wheel
Ignition Switch.......................................... 124
ENGINE START/STOP Button ..................... 125
Ignition Switch and Power Mode Comparison ... 128Turn Signals .............................................. 129
Light Switches .......................................... 129
Fog Lights
*............................................... 132
Daytime Running Lights ............................ 133
Wipers and Washers ................................. 134
Brightness Control .................................... 136
Defogger/Heated Door Mirror*/Heated Windshield*... 137Adjusting the Steering Wheel ................... 139
Models without smart entry system
Models with smart entry system
Adjusting the Mirrors Interior Rearview Mirror.................................. 140
Power Door Mirrors ........................................ 141
Adjusting the Seats Front Seats ..................................................... 142
Head Restraints .............................................. 144
Maintain a Proper Sitting Position ................... 147
Rear Seats ...................................................... 148
Armrest .......................................................... 151
Interior Lights/Interior Convenience Items Interior Lights ................................................. 152
Interior Convenience Items ............................. 154
Heating and Cooling System
*Using Vents, Heating and A/C ........................ 163
Climate Control System*Using Automatic Climate Control ................... 167
Automatic Climate Control Sensors ................ 175
* Not available on all models
18 HR-V-31T7A6200.book 95 ページ 2017年6月30日 金曜日 午後1時23分