clock HONDA HR-V 2018 (in English) Owner's Guide
[x] Cancel search | Manufacturer: HONDA, Model Year: 2018, Model line: HR-V, Model: HONDA HR-V 2018Pages: 503, PDF Size: 32.79 MB
Page 262 of 503
260
uuCustomized Features u
Features
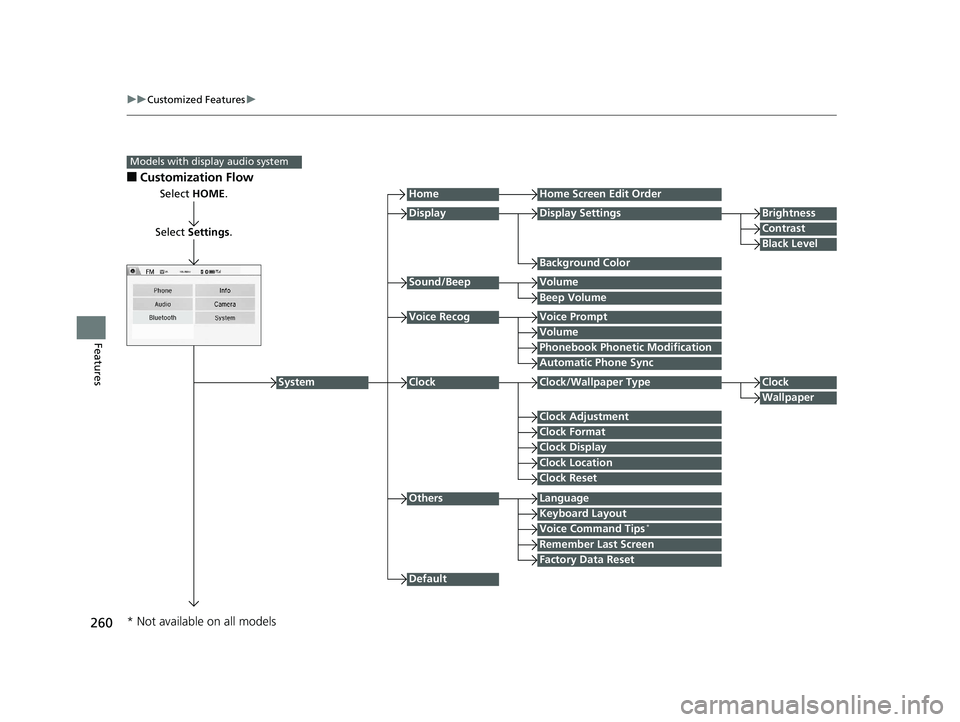
■Customization Flow
Models with display audio system
Select HOME.
Select Settings .
HomeHome Screen Edit Order
Background Color
DisplayDisplay SettingsBrightness
Contrast
Black Level
Beep Volume
Sound/BeepVolume
Volume
Voice RecogVoice Prompt
Automatic Phone Sync
Phonebook Phonetic Modification
Default
Factory Data Reset
Clock Format
ClockClock/Wallpaper TypeClock
Wallpaper
Clock Adjustment
Clock Display
Clock Location
Clock Reset
Keyboard Layout
OthersLanguage
Remember Last Screen
Voice Command Tips*
System
* Not available on all models
18 HR-V-31T7A6200.book 260 ページ 2017年6月30日 金曜日 午後1時23分
Page 264 of 503
262
uuCustomized Features u
Features
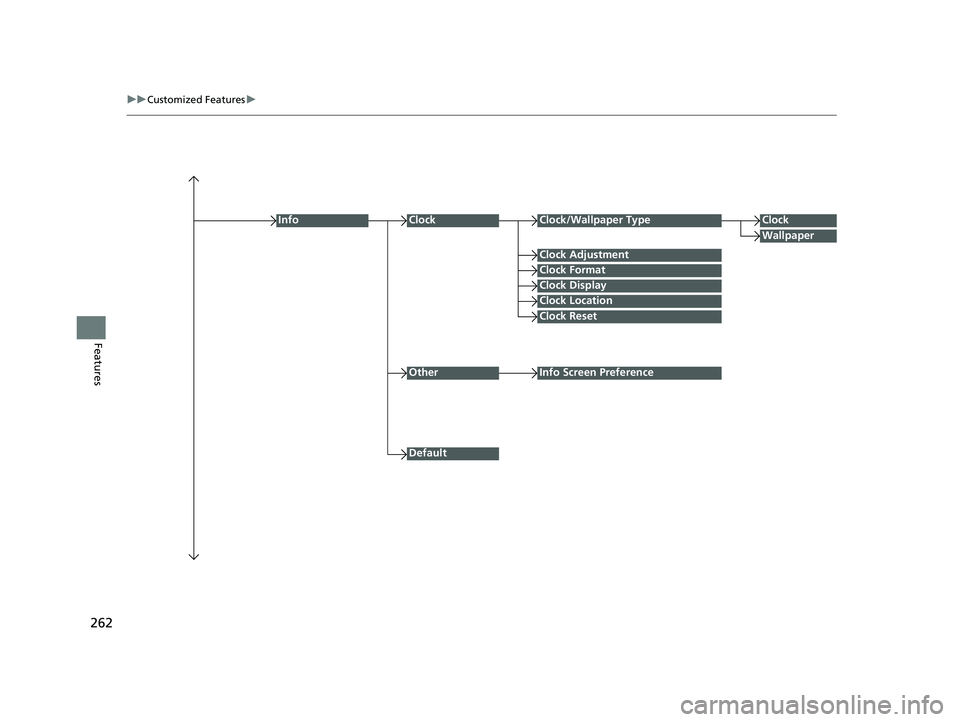
Clock Format
ClockClock/Wallpaper TypeClock
Wallpaper
Clock Adjustment
Clock Display
Clock Location
Clock Reset
Info
Default
OtherInfo Screen Preference
18 HR-V-31T7A6200.book 262 ページ 2017年6月30日 金曜日 午後1時23分
Page 268 of 503
266
uuCustomized Features u
Features
*1:Default Setting
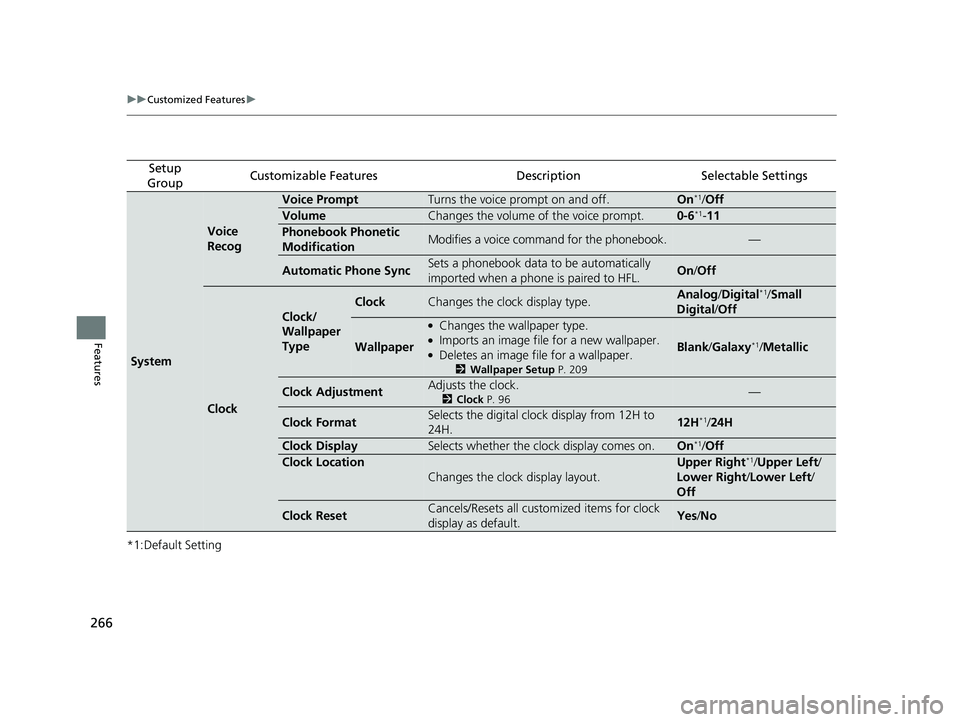
Setup
GroupCustomizable FeaturesDescriptionSelectable Settings
System
Voice
Recog
Voice PromptTurns the voice prompt on and off.On*1/ Off
VolumeChanges the volume of the voice prompt.0-6*1-11
Phonebook Phonetic
ModificationModifies a voice command for the phonebook.—
Automatic Phone SyncSets a phonebook data to be automatically
imported when a phone is paired to HFL.On/Off
Clock
Clock/
Wallpaper
Type
ClockChanges the clock display type.Analog /Digital*1/ Small
Digital /Off
Wallpaper
●Changes the wallpaper type.●Imports an image file for a new wallpaper.●Deletes an image file for a wallpaper.
2 Wallpaper Setup P. 209
Blank/Galaxy*1/Metallic
Clock AdjustmentAdjusts the clock.
2 Clock P. 96—
Clock FormatSelects the digital clock display from 12H to
24H.12H*1/24H
Clock DisplaySelects whether the clock display comes on.On*1/Off
Clock Location
Changes the clock display layout.
Upper Right*1/Upper Left/
Lower Right /Lower Left /
Off
Clock ResetCancels/Resets all customized items for clock
display as default.Yes /No
18 HR-V-31T7A6200.book 266 ページ 2017年6月30日 金曜日 午後1時23分
Page 271 of 503
269
uuCustomized Features u
Continued
Features
*1:Default Setting
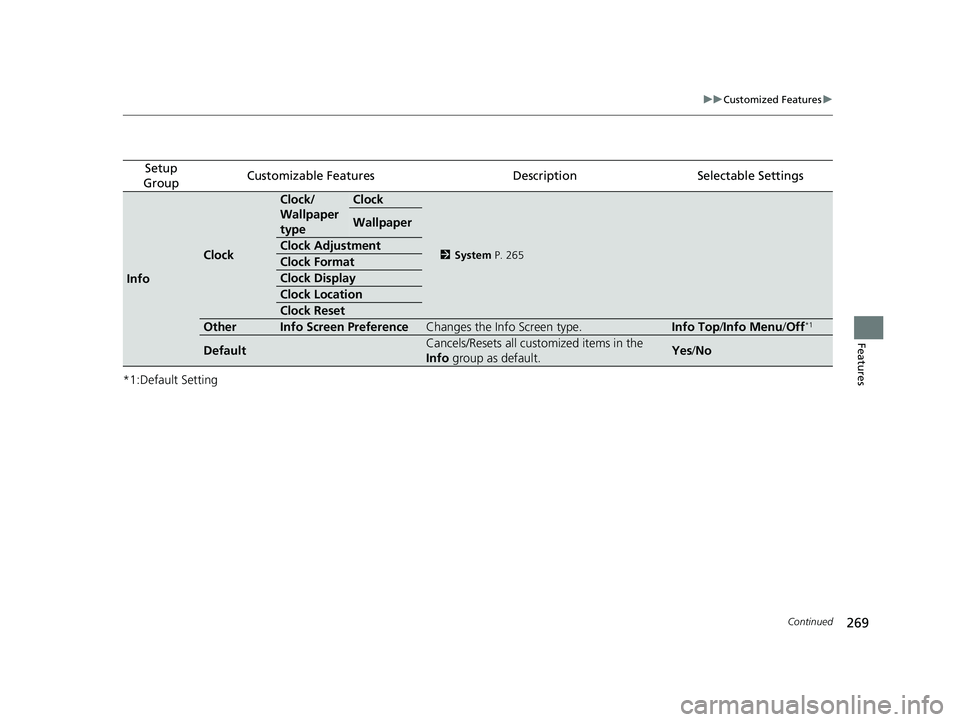
Setup
GroupCustomizable FeaturesDescriptionSelectable Settings
Info
Clock
Clock/
Wallpaper
typeClock
2 System P. 265
Wallpaper
Clock Adjustment
Clock Format
Clock Display
Clock Location
Clock Reset
OtherInfo Screen PreferenceChanges the Info Screen type.Info Top /Info Menu/ Off*1
DefaultCancels/Resets all customized items in the
Info group as default.Yes/No
18 HR-V-31T7A6200.book 269 ページ 2017年6月30日 金曜日 午後1時23分
Page 409 of 503
407
uuMaintenance Under the Hood uEngine Coolant
Maintenance
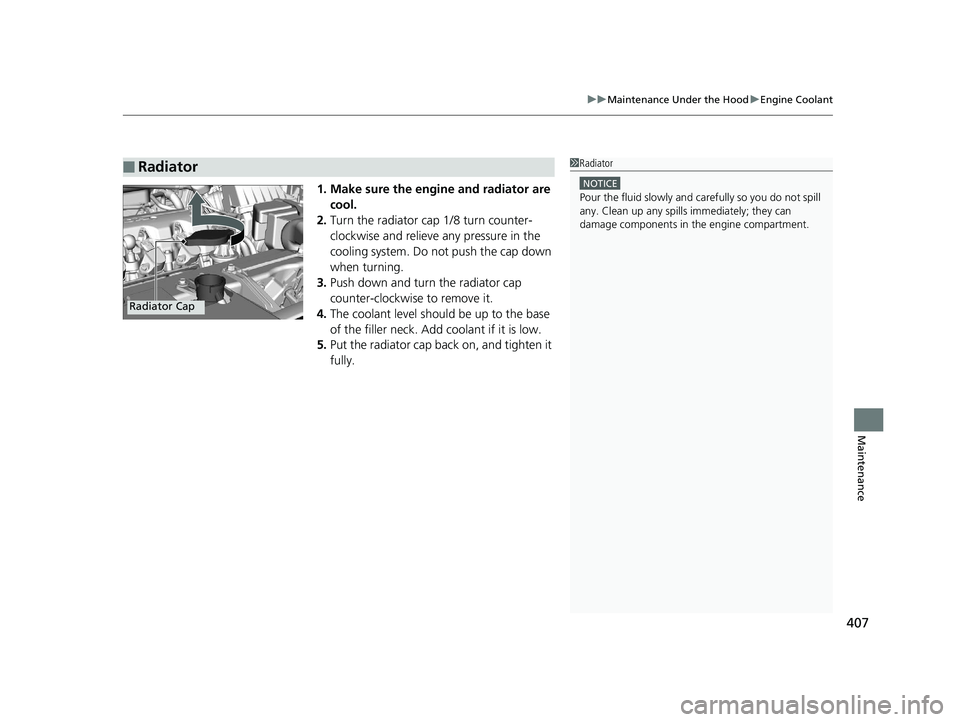
1. Make sure the engine and radiator are
cool.
2. Turn the radiator cap 1/8 turn counter-
clockwise and relieve any pressure in the
cooling system. Do not push the cap down
when turning.
3. Push down and turn the radiator cap
counter-clockwise to remove it.
4. The coolant level should be up to the base
of the filler neck. Add coolant if it is low.
5. Put the radiator cap back on, and tighten it
fully.
■Radiator1Radiator
NOTICE
Pour the fluid slowly and ca refully so you do not spill
any. Clean up any spills immediately; they can
damage components in the engine compartment.
Radiator Cap
18 HR-V-31T7A6200.book 407 ページ 2017年6月30日 金曜日 午後1時23分
Page 414 of 503
412
uuReplacing Light Bulbs uFront Turn Signal/Parking Light Bulbs
Maintenance
Front Turn Signal/Parking Light Bulbs
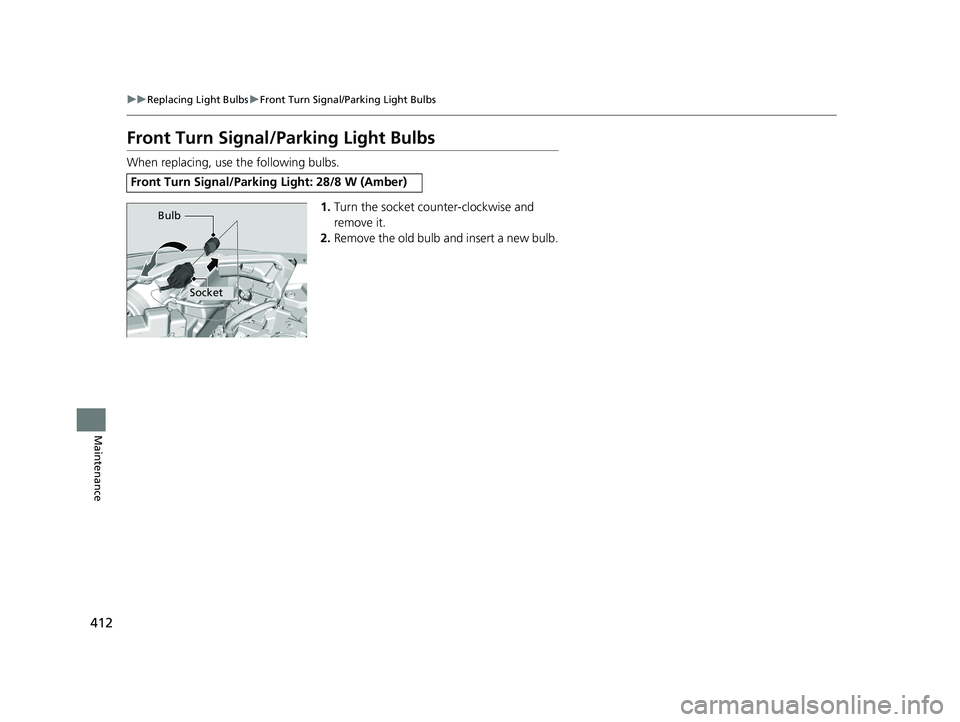
When replacing, use the following bulbs.
1.Turn the socket counter-clockwise and
remove it.
2. Remove the old bulb and insert a new bulb.
Front Turn Signal/Parking Light: 28/8 W (Amber)
Bulb
Socket
18 HR-V-31T7A6200.book 412 ページ 2017年6月30日 金曜日 午後1時23分
Page 415 of 503
413
uuReplacing Light Bulbs uFront Side Marker Light Bulbs
Continued
Maintenance
Front Side Marker Light Bulbs
When replacing, use the following bulbs.
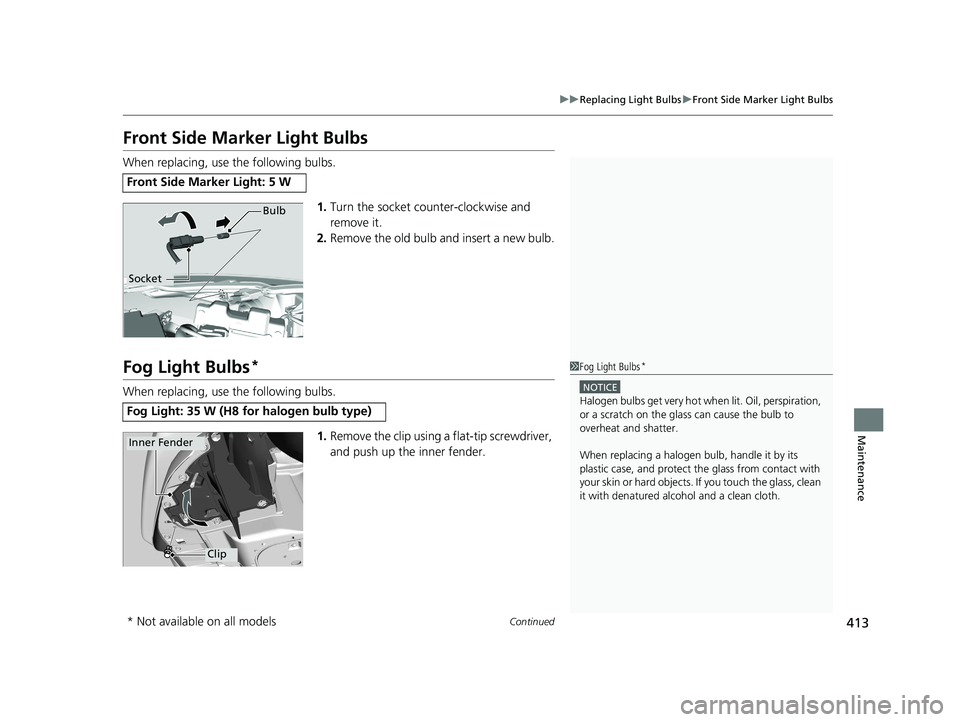
1.Turn the socket counter-clockwise and
remove it.
2. Remove the old bulb and insert a new bulb.
Fog Light Bulbs*
When replacing, use the following bulbs.
1.Remove the clip using a flat-tip screwdriver,
and push up the inner fender.
Front Side Marker Light: 5 W
Bulb
Socket
Fog Light: 35 W (H8 for halogen bulb type)
1 Fog Light Bulbs*
NOTICE
Halogen bulbs get very hot wh en lit. Oil, perspiration,
or a scratch on the glass can cause the bulb to
overheat and shatter.
When replacing a halogen bulb, handle it by its
plastic case, and protect th e glass from contact with
your skin or hard objects. If you touch the glass, clean
it with denatured alc ohol and a clean cloth.
Clip
Inner Fender
* Not available on all models
18 HR-V-31T7A6200.book 413 ページ 2017年6月30日 金曜日 午後1時23分
Page 416 of 503
uuReplacing Light Bulbs uSide Turn Signal/Emergency Indicator Lights*
414
Maintenance
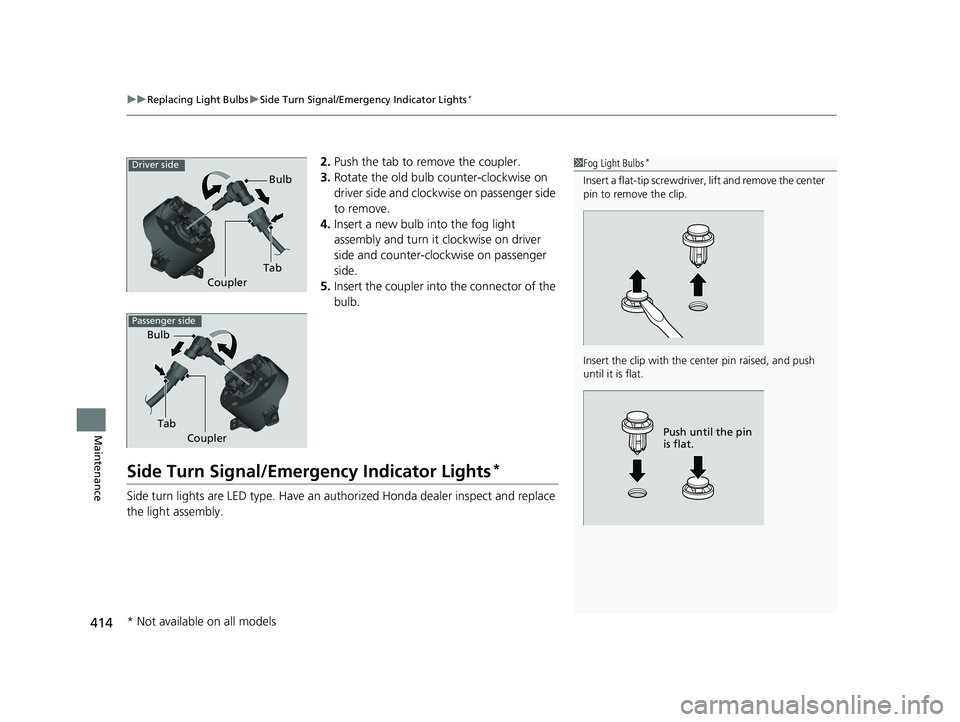
2. Push the tab to remove the coupler.
3. Rotate the old bulb counter-clockwise on
driver side and clockwise on passenger side
to remove.
4. Insert a new bulb into the fog light
assembly and turn it clockwise on driver
side and counter-clockwise on passenger
side.
5. Insert the coupler into the connector of the
bulb.
Side Turn Signal/Emergency Indicator Lights*
Side turn lights are LED type. Have an au thorized Honda dealer inspect and replace
the light assembly.
1 Fog Light Bulbs*
Insert a flat-tip screwdriver, lift and remove the center
pin to remove the clip.
Insert the clip with the center pin raised, and push
until it is flat.
Push until the pin
is flat.
Tab Bulb
Coupler
Driver side
Passenger side
Tab
Bulb
Coupler
* Not available on all models
18 HR-V-31T7A6200.book 414 ページ 2017年6月30日 金曜日 午後1時23分
Page 417 of 503
415
uuReplacing Light Bulbs uRear Turn Signal Light Bulbs
Maintenance
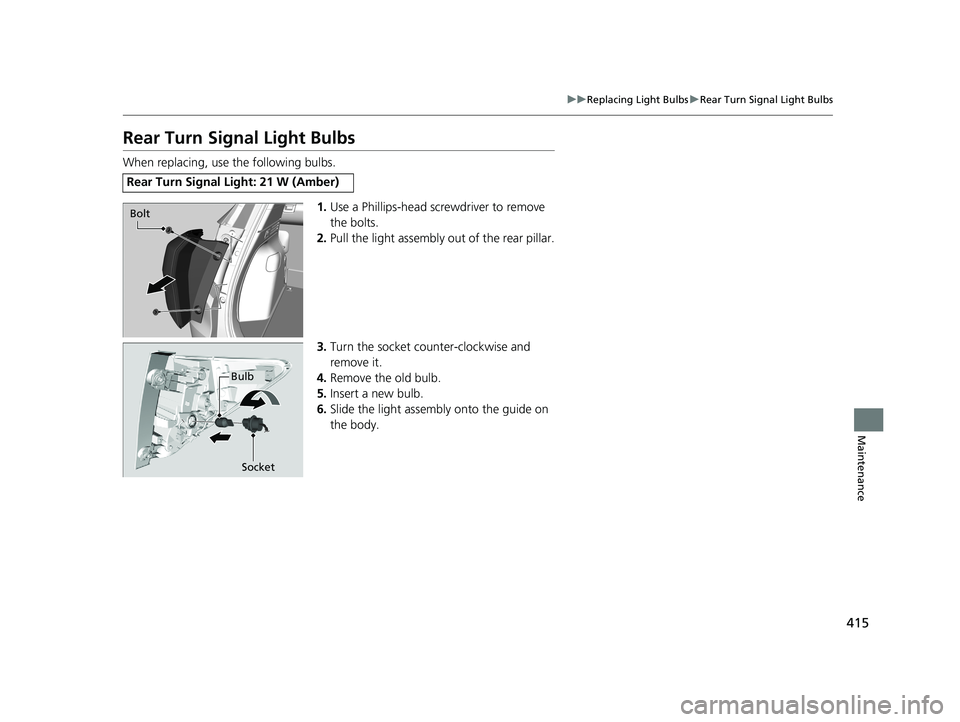
Rear Turn Signal Light Bulbs
When replacing, use the following bulbs.
1.Use a Phillips-head screwdriver to remove
the bolts.
2. Pull the light assembly out of the rear pillar.
3. Turn the socket counter-clockwise and
remove it.
4. Remove the old bulb.
5. Insert a new bulb.
6. Slide the light assembly onto the guide on
the body.
Rear Turn Signal Light: 21 W (Amber)
Bolt
Bulb
Socket
18 HR-V-31T7A6200.book 415 ページ 2017年6月30日 金曜日 午後1時23分
Page 418 of 503
416
uuReplacing Light Bulbs uBack-Up Light Bulbs
Maintenance
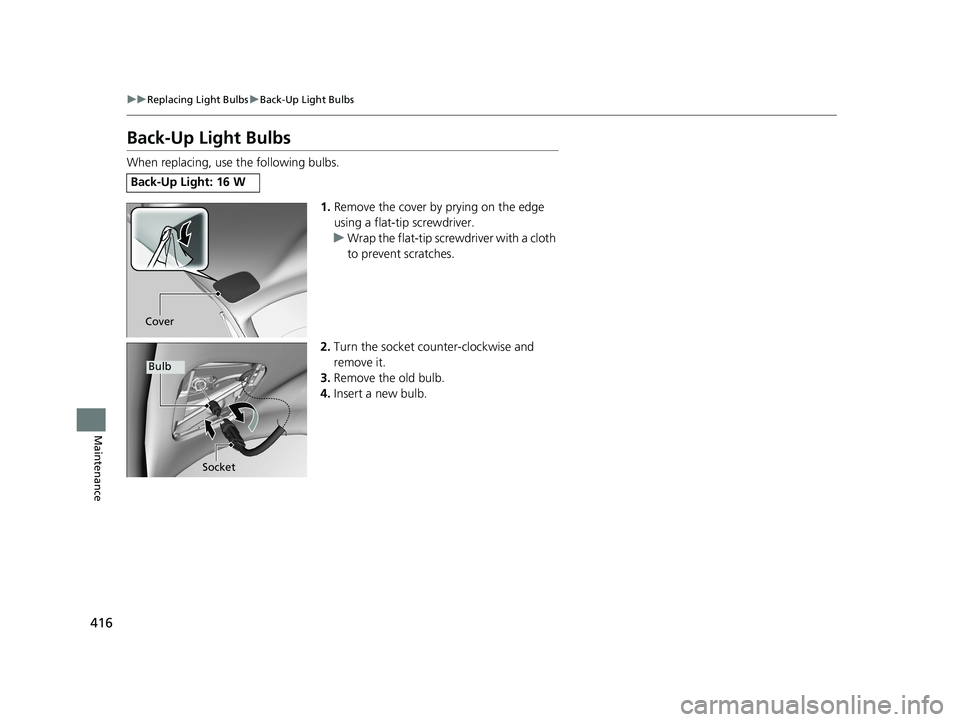
Back-Up Light Bulbs
When replacing, use the following bulbs.
1.Remove the cover by prying on the edge
using a flat-tip screwdriver.
u Wrap the flat-tip screwdriver with a cloth
to prevent scratches.
2. Turn the socket counter-clockwise and
remove it.
3. Remove the old bulb.
4. Insert a new bulb.
Back-Up Light: 16 W
Cover
Bulb
Socket
18 HR-V-31T7A6200.book 416 ページ 2017年6月30日 金曜日 午後1時23分