light HONDA HR-V 2018 (in English) Repair Manual
[x] Cancel search | Manufacturer: HONDA, Model Year: 2018, Model line: HR-V, Model: HONDA HR-V 2018Pages: 503, PDF Size: 32.79 MB
Page 373 of 503
371
uuWhen Driving uLaneWatchTM*
Driving
■Customizing the La neWatch settings
You can customize the following items using the audio/information screen.
• Show with Tu rn Signal: Selects whether LaneWatch monitor comes on when
you operate the turn signal light lever.
• Display Time after Turn Signal Off: Changes the remaining LaneWatch
display time after you pull the turn signal lever back.
• Reference Line: Selects whether the reference lines appear on the LaneWatch
monitor.
• Next Maneuver Pop up
*: Selects whether a turn direction screen of the
navigation system interr upts the LaneWatch display.
• Display: Adjusts display settings.
2Customized Features P. 252
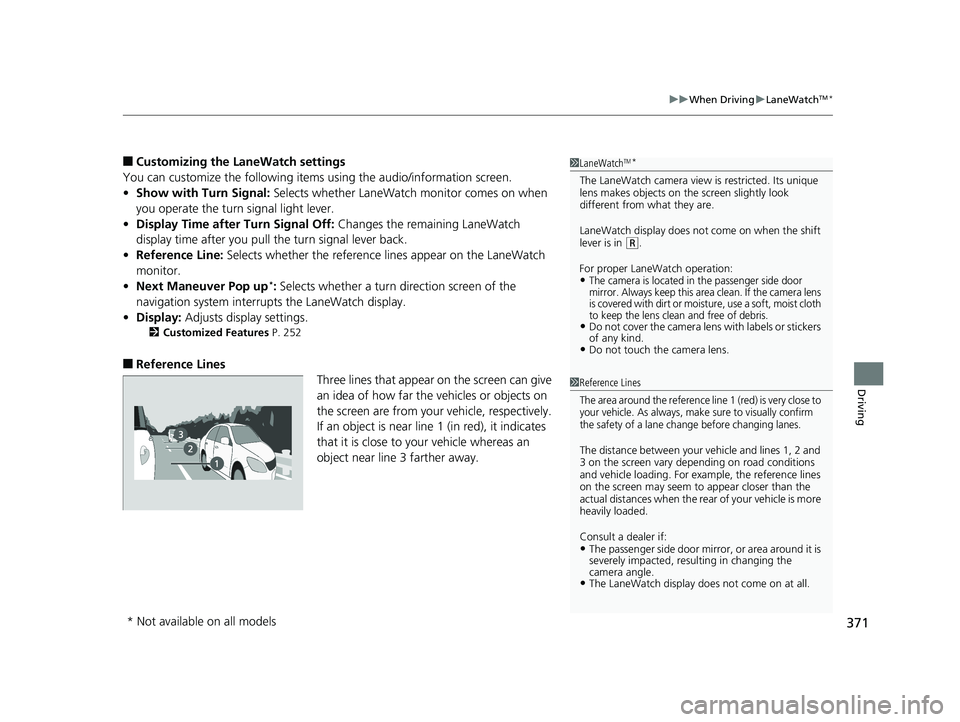
■Reference Lines
Three lines that appear on the screen can give
an idea of how far the vehicles or objects on
the screen are from your vehicle, respectively.
If an object is near line 1 (in red), it indicates
that it is close to your vehicle whereas an
object near line 3 farther away.
1LaneWatchTM*
The LaneWatch camera view is restricted. Its unique
lens makes objects on the screen slightly look
different from what they are.
LaneWatch display does not come on when the shift
lever is in
( R.
For proper LaneWatch operation:
•The camera is located in the passenger side door
mirror. Always keep this area clean. If the camera lens
is covered with dirt or moisture, use a soft, moist cloth
to keep the lens clean and free of debris.
•Do not cover the camera lens with labels or stickers
of any kind.
•Do not touch the camera lens.
1 Reference Lines
The area around the reference line 1 (red) is very close to
your vehicle. As always, make sure to visually confirm
the safety of a lane change before changing lanes.
The distance betwee n your vehicle and lines 1, 2 and
3 on the screen vary depending on road conditions
and vehicle loading. For ex ample, the reference lines
on the screen may seem to appear closer than the
actual distances when the rear of your vehicle is more
heavily loaded.
Consult a dealer if:
•The passenger side door mirr or, or area around it is
severely impacted, resulting in changing the
camera angle.
•The LaneWatch display doe s not come on at all.
* Not available on all models
18 HR-V-31T7A6200.book 371 ページ 2017年6月30日 金曜日 午後1時23分
Page 379 of 503
377Continued
Driving
Braking
Brake System
Use the parking brake to keep the vehicle stationary when parked. When the
parking brake is applied, you can manu ally or automatically release it.
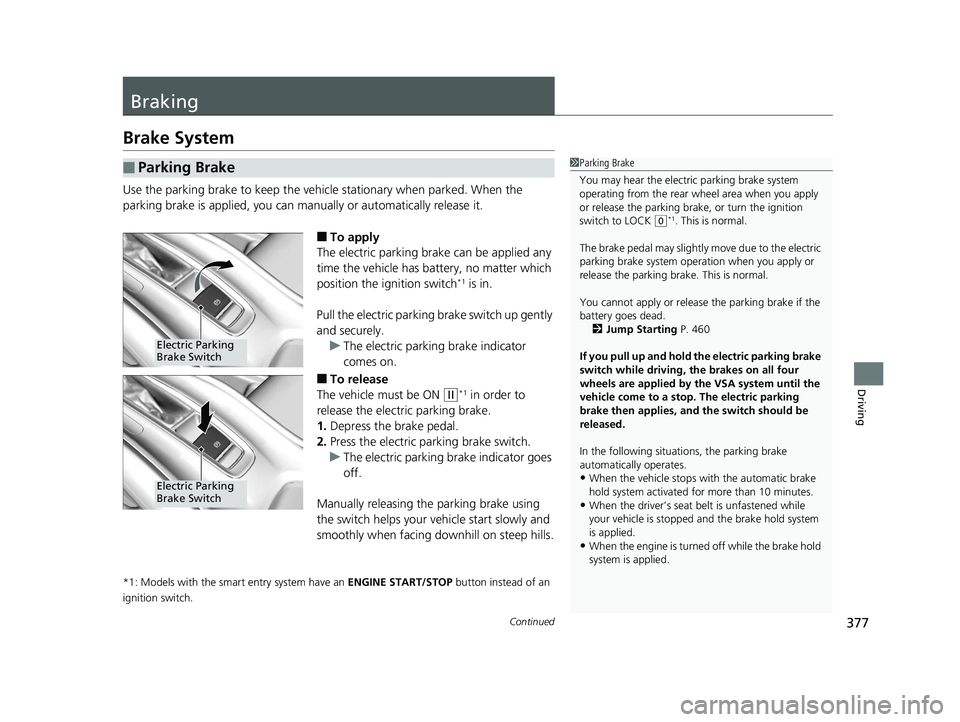
■To apply
The electric parking brake can be applied any
time the vehicle has battery, no matter which
position the ignition switch
*1 is in.
Pull the electric parking brake switch up gently
and securely. u The electric parking brake indicator
comes on.
■To release
The vehicle must be ON
(w*1 in order to
release the electric parking brake.
1. Depress the brake pedal.
2. Press the electric parking brake switch.
u The electric parking brake indicator goes
off.
Manually releasing the parking brake using
the switch helps your vehicle start slowly and
smoothly when facing downhill on steep hills.
*1: Models with the smart entry system have an ENGINE START/STOP button instead of an
ignition switch.
■Parking Brake1 Parking Brake
You may hear the electric parking brake system
operating from the rear wh eel area when you apply
or release the parking brak e, or turn the ignition
switch to LOCK
( 0*1. This is normal.
The brake pedal may slightly move due to the electric
parking brake system opera tion when you apply or
release the parking brake. This is normal.
You cannot apply or release the parking brake if the
battery goes dead.
2 Jump Starting P. 460
If you pull up and hold the electric parking brake
switch while driving, the brakes on all four
wheels are applied by the VSA system until the
vehicle come to a stop. The electric parking
brake then applies, and the switch should be
released.
In the following situations, the parking brake
automatically operates.
•When the vehicle stops with the automatic brake
hold system activated for more than 10 minutes.
•When the driver’s seat belt is unfastened while
your vehicle is stopped and the brake hold system
is applied.
•When the engine is turned off while the brake hold
system is applied.
Electric Parking
Brake Switch
Electric Parking
Brake Switch
18 HR-V-31T7A6200.book 377 ページ 2017年6月30日 金曜日 午後1時23分
Page 381 of 503
Continued379
uuBraking uBrake System
Driving
The parking brake automatically releases as you depress the accelerator pedal when:
• You are wearing the driver’s seat belt.
• The engine is running.
• The transmission is not in
(P or (N.
• The transmission is not in
(N.
Your vehicle is equipped with disc brakes at all four wheels. A vacuum power assist
helps to reduce the effort needed on th e brake pedal. The brake assist system
increases the stopping force when you depress the brake pedal hard in an
emergency situation. The an ti-lock brake system (ABS) helps you retain steering
control when brak ing very hard.
2Brake Assist System P. 384
2 Anti-lock Brake System (ABS) P. 383
■Foot Brake
Continuously variable transmission models
Manual transmission models
1Foot Brake
Check the brakes after driving through deep water,
or if there is a buildup of road surface water. If
necessary, dry the brakes by lightly depressing the
pedal several times.
If you hear a continuous me tallic friction sound when
applying the brakes, this is caused by the brake wear
indicator rubbing on the brake rotor and indicates
that the brake pads need to be replaced. Have the
vehicle checked by a deal er. If you hear only an
occasional squeak or squeal when you initially apply
the brake pedal, this may be normal and caused by
high frequency vibr ation of the brake pads against
the rotating brake disc.
Constantly using the brak e pedal while going down a
long hill builds up heat, which reduces the brake
effectiveness. Apply engine braking by taking your
foot off the accelerator pe dal and downshifting to a
lower gear/speed position. With manual transmission
use a lower gear for gr eater engine braking.
Do not rest your foot on the brake pedal while
driving, as it will lightly apply the brakes and cause
them to lose effectiveness over time and reduce pad
life. It will also conf use drivers behind you.
18 HR-V-31T7A6200.book 379 ページ 2017年6月30日 金曜日 午後1時23分
Page 382 of 503
uuBraking uBrake System
380
Driving
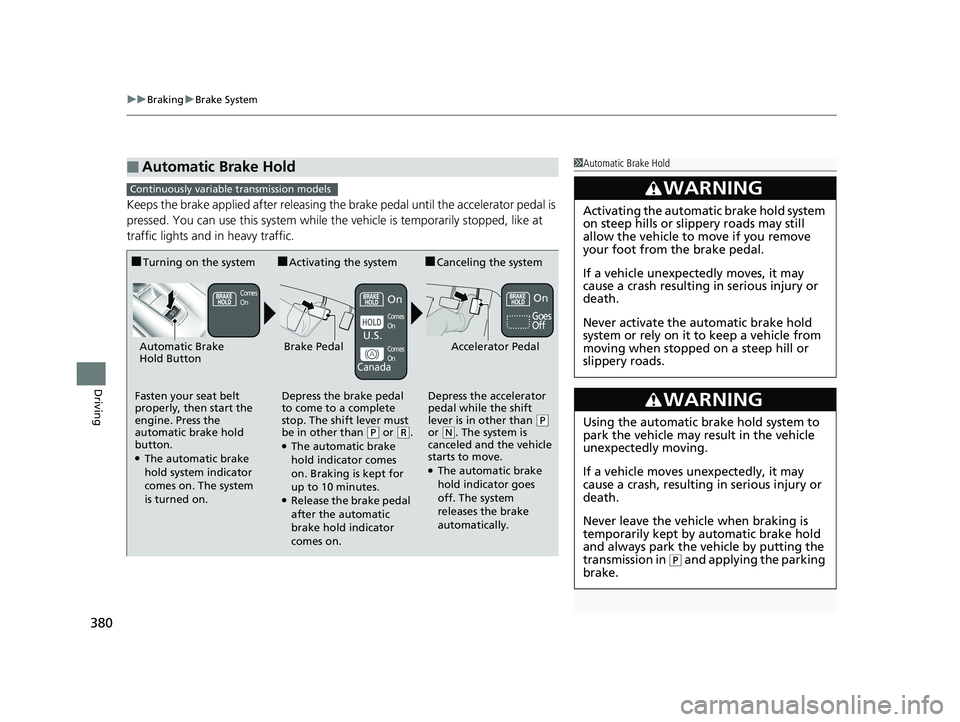
Keeps the brake applied after releasing the brake pedal until the accelerator pedal is
pressed. You can use this system while the vehicle is temporarily stopped, like at
traffic lights and in heavy traffic.
■Automatic Brake Hold1Automatic Brake Hold
3WARNING
Activating the automatic brake hold system
on steep hills or slippery roads may still
allow the vehicle to move if you remove
your foot from the brake pedal.
If a vehicle unexpectedly moves, it may
cause a crash resulting in serious injury or
death.
Never activate the automatic brake hold
system or rely on it to keep a vehicle from
moving when stopped on a steep hill or
slippery roads.
3WARNING
Using the automatic brake hold system to
park the vehicle may re sult in the vehicle
unexpectedly moving.
If a vehicle moves unexpectedly, it may
cause a crash, resulting in serious injury or
death.
Never leave the vehicle when braking is
temporarily kept by automatic brake hold
and always park the vehicle by putting the
transmission in
( P and applying the parking
brake.
Continuously variable transmission models
■Turning on the system
Fasten your seat belt
properly, then start the
engine. Press the
automatic brake hold
button.
●The automatic brake
hold system indicator
comes on. The system
is turned on.
■Activating the system
Depress the brake pedal
to come to a complete
stop. The shift lever must
be in other than
( P or (R.●The automatic brake
hold indicator comes
on. Braking is kept for
up to 10 minutes.
●Release the brake pedal
after the automatic
brake hold indicator
comes on.
■Canceling the system
Depress the accelerator
pedal while the shift
lever is in other than
( P
or ( N. The system is
canceled and the vehicle
starts to move.
●The automatic brake
hold indicator goes
off. The system
releases the brake
automatically.
Accelerator PedalBrake PedalAutomatic Brake
Hold Button
Goes
Off
Comes
OnOn On
Comes
On
Comes
On
U.S.
Canada
18 HR-V-31T7A6200.book 380 ページ 2017年6月30日 金曜日 午後1時23分
Page 383 of 503
381
uuBraking uBrake System
Continued
Driving
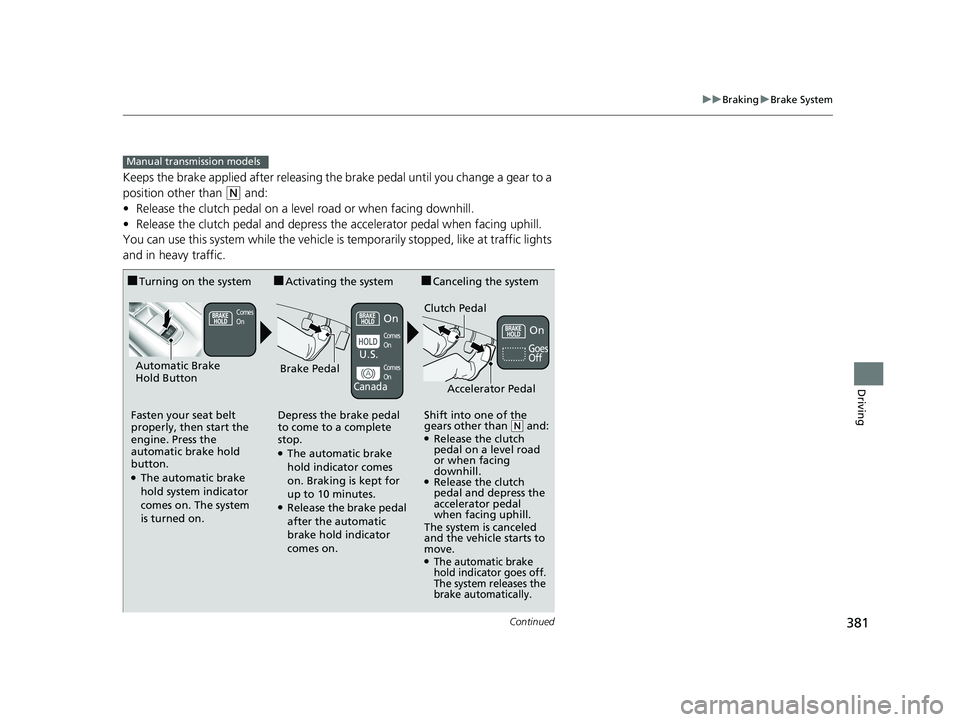
Keeps the brake applied after releasing the brake pedal until you change a gear to a
position other than
(N and:
• Release the clutch pedal on a level road or when facing downhill.
• Release the clutch pedal and depress the accelerator pedal when facing uphill.
You can use this system while the vehicle is temporarily stopped, like at traffic lights
and in heavy traffic.
Manual transmission models
■Turning on the system
Fasten your seat belt
properly, then start the
engine. Press the
automatic brake hold
button.
●The automatic brake
hold system indicator
comes on. The system
is turned on.
■Activating the system
Depress the brake pedal
to come to a complete
stop.
●The automatic brake
hold indicator comes
on. Braking is kept for
up to 10 minutes.
●Release the brake pedal
after the automatic
brake hold indicator
comes on.
■Canceling the system
Shift into one of the
gears other than
( N and: ●Release the clutch
pedal on a level road
or when facing
downhill.
●Release the clutch
pedal and depress the
accelerator pedal
when facing uphill.
The system is canceled
and the vehicle starts to
move.
●The automatic brake
hold indicator goes off.
The system releases the
brake automatically.
Accelerator Pedal
Brake PedalAutomatic Brake
Hold Button
Goes
Off
Comes
OnOn On
Comes
On
Comes
On
U.S.
Canada
Clutch Pedal
18 HR-V-31T7A6200.book 381 ページ 2017年6月30日 金曜日 午後1時23分
Page 385 of 503
383
uuBraking uAnti-lock Brake System (ABS)
Driving
Anti-lock Brake System (ABS)
Helps prevent the wheels from locking up, and helps you retain steering control by
pumping the brakes rapidly, much faster than you.
The electronic brake distribu tion (EBD) system, which is part of the ABS, also
balances the front-to-rear braking distribution according to vehicle loading.
You should never pump the brake pedal. Let the ABS work for you by always
keeping firm, steady pressure on the brake pe dal. This is sometimes referred to as
“stomp and steer.”
■ABS operation
The brake pedal may pulsate slightly when the ABS is working. Keep holding the
pedal firmly down. On dry pavement, you will need to press on the brake pedal very
hard before the ABS activates. However, you may feel the ABS activate immediately
if you are trying to stop on snow or ice.
ABS may activate when you depres s the brake pedal when driving on:
• Wet or snow covered roads.
• Roads paved with stone.
• Roads with uneven surf aces, such as potholes, cracks, manholes, etc.
When the vehicle speed goes under 6 mph (10 km/h), the ABS stops.
■ABS1Anti-lock Brake System (ABS)
NOTICE
The ABS may not function correc tly if you use a tire of
the wrong size or type.
If the ABS indicator comes on while driving, there
may be a problem with the system.
While normal braking will not be affected, there is a
possibility that the ABS will not operating. Have your
vehicle checked by a dealer immediately.
The ABS is not designed for the purpose of reducing
the time or distance it takes for a vehicle to stop: It is
designed to limit brake lo ckup which can lead to
skidding and loss of steering control.
In the following cases, your vehicle may need more
distance to stop than a vehicle without the ABS:
•You are driving on rough or uneven road surfaces,
such as gravel or snow.
•The tires are equipped with snow chains.
The following may be observed with the ABS system:
•Motor sounds coming from the engine
compartment when the brakes are applied, or
when system checks are being performed after the
engine has been started and while vehicle is
accelerates.
•Brake pedal and/or the ve hicle body vibration when
ABS activates.
These vibrations and sounds are normal to ABS
systems and are no cause for concern.
18 HR-V-31T7A6200.book 383 ページ 2017年6月30日 金曜日 午後1時23分
Page 386 of 503
384
uuBraking uBrake Assist System
Driving
Brake Assist System
Designed to assist the driver by generating greater braking force when you depress
the brake pedal hard during emergency braking.
■Brake assist system operation
Press the brake pedal firmly for more powerful braking.
When brake assist operates, the pedal ma y wiggle slightly and an operating noise
may be heard. This is normal. Keep holding the brake pedal firmly down.
■Brake Assist System
18 HR-V-31T7A6200.book 384 ページ 2017年6月30日 金曜日 午後1時23分
Page 388 of 503
386
Driving
Multi-View Rear Camera
About Your Multi-View Rear Camera
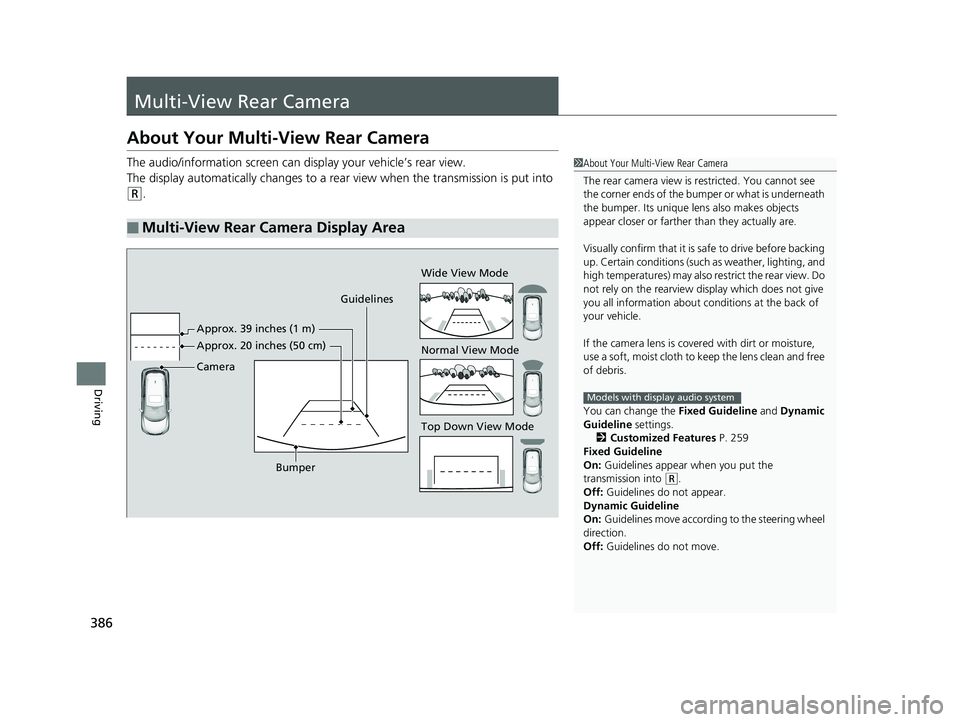
The audio/information screen can display your vehicle’s rear view.
The display automatically changes to a rear view when the transmission is put into
(R.
■Multi-View Rear Camera Display Area
1About Your Multi-View Rear Camera
The rear camera view is restricted. You cannot see
the corner ends of the bum per or what is underneath
the bumper. Its unique le ns also makes objects
appear closer or farther than they actually are.
Visually confirm that it is safe to drive before backing
up. Certain conditions (such as weather, lighting, and
high temperatures) may also restrict the rear view. Do
not rely on the rearview display which does not give
you all information about c onditions at the back of
your vehicle.
If the camera lens is cove red with dirt or moisture,
use a soft, moist cloth to keep the lens clean and free
of debris.
You can change the Fixed Guideline and Dynamic
Guideline settings.
2 Customized Features P. 259
Fixed Guideline
On: Guidelines appear when you put the
transmission into
( R.
Off: Guidelines do not appear.
Dynamic Guideline
On: Guidelines move according to the steering wheel
direction.
Off: Guidelines do not move.
Models with display audio system
Guidelines
Bumper Wide View Mode
Normal View Mode
Top Down View Mode
Camera Approx. 20 inches (50 cm) Approx. 39 inches (1 m)
18 HR-V-31T7A6200.book 386 ページ 2017年6月30日 金曜日 午後1時23分
Page 393 of 503
391
Maintenance
This chapter discusses basic maintenance.
Before Performing MaintenanceInspection and Maintenance ............ 392
Safety When Performing Maintenance .... 393
Parts and Fluids Used in Maintenance Service ........................................... 394
Maintenance Minder
TM..................... 395
Maintenance Under the Hood
Maintenance Items Un der the Hood .... 399
Opening the Hood ........................... 400
Recommended Engine Oil ................ 401
Oil Check ......................................... 402
Adding Engine Oil ............................ 403
Changing the Engine Oil and Oil Filter ..... 404
Engine Coolant ................................ 406
Transmission Fluid ............................ 408
Brake/Clutch
* Fluid .......................... 409
Refilling Window Wa sher Fluid......... 410
Replacing Light Bulbs ....................... 411
Checking and Maintaining Wiper Blades.... 419Checking and Maintaining Tires
Checking Tires ................................. 423
Tire and Loading Information Label .. 425
Tire Labeling .................................... 425
DOT Tire Quality Grading (U.S. Vehicles).. 427Wear Indicators................................ 429 Tire Service Life ................................ 429
Tire and Wheel Replacement ........... 430
Tire Rotation .................................... 431
Winter Tires ..................................... 432
Battery ............................................... 433
Remote Transmitter Care
Replacing the Button Battery ........... 435
Heating and Cooling System
*/Climate
Control System* Maintenance ....... 437
Cleaning Interior Care .................................... 438
Exterior Care.................................... 440
Accessories and Modifications ........ 443
* Not available on all models
18 HR-V-31T7A6200.book 391 ページ 2017年6月30日 金曜日 午後1時23分
Page 394 of 503
392
Maintenance
Before Performing Maintenance
Inspection and Maintenance
For your safety, perform all listed inspections and maintenance to keep your vehicle
in good condition. If you become aware of any abnormality (noise, smell, insufficient
brake fluid, oil residue on the ground, etc.), have your vehicle inspected by a dealer.
(Note, however, that service at a dealer is not mandatory to keep your warranties in
effect.)
■Daily inspections
Perform inspections before long distance tri ps, when washing the vehicle, or when
refueling.
■Periodic inspections
• Check the brake/clutch* fluid level monthly.
2 Brake/Clutch* Fluid P. 409
•Check the tire pressure monthly. Examin e the tread for wear and foreign objects.
2Checking and Maintaining Tires P. 423
•Check the operation of the exterior lights monthly.
2 Replacing Light Bulbs P. 411
•Check the condition of the wiper bl ades at least every six months.
2Checking and Maintaining Wiper Blades P. 419
■Types of Inspection and Maintenance
1Inspection and Maintenance
Maintenance, replacement, or repair of
emissions control devices and systems may be
done by any automotive repair establishment or
individuals using parts that are “certified” to
EPA standards.
According to state and fede ral regulations, failure to
perform maintenance on the maintenance main
items marked with # will not void your emissions
warranties. However, all ma intenance services should
be performed in accordan ce with the intervals
indicated by the information display.
2 Maintenance Service Items P. 397
If you want to perform complex maintenance tasks
that require more skills a nd tools, you can purchase a
subscription to the Service Express website at
www.techinfo.honda.com .
2 Authorized Manuals P. 489
If you want to perform ma intenance yourself, make
sure that you have the necessary tools and skills first.
After performing ma intenance, update the records in
the separate maintenance booklet.
U.S. models
* Not available on all models
18 HR-V-31T7A6200.book 392 ページ 2017年6月30日 金曜日 午後1時23分