dashboard HONDA INSIGHT 2001 1.G User Guide
[x] Cancel search | Manufacturer: HONDA, Model Year: 2001, Model line: INSIGHT, Model: HONDA INSIGHT 2001 1.GPages: 269, PDF Size: 4.52 MB
Page 77 of 269
The AUTO f unction only works to
lower the driver’s window. To raise
the window, you must push the
window switch up and hold it until
the window reaches the desired
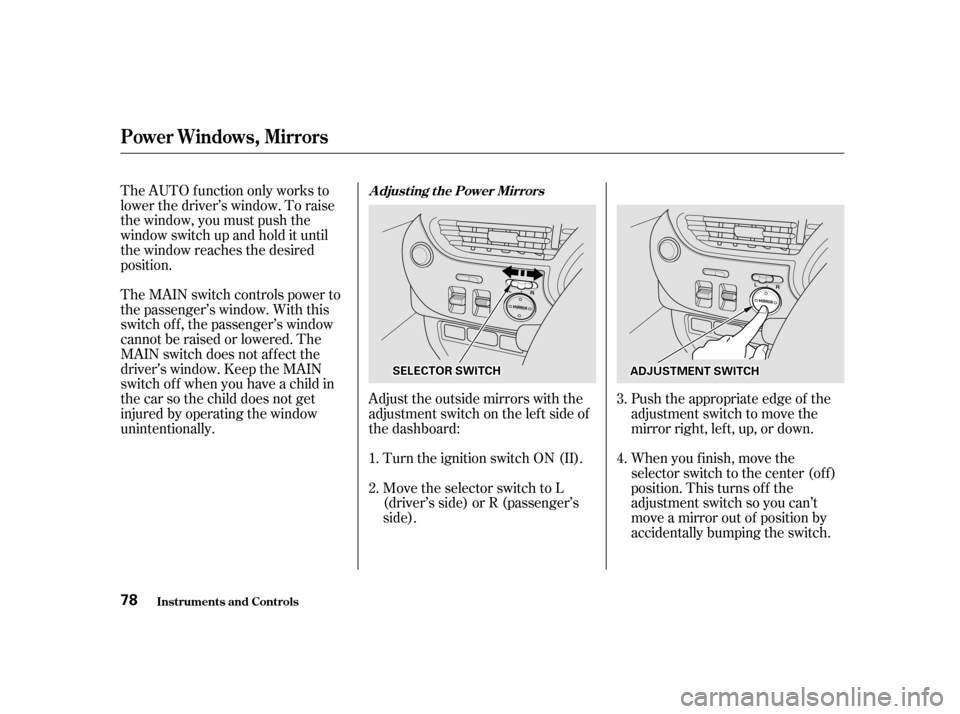
position.Adjust the outside mirrors with the
adjustment switch on the lef t side of
the dashboard:Turn the ignition switch ON (II).
Move the selector switch to L
(driver’s side) or R (passenger’s
side). Push the appropriate edge of the
adjustment switch to move the
mirrorright,left,up,ordown.
When you f inish, move the
selector switch to the center (off)
position. This turns of f the
adjustment switch so you can’t
move a mirror out of position by
accidentally bumping the switch.
The MAIN switch controls power to
the passenger’s window. With this
switch of f , the passenger’s window
cannot be raised or lowered. The
MAIN switch does not af f ect the
driver’s window. Keep the MAIN
switch of f when you have a child in
the car so the child does not get
injured by operating the window
unintentionally.
1. 2.3. 4.
Power Windows, Mirrors
Inst rument s and Cont rols
Adjusting the Power Mirrors
78
AADDJJUUSSTTMMEENNTTSSWWIITTCCHHSSEELLEECCTTOORRSSWWIITTCCHH
Page 84 of 269
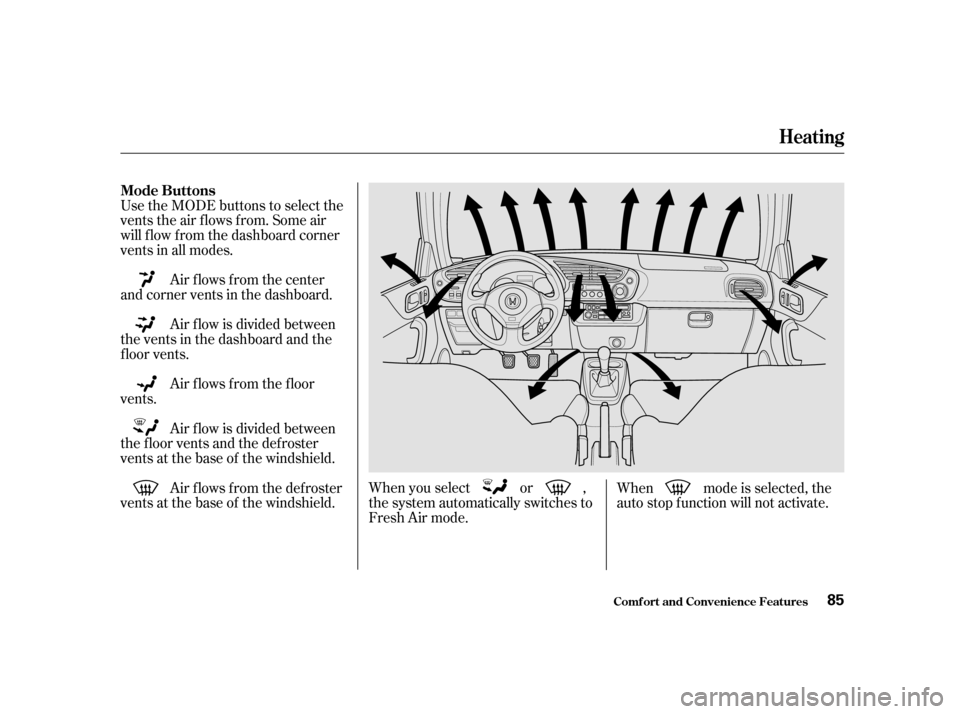
Use the MODE buttons to select the
vents the air flows from. Some air
will f low f rom the dashboard corner
vents in all modes.Air flows from the center
and corner vents in the dashboard.
Air f low is divided between
the vents in the dashboard and the
f loor vents.
When you select or ,
the system automatically switches to
Fresh Air mode.When mode is selected, the
auto stop function will not activate.
Air f lows f rom the f loor
vents.
Air f low is divided between
the f loor vents and the def roster
vents at the base of the windshield.
Air f lows f rom the def roster
vents at the base of the windshield.
Comf ort and Convenience Feat ures
Mode Buttons
Heating
85
Page 85 of 269
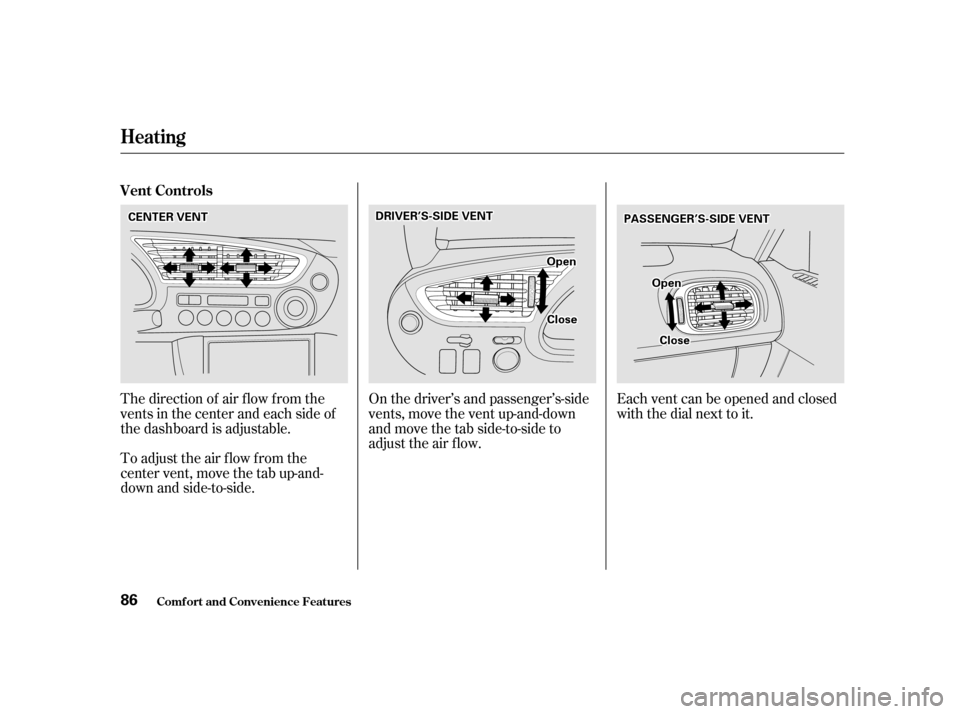
The direction of air f low f rom the
vents in the center and each side of
the dashboard is adjustable.
To adjust the air flow from the
center vent, move the tab up-and-
down and side-to-side.Each vent can be opened and closed
with the dial next to it.
On the driver’s and passenger’s-side
vents, move the vent up-and-down
andmovethetabside-to-sideto
adjust the air flow.
Comf ort and Convenience Feat ures
Vent Controls
Heating
86
CCEENNTTEERRVVEENNTTPPAASSSSEENNGGEERR’’SS--SSIIDDEEVVEENNTTDDRRIIVVEERR’’SS--SSIIDDEEVVEENNTT
CClloossee
OOppeenn
OOppeenn
CClloossee
Page 89 of 269
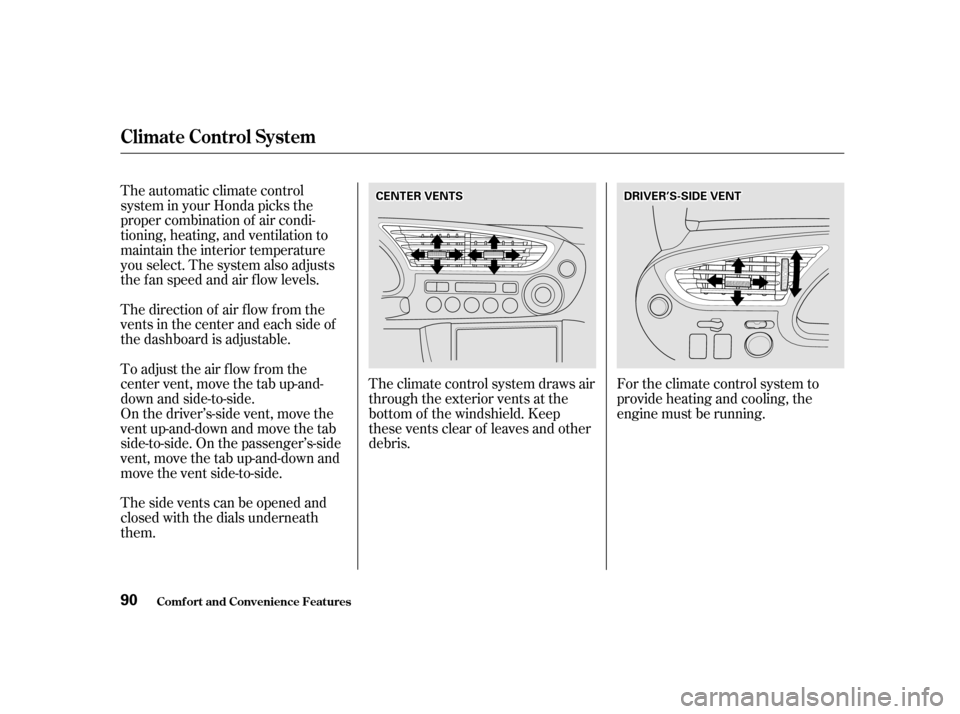
The climate control system draws air
through the exterior vents at the
bottom of the windshield. Keep
these vents clear of leaves and other
debris.For the climate control system to
provide heating and cooling, the
engine must be running.
The automatic climate control
system in your Honda picks the
proper combination of air condi-
tioning, heating, and ventilation to
maintain the interior temperature
you select. The system also adjusts
the fan speed and air flow levels.
The direction of air f low f rom the
vents in the center and each side of
the dashboard is adjustable.
To adjust the air flow from the
center vent, move the tab up-and-
down and side-to-side.
On the driver’s-side vent, move the
vent up-and-down and move the tab
side-to-side. On the passenger’s-side
vent, move the tab up-and-down and
move the vent side-to-side.
Thesideventscanbeopenedand
closed with the dials underneath
them.
Climat e Cont rol Syst em
Comf ort and Convenience Feat ures
90
CCEENNTTEERRVVEENNTTSSDDRRIIVVEERR’’SS--SSIIDDEEVVEENNTT
Page 94 of 269
CONT INUED
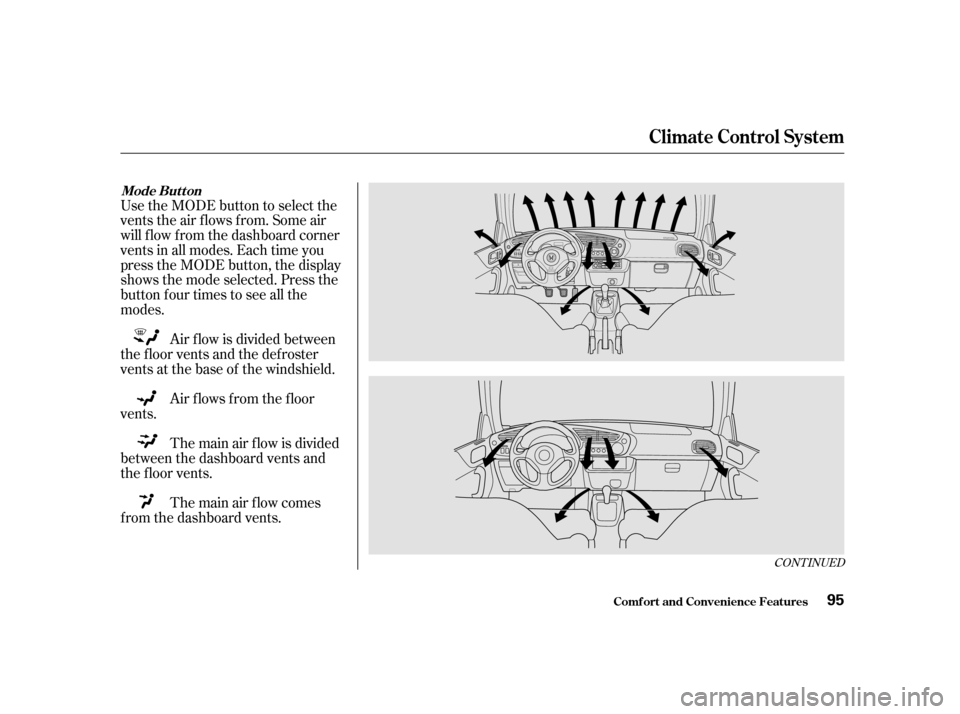
Use the MODE button to select the
vents the air flows from. Some air
will f low f rom the dashboard corner
vents in all modes. Each time you
press the MODE button, the display
shows the mode selected. Press the
button four times to see all the
modes.Air f low is divided between
the f loor vents and the def roster
vents at the base of the windshield.
The main air f low is divided
between the dashboard vents and
the f loor vents. Air f lows f rom the f loor
vents.
The main air flow comes
f rom the dashboard vents.
Climat e Cont rol Syst em
Comf ort and Convenience Feat ures
Mode Button
95
Page 95 of 269
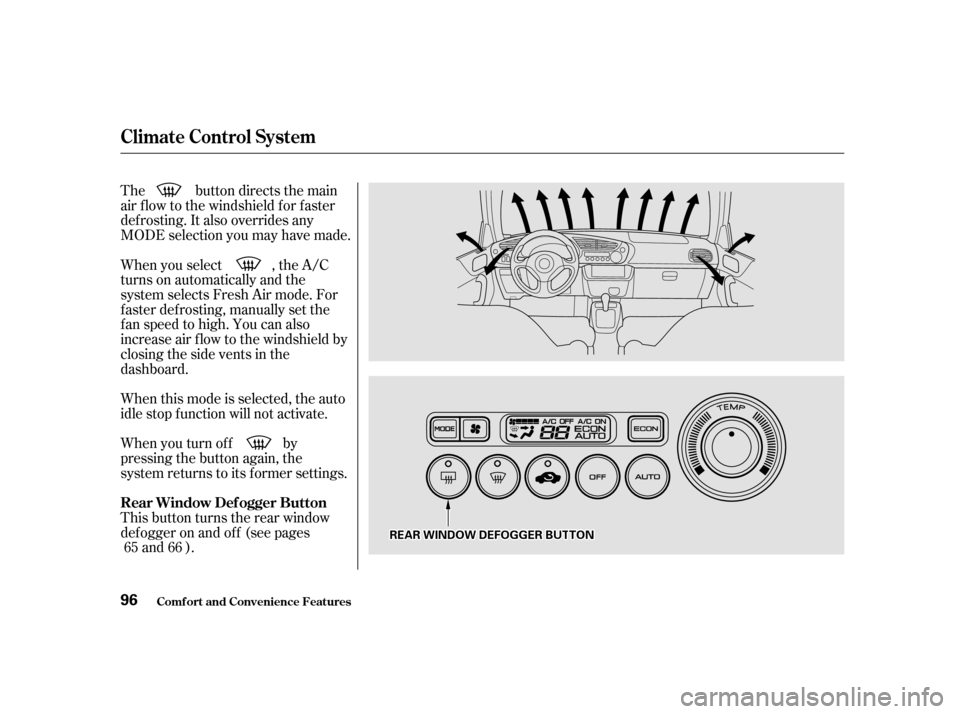
The button directs the main
air f low to the windshield f or f aster
def rosting. It also overrides any
MODE selection you may have made.
When you turn of f by
pressing the button again, the
system returns to its former settings.
When you select , the A/C
turns on automatically and the
system selects Fresh Air mode. For
f aster def rosting, manually set the
fanspeedtohigh.Youcanalso
increase air f low to the windshield by
closing the side vents in the
dashboard.
When this mode is selected, the auto
idle stop f unction will not activate.
This button turns the rear window
def ogger on and of f (see pages
and ).
65 66
Climat e Cont rol Syst em
Comf ort and Convenience Feat ures
Rear Window Def ogger Button 96
RREEAARRWWIINNDDOOWWDDEEFFOOGGGGEERRBBUUTTTTOONN
Page 96 of 269
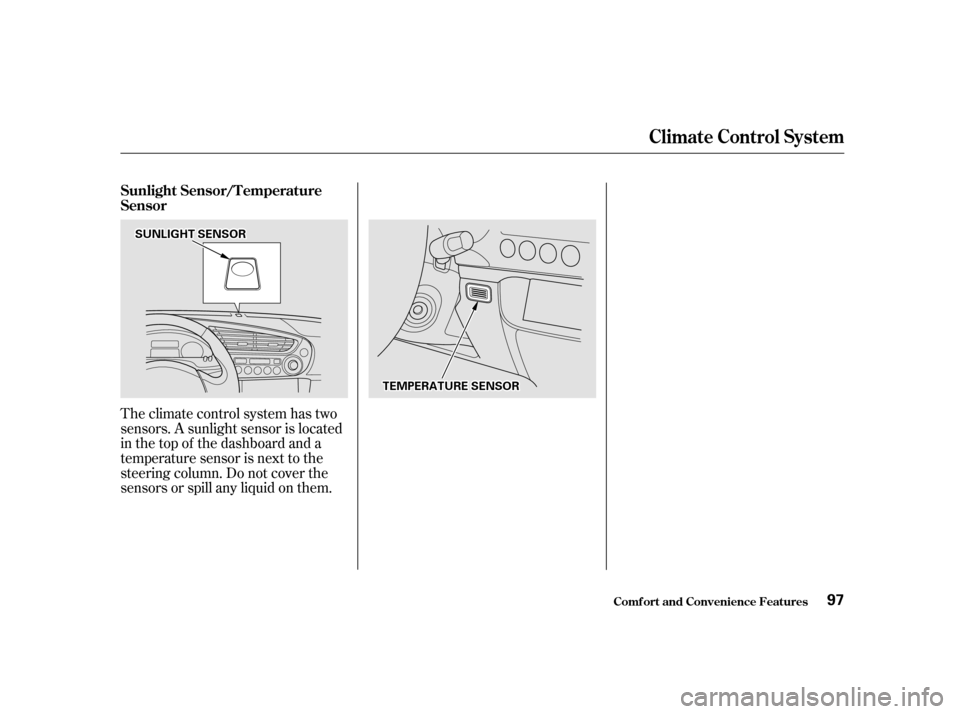
Theclimatecontrolsystemhastwo
sensors. A sunlight sensor is located
in the top of the dashboard and a
temperature sensor is next to the
steering column. Do not cover the
sensors or spill any liquid on them.
Sunlight Sensor/T emperature
Sensor
Climat e Cont rol Syst em
Comf ort and Convenience Feat ures
97
TTEEMMPPEERRAATTUURREESSEENNSSOORR
SSUUNNLLIIGGHHTTSSEENNSSOORR
Page 121 of 269
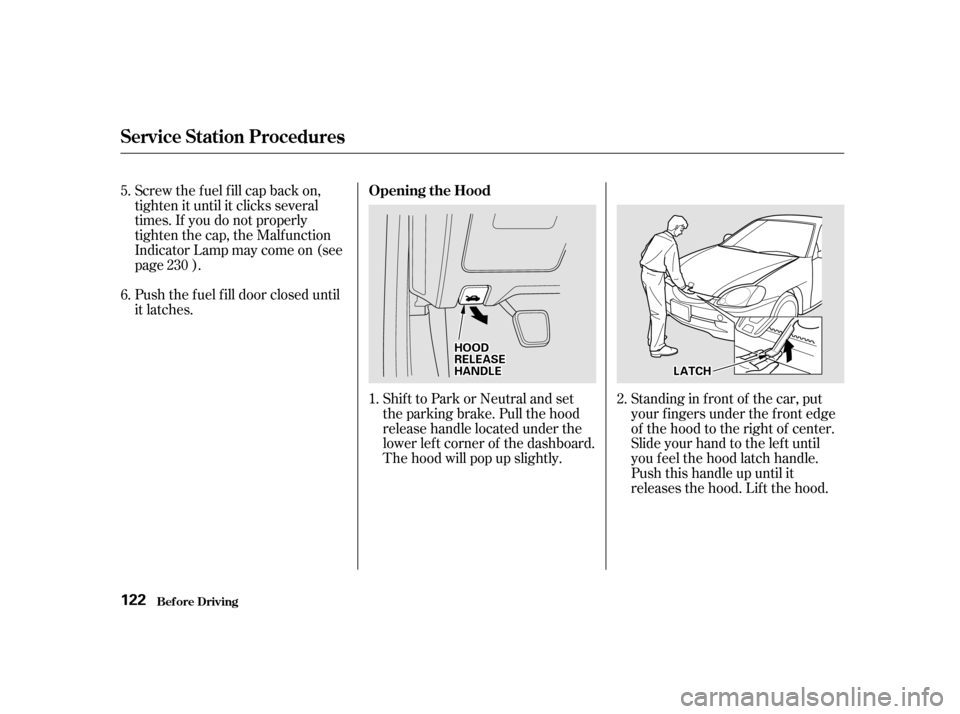
Shift to Park or Neutral and set
the parking brake. Pull the hood
release handle located under the
lower lef t corner of the dashboard.
The hood will pop up slightly.
Screw the f uel f ill cap back on,
tighten it until it clicks several
times. If you do not properly
tighten the cap, the Malfunction
Indicator Lamp may come on (see
page ).
Push the f uel f ill door closed until
it latches.
Standing in f ront of the car, put
your f ingers under the f ront edge
of the hood to the right of center.
Slide your hand to the lef t until
you f eel the hood latch handle.
Push this handle up until it
releases the hood. Lif t the hood.
1.
2.
5. 6.
230
Service Station Procedures
Bef ore Driving Opening the Hood
122
HHOOOODDRREELLEEAASSEEHHAANNDDLLEELLAATTCCHH
Page 128 of 269

In addition, any modif ications that
decrease ground clearance increase
the chance of undercarriage parts
striking a curb, speed bump, or other
raised object, which could cause
your airbags to deploy.
Do not modif y your steering wheel
or any other part of your
Supplemental Restraint System.
Modif ications could make the
system inef f ective.
Do not remove any original
equipment or modif y your car in any
way that would alter its design or
operation. This could make your car
unsaf e and illegal to drive.
For example, do not make any
modif ications that would change the
ride height of your car, or install
wheels and tires with a dif f erent
overall diameter. Do not attach or place objects on the
airbag covers. Any object attached to
or placed on the covers marked ‘‘SRS
AIRBAG,’’ in the center of the
steering wheel and on top of the
dashboard, could interf ere with the
proper operation of the airbags. Or,
if the airbags inf late, the objects
could be propelled inside the car and
hurt someone.
Such modif ications can adversely
af f ect handling, and interf ere with
the operation of the car’s other
systems.
Modif ications
Additional Saf ety Precaution
Bef ore Driving
A ccessories and Modif ications
129
Page 232 of 269
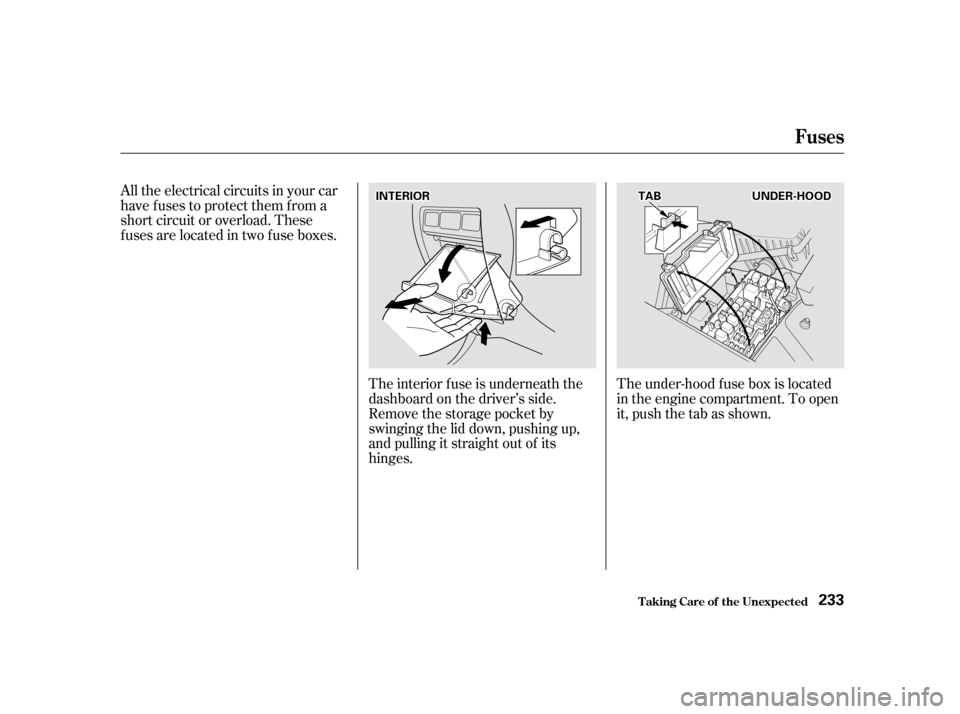
All the electrical circuits in your car
have fuses to protect them from a
short circuit or overload. These
f uses are located in two f use boxes.The interior f use is underneath the
dashboard on the driver’s side.
Remove the storage pocket by
swinging the lid down, pushing up,
and pulling it straight out of its
hinges.The under-hood f use box is located
in the engine compartment. To open
it, push the tab as shown.
Fuses
T aking Care of t he Unexpect ed
233
IINNTTEERRIIOORRTTAABBUUNNDDEERR--HHOOOODD