HONDA INSIGHT 2011 2.G Owners Manual
INSIGHT 2011 2.G
HONDA
HONDA
https://www.carmanualsonline.info/img/13/5954/w960_5954-0.png
HONDA INSIGHT 2011 2.G Owners Manual
Trending: winter tires, warning light, airbag off, coolant level, alarm, change time, ECO mode
Page 331 of 416
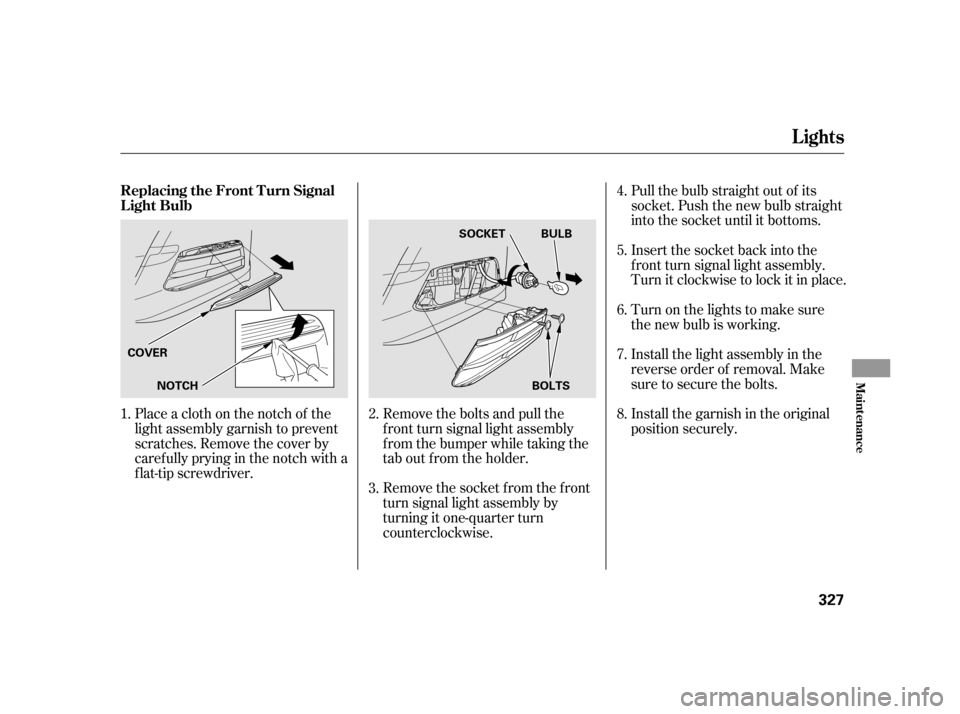
Remove the socket f rom the f ront
turn signal light assembly by
turning it one-quarter turn
counterclockwise.Pull the bulb straight out of its
socket. Push the new bulb straight
into the socket until it bottoms.
Insert the socket back into the
f ront turn signal light assembly.
Turn it clockwise to lock it in place.
Turn on the lights to make sure
the new bulb is working.
Install the garnish in the original
position securely.
Placeaclothonthenotchof the
light assembly garnish to prevent
scratches. Remove the cover by
caref ully prying in the notch with a
f lat-tip screwdriver. Remove the bolts and pull the
f ront turn signal light assembly
from the bumper while taking the
tab out from the holder.Install the light assembly in the
reverse order of removal. Make
sure to secure the bolts.
5. 6.
1. 7.8.
3. 4.
2.
Lights
Replacing the Front T urn Signal
Light Bulb
Maint enance
327
NOTCH
COVER
BOLTSBULB
SOCKET
Page 332 of 416
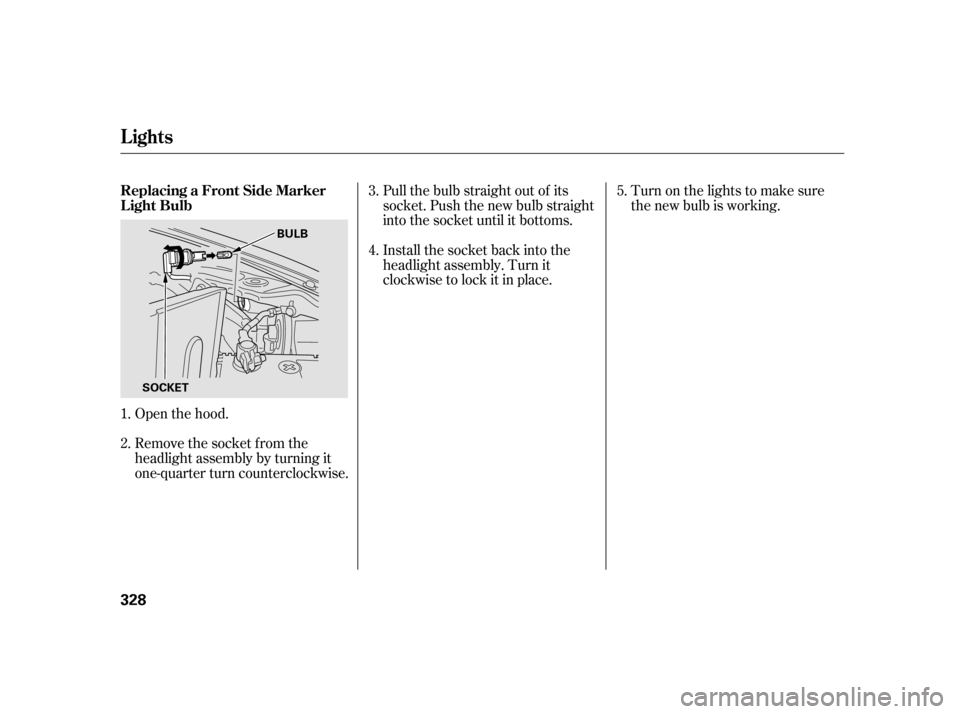
Open the hood.
Remove the socket from the
headlight assembly by turning it
one-quarter turn counterclockwise.Pull the bulb straight out of its
socket. Push the new bulb straight
into the socket until it bottoms.
Install the socket back into the
headlight assembly. Turn it
clockwise to lock it in place.
Turn on the lights to make sure
the new bulb is working.
2. 3. 4.
5.
1.
Lights
Replacing a Front Side Marker
Light Bulb 328 BULB
SOCKET
Page 333 of 416
CONT INUED
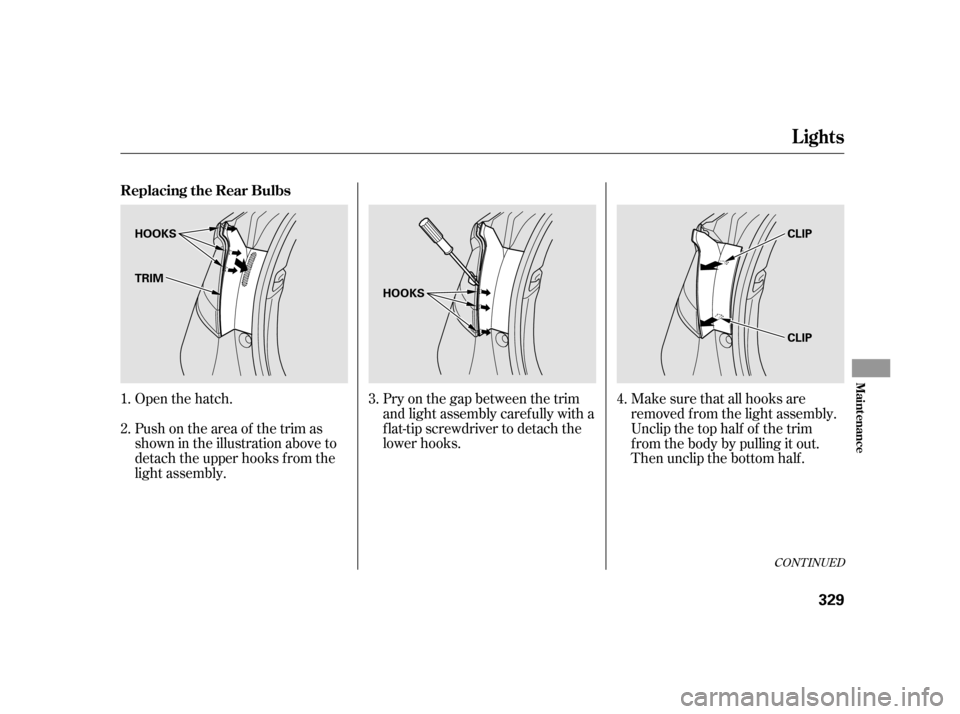
Open the hatch.
Push on the area of the trim as
shown in the illustration above to
detach the upper hooks f rom the
light assembly.Pry on the gap between the trim
and light assembly caref ully with a
flat-tip screwdriver to detach the
lower hooks.
Make sure that all hooks are
removed f rom the light assembly.
Unclip the top half of the trim
fromthebodybypullingitout.
Then unclip the bottom half.
1. 2.
3.
4.
Lights
Replacing the Rear Bulbs
Maint enance
329
HOOKS
TRIM
HOOKS CLIP CLIP
Page 334 of 416
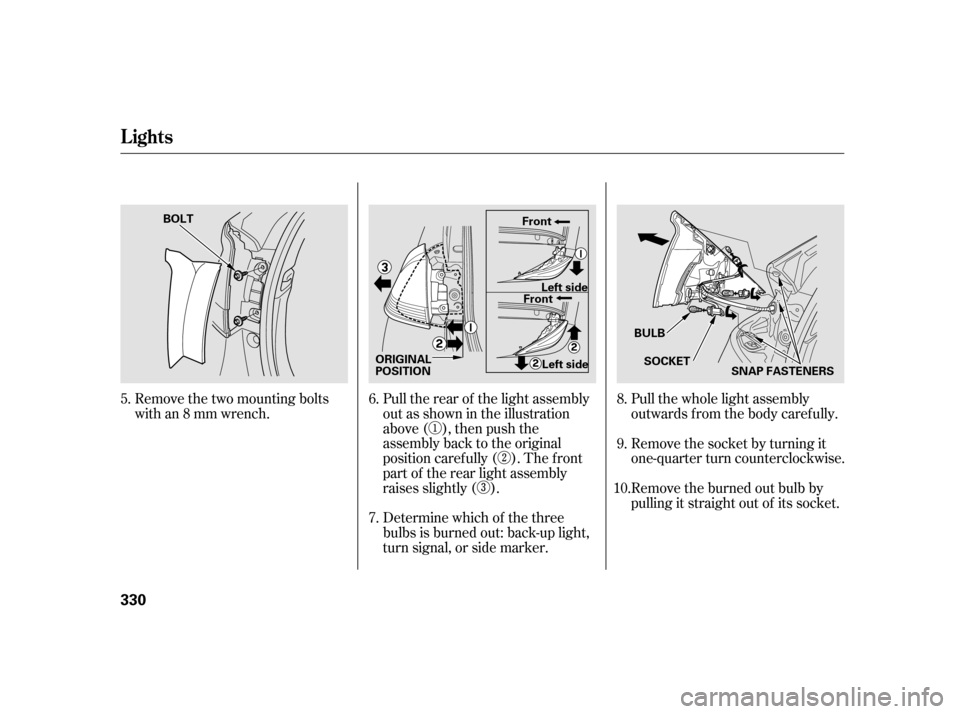
Remove the two mounting bolts
with an 8 mm wrench.Pull the rear of the light assembly
out as shown in the illustration
above ( ), then push the
assembly back to the original
position caref ully ( ). The f ront
part of the rear light assembly
raises slightly ( ).
Determine which of the three
bulbs is burned out: back-up light,
turn signal, or side marker.Pull the whole light assembly
outwards f rom the body caref ully.
Remove the socket by turning it
one-quarter turn counterclockwise.
Remove the burned out bulb by
pulling it straight out of its socket.
6. 7.
5.
8. 9.
10.
Lights
330 BOLT
ORIGINAL
POSITIONFront
Front
Left side BULBSOCKET SNAP FASTENERS
Left side
Page 335 of 416
Install the new bulb in the socket
by pushing it straight in the socket
until it bottoms.
Reinstall the socket into the light
assembly. Turn it clockwise to
lock it in place.
Testthelightstomakesurethe
new bulb is working.
When reinstalling the taillight
assembly, align and pop the snap
f asteners in place. Reinstall and
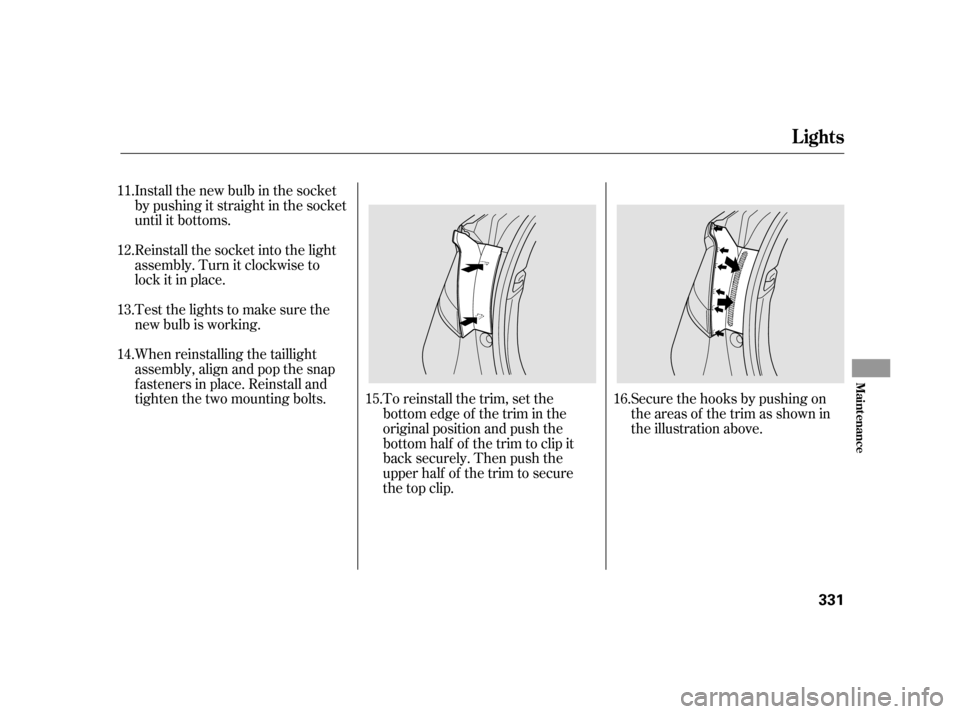
tighten the two mounting bolts. To reinstall the trim, set thebottom edge of the trim in the
original position and push the
bottom half of the trim to clip it
back securely. Then push the
upperhalfofthetrimtosecure
the top clip.Secure the hooks by pushing on
the areas of the trim as shown in
the illustration above.
11. 12.13. 14.
15. 16.
Lights
Maint enance
331
Page 336 of 416
The high-mount brake light should
be replaced by your dealer.
The license plate has two lights
above it. The bulbs should be
replaced by your dealer.
Each outside mirror has side turn
signal lights. The lights should be
replaced by your dealer.
The stop/taillights should be
replaced by your dealer.
EX models
Lights
High-mount Brake L ight
Rear License Plate Light Bulbs
Side T urn Signal L ights
Stop/taillights
332
Page 337 of 416
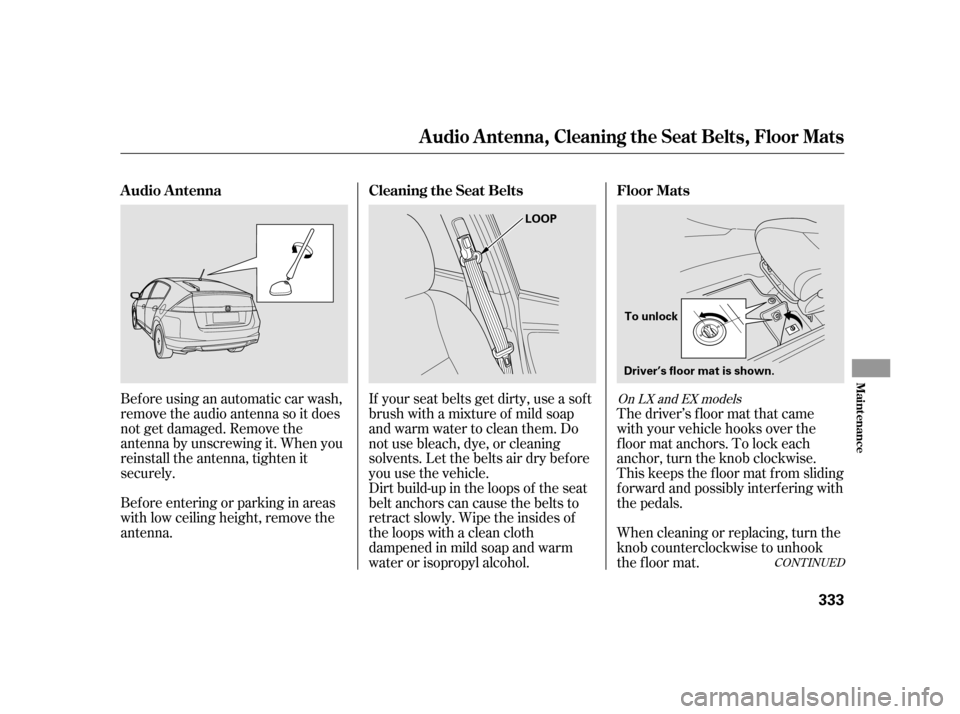
Beforeusinganautomaticcarwash,
remove the audio antenna so it does
not get damaged. Remove the
antenna by unscrewing it. When you
reinstall the antenna, tighten it
securely.
Bef ore entering or parking in areas
with low ceiling height, remove the
antenna.The driver’s f loor mat that came
with your vehicle hooks over the
f loor mat anchors. To lock each
anchor, turn the knob clockwise.
This keeps the f loor mat f rom sliding
f orward and possibly interf ering with
the pedals.
If your seat belts get dirty, use a sof t
brush with a mixture of mild soap
and warm water to clean them. Do
not use bleach, dye, or cleaning
solvents. Let the belts air dry bef ore
you use the vehicle.
Dirt build-up in the loops of the seat
belt anchors can cause the belts to
retract slowly. Wipe the insides of
the loops with a clean cloth
dampened in mild soap and warm
water or isopropyl alcohol.
When cleaning or replacing, turn the
knob counterclockwise to unhook
the floor mat.
CONT INUED
On LX and EX models
Floor Mats
Cleaning the Seat Belts
A udio A ntenna
A udio A ntenna, Cleaning the Seat Belts, Floor Mats
Maint enance
333
LOOP
To unlock
Driver’s floor mat is shown.
Page 338 of 416

Check the condition of the wiper
blades at least every 6 months.
Replace them if you f ind signs of
cracking in the rubber, and areas
that are getting hard or if they leave
streaks and unwiped areas when
used.
If you remove a f loor mat, make sure
tore-anchoritwhenyouputitback
in your vehicle.
If you use a non-Honda f loor mat,
make sure it f its properly and that it
canbeusedwiththefloormat
anchors. Do not put additional f loor
mats on top of the anchored mats.
Make sure the rear f loor mats are
properly positioned. If not, the f loor
mat will interf ere with the seat
operation and make the f ront
passenger’s weight sensors
inef f ective. This f ilter removes the dust and
pollenthatisbroughtinfromthe
outside through the climate control
system.
Have your dealer replace the filter
when this service is indicated by a
maintenance message on the multi-
inf ormation display. It should be
replaced every 15,000 miles (24,000
km) if you drive primarily in urban
areas that have high concentrations
of soot in the air, or if the f low f rom
theclimatecontrolsystembecomes
less than usual. Wiper Blades
Dust and Pollen Filter
Floor Mats, Dust and Pollen Filter, Wiper Blades
334
Page 339 of 416
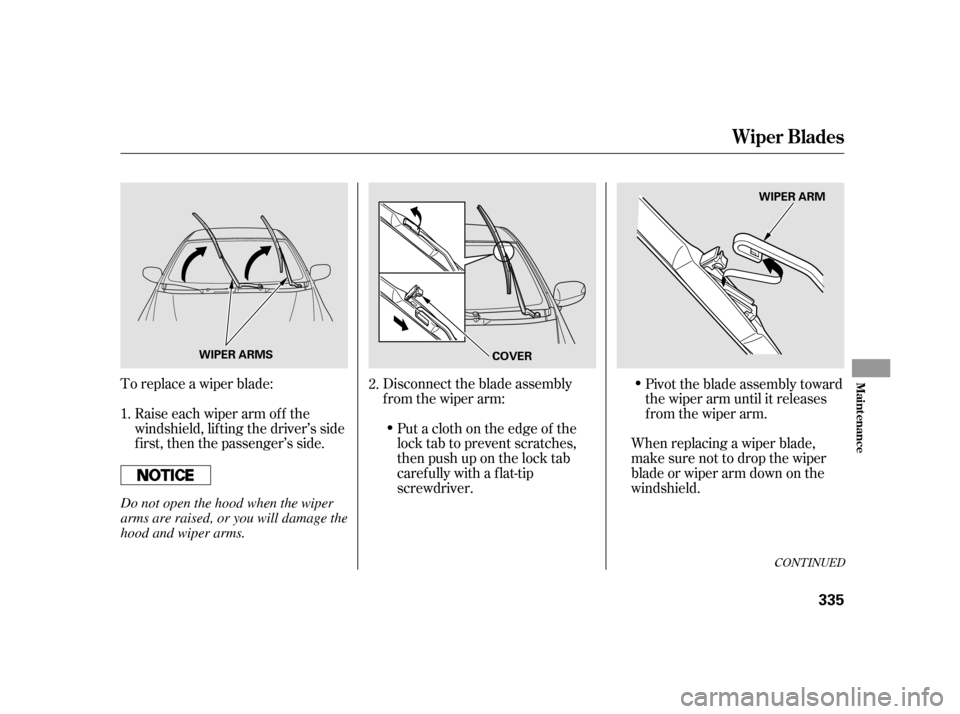
To replace a wiper blade:Raise each wiper arm of f the
windshield, lif ting the driver’s side
first, then the passenger’s side. Disconnect the blade assembly
from the wiper arm:
When replacing a wiper blade,
make sure not to drop the wiper
blade or wiper arm down on the
windshield.
Put a cloth on the edge of the
lock tab to prevent scratches,
then push up on the lock tab
carefully with a flat-tip
screwdriver. Pivot the blade assembly toward
the wiper arm until it releases
from the wiper arm.
1. 2.
CONT INUED
Wiper Blades
Maint enance
335
WIPER ARMS
WIPER ARM
COVER
Do not open the hood when the wiper
arms are raised, or you will damage the
hood and wiper arms.
Page 340 of 416
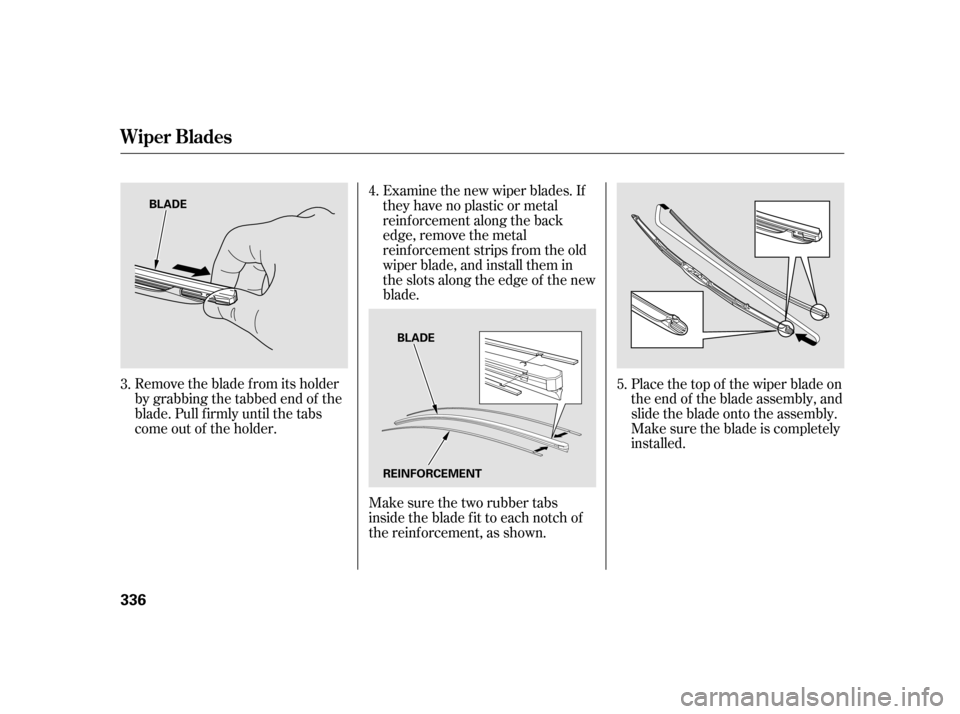
Remove the blade f rom its holder
by grabbing the tabbed end of the
blade. Pull f irmly until the tabs
come out of the holder.Make sure the two rubber tabs
inside the blade f it to each notch of
the reinf orcement, as shown. Make sure the blade is completely
installed.
Place the top of the wiper blade on
the end of the blade assembly, and
slide the blade onto the assembly.
Examine the new wiper blades. If
they have no plastic or metal
reinf orcement along the back
edge, remove the metal
reinf orcement strips f rom the old
wiper blade, and install them in
the slots along the edge of the new
blade.
3. 4.
5.
Wiper Blades
336BLADE
REINFORCEMENTBLADE
Trending: stop start, towing, deactivate airbag, start stop button, ground clearance, USB, headlight aiming
