tow HONDA INSIGHT 2020 (in English) Owner's Guide
[x] Cancel search | Manufacturer: HONDA, Model Year: 2020, Model line: INSIGHT, Model: HONDA INSIGHT 2020Pages: 675, PDF Size: 36.95 MB
Page 532 of 675
uuHonda Sensing ®u Front Sensor Camera
530
Driving
1Front Sensor Camera
If the Some Driver Assist Systems Cannot
Operate: Camera Temperature Too High message
appears:
•Use the climate control system to cool down the
interior and, if necessary, also use defroster mode
with the airflow directed towards the camera.
•Start driving the vehicle to lower the windshield
temperature, which cool s down the area around
the camera.
If the Some Driver Assist Systems Cannot
Operate: Clean Front Windshield message
appears:
•Park your vehicle in a sa fe place, and clean the
windshield. If the message does not disappear after
you have cleaned the winds hield and driven for a
while, have your vehicle checked by a dealer.
20 INSIGHT-31TXM6100.book 530 ページ 2019年4月24日 水曜日 午後2時2分
Page 537 of 675
Continued535
uuBraking uBrake System
Driving
■Activating and deactivating the automatic parking brake feature
With the power mode is in ON, carry out th e following steps to either activate or
deactivate the automatic parking brake feature.
1. Put the transmission into
(P.
2. Without depressing the brake pedal, pull up and release the parking brake switch.
u Check that the parking brake indicator (red) has come on.
3. Pull up and hold the parking brake swit ch. When you hear a beeping sound,
release the switch and within 3 second s pull up and hold the switch again.
4. When you hear a sound indicating that the procedure is completed, release the
switch.
u Two beeps indicates that the feature has been activated.
u One beep indicates that the feature has been deactivated.
u When you have completed activating the feature, the parking brake will
remain applied after you turn off the engine.
u To confirm that the park ing brake is applied, check if the parking brake
indicator (red) is on.
If you need to temporarily deactivate th e feature for when putting your vehicle
through a conveyor type car wash, you can follow the procedure explained below.
1. Depress the brake pedal and bring the vehicle to a stop.
2. Set the power mode to VEHICLE OFF and then within 2 seconds push down the
parking brake switch.
u Activation and deactivation settings for the feature will not be affected.
u Before temporarily deactivating the feat ure, make sure to first turn off both
ACC with Low Speed Follow and the automatic brake hold system.
u To confirm that the park ing brake is applied, check if the parking brake
indicator (red) is on.
1 Parking Brake
In cold climates, the parking brake may freeze in
place if applied.
When parking the vehicle, chock the wheels and
make sure the automatic parking brake feature is
deactivated.
Also, when putting your vehicle through a conveyor-
type car wash or when ha ving your vehicle towed,
deactivate the automatic parking brake feature and
leave the parking brake released.
20 INSIGHT-31TXM6100.book 535 ページ 2019年4月24日 水曜日 午後2時2分
Page 555 of 675
553
uuBefore Performing Maintenance uSafety When Performing Maintenance
Continued
Maintenance
Safety When Performing Maintenance
Some of the most important safety precau tions are given here. However, we cannot
warn you of every conceivable hazard that can arise in performing maintenance.
Only you can decide whether you should perform a given task.
• To reduce the possibility of fire or explos ion, keep cigarettes, sparks, and flames
away from the 12-volt battery, all High Volt age system, and all fuel related parts.
• Never leave rags, towels, or other flammable objects under the hood.
u Heat from the engine and exhaust can ignite them, causing a fire.
• To clean parts, use a co mmercially available degreaser or parts cleaner, not
gasoline.
• Wear eye protection and pr otective clothing when working with the 12-volt
battery or compressed air.
• Engine exhaust contains carbon monoxide, which is poisonous and can kill you.
u Only operate the engine if th ere is sufficient ventilation.
■Maintenance Safety
1Safety When Performing Maintenance
3WARNING
Improperly maintaining this vehicle or
failing to correct a pr oblem before driving
can cause a crash in which you can be
seriously hurt or killed.
Always follow the inspection and
maintenance recommendations according
to the schedules in this owner’s manual.
3WARNING
Failure to properly follow maintenance
instructions and prec autions can cause you
to be seriously hurt or killed.
Always follow the procedures and
precautions in this owner’s manual.
20 INSIGHT-31TXM6100.book 553 ページ 2019年4月24日 水曜日 午後2時2分
Page 565 of 675
563
uuMaintenance Under the Hood uOpening the Hood
Maintenance
Opening the Hood
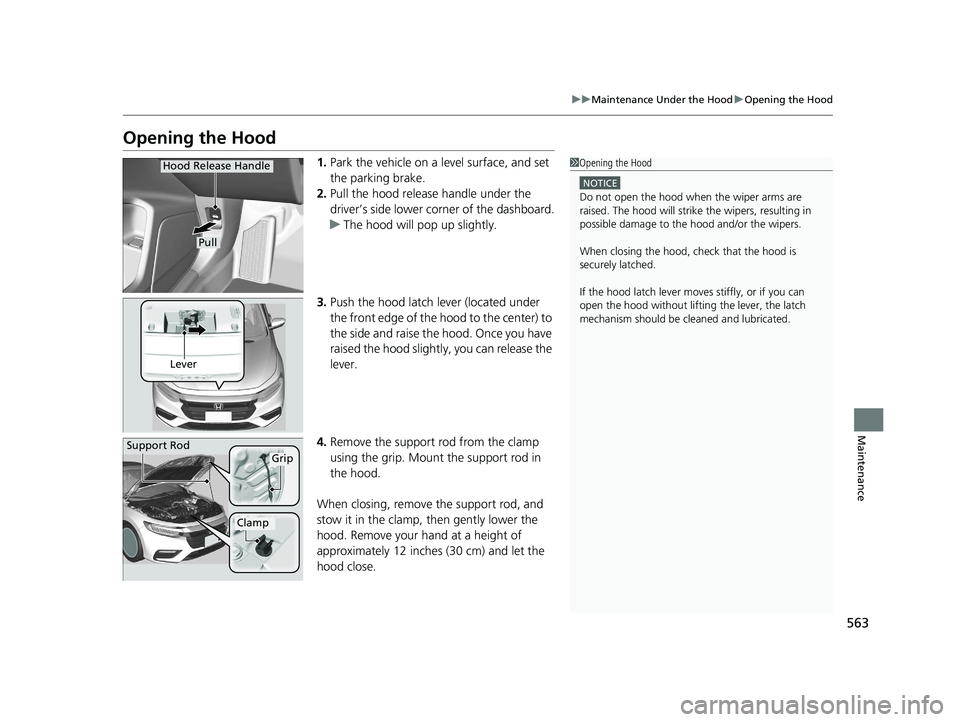
1. Park the vehicle on a level surface, and set
the parking brake.
2. Pull the hood release handle under the
driver’s side lower corner of the dashboard.
u The hood will pop up slightly.
3. Push the hood latch lever (located under
the front edge of the hood to the center) to
the side and raise the hood. Once you have
raised the hood slightly, you can release the
lever.
4. Remove the support rod from the clamp
using the grip. Mount the support rod in
the hood.
When closing, remove the support rod, and
stow it in the clamp, then gently lower the
hood. Remove your hand at a height of
approximately 12 inches (30 cm) and let the
hood close.1 Opening the Hood
NOTICE
Do not open the hood when the wiper arms are
raised. The hood will strike the wipers, resulting in
possible damage to the hood and/or the wipers.
When closing the hood, check that the hood is
securely latched.
If the hood latch lever moves stiffly, or if you can
open the hood without lifti ng the lever, the latch
mechanism should be cl eaned and lubricated.
Hood Release Handle
Pull
Lever
Support RodGrip
Clamp
20 INSIGHT-31TXM6100.book 563 ページ 2019年4月24日 水曜日 午後2時2分
Page 567 of 675
565
uuMaintenance Under the Hood uOil Check
Maintenance
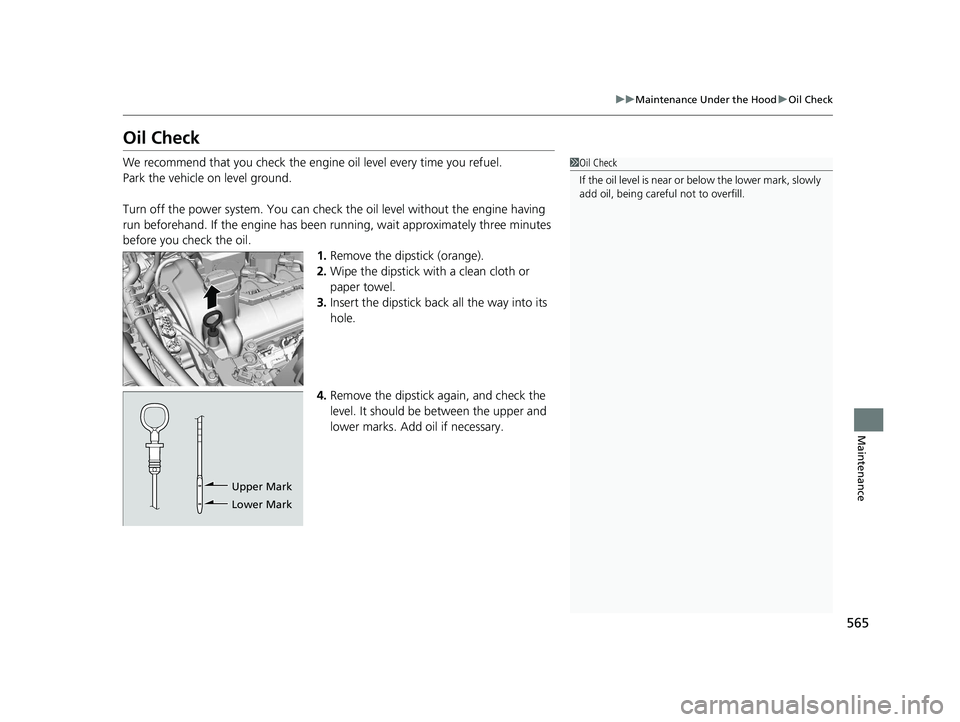
Oil Check
We recommend that you check the engi ne oil level every time you refuel.
Park the vehicle on level ground.
Turn off the power system. You can check the oil level without the engine having
run beforehand. If the engine has been ru nning, wait approximately three minutes
before you check the oil.
1.Remove the dipstick (orange).
2. Wipe the dipstick with a clean cloth or
paper towel.
3. Insert the dipstick back all the way into its
hole.
4. Remove the dipstick again, and check the
level. It should be between the upper and
lower marks. Add oil if necessary.1Oil Check
If the oil level is near or below the lower mark, slowly
add oil, being carefu l not to overfill.
Upper Mark
Lower Mark
20 INSIGHT-31TXM6100.book 565 ページ 2019年4月24日 水曜日 午後2時2分
Page 605 of 675
603
Handling the Unexpected
This chapter explains how to handle unexpected troubles.
ToolsTypes of Tools .................................. 604
If a Tire Goes Flat
Changing a Flat Tire ......................... 605
Temporarily Repairi ng a Flat Tire....... 611
Power System Won’t Start Checking the Procedure ................... 625
If the Remote Battery is Weak .......... 626
Emergency Power System Off........... 627
Jump Starting .................................... 628
Overheating
How to Handle Overheating ............. 631
Models with optional spare tire
Indicator, Coming On/BlinkingIf the Low Oil Pressure Warning Appears ... 633If the 12-Volt Battery Charging System Indicator Comes On ....................... 634
If the Malfunction Indicator Lamp Comes On or Blinks ................................... 635
If the Brake System Indicator (Red) Comes On or Blinks ..................................... 636
If the Brake System Indicator (Red) Comes On
or Blinks at the Same Time When the Brake
System Indicator (Amber) Comes On.... 637
If the Electric Power Steering (EPS) System Indicator Comes On......................... 638 If the Low Tire Pressure/TPMS Indicator
Comes On or Blinks ....................... 639
If the Transmission System Indicator Blinks
along with the Warning Message ...... 640
Fuses Fuse Locations ................................. 641
Inspecting and Changing Fuses ........ 646
Emergency Towing ........................... 647
When You Cannot Unlock the Fuel Fill
Door ................................................. 648
When You Cannot Open the Trunk ... 649
20 INSIGHT-31TXM6100.book 603 ページ 2019年4月24日 水曜日 午後2時2分
Page 607 of 675
605Continued
Handling the Unexpected
If a Tire Goes Flat
Changing a Flat Tire
If a tire goes flat while driving, grasp the steering wheel firmly, and brake gradually
to reduce speed. Then, stop in a safe plac e. Replace the flat tire with a compact
spare tire. Go to a dealer as soon as possib le to have the full-size tire repaired or
replaced.
1. Park the vehicle on firm, level, non-slip pery surface and apply the parking brake.
2. Put the transmission into
(P.
3. Turn on the hazard warning lights an d set the power mode to VEHICLE OFF.
Models with optional spare tire
1Changing a Flat Tire
Follow compact spare precautions:
Periodically check the tire pressure of the compact
spare. It should be set to the specified pressure.
Specified Pressure: 60 psi (420 kPa, 4.2 kgf/cm
2)
When driving with the compact spare tire, keep the
vehicle speed under 50 mph (80 km/h). Replace with
a full-size tire as soon as possible.
The compact spare tire and wheel in your vehicle are
specifically for this model. Do not use them with
another vehicle. Do not us e another type of compact
spare tire or wheel with your vehicle.
Do not mount tire chains on a compact spare tire.
If a chain-mounted front tire goes flat, remove one of
the full-size rear tires and replace it with the compact
spare tire. Remove the flat front tire and replace it
with the full-size tire that was removed from the rear.
Mount the tire chains on the front tire.
NOTICE
Do not use the jack if it doesn’t work properly.
Call your dealer or a pr ofessional towing service.
20 INSIGHT-31TXM6100.book 605 ページ 2019年4月24日 水曜日 午後2時2分
Page 613 of 675
611
uuIf a Tire Goes Flat uTemporarily Repairing a Flat Tire
Continued
Handling the Unexpected
Temporarily Repairing a Flat Tire
If the tire has a large cut or is otherwise severely damaged, you will need to have the
vehicle towed. If the tire only has a small puncture, from a nail for instance, you can
use the temporary tire repair kit so that you can drive to the nearest service station
for a more permanent repair.
If a tire goes flat while driving, grasp the steering wheel firmly, and brake gradually
to reduce speed. Then stop in a safe place.
1. Park the vehicle on a firm, level, and n on-slippery surface, and apply the parking
brake.
2. Put the transmission into
(P.
3. Turn on the hazard warning lights an d set the power mode to VEHICLE OFF
(LOCK).
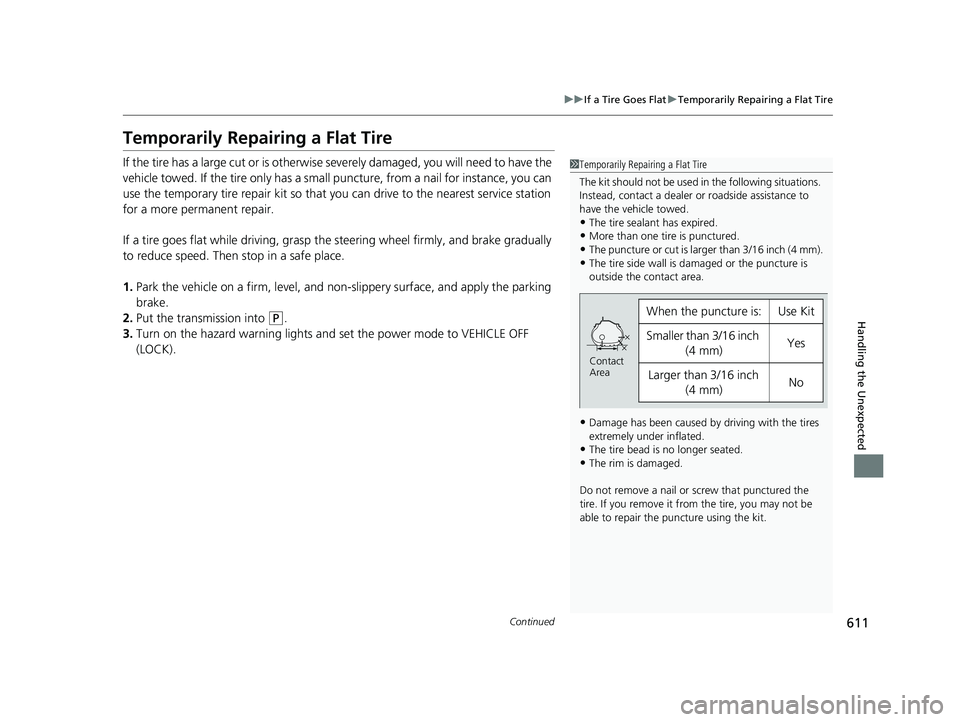
1 Temporarily Repairing a Flat Tire
The kit should not be used in the following situations.
Instead, contact a dealer or roadside assistance to
have the vehicle towed.
•The tire sealant has expired.
•More than one tire is punctured.
•The puncture or cut is larger than 3/16 inch (4 mm).•The tire side wall is da maged or the puncture is
outside the contact area.
•Damage has been caused by driving with the tires
extremely under inflated.
•The tire bead is no longer seated.
•The rim is damaged.
Do not remove a nail or screw that punctured the
tire. If you remove it from the tire, you may not be
able to repair the puncture using the kit.
When the puncture is:Use Kit
Smaller than 3/16 inch (4 mm)Yes
Larger than 3/16 inch (4 mm)No
Contact
Area
20 INSIGHT-31TXM6100.book 611 ページ 2019年4月24日 水曜日 午後2時2分
Page 618 of 675
uuIf a Tire Goes Flat uTemporarily Repairing a Flat Tire
616
Handling the Unexpected
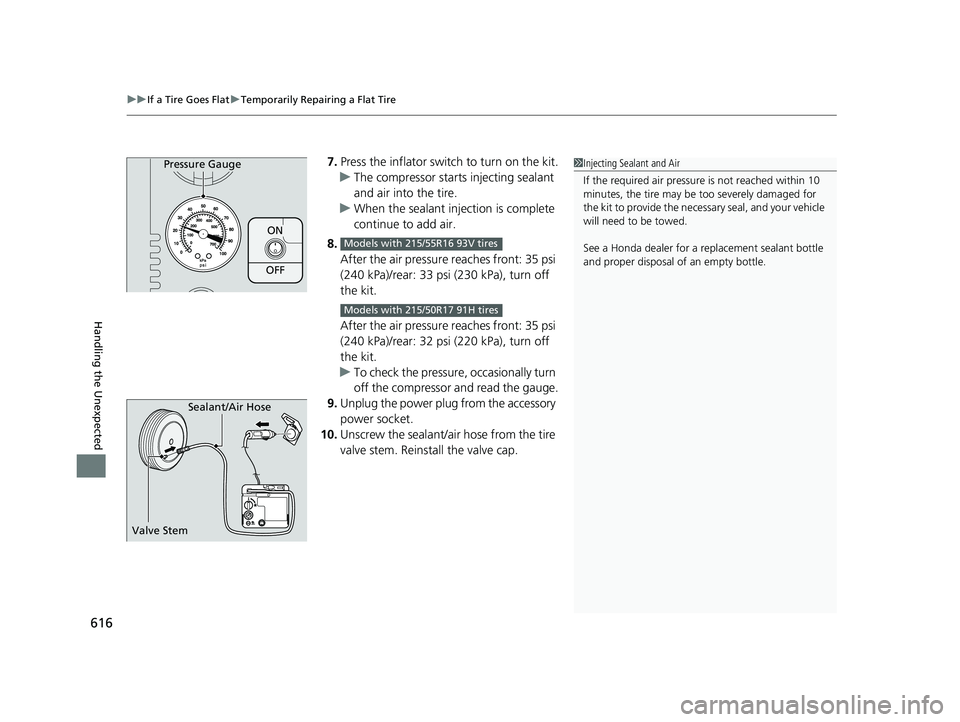
7. Press the inflator swit ch to turn on the kit.
u The compressor starts injecting sealant
and air into the tire.
u When the sealant injection is complete
continue to add air.
8. After the air pressure reaches front: 35 psi
(240 kPa)/rear: 33 psi (230 kPa), turn off
the kit.
After the air pressure reaches front: 35 psi
(240 kPa)/rear: 32 psi (220 kPa), turn off
the kit.
u To check the pressure, occasionally turn
off the compressor and read the gauge.
9. Unplug the power plug from the accessory
power socket.
10. Unscrew the sealant/air hose from the tire
valve stem. Reinstall the valve cap.
ON
OFF
Pressure Gauge
Models with 215/55R16 93V tires
Models with 215/50R17 91H tires
1Injecting Sealant and Air
If the required air pressure is not reached within 10
minutes, the tire may be too severely damaged for
the kit to provide the necessa ry seal, and your vehicle
will need to be towed.
See a Honda dealer for a replacement sealant bottle
and proper disposal of an empty bottle.
Sealant/Air Hose
Valve Stem
20 INSIGHT-31TXM6100.book 616 ページ 2019年4月24日 水曜日 午後2時2分
Page 621 of 675
619
uuIf a Tire Goes Flat uTemporarily Repairing a Flat Tire
Continued
Handling the Unexpected
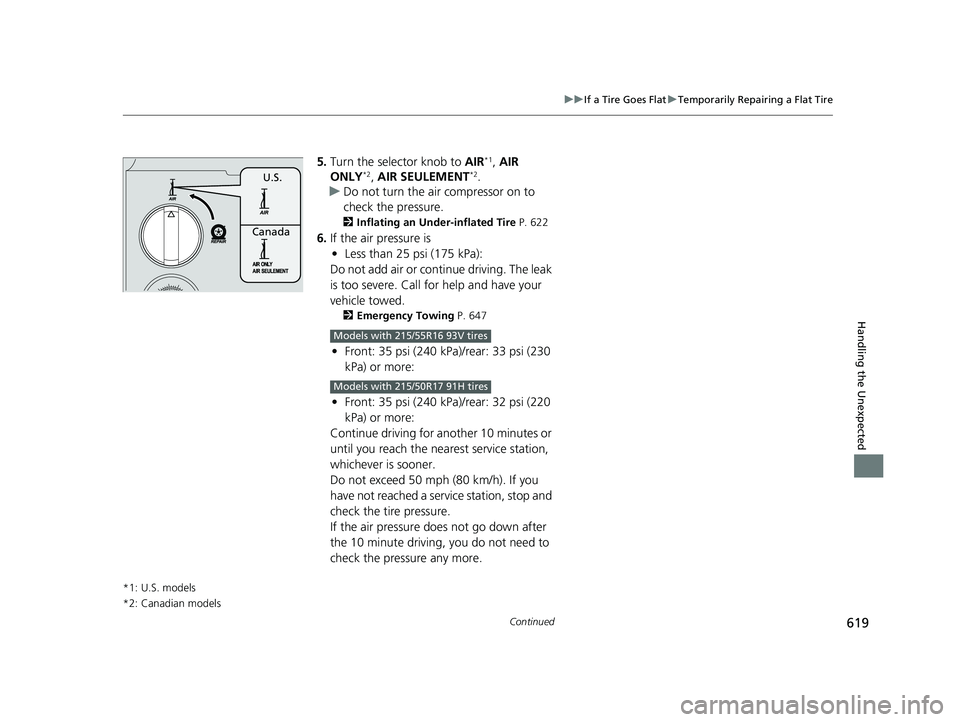
5. Turn the selector knob to AIR*1, AIR
ONLY*2, AIR SEULEMENT*2.
u Do not turn the air compressor on to
check the pressure.
2 Inflating an Under-inflated Tire P. 622
6.If the air pressure is
• Less than 25 psi (175 kPa):
Do not add air or continue driving. The leak
is too severe. Call for help and have your
vehicle towed.
2 Emergency Towing P. 647
•Front: 35 psi (240 kPa) /rear: 33 psi (230
kPa) or more:
• Front: 35 psi (240 kPa) /rear: 32 psi (220
kPa) or more:
Continue driving for another 10 minutes or
until you reach the nearest service station,
whichever is sooner.
Do not exceed 50 mph (80 km/h). If you
have not reached a serv ice station, stop and
check the tire pressure.
If the air pressure does not go down after
the 10 minute driving, you do not need to
check the pressure any more.
*1: U.S. models
*2: Canadian models
U.S.
Canada
Models with 215/55R16 93V tires
Models with 215/50R17 91H tires
20 INSIGHT-31TXM6100.book 619 ページ 2019年4月24日 水曜日 午後2時2分