Exhaust HONDA INTEGRA 1994 4.G User Guide
[x] Cancel search | Manufacturer: HONDA, Model Year: 1994, Model line: INTEGRA, Model: HONDA INTEGRA 1994 4.GPages: 1413, PDF Size: 37.94 MB
Page 86 of 1413
Valves, Valve Springs and
Valve Seals
Valve lnstallation
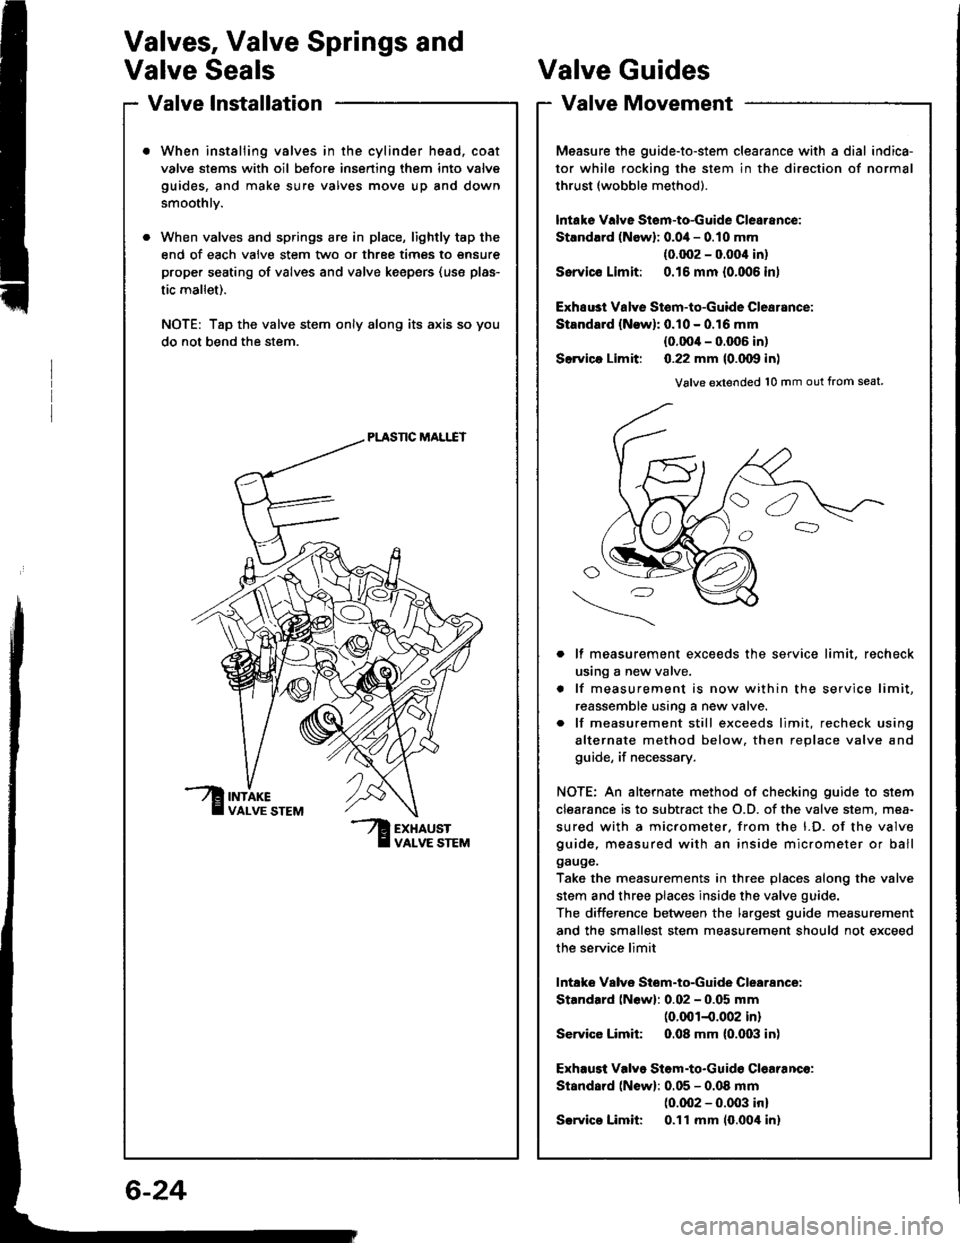
When instaliing valves in the cylinder head, coat
valve stems with oil before insening them into valve
guides, and make sure valves move up and down
smoothlv.
When valves and springs are in place, lightly tap the
end of each valve stem two or three times to snsure
proper seating of valves and valve keepsrs (use plas-
tic mallet).
NOTE: Tap the valve stem only along its axis so you
do not bend the stem.
PLASNC MALI.IT
?ur
Valve Guides
Valve Movement
Measure the guide-to-stem clearance with a dial indica-
tor while rocking the stem in the direction of normal
thrust (wobble method).
lntake Valve Stsm-to-Guide Clearance:
Strndlrd (Newl: 0.0i1- 0.10 mm
(0.002 - 0.004 in)
Ssrvicc Limit: 0.16 mm {0.006 in)
Exhsust Valye Stom-to-Guide Clearance:
Standard {N€w): 0.10 - 0.16 mm
{0.0O'l - 0.006 in)
Slrvica Limit: 0.22 mm {0.000 in)
Valve extended 10 mm out from seat
lf measurement exceeds the service limit, recheck
using a new valve.
lf measurement is now within the service limit,
reassemble using a n€w valve.
lf measurement still exceeds limit, recheck using
alternate method below. then replace valve and
guide, if necessary.
NOTE: An alternate method of checking guide to stem
clearance is to subtract the O.D. of the valve stem, mea-
sured with a micrometer. from the l.D. of the valve
guide, measured with an inside micrometer or ball
gauge.
Take the measurements in three places along the valve
stem and three places inside the valve guide.
The diiference between the largest guide measurement
and the smallest stem measurement should not exceed
the service limit
lntake Valve Stom-to-Guide Clearance:
Standard (Newl: 0.02 - 0.05 mm(0.001-0.002 in)
Service Limit 0.08 mm (0.003 in)
Exhaust Valve Stom.to.Guid€ Clearanco:
Standard (Newl: 0.05 - 0.08 mm(0.002 - 0.003 inl
Srrvico Limit 0.ll mm 10.00't inl
6-24
Page 88 of 1413
Valve Guides
Replacement {cont'd}
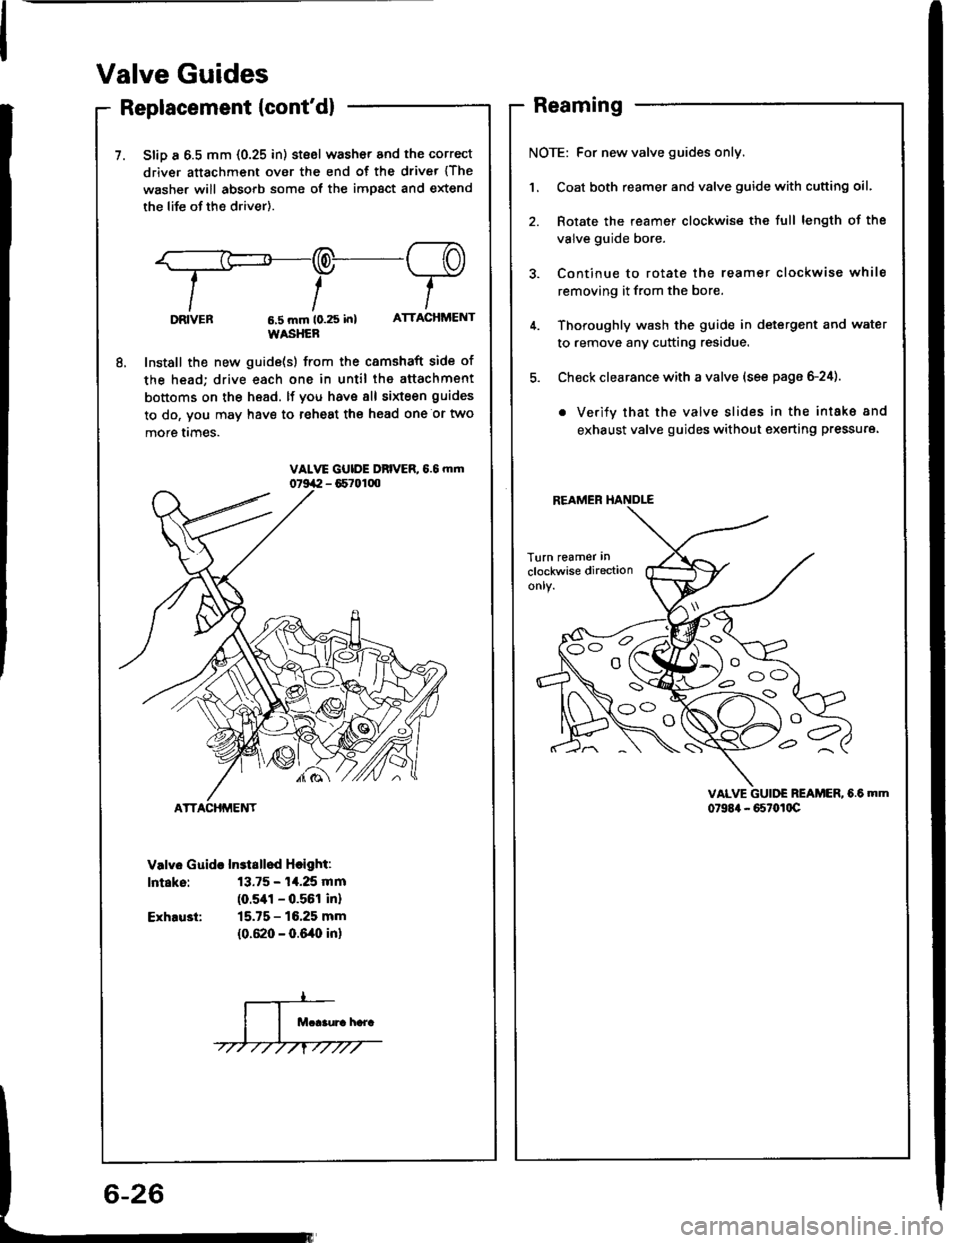
7. SliD a 6.5 mm {0.25 in) stsel washor and the correct
driver attachment over the end of the driver {The
washer will absorb some of the impact and extend
the life of the driver).
.,F-q-re
tt-T-IIttlDRVEn 6,5 mm t0.25 in) ATTACHMENT
WASHER
8, Install the new guide(s) from the camshaft side of
the head; drive each one in until the attachment
bottoms on the head. lf you have 8ll sixteen guides
to do, vou may have to reheat the head one or two
more I|mes.
Valv6 Guida Instsllod Hcight:
lntaks: 13.75 - 14.25 mm
(o.sal - 0.561 inl
Exhru3t: 15.75 - 16.25 mm
{0.620 - 0.640 in}
Reaming
NOTE: For new valve guides only.
Coat both reamer and valve guide with cutting oil.
Rotate the reamer clockwise the full length of the
valve guide bore.
Continue to rotate the reamet clockwise while
removing it from the bore.
Thoroughly wash the guide in detergent and water
to remove any cutting residue.
Check clearance with a valve (see page 6-24).
. Verify that the valve slides in the intake 8nd
exhaust valve guides without ex€rting pressure.
VALVE GUII'E REAMER, 6.6 MM
079E4 - 667ot0c
REAMER HANDLE
s
Page 89 of 1413
Valve Seats
ACTUALSEATINGSUBFACE
VALVESEAT
PRUSSIAN
Reconditioning
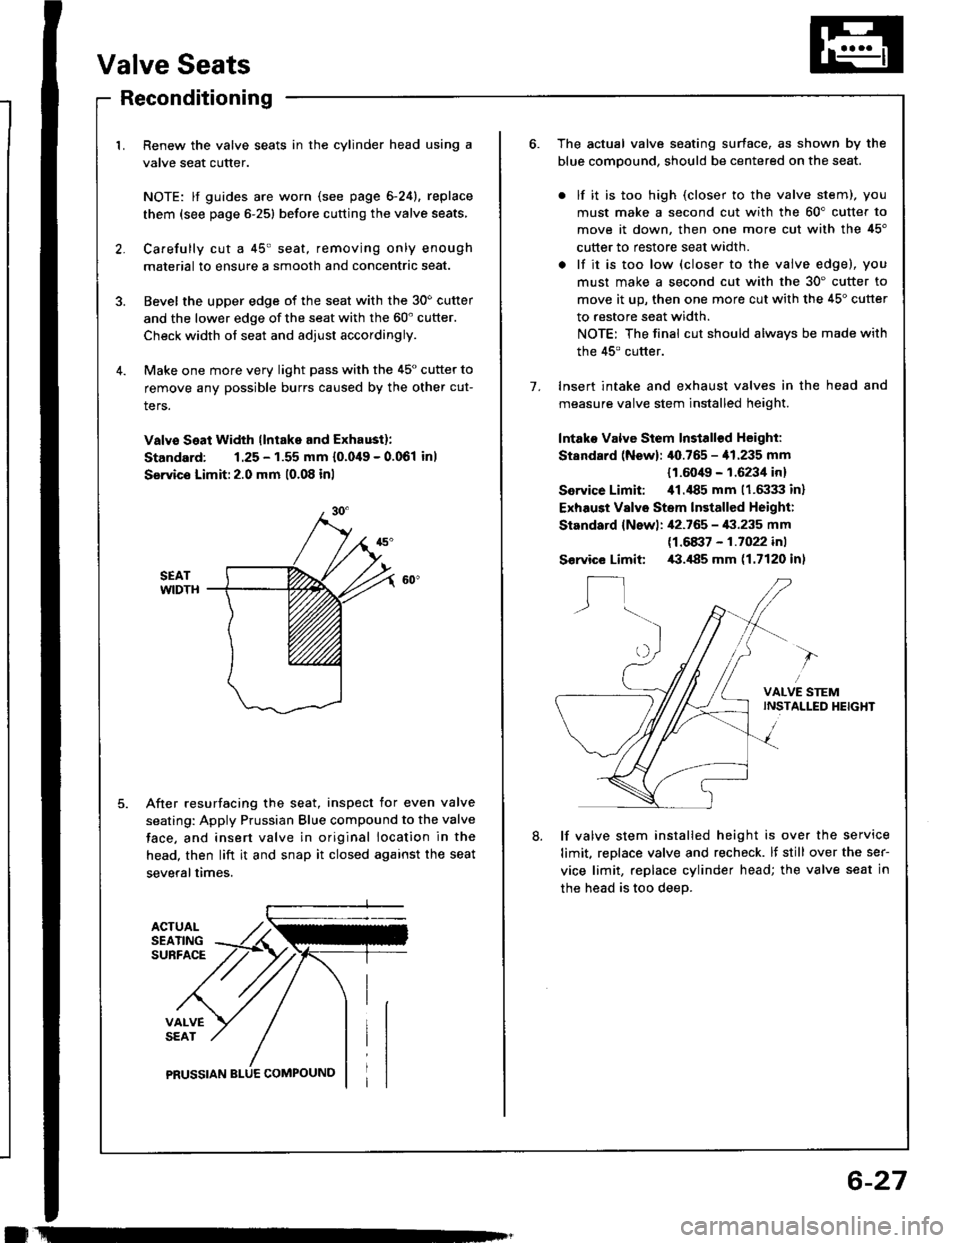
1. Renew the valve seats in the cylinder head using a
valve seat cutter.
NOTE: lf guides are worn (see page 6-24), replace
them (see page 6-251 before cutting the valve seats,
2. Carefully cut a 45' seat, removing only enough
material to ensure a smooth and concentric seat.
3. Bevel the upper edge of the seat with the 30o cutter
and the lower edge of the seat with the 60' cutter.
Check width of seat and adjust accordingly.
4. Make one more very light pass with the 45" cutter to
remove any possible burrs caused by the other cut-
ters.
Valvo Seat Width llntake and Exhaustl:
Standard: 1.25 - 1.55 mm {0.049 - 0.061 inl
Servics Limit:2.0 mm 10.08 inl
SEATWIDTH
After resurfacing the seat, inspect for even valve
seating: Apply Prussian Blue compound to the valve
face, and insert valve in original location in the
head, then lift it and snap it closed against the seat
severaltimes.
!
6-27
7.
The actual valve seating surface, as shown by the
blue compound, should be centered on the seat.
. lf it is too high (closer to the valve stem), you
must make a second cut with the 60" cutter to
move it down, then one more cut with the 45'
cutter to restore seat width.
. lf it is too low (closer to the valve edgel, you
must make a second cut with the 30' cutter to
move it up, then one more cut with the 45" cutter
to restore seat width.
NOTE: The final cut should always be made with
the 45' cutter.
Insert intake and exhaust valves in the head and
measure valve stem installed height
Intako Valve Stem Install€d Height:
Standard (New): /$.765 - '11.235 mm
{1.604It - 1.6234 in}
Service Limit: ill.il85 mm (1.6:133 inl
Exhaust Valvo Stem lnstalled Height:
Standard {Newl: ,12.765 - i|:|.235 mm
11.6a37 - 1.1022 in1
Service Limit /B.il85 mm (1.7120 inl
lf valve stem installed height is over the service
limit, reDlace valve and recheck. lf still over the ser-
vice limit, replace cylinder head; the valve seat in
the head is too deeo.
8.
Page 91 of 1413
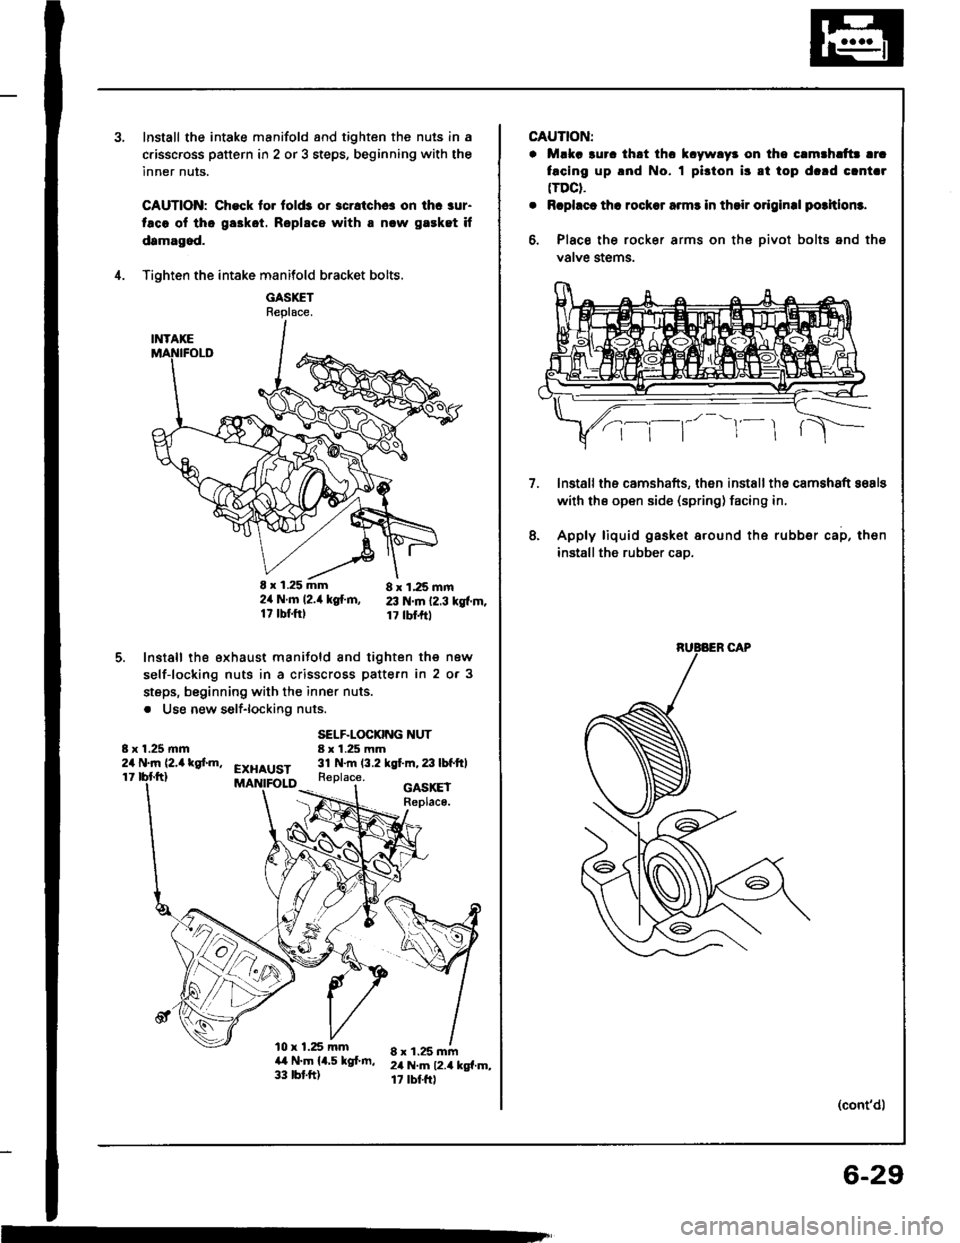
Install the intake manifold and tighten the nuls in a
c.isscross pattern in 2 or 3 steps, beginning with the
inner nuts.
CAUTION: Check to. fold3 or 3cratchc! on ihc aur-
taco ol tho ga3kot. Roplscs with a nlw gaeket if
damagod.
Tighten the intake manifold bracket bolts.
GASXETReplace.
E x 1.25 mm 8 x 1,25 mm2ir N.m l2.it kg{.m, 23 N.m 12.3 kgf.m.17 tbf.ftl 17 tbl.frt
Install the exhaust manifold and tighten the new
self-locking nuts in a crisscross pattern in 2 or 3
steps, beginning with the inner nuts.
. Use new self-lockiflg nuts.
4.
5.
8 x 1.25 mm24 N.m (2,a kgf.m,
SELF.LOCKING NUT8 x 1.25 mm31 N.m (3.2 kgt m,23lbfftlEXHAUST11Replace.
l0 x 1.25 mma,t N.m 14.5 kgf.m,33 tbt.ft)
GASKEIReplace.
8 x 1.25 mm2il N.m 12.4 kg{.m,17 rbtftl
m
CAUTION:
. Mlka 3uro thrt thc k.ywlyr on tho c.mthlttr lrc
facing up .nd No. I pi3ton i3 8t top d.rd clnt.r(TDCt.
. Rcphct th! rocksr armr in thsir o.iginal potltlom.
6, Place the rocker arms on the oivot bolts and ths
valve stems.
lnstallths camshafts, then installth€ camshaft sosls
with ths open side (spring) facing in.
Apply liquid gasket around the rubber cap, then
installthe rubber cao.
7.
8.
(cont'd)
6-29
Page 105 of 1413
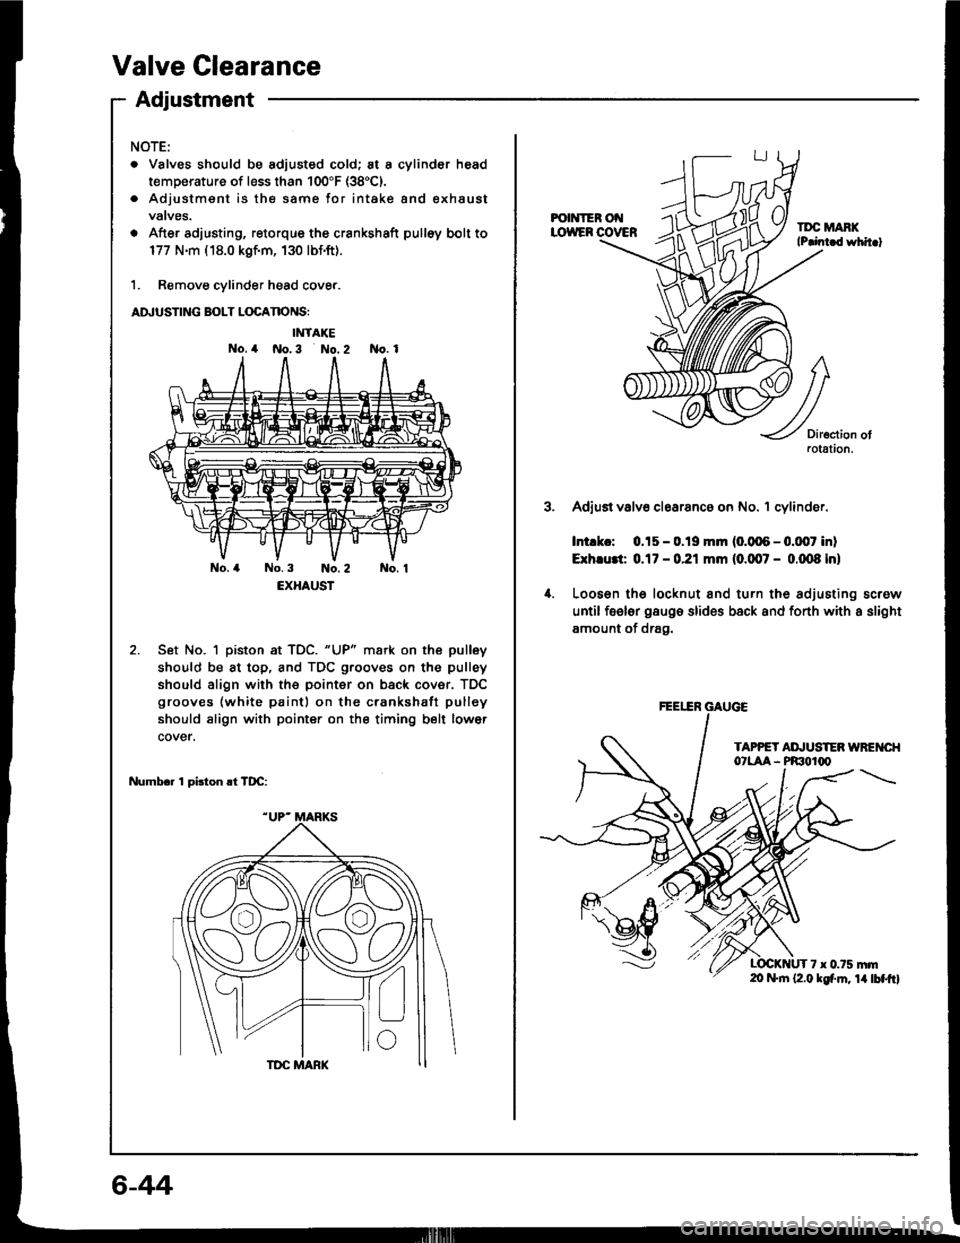
Valve Clearance
Adiustment
NOTE:
. Valves should be adjusted cold; at a cylinder head
temperature of less than 100"F (38'C).
. Adjustmsnt is the same for intake and exhaust
vatves.
o After adjusting, retorque the crankshaft pulloy bolt to
177 N.m ( 18.0 kgf.m, 130 lbf.ft).
1. Remove cylinder head cove..
ADJUSTING BOLT LOCANONS:
IMTAKE
No. 4 No.3 No. 2 No. 1
No.4 No.3 No.2 No. 1
EXHAUST
Set No. 1 piston at TDC. "UP" mark on the pulley
should be at top, and TDC grooves on the pulley
should align with the pointer on back cover. TDC
grooves (white paint) on the crankshatt pulley
should align with pointer on the timing belt lower
cover.
Numbr. 1 pirton .t TDC:
6-44
FOI{IER Ot{LOWEF COVERTDC MANKlP.int d whit.t
3.
4.
Diroction ofaotation.
Adjust valv6 clearanc6 on No. 1 cylinder.
Intlkc: 0.15 - 0.19 mm (0.006 - 0.0,07 inl
Exh.u3t 0.17 - 0.21 mm (0.007 - 0.m8 inl
Looson lh6 locknut and turn the adjusting screw
until feeler gaugo slides back and fonh with a slight
amount of drag.
TAPPET AI\,USTEN WREI{CI{O'LAA - PRIOIq'
7 x 0.75 mrn20 f+|n (2.0 kgf'm. 14lbtftl
FEEEN GAUGE
Page 112 of 1413
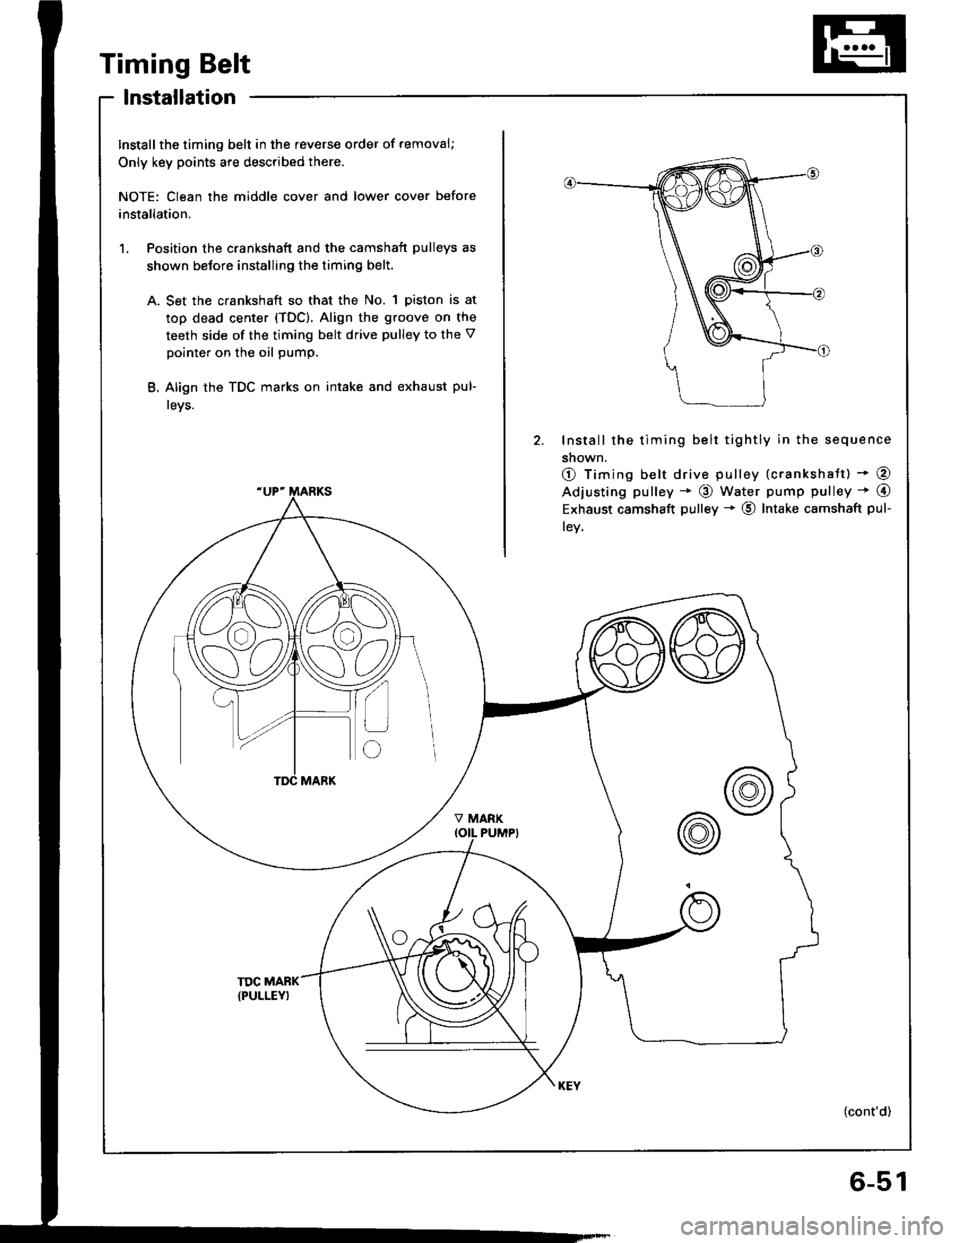
Timing Belt
lnstallation
Install the timing belt in the feverse order of removal;
Only key points are described there.
NOTE: Clean the middle cover and lower cover before
installation.
1. Position the crankshaft and the camshaft pulleys as
shown betore installing the timing belt.
A. Set the crankshaft so that the No. 1 piston is at
top dead center {TDC). Align the groove on the
teeth side of the timing belt drive pulley to the V
pointer on the oil pump.
B. Align the TDC marks on intake and exhaust pul-
leys.
2. Install the timing belt tightly in the sequence
shown.
O Timing belt drive pulley (crankshatt) * @
Adjusting pulley * @ water pump pulley * @
Exhaust camshaft pulley * @ Intake camshaft pul-
lev,
(cont'd)
6-51
Page 115 of 1413
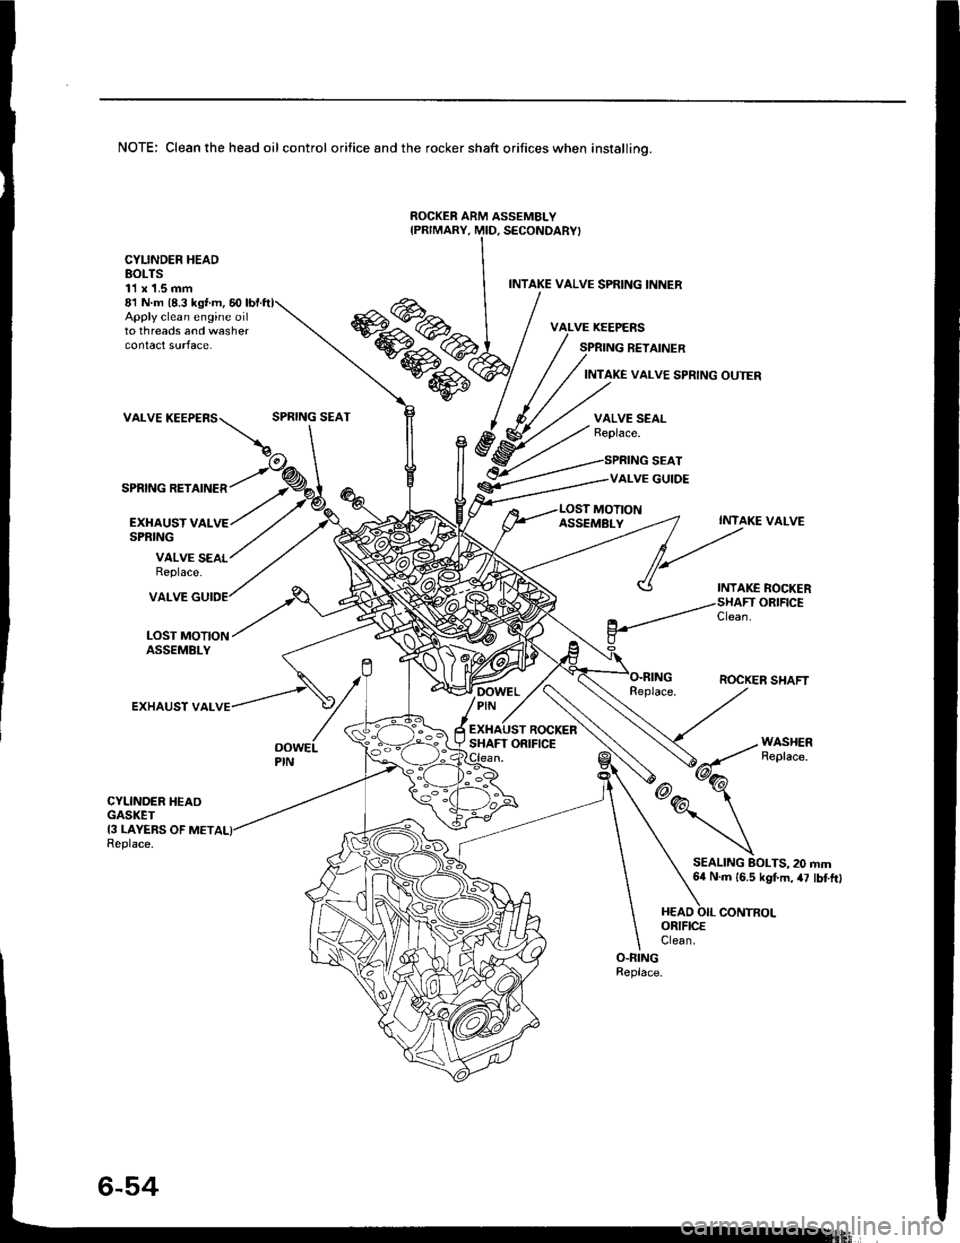
NOTE: Clean the head oil control orifice and the rocker shaft orifices when installino.
ROCKEB ARM ASSEMBLY
Apply clean engine oilto threads and washercontact surface.
81 N m (8.3 ks{ m, 60
VALVE
SPRING RETAINER
CYLINDER HEADBOLTS11 x 1.5 mm
EXI{AUST VALSPRING
INTAKE VALVE SPRING INNER
SPRING RETAINER
INTAKE VALVE SPRING OUTER
SPRING SEATVALVE SEALReplace.
SPRING SEAT
VALVE GUIDE
MOTION
VALVE SEALReplace.
ASSEMBLYINTAKE VALVE
INTAKE ROCKERORIFICE
LOST MOTIONASSEMBLY
VALVE
EXHAUST VAL
Clean.
ROCKER SHAFTDOWELPIN -,
ROCKERSHAFT ORIFICEOOWELPIN
CYLINDER HEAOGASKET13 LAYEBS OF METReplace.
SEALING BOLTS, 20 mm64 N.m 16.5 kgf.m, 47 lbtftl
Page 119 of 1413
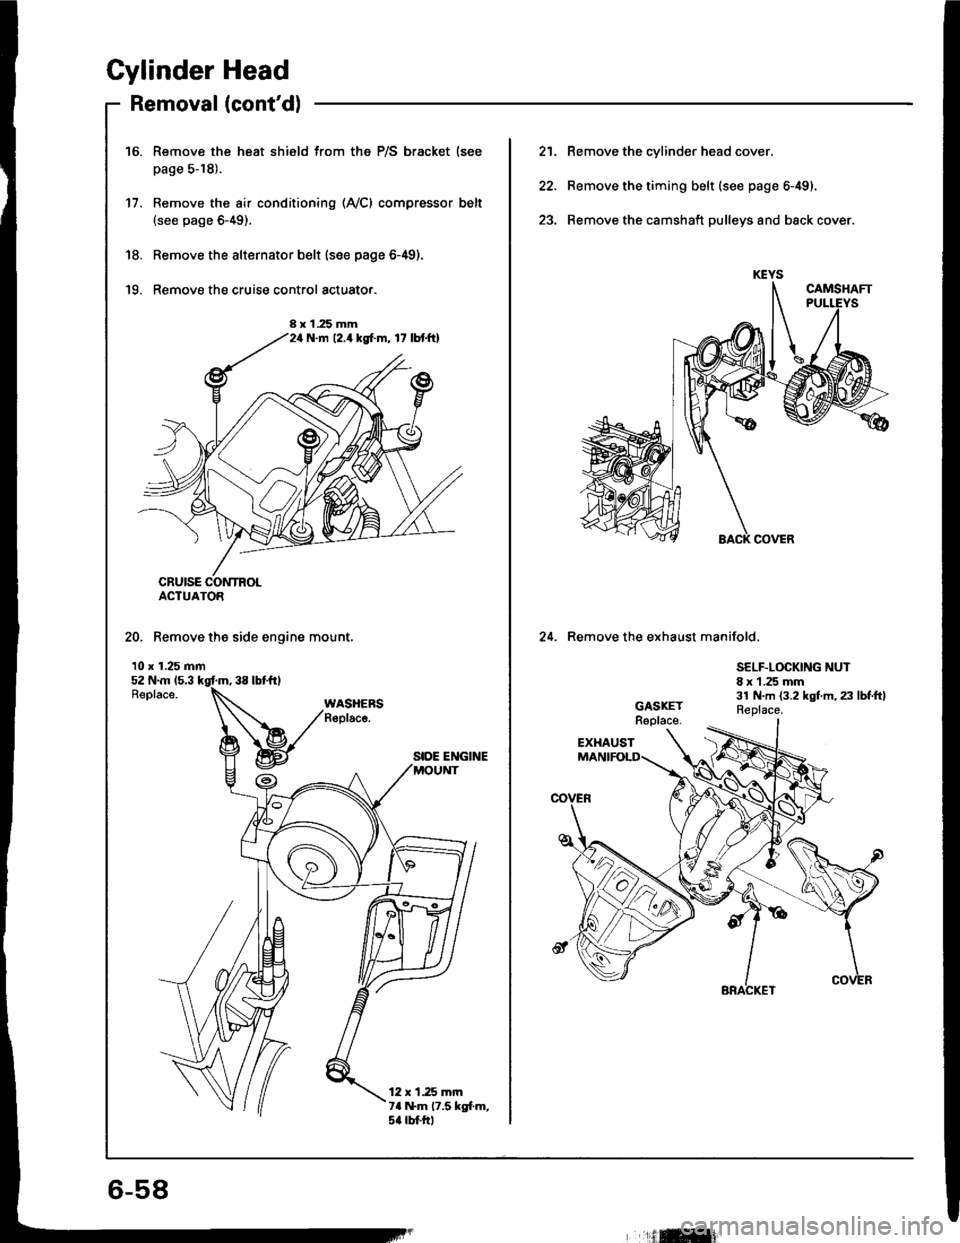
Cylinder Head
Removal (cont'dl
Remove the heat shield from the P/S bracket (see
page 5-18).
Remove the air conditioning (Ay'Cl compressor belt(see page 6-49).
Remove the alternator belt {s€e page 6-49).
Remove the cruise control actuato..
16.
17.
'18.
'19.
ACTUATOR
20. Remove the side engine mount.
10 x 1.25 mm
SIDE ENGINE
12 x 1.25 mrn7a N.m 17.5 kgl.m,5a rbtftl
8 x 1.25 mmN.m 12.4 kgf.m, 17 lbtftl
21. Remove the cylinder head cover.
22. Remove the timing belt (see page 6-49).
23. Remove the camshaft pulleys and back cover.
24. Remove the exhaust manifold.
SELF.LOCKING NUT8 x 1 .25 mm31 N.m {3.2 kgt m, 23 lbf.ftlReplace.
6-58
'ilffi{
Page 120 of 1413
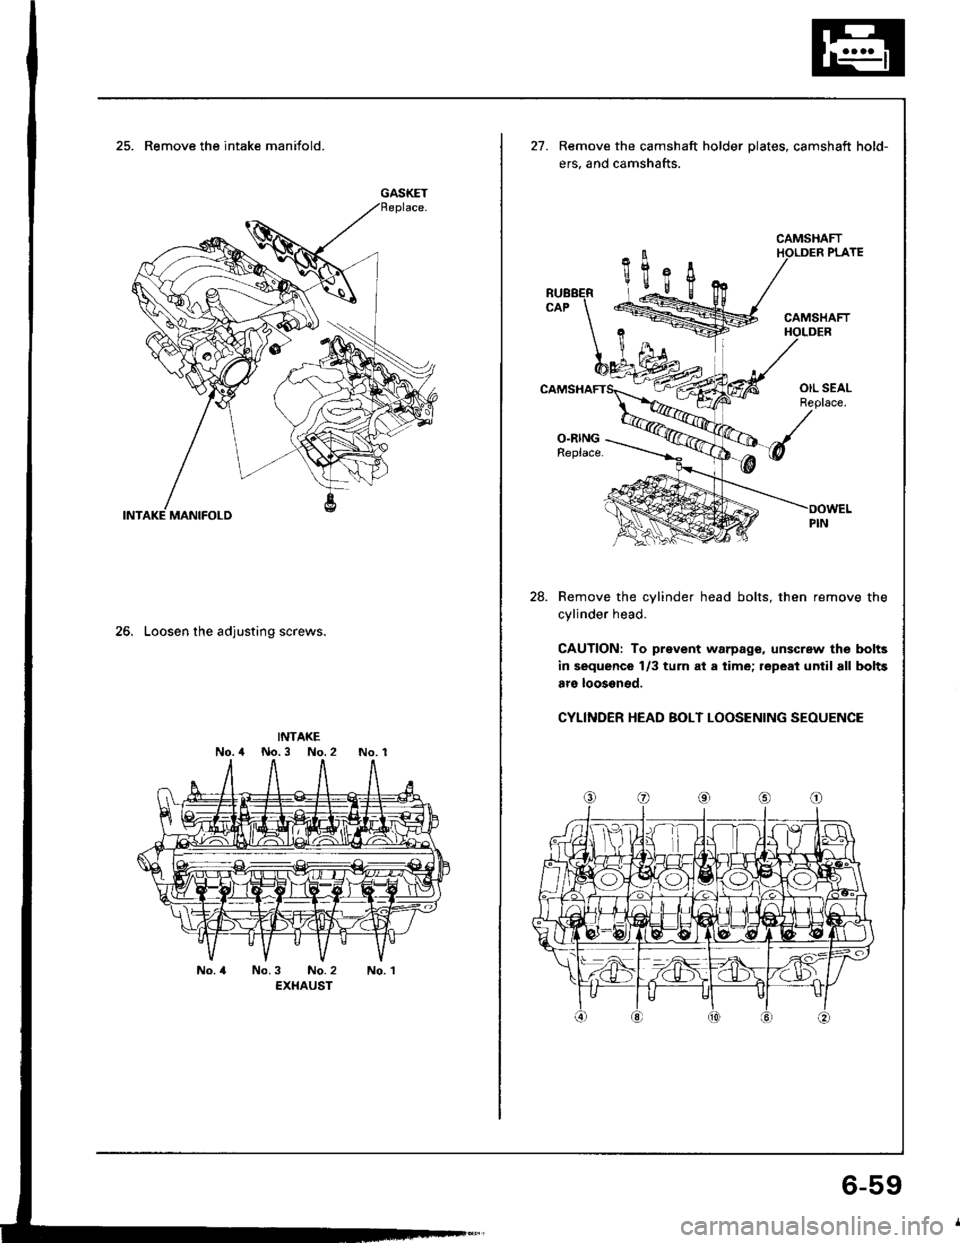
25. Remove the intake manifold.
26. Loosen the adjusting screws.
INTAKENo.4 No.3 No.2No. 1
No. 4No.3 No. 2EXHAUSTNo. 1
GASKET
21.Remove the camshaft holder plates, camshaft hold-
ers, and camshafts.
CAMSHAFT
28. Remove the cylinder head bolts, then remove the
cylinder head.
CAUTION: To prsvent warpage, unscrew th€ bolts
in sequence l/3 turn at a time; repeat until all bolts
aro loosoned.
CYLINDER HEAD BOLT LOOSENING SEOUENCE
6-59
Page 121 of 1413
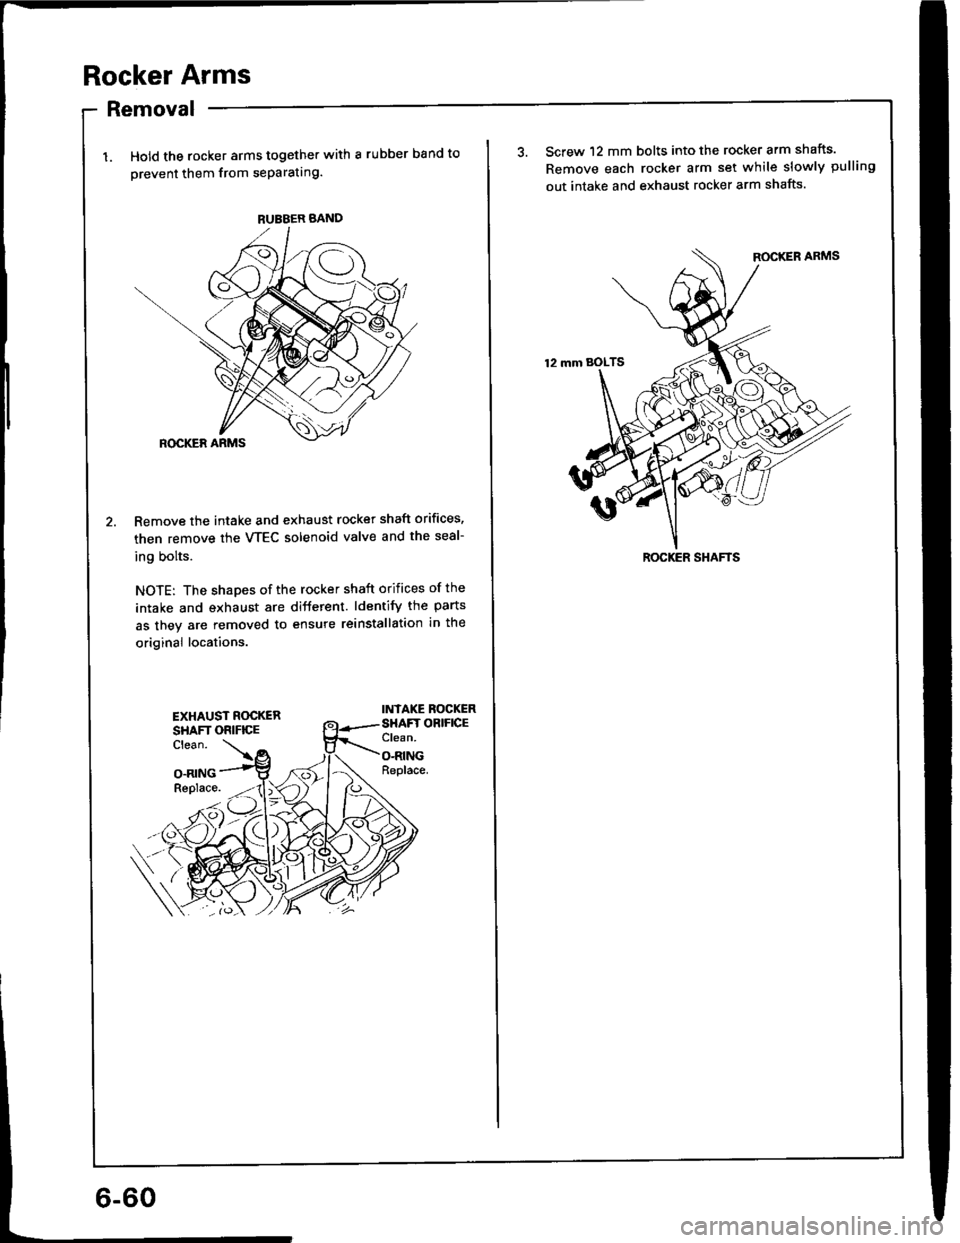
Rocker Arms
Removal
Hold the rocker arms together with a rubber band to
orevent them from seParating.
Remove the intake and exhaust rocker shaft orifices,
then remove the VTEC solenoid valve and the seal-
ing bolts.
NOTE: The shapes of the rocker shaft orifices of the
intake and exhaust are different. ldentify the parts
as they are removed to ensure reinstallation in the
original locations.
INTAKE ROCKERSHAFT OBIFICEClean.
O-RINGReplace.
RUBBER BAND
EXHAUST ROCKERSHAFT ORIFICEClean.
O.RINGReplace.
3. Screw 12 mm bolts into the rocker arm shafts.
Remove each rocker arm set while slowly pulling
out intake and exhaust rocker arm shafts.
ROCKER SHAFTS