trunk HONDA INTEGRA 1994 4.G Owner's Manual
[x] Cancel search | Manufacturer: HONDA, Model Year: 1994, Model line: INTEGRA, Model: HONDA INTEGRA 1994 4.GPages: 1413, PDF Size: 37.94 MB
Page 1148 of 1413
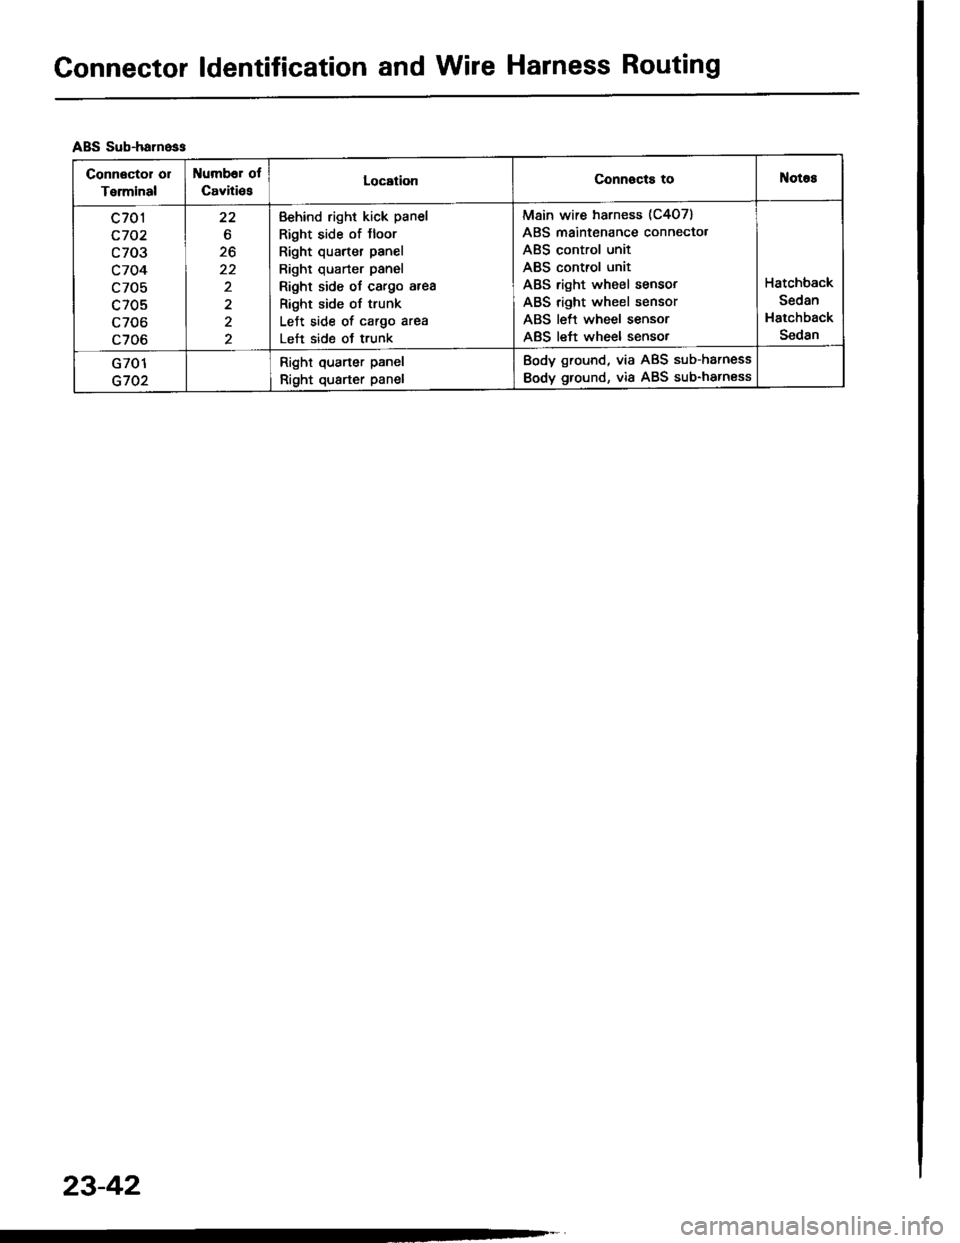
Gonnector ldentification and Wire Harness Routing
ABS Sub-harn6ss
Connactor ol
Terminal
Number of
CavitiesLocationConn€cts toNotas
c701
c702
c703
c704
c705
c705
c706
c706
22
20
22
2
2
Behind right kick panel
Right side of Jloor
Right quarter panel
Bighl quarter panel
Right side of cargo area
Right side of trunk
LeJt side of cargo area
Left side ot trunk
Main wire harness (C407)
ABS maintenance connecto.
ABS control unit
ABS control unit
ABS right wheel sensor
ABS right wheel sensor
ABS left wheel sensor
ABS left wheel sensor
Hatchback
Sedan
Hatchback
Sedan
G701
G702
Right quarter panel
Right quarter panel
Body ground, via ABS sub-harness
Body ground, via ABS sub-harness
23-42
Page 1268 of 1413
Headlight
Adjustment
Belol€ adiusting lha hoadlights:
a Park the car on level ground.
a Make sure the luel tank is full.
a The driver or someone who weighs the same should
sit in the driver's seat.
a Load the trunk with the items you usually carry (if you
usually pull a trailer, attach it to the carl.
a Push down on the tront and rear bumDers several
times to make sure the car is sitting normally.
a When installing a new headlight assembly, tighten the
four mounting bolts so that.the indicator in the verti-
cal gauge comes to the "O" mark.
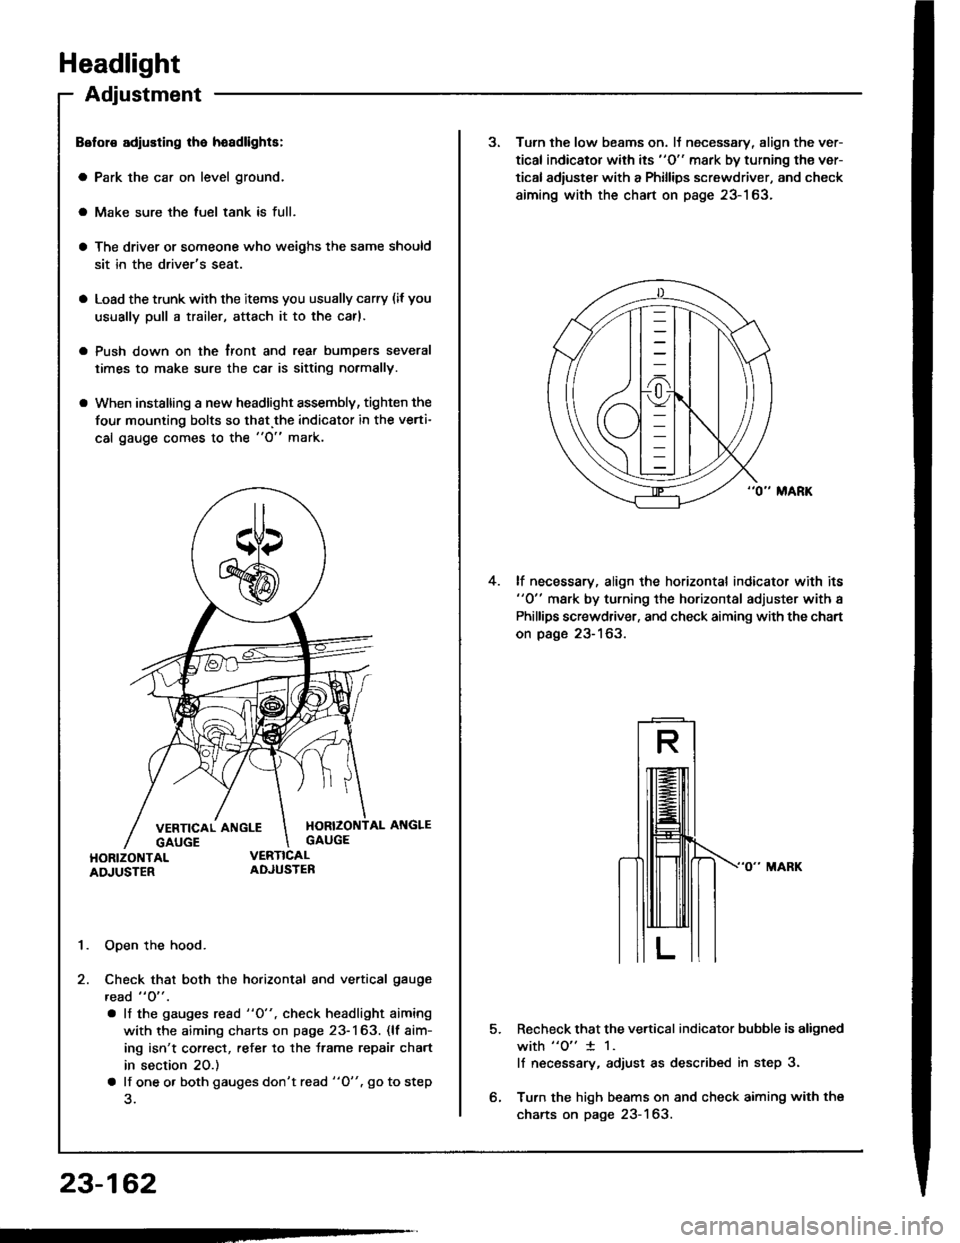
1. Open the hood.
2. Check that both the horizontal and vertical gauge
read " O" .
. lf the gauges rcad "O", check headlight aiming
with the aiming charts on page 23-163. (lf aim-
ing isn't correct, refer to the trame repair chart
in section 20.)
a lf one o. both gauges don't read "O". go to step
23-162
3. Turn the low beams on. lJ necessary, align the ver-
tical indicator with its "O" mark by turning the ver-
tical adiuster with a Phillips screwdriver, and check
aiming with the chart on page 23-163.
lf necessary, align the horizontal indicator with its"0" mark by turning the horizontal adjuster with a
Phillips screwdriver, and check aiming with the chart
on page 23-163.
4.
5.Recheck that the vertical indicator bubble is aligned
with "o" 1 1.
lf necsssary, adjust as described in step 3.
Turn the high beams on and check aiming with the
charts on page 23-163.
Page 1273 of 1413
Taillights (Sedan)
Replacement
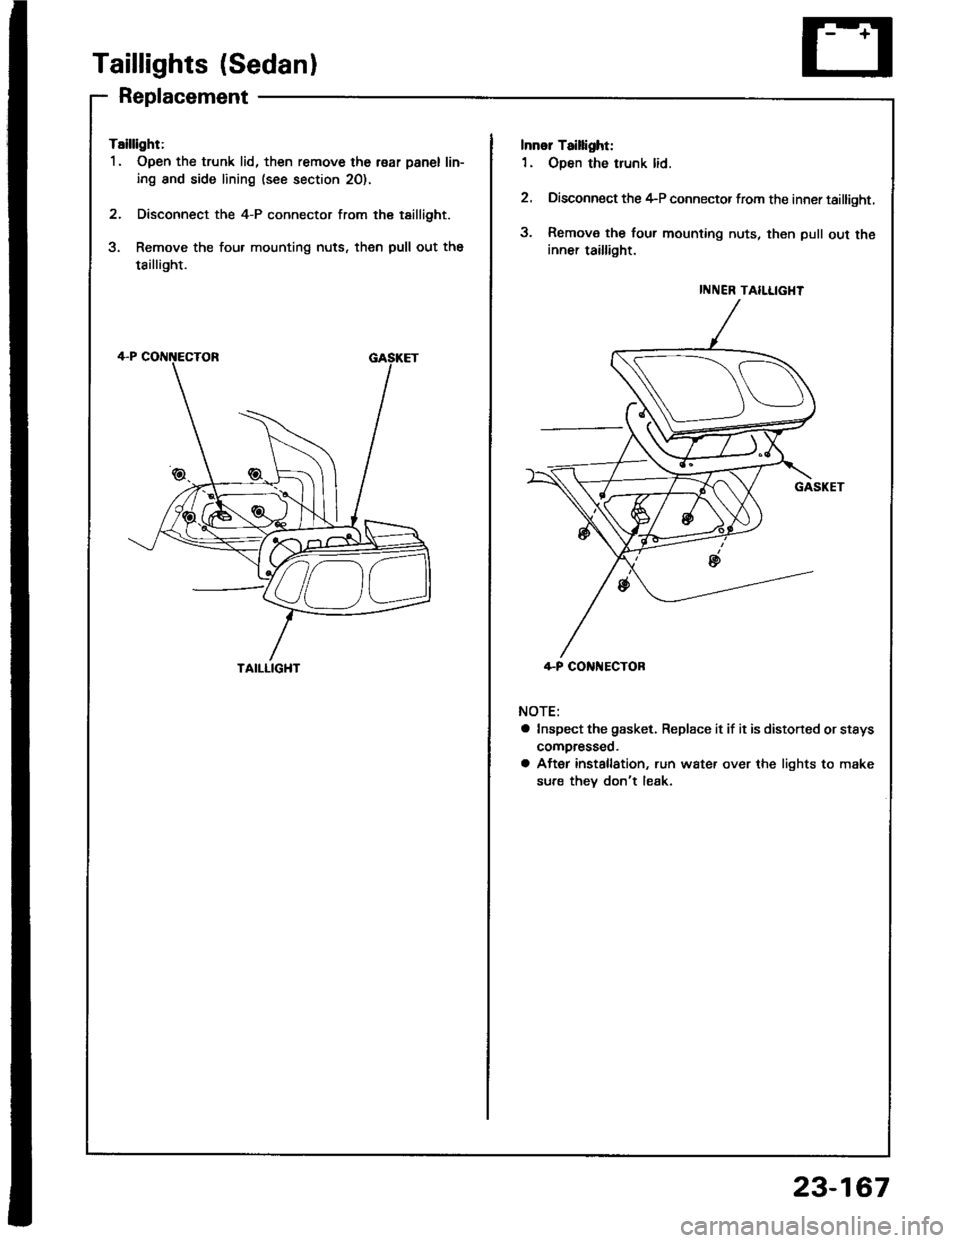
Tsillight:
1. Open the trunk lid, then remove the r€ar panel lin-
ing and side lining (see section 20).
2. Disconnect the 4-P connector from the tsillight.
3. Remove the four mounting nuts, then pull out the
tsillight.
TAILLIGHT
INNER TAILLIGHT
4-P CONi{ECTOR
Innol Taillight:
1. Open the trunk lid.
2. Disconnect the 4-P connector from the inner taillight.
3. Remova the four mounting nuts, then pull out theinner taillight.
NOTE:
a Inspect the gasket. Replace it if it is distoned or stsys
compresseo.
a After installation, run water over the lights to make
sure thev don't leak.
23-167
Page 1274 of 1413
Taillights (Sedanl
Bulb Replacement
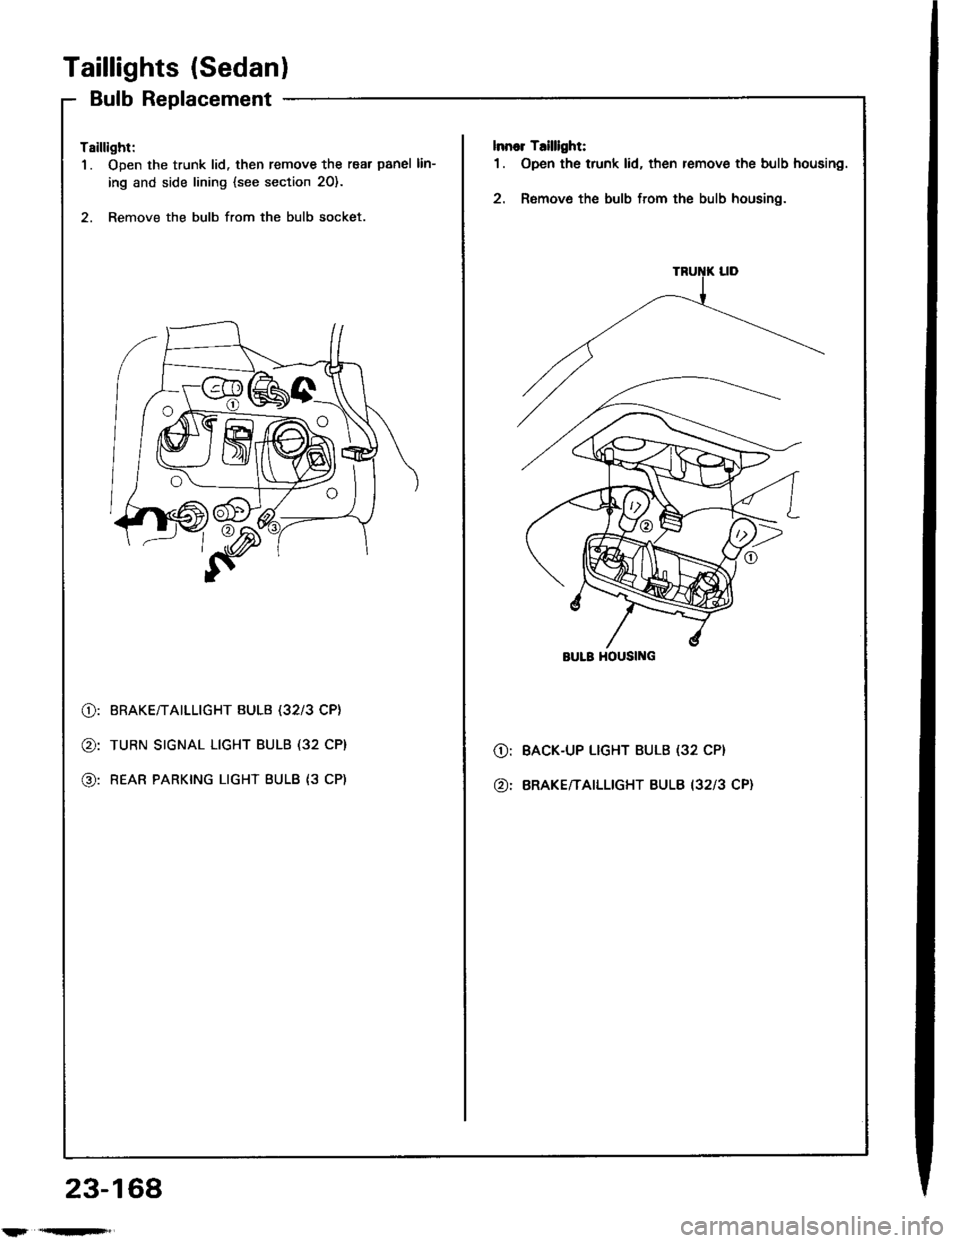
Tsillight:
1. Open the trunk lid. then remove the rear panel lin-
ing and side lining {see section 20}.
2. Remove the bulb from the bulb socket.
lnnor T.illlght:
1. Open the trunk lid, then remove the bulb housing.
2. Remove the bulb from the bulb housing.
@:
@:
@:
BRAKE/TAILLIGHT BULB (32l3 CP}
TURN SIGNAL LIGHT BULB (32 CP}
REAR PARKING LIGHT BULB {3 CP)
O:
@:
BACK-UP LIGHT BULB (32 CP}
BRAKE/TAILLIGHT BULB I3213 CP}
BULB HOUSII{G
23-168
l'r'qn'F',
Page 1278 of 1413
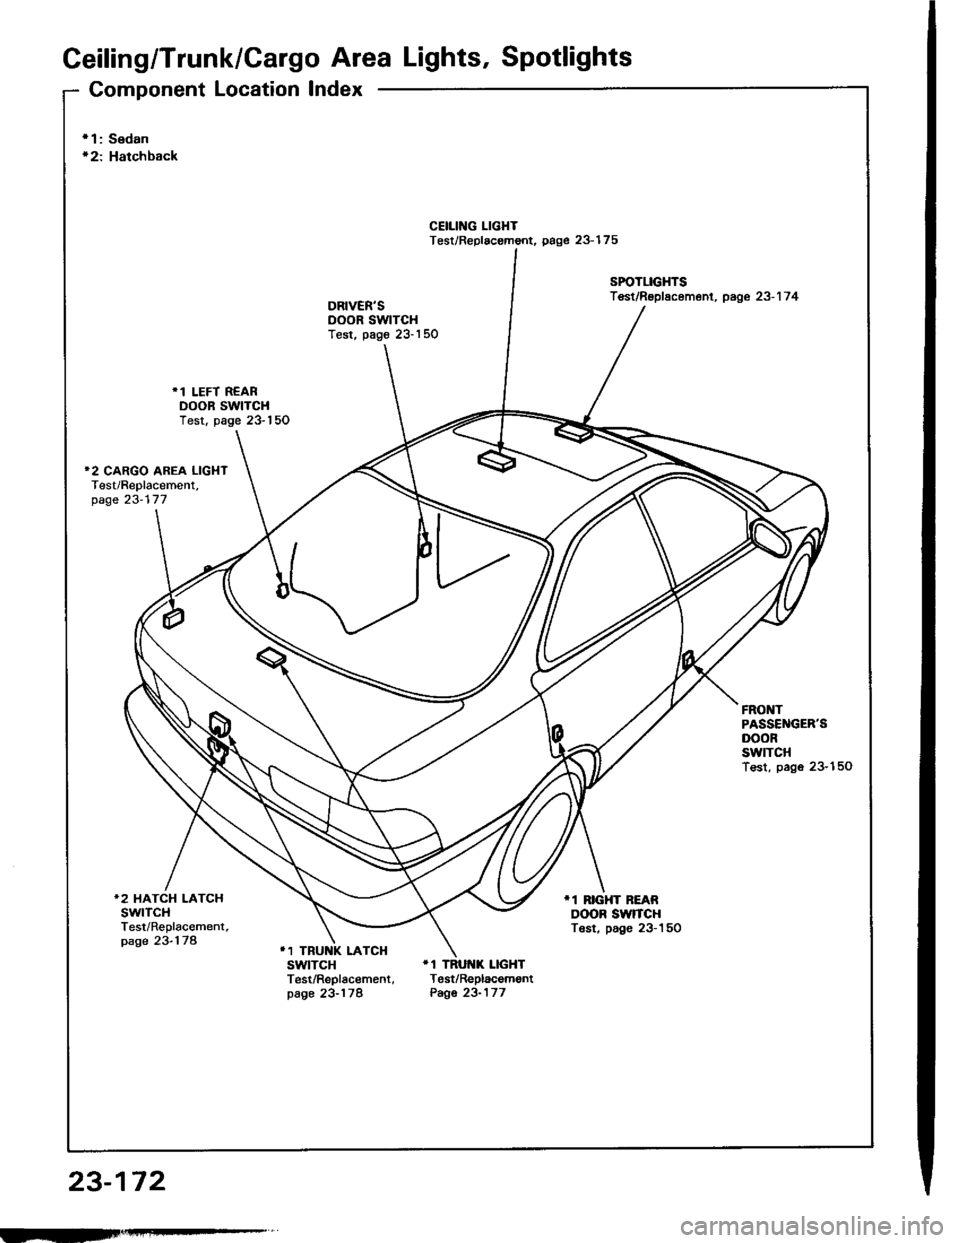
Ceiling/Trunk/Gargo Area Lights, Spotlights
Component Location Index
23-172
r 1: Sedanr2: Hatchback
CEIIING LIGHTTest/Replac€mont. page 23-175
SPOTLIGHTSTest/Rsplscement, page 23-1 7 4
.1 LEFT REARDOOR SWTCHTest. page 23-150
FRONTPASSEl{GER'SDOORswtTcHTest, pago 23-150
*2 HATCH LATCHswtTcHTest/Replacement,page 23-178
11 RrcHT BEARDOOR SWrCHTost. page 23-150
11 TRUNK LATCHSWITCH '1 TRUI{K LIGHTTest/Replac€ment, Test/Replacemontpage 23-178 Page 23-177
rII-
Page 1280 of 1413
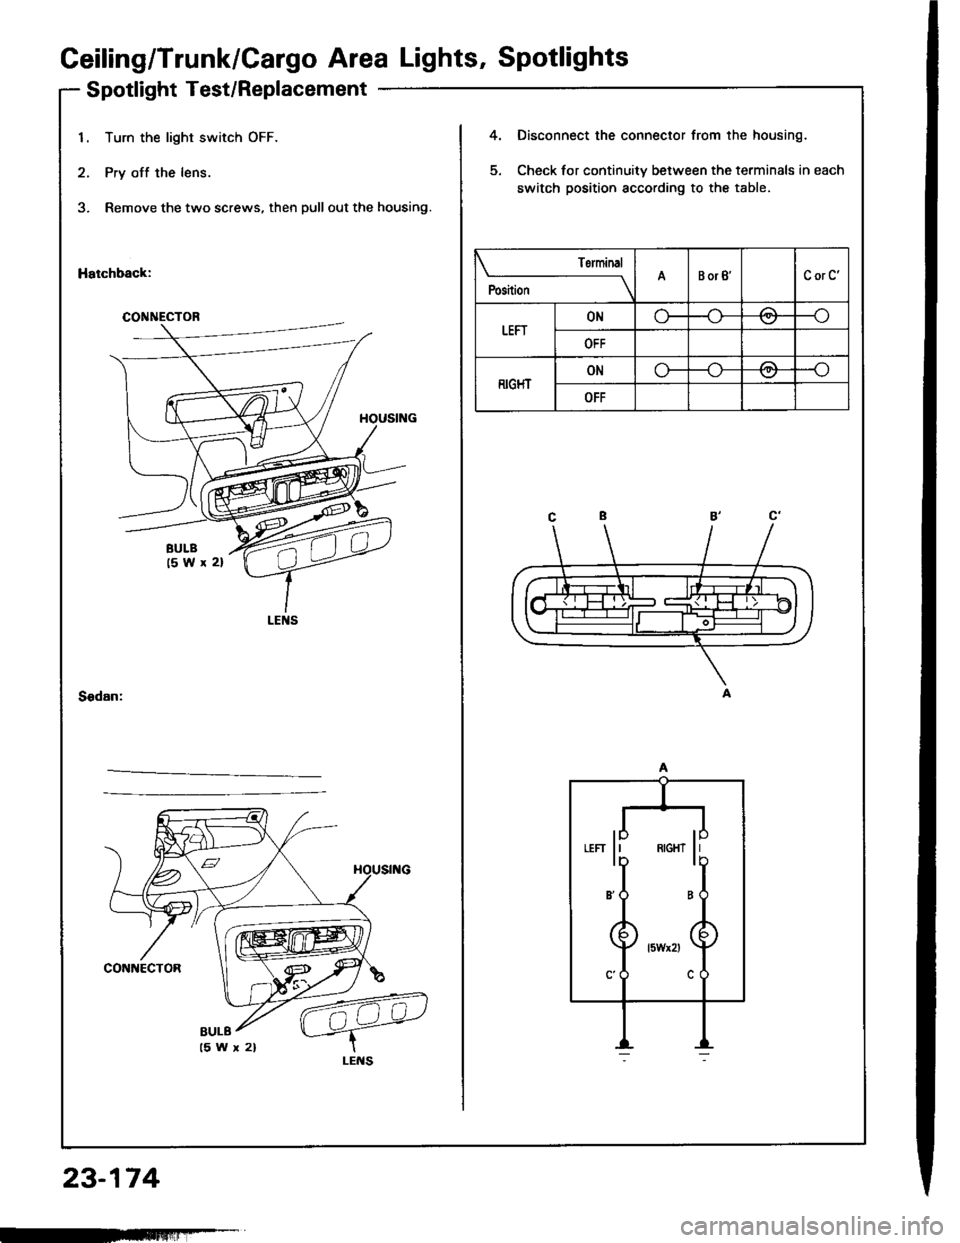
Ceiling/Trunk/Cargo Area Lights, Spotlights
Spotlight Test/Replacement
23-174
1. Turn the light switch OFF.
2. Pry off the lens.
3, Remove the two screws, then pull out the housing.
Hatchback:
4.
5.
Disconnect the connector from the housing.
Check for continuity between the terminals in each
switch position according to the table.
Sedan:
CONNECTOR
Torminal
;r,,-
----lABorB'CorC'
tEFrONo-/:\--o\:/
OFF
RIGHTONo---o
OFF
"" li ** li
B'O B
BULB
-FFmlliF-T
Page 1282 of 1413
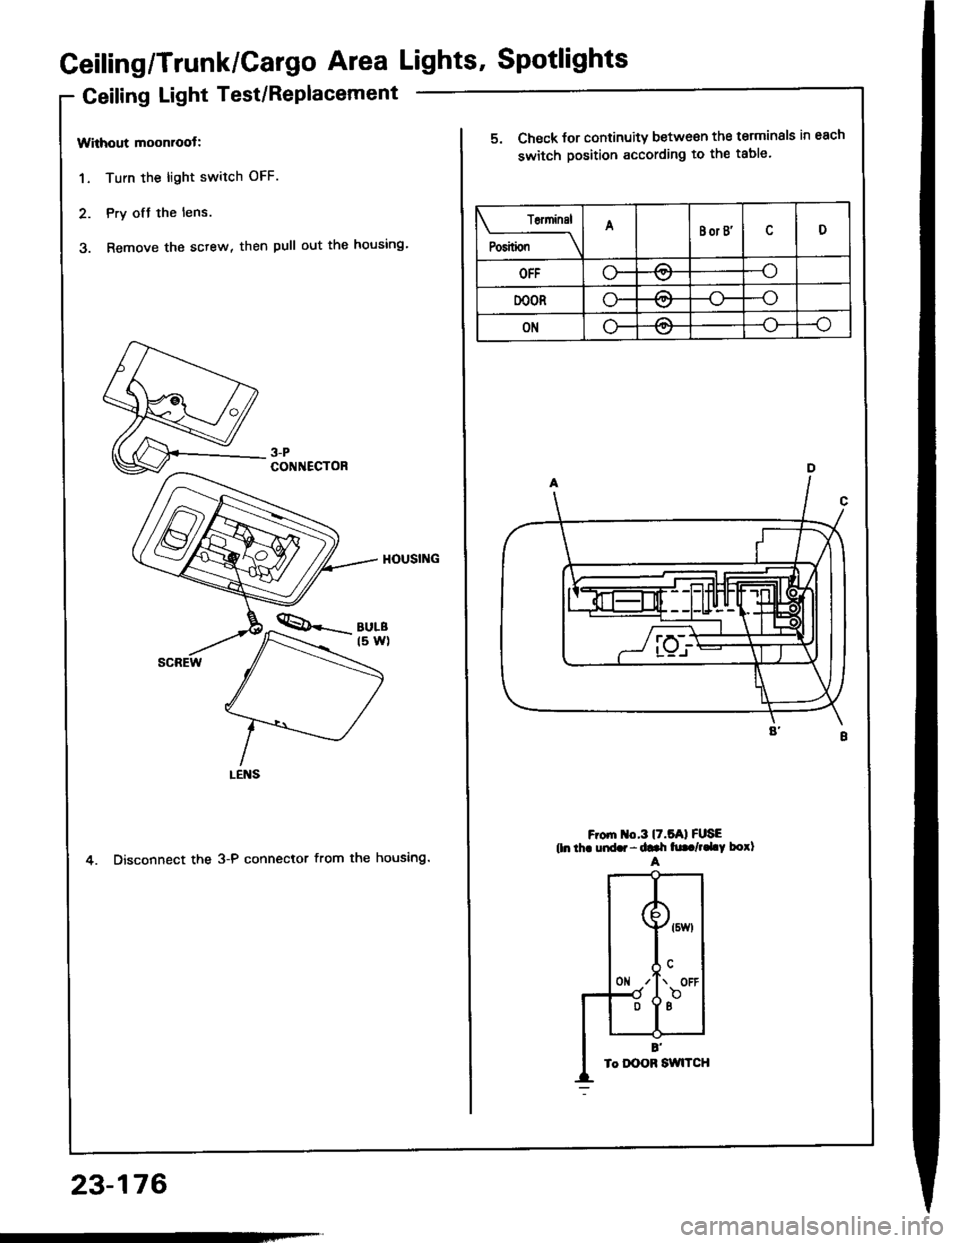
Geiling/Trunk/Cargo Area Lights' Spotlights
Geiling Light Test/Replacement
Without moonroot:
1. Turn the light switch OFF.
2. Pry ofJ the lens.
3. Remove the sctew, then pull out the housing'
4. Disconnect the 3-P connector from the housing.
3-PCONNECTOR
23-176
T6ninsl
P"riti"" \
ABor B'D
OFFo-/:\--o\:.,/
DOORo-A--o
ONLF/A--o
5. Check for continuity between the terminals in each
switch position according to the table.
F om o.3l7.5Al FUSEtln thr uid.r - ddr h|. /,.LY borlA
Page 1283 of 1413
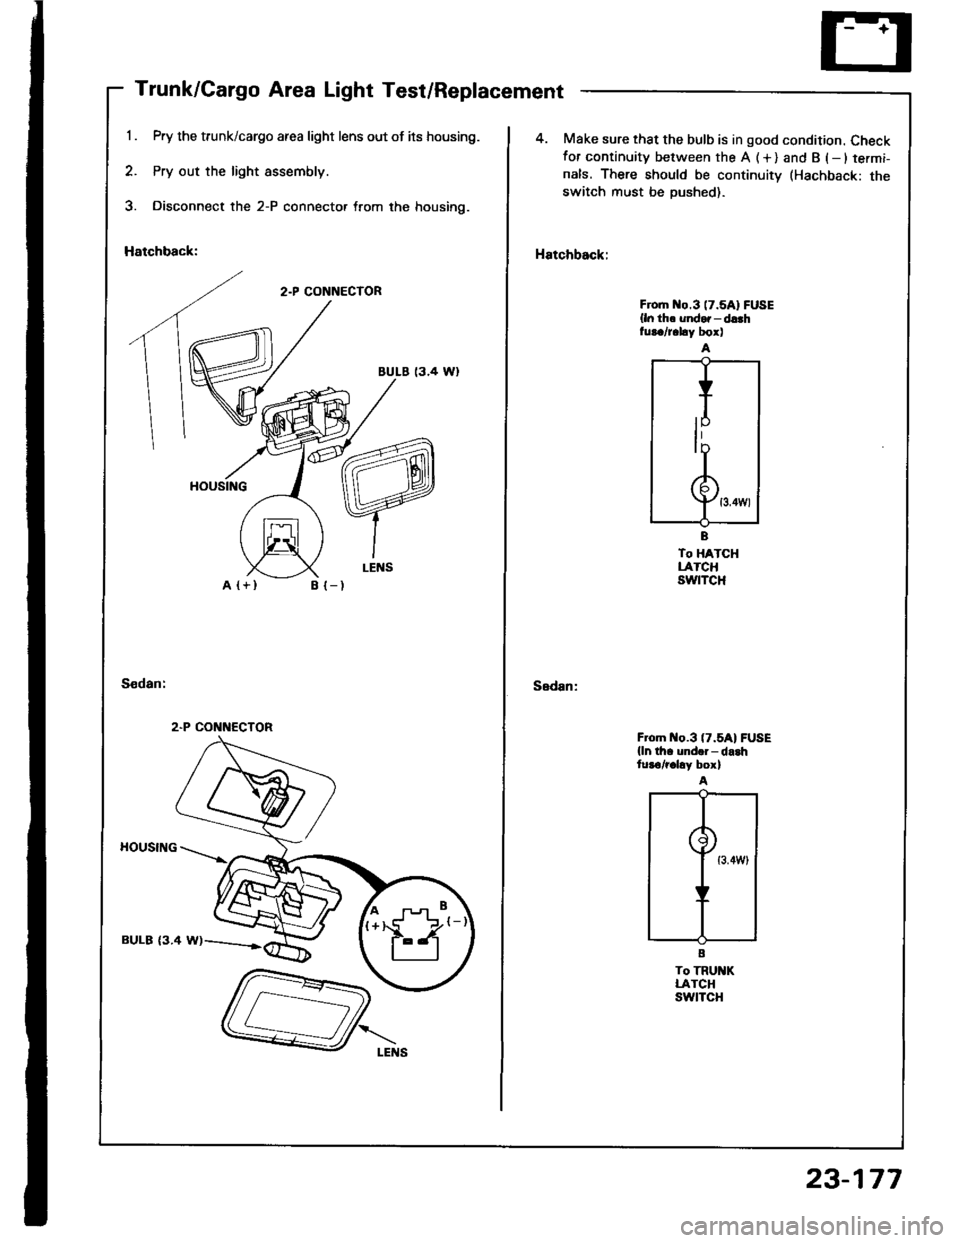
Trunk/Cargo Area Light Test/Replacement
Pry the trunk/cargo afea light lens out of its housing.
Pry out the light assembly.
Disconnect the 2-P connector trom the housing.
Hatchback:
2.P CONNECTOR
BULE 13.4 Wl
A {+}B {-)
HOUSING
BULB {3.4 W)
2.P CONNECTOR
4. Make sure that the bulb is in good condition. Checkfor continuity between the A (+) and B (-ltermi-
nals. There should be continuitv (Hachback: theswitch must be Dushed).
Hatchback:
Sedan:
Froh o.3 (7.5A1FUSE
{ln th. undor - d!.hfur./r.hy box)
To HATCHLATCHswtTcH
F om o.3 (7.5A1FUSE
{ln th. und.i- da.htur€/r.hy box)
To TRU KLATCHswtTcH
23-177
Page 1284 of 1413
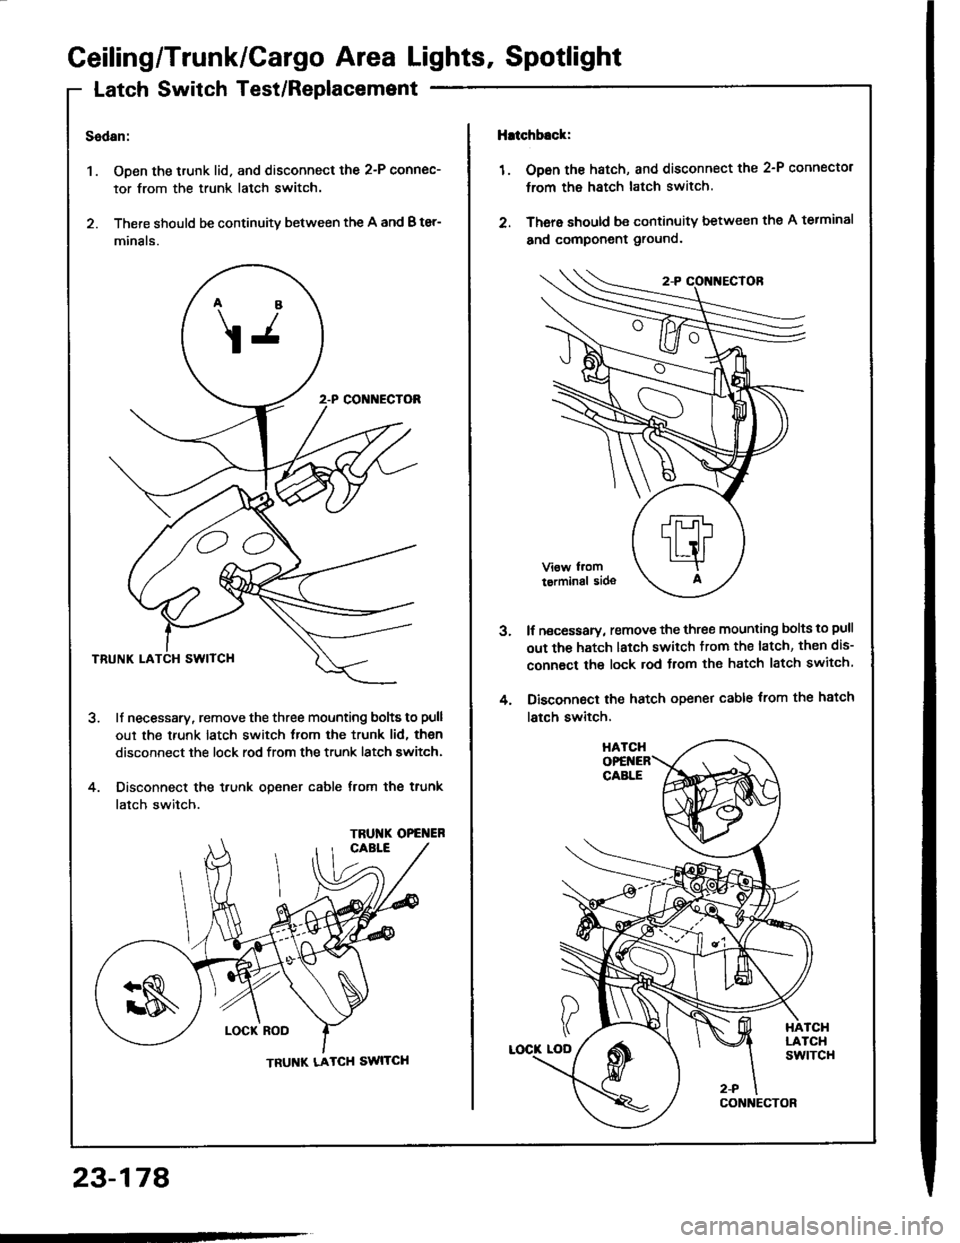
Ceiling/Trunk/Cargo Area Lights, Spotlight
Latch Switch Test/Replacemsnt
Sedan:
1. Open the trunk lid. and disconnect the 2-P connec-
tor from the trunk latch switch.
2. There should be continuity between the A and B ter-
minals.
ll necessary, remove the three mounting bolts to pull
out the trunk latch switch from the trunk lid, then
disconnect the lock rod from the trunk latch switch.
Disconnect the trunk opener cable from the trunk
latch switch.
4.
\j
CC
TRU'{K OPG ER
TRUNK LATCH SWITCH
lhtchb.ck:
1 . Op6n the hatch, and disconnect the 2-P connector
trom the hatch latch switch.
2. There should be continuity between thg A terminal
and component ground.
lf necessary, remove the three mounting bolts to pull
out the hatch latch switch trom the latch, then dis-
connact the lock rod Jrom the hatch latch switch
Disconnect the hatch opener cable trom the hatch
latch switch,
3.
4.
23-178
Page 1289 of 1413
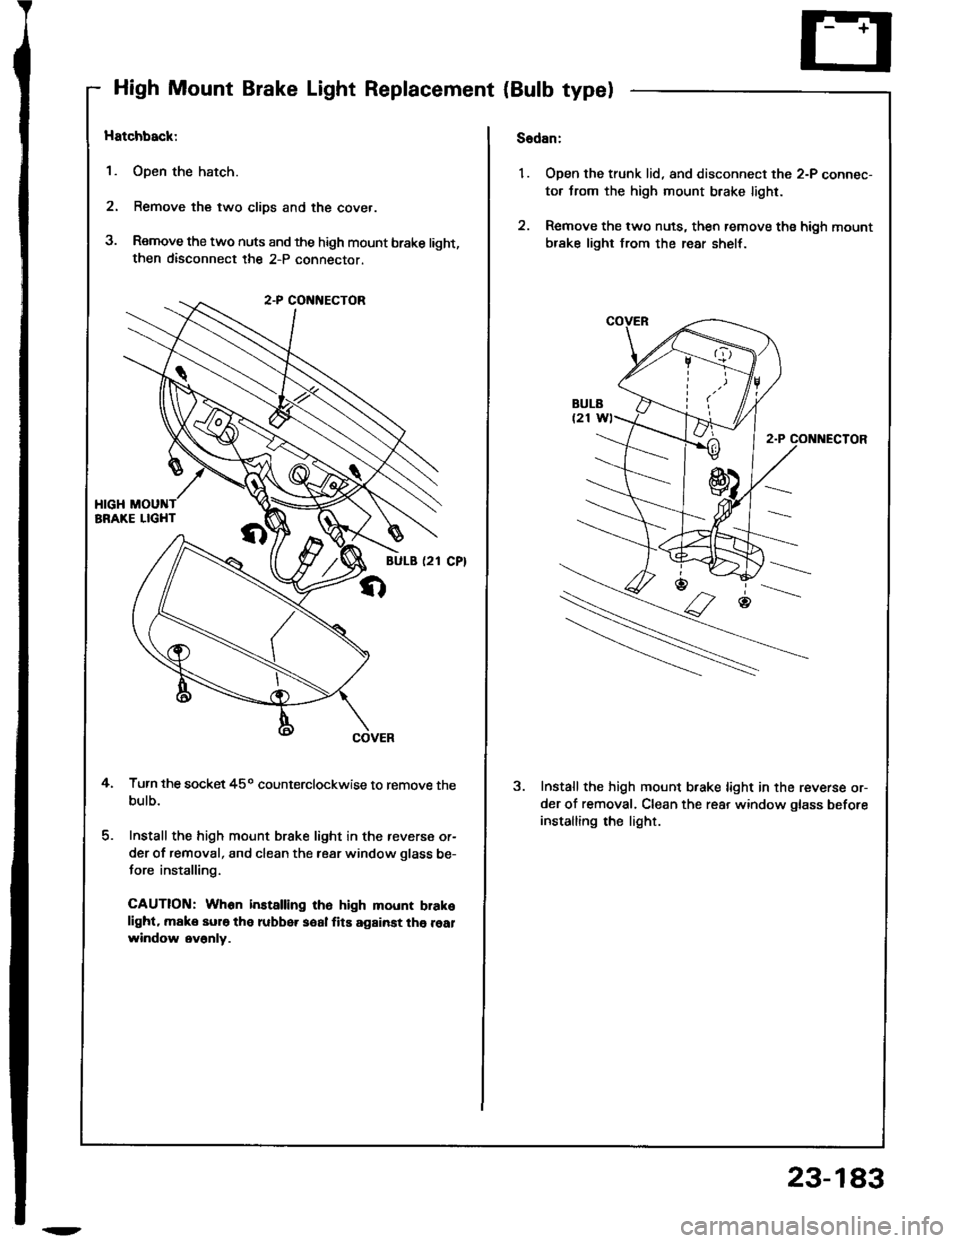
High Mount Brake Light Replacement {Bulb type)
Hatchback:
1. Open the hatch.
2. Remove the two clips and the cover.
3. Remove the two nuts and the high mount brake light,then disconnect the 2-P connector.
Turn the socket 45o counterclockwise to remove thebulb.
Install the high mount brake light in the reverse or-
der of removal, and clean the rear window glass be-
tore installing.
CAUTION: Whon installing ih6 high mount brakelight. make sur6 the rubber soal fits against the realwindow ev6nly.
4.
Sadan:
1. Open the trunk lid, and disconnect the 2-P connec-
tor trom the high mount brake light.
2. Remove the two nuts, then remove ths high mount
brake light from the rear shelt.
2-P CONt{ECTOR
Install the high mount brake light in the reverse or-
der of removal. Clean the rear window glass before
installing rhe light.
2
23-183