clock HONDA ODYSSEY 1996 Owners Manual
[x] Cancel search | Manufacturer: HONDA, Model Year: 1996, Model line: ODYSSEY, Model: HONDA ODYSSEY 1996Pages: 240, PDF Size: 2.64 MB
Page 32 of 240

Instruments and Controls
This section gives information about the controls and displays thatcontribute to the daily operation of
your Honda. All the essential controls are within easy reach.
Control Locations............................ 32
Indicator Lights................................ 33
Gauges.............................................. 37
Speedometer................................ 37
Trip Meter.................................... 37
Odometer......................................
37
Temperature Gauge................... .
38
Fuel Gauge.................................. 38
Maintenanc
e Required
Indicator...................................
38
Controls Nea r
the Steering
Wheel........................................ 39
Headlights.................................... 40
Daytime Running Lights............. 40
Instrument Panel Brightness..... 41
Turn Signals................................. 41
Windshield Wipers...................... 42
Windshield Washers................... 42 Rear Window Wiper and Washer...................................... 43
Hazard Warning........................... 43
Rear Window Defogger.............. 43
Steering Wheel Adjustment....... 44
Steering Wheel Controls................ 46 Cruise Control.............................. 46
Keys and Locks................................ 49
Keys............................................... 49
Ignition Switch............................. 49
Power Door Locks....................... 50
Remote Transmitter.................... 51Childproof Door Locks............... 52
Tailgate......................................... 52
Glove Box..................................... 53
Seats.................................................. 54
Passenger Seating....................... 54
Seat Adjustments......................... 54
Driver's Seat Power Height Adjustment............................... 55
Head Restraints........................... 56 Third Seat Access........................ 56
Removing the Second Seats in the Six-Passenger Model.... 57
Folding the Second Seats in the Seven-Passenger
Model....................................
58
Reclining th e
Second Seat.......... 59
Folding the Third Seat
in All Models............................ 60
Power Windows............................... 62
Sunroof.............................................. 63
Mirrors.............................................. 64
Adjusting the Power Mirrors..... 64
Parking Brake..................................
65
Digital Clock.................................... .
66
Beverage Holder.............................. 66
Dashboard Compartment............... 68 Center Pocket.................................. 68
Vanity Mirror................................... 68 Cigarette Lighter............................. 69
Ashtrays............................................ 69 Interior Lights.................................. 70
Ceiling Lights............................... 70
Spotlights...................................... 70
Tailgate Light............................... 71 Courtesy Lights........................... 71
Instruments and ControlsProCarManuals.comMain Menu s t
Page 33 of 240

DOOR LOCK
SWITCH
(P.50)
POWER WINDO
W
SWITCH
(P.62)
FUEL FILL
DOOR RELEASE
(P.110)
HEATING/COOLIN
G
CONTROLS (P.74)
AUDIO SYSTEM
(P.83")
Control Locations
MIRROR
CONTROLS DIGITAL CLOCK
(P.66)
DOOR LOCK
SWITCH
(P.50)
POWER WINDO
W
SWITCH
(P.62)
FUEL FILL
DOOR RELEASE
(P.110)
HEATING/COOLIN
G
CONTROLS (P.74)
AUDIO SYSTEM
(P.83)
HOOD
RELEASE
HANDLE
(P.111)
Instruments and Controls
(P.64)
ProCarManuals.comMain Menu s t Table of Contents
Page 44 of 240
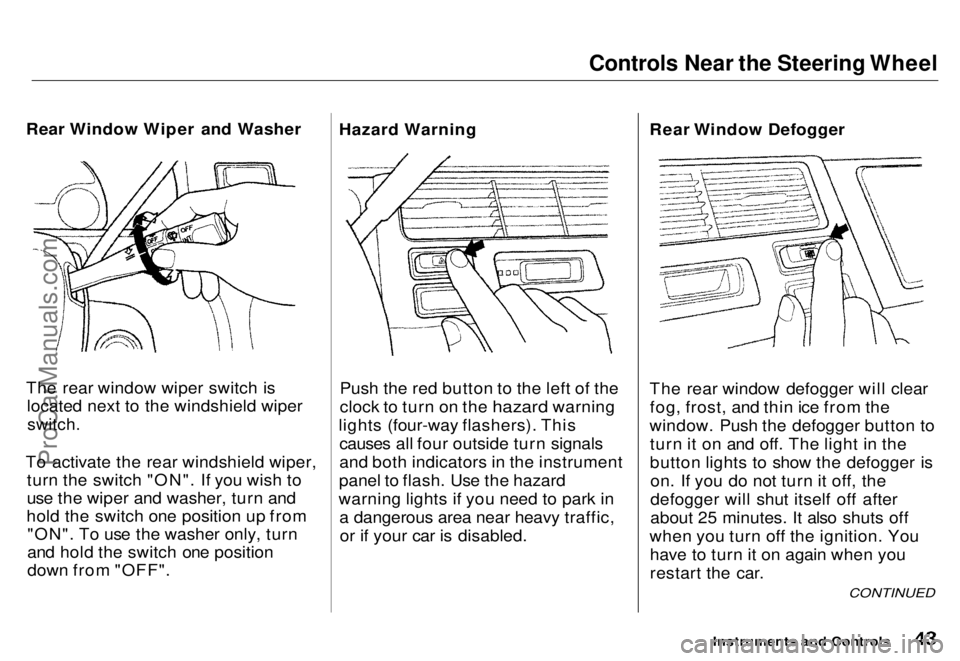
Controls Near the Steering Wheel
Rear Window Wiper and Washer
The rear window wiper switch is located next to the windshield wiper
switch.
To activate the rear windshield wiper, turn the switch "ON". If you wish to
use the wiper and washer, turn and
hold the switch one position up from "ON". To use the washer only, turn
and hold the switch one position
down from "OFF". Hazard Warning
Push the red button to the left of the
clock to turn on the hazard warning
lights (four-way flashers). This causes all four outside turn signals
and both indicators in the instrument
panel to flash. Use the hazard
warning lights if you need to park in a dangerous area near heavy traffic,or if your car is disabled. Rear Window Defogger
The rear window defogger will clear
fog, frost, and thin ice from the
window. Push the defogger button to turn it on and off. The light in the
button lights to show the defogger ison. If you do not turn it off, the
defogger will shut itself off after
about 25 minutes. It also shuts off
when you turn off the ignition. You have to turn it on again when you
restart the car.
Instruments and Controls
CONTINUED
ProCarManuals.comMain Menu s t Table of Contents
Page 67 of 240
.
To set the clock:
1. Turn the ignition switch ON (II) to display the time. 2. Pres")
Digital Clock, Beverage Holder
Digital Clock
The digital clock displays the time with the ignition switch ON (II).
To set the clock:
1. Turn the ignition switch ON (II) to display the time. 2. Press and hold the HOUR button
until the hour advances to the
desired time.
3. Press and hold the MIN. button until the numbers advance to the
desired time.
You can use the RESET button to quickly set the time to the nearest
hour. If the displayed time is before
the half hour, pressing the RESET
button sets the clock back to the previous hour. If the displayed time
is after the half hour, pressing the
RESET button sets the clock for-
ward to the beginning of the next
hour. For example: 1:06 would RESET to 1:00.
1:52 would RESET to 2:00.
Beverage Holder
To use the front beverage holder,
pull on the front. Push the holder all
the way in to close it.
Instruments and Controls
HOUR
MIN
RESETProCarManuals.coms t Main Menu Table of Contents
Page 150 of 240

Cooling System
Adding Engine Coolant If the reserve tank is completely
empty, you should also check the
coolant level in the radiator.
1. Make sure the engine and radiator
are cool.
2. Turn the radiator cap counter-
clockwise, without pressing down
on it, until it stops. This relieves
any pressure remaining in the
cooling system.
3. Remove the radiator cap by pushing down and turning
counterclockwise.
4. The coolant level should be up to
the base of the filler neck. Add
coolant if it is low.
5. Put the radiator cap back on. Tighten it fully.
6. Pour coolant into the reserve tank. Fill it to halfway between the MAX
and MIN marks. Put the cap back
on the reserve tank.
Maintenance
CONTINUED
Removing the radiator cap
while the engine is hot can cause the coolant to spray out,
seriously scalding you.
Always let the engine and radiator cool down before
removing the radiator cap. RADIATOR CAP
RESERVE TANKProCarManuals.comMain Menu s t Table of Contents
Page 177 of 240

Lights
Replacing the Front Side Marker/
Turn Signal and Parking Light
Bulb
SCREW
1. Use a Phillips-head screwdriver to remove the screw from the top of
the fender.
2. Move the side marker light assembly forward until it slides out
of the body. 3. Turn the socket one-quarter turn
counterclockwise to remove it
from the lens.
4. Remove the bulb by pushing it in slightly and turning it counter-
clockwise.
5. Install the new bulb in the socket.
Turn it clockwise to lock it in place
6. Insert the socket back into the lens. Turn it clockwise to lock it in
place.
7. Put the side marker assembly back into the body. Align the four
tabs and push on the front edgeuntil it snaps into place.
Install the mounting screw and
tighten it securely.
MaintenanceProCarManuals.comMain Menu s t Table of Contents
Page 178 of 240
.
2. Determine which of th")
Lights
Replacing Rear Bulbs
1. Open the tailgate. Swing the taillight cover open and remove it.
To replace a bulb on the right side, remove the spare tire (see page
194
).
2. Determine which of the three bulbs is burned out: tail/stoplight,
back-up light or turn signal.
3. Remove the socket by turning it
one-quarter turn counterclockwise.
4. Remove the burned out bulb from the socket by pulling it straight outof its socket.
5. Install the new bulb in the socket. 6. Reinstall the socket into the light
assembly.
7. Test the lights to make sure the new bulb is working.
8. Reinstall the taillight assembly cover.
9. (Right side) Reinstall the spare tire.
Maintenance
COVERProCarManuals.comMain Menu s t Table of Contents
Page 192 of 240

Changing a Flat Tire
5. Remove the tools from the tray. Remove the tray by pulling itstraight up.
6. Loosen the jack from its holder by turning the end counterclockwise.Remove the jack from the
compartment. 7. Unzip the spare tire cover.
STORAGE BIN
8. Unscrew the wing bolt. Remove the storage bin and spare tire.
Taking Care of the UnexpectedProCarManuals.comMain Menu s t Table of Contents
Page 193 of 240

Changing a Flat Tire
9. Loosen the five wheel nuts 1/2
turn with the wheel wrench.
LX model:
Do no
t attempt to forcibly pry the
wheel cover off with a screwdriver or
other tool. The wheel cover
cannot b
e removed without first
removing
the wheel nuts. 10.Find th
e jacking point nearest the
wheel yo
u are removing. Place th e
jac
k under the jacking point. Turn
the en
d bracket clockwise until
the
top of the jack contacts the
jacking point. Make sure the
jacking point tab is resting in the jack notch. 11.Use the extension and wheel
wrench as shown to raise
the car
until the flat tire is off the ground.
CONTINUED
Taking
Care of the Unexpected
WHEEL
NUTS
JACKING POINT WHEEL WRENC
H
EXTENSION
ProCarManuals.comMain Menu s t Table of Contents
Page 196 of 240

Changing a Flat Tire
18.Remove the spacer cone from the wing bolt, turn it over, and put itback on the bolt.
19.Install the flat tire and storage bin on the side panel as shown. Secure
them by screwing the wing boltback into its hole. 20.Put the spare tire cover in the
storage bin.
21. Knot the top of the vinyl bag as
shown.
22.Store the jack in its holder. Turn
the jack's end bracket clockwise to
lock it in place. Replace the tool
tray and store the tool kit. Installthe armrest pad.
23.Store the wheel cover or center cap in the cargo area. Make sure it
will not get scratched or damaged.
Taking Care of the Unexpected STORAGE BINProCarManuals.comMain Menu s t Table of Contents