HONDA ODYSSEY 1997 Owners Manual
Manufacturer: HONDA, Model Year: 1997, Model line: ODYSSEY, Model: HONDA ODYSSEY 1997Pages: 241, PDF Size: 2.52 MB
Page 151 of 241
Cooling System
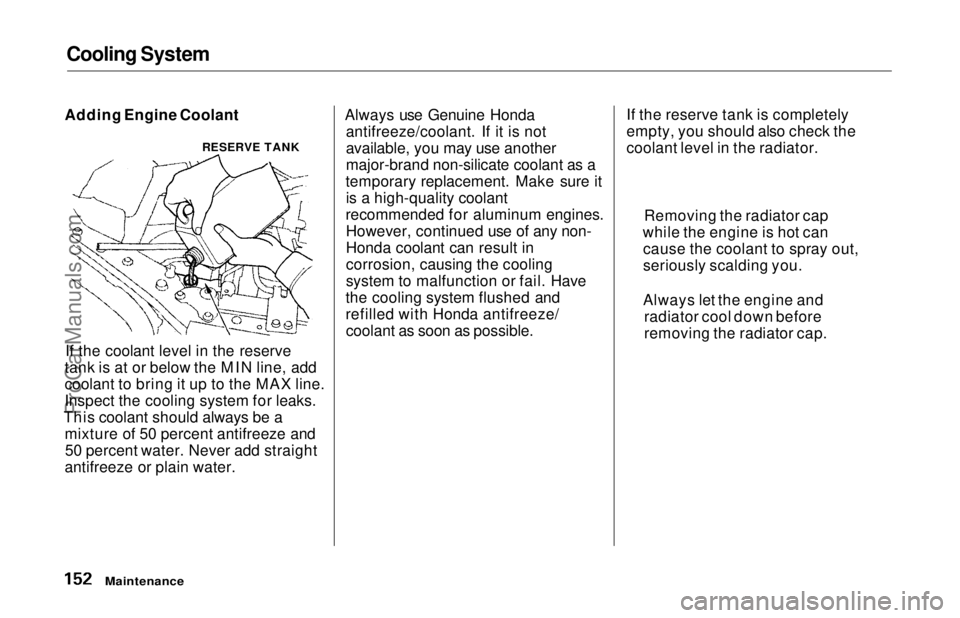
Adding Engine Coolant
If the coolant level in the reserve
tank is at or below the MIN line, add
coolant to bring it up to the MAX line.
Inspect the cooling system for leaks.
This coolant should always be a mixture of 50 percent antifreeze and50 percent water. Never add straight
antifreeze or plain water. Always use Genuine Honda
antifreeze/coolant. If it is not
available, you may use another
major-brand non-silicate coolant as a
temporary replacement. Make sure it is a high-quality coolant
recommended for aluminum engines. However, continued use of any non-
Honda coolant can result in
corrosion, causing the cooling
system to malfunction or fail. Have
the cooling system flushed and
refilled with Honda antifreeze/ coolant as soon as possible. If the reserve tank is completely
empty, you should also check the
coolant level in the radiator.
Maintenance
RESERVE TANK
Removing the radiator cap
while the engine is hot can cause the coolant to spray out,
seriously scalding you.
Always let the engine and radiator cool down before
removing the radiator cap.ProCarManuals.comMain Menu Table of Contents s t
Page 152 of 241
Cooling System
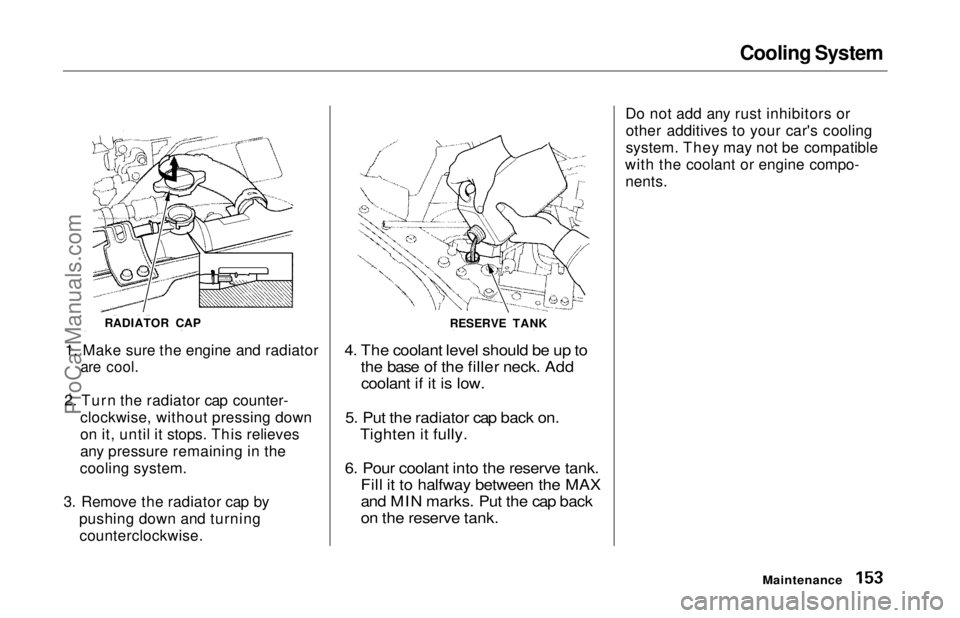
1. Make sure the engine and radiator
are cool.
2. Turn the radiator cap counter- clockwise, without pressing down
on it, until it stops. This relieves
any pressure remaining in the
cooling system.
3. Remove the radiator cap by pushing down and turningcounterclockwise.
4. The coolant level should be up to
the base of the filler neck. Addcoolant if it is low.
5. Put the radiator cap back on. Tighten it fully.
6. Pour coolant into the reserve tank. Fill it to halfway between the MAX
and MIN marks. Put the cap back
on the reserve tank.
Do not add any rust inhibitors or
other additives to your car's cooling
system. They may not be compatible
with the coolant or engine compo- nents.
Maintenance
RADIATOR CAP
RESERVE TANKProCarManuals.comMain Menu Table of Contents s t
Page 153 of 241
Cooling System
Replacing Engine Coolant
The cooling system should be completely drained and refilled with
new coolant according to the time and distance recommendations in
the maintenance schedule. Only use Genuine Honda antifreeze/coolant.
Draining the coolant requires access
to the underside of the car. Unless
you have the tools and knowledge, you should have this maintenance done by a skilled mechanic.
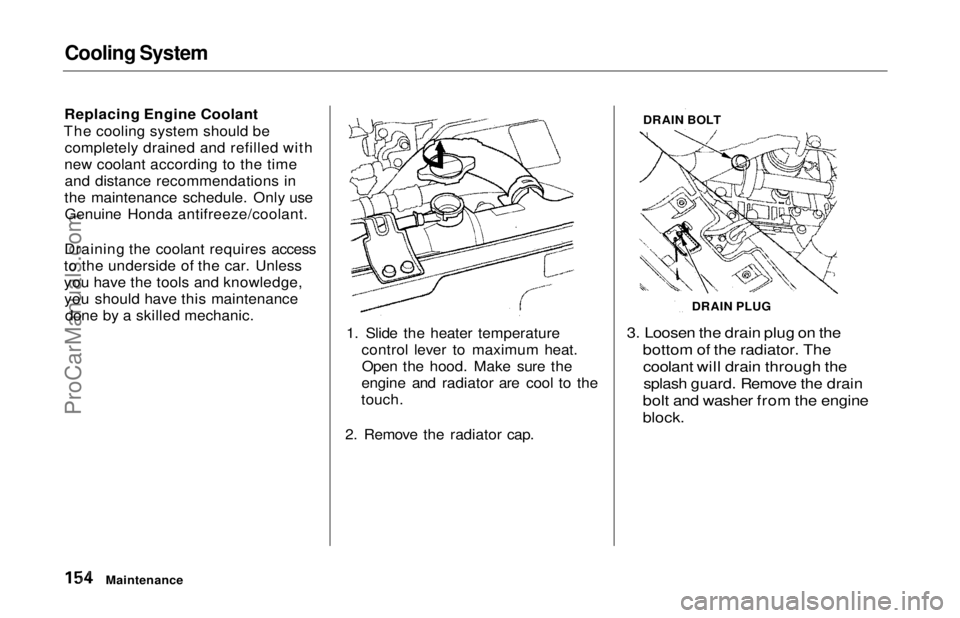
1. Slide the heater temperaturecontrol lever to maximum heat.Open the hood. Make sure the
engine and radiator are cool to the
touch.
2. Remove the radiator cap.
3. Loosen the drain plug on the
bottom of the radiator. The
coolant will drain through the
splash guard. Remove the drain
bolt and washer from the engine
block.
Maintenance DRAIN BOLT
DRAIN PLUGProCarManuals.comMain Menu Table of Contents s t
Page 154 of 241
Cooling System
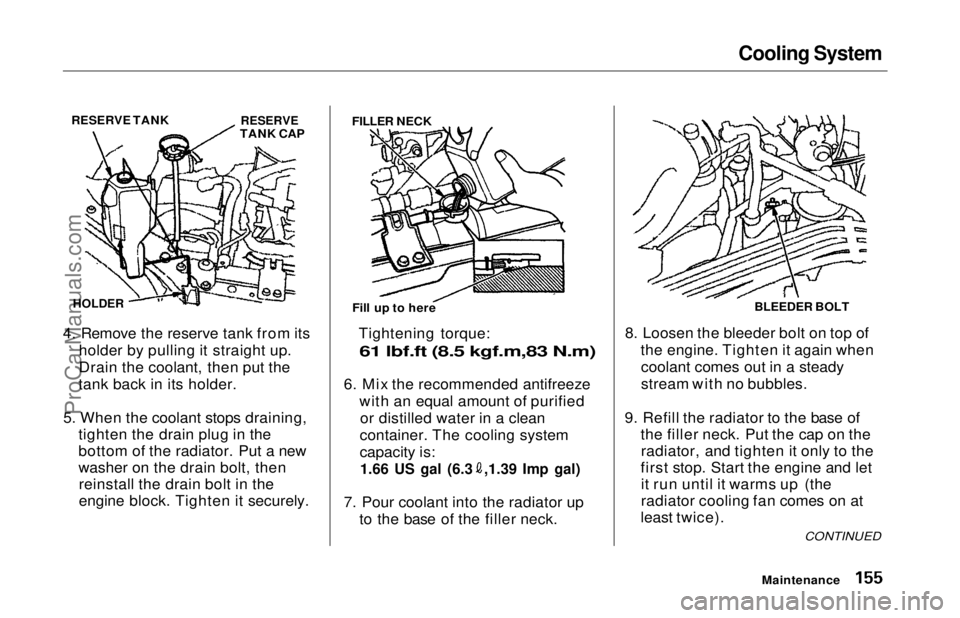
4. Remove the reserve tank from its holder by pulling it straight up.
Drain the coolant, then put the
tank back in its holder.
5. When the coolant stops draining, tighten the drain plug in the
bottom of the radiator. Put a new
washer on the drain bolt, thenreinstall the drain bolt in the
engine block. Tighten it securely. Tightening torque:
61 lbf.ft (8.5 kgf.m,83 N.m)
6. Mix the recommended antifreeze
with an equal amount of purifiedor distilled water in a clean
container. The cooling system
capacity is:
1.66 US gal (6.3 ,1.39 Imp gal)
7. Pour coolant into the radiator up to the base of the filler neck. 8. Loosen the bleeder bolt on top of
the engine. Tighten it again whencoolant comes out in a steady
stream with no bubbles.
9. Refill the radiator to the base of the filler neck. Put the cap on theradiator, and tighten it only to the
first stop. Start the engine and let it run until it warms up (the
radiator cooling fan comes on at
least twice).
Maintenance
CONTINUED
RESERVE TANK
RESERVE
TANK CAP
HOLDER
FILLER NECK
Fill up to here BLEEDER BOLT
ProCarManuals.comMain Menu Table of Contents s t
Page 155 of 241
Cooling System, Windshield Washers
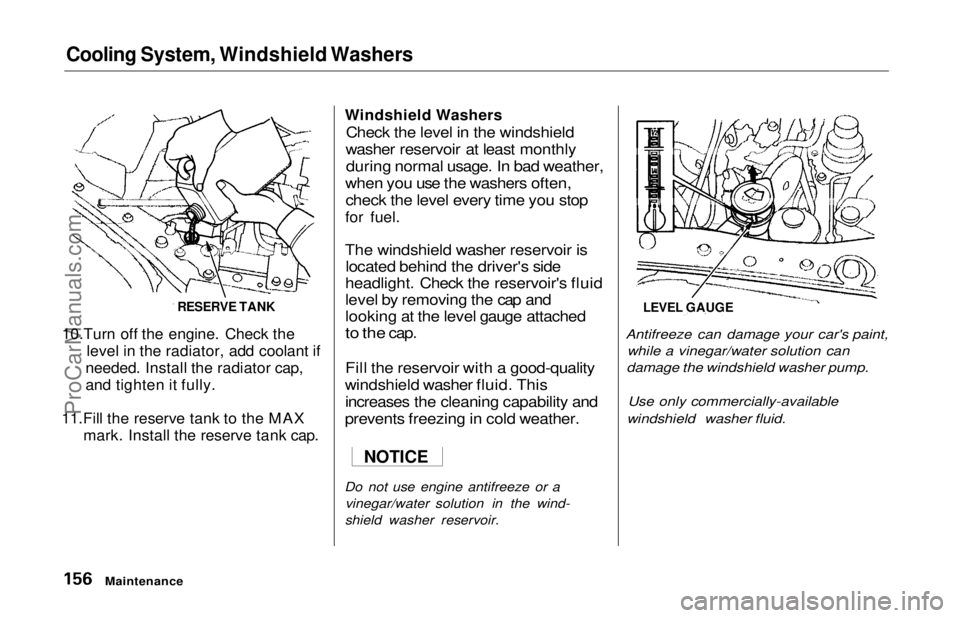
10.Turn off the engine. Check the level in the radiator, add coolant if
needed. Install the radiator cap,
and tighten it fully.
11.Fill the reserve tank to the MAX mark. Install the reserve tank cap. Windshield Washers
Check the level in the windshield
washer reservoir at least monthly during normal usage. In bad weather,
when you use the washers often, check the level every time you stop
for fuel.
The windshield washer reservoir is located behind the driver's side
headlight. Check the reservoir's fluid
level by removing the cap and
looking at the level gauge attached
to the
cap.
Fill the reservoir with a good-quality
windshield washer fluid. This increases the cleaning capability and
prevents freezing in cold weather.
Do not use engine antifreeze or a vinegar/water solution in the wind-
shield washer reservoir.
Antifreeze can damage your car's paint,
while a vinegar/water solution can
damage the windshield washer pump.
Use only commercially-available
windshield washer fluid.
Maintenance
RESERVE TANK
LEVEL GAUGE
NOTICEProCarManuals.comMain Menu Table of Contents s t
Page 156 of 241
Automatic Transmission Fluid
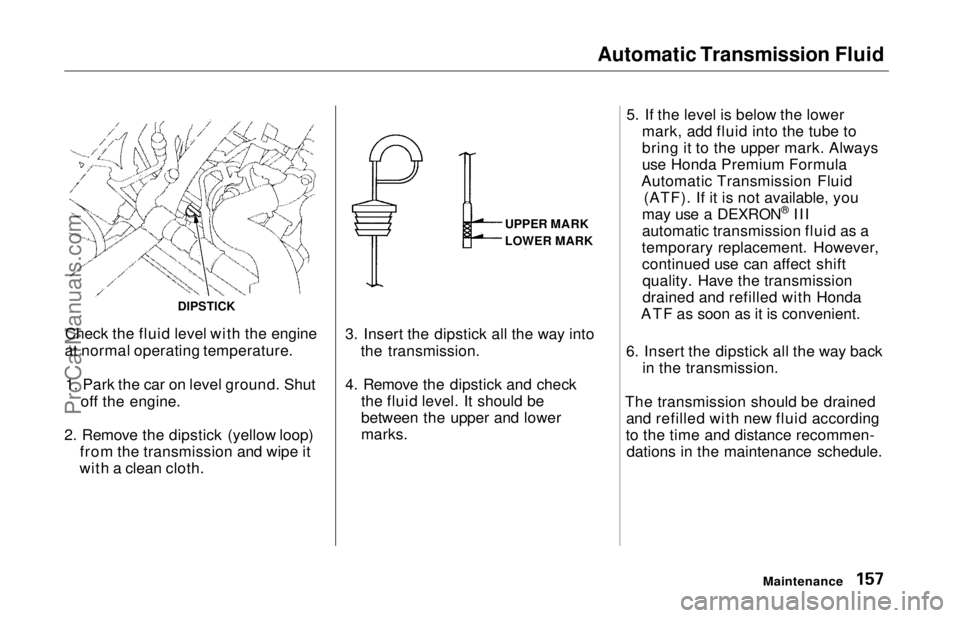
Check the fluid level with the engine
at normal operating temperature.
1. Park the car on level ground. Shut off the engine.
2. Remove the dipstick (yellow loop) from the transmission and wipe it
with a clean cloth. 3. Insert the dipstick all the way into
the transmission.
4. Remove the dipstick and check the fluid level. It should be
between the upper and lower
marks. 5. If the level is below the lower
mark, add fluid into the tube to
bring it to the upper mark. Always
use Honda Premium Formula
Automatic Transmission Fluid (ATF). If it is not available, you
may use a DEXRON ®
III
automatic transmission fluid as a
temporary replacement. However, continued use can affect shiftquality. Have the transmission
drained and refilled with Honda
ATF as soon as it is convenient.
6. Insert the dipstick all the way back in the transmission.
The transmission should be drained and refilled with new fluid according
to the time and distance recommen- dations in the maintenance schedule.
Maintenance
DIPSTICK
UPPER MARK
LOWER MARKProCarManuals.comMain Menu Table of Contents s t
Page 157 of 241
Brake Fluid
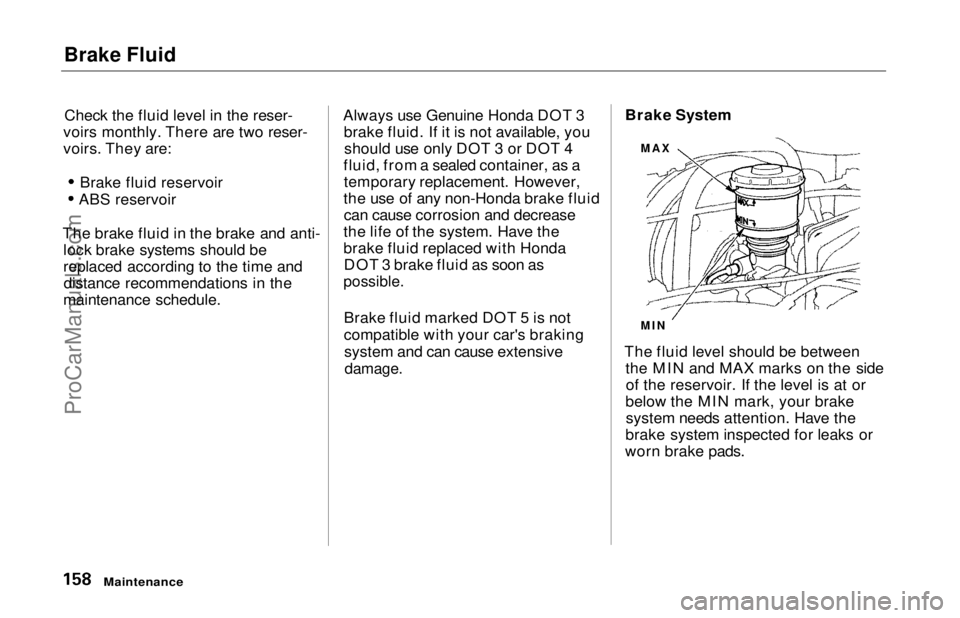
Check the fluid level in the reser-
voirs monthly. There are two reser-
voirs. They are:
Brake fluid reservoir
ABS reservoir
The brake fluid in the brake and anti- lock brake systems should be
replaced according to the time anddistance recommendations in the
maintenance schedule. Always use Genuine Honda DOT 3
brake fluid. If it is not available, youshould use only DOT 3 or DOT 4
fluid, from a sealed container, as a temporary replacement. However,
the use of any non-Honda brake fluid can cause corrosion and decrease
the life of the system. Have the
brake fluid replaced with Honda DOT 3 brake fluid as soon as
possible.
Brake fluid marked DOT 5 is not
compatible with your car's brakingsystem and can cause extensive
damage.
Brake System
The fluid level should be between the MIN and MAX marks on the sideof the reservoir. If the level is at or
below the MIN mark, your brake system needs attention. Have the
brake system inspected for leaks or
worn brake pads.
Maintenance
MAX
MINProCarManuals.comMain Menu Table of Contents s t
Page 158 of 241
Brake Fluid, Power Steering
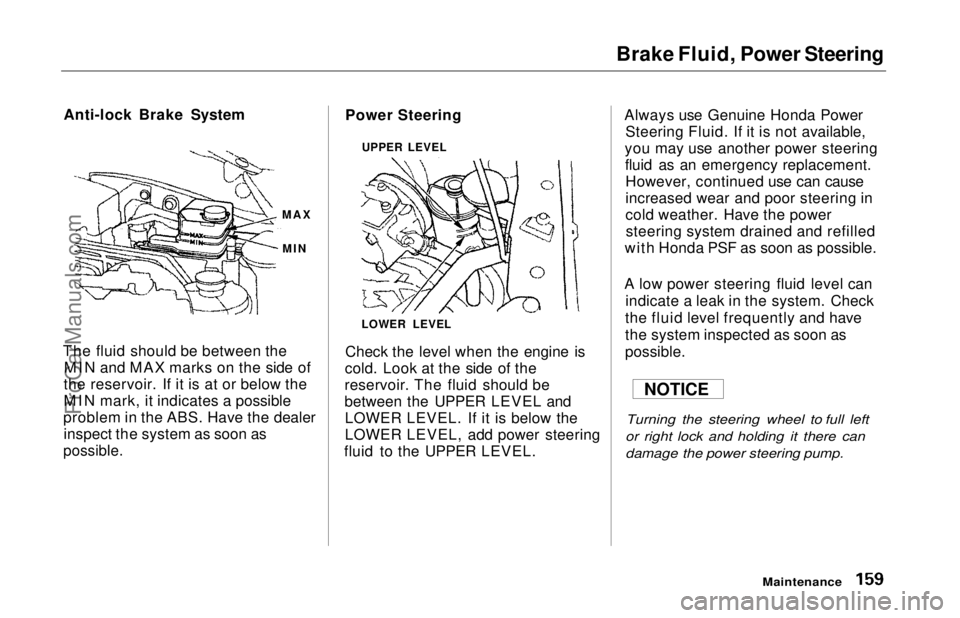
Anti-lock Brake System
The fluid should be between the MIN and MAX marks on the side of
the reservoir. If it is at or below the
MIN mark, it indicates a possible
problem in the ABS. Have the dealer inspect the system as soon as
possible.
Power Steering
Check the level when the engine is
cold. Look at the side of the
reservoir. The fluid should be
between the UPPER LEVEL and LOWER LEVEL. If it is below the
LOWER LEVEL, add power steering
fluid to the UPPER LEVEL. Always use Genuine Honda Power
Steering Fluid. If it is not available,
you may use another power steering fluid as an emergency replacement.However, continued use can cause
increased wear and poor steering in
cold weather. Have the powersteering system drained and refilled
with Honda PSF as soon as possible.
A low power steering fluid level can indicate a leak in the system. Check
the fluid level frequently and have
the system inspected as soon as
possible.
Turning the steering wheel to full left
or right lock and holding it there can
damage the power steering pump.
Maintenance
MAX
MIN
NOTICE
LOWER LEVEL UPPER LEVELProCarManuals.comMain Menu Table of Contents s t
Page 159 of 241
Air Cleaner Element
The air cleaner element should becleaned or replaced according to the
time and distance recommendations in the maintenance schedule. Cleaning (Severe Conditions)
Clean the air cleaner element by
blowing compressed air through it in
the opposite direction to normal air
flow. If you do not have access to compressed air (such as a service
station), ask your Honda dealer to do
this service.
Follow the replacement procedure
for removal and reinstallation. Replacement
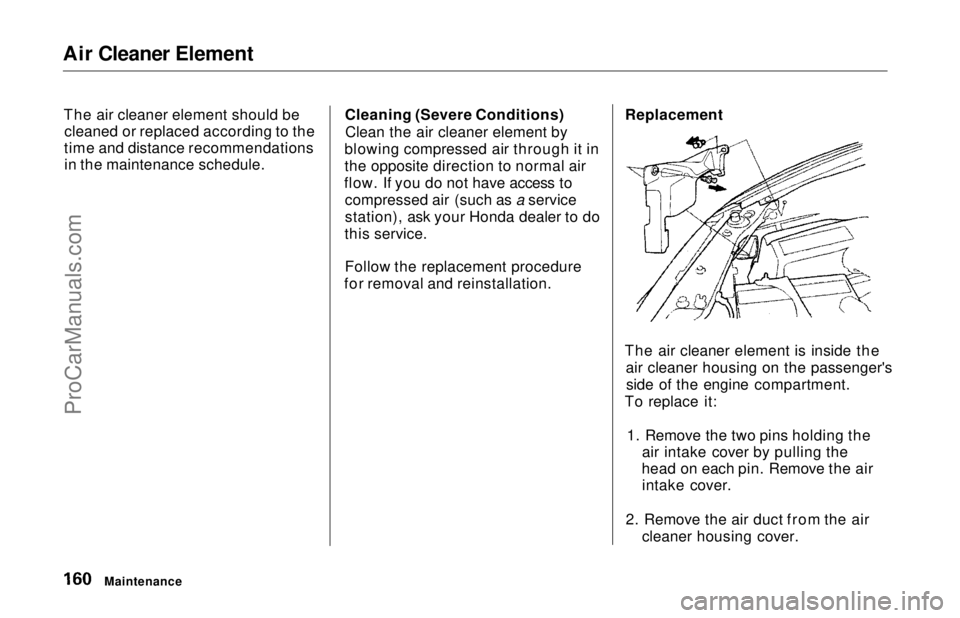
The air cleaner element is inside the air cleaner housing on the passenger'sside of the engine compartment.
To replace it:
1. Remove the two pins holding the air intake cover by pulling the
head on each pin. Remove the air intake cover.
2. Remove the air duct from the air cleaner housing cover.
MaintenanceProCarManuals.comMain Menu Table of Contents s t
Page 160 of 241
Air Cleaner Element
MAINTENANCE HOLE CAP
BOLTS
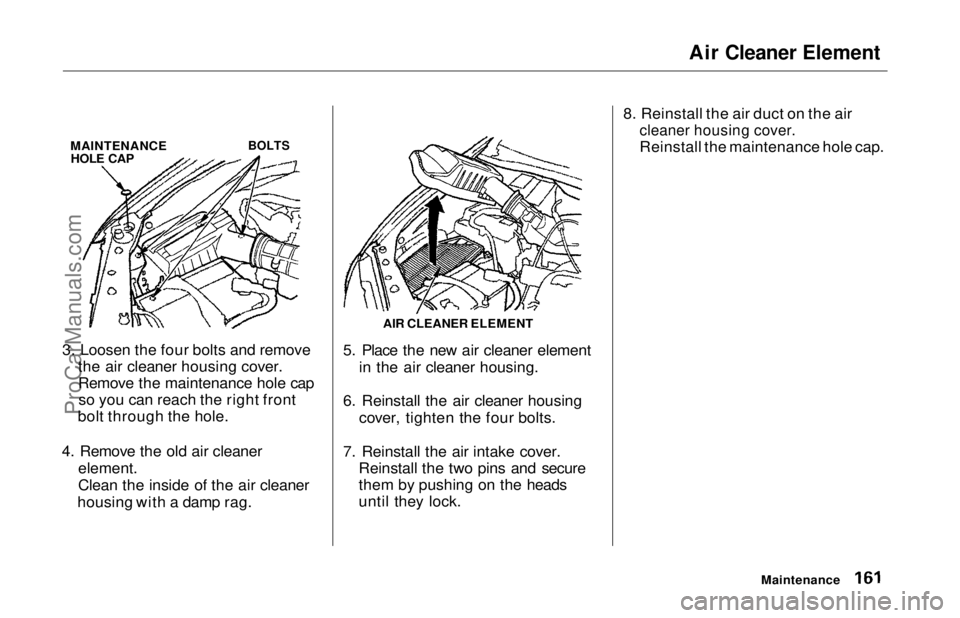
3. Loosen the four bolts and remove the air cleaner housing cover.
Remove the maintenance hole capso you can reach the right front
bolt through the hole.
4. Remove the old air cleaner
element.
Clean the inside of the air cleaner
housing with a damp rag. 5. Place the new air cleaner element
in the air cleaner housing.
6. Reinstall the air cleaner housing cover, tighten the four bolts.
7. Reinstall the air intake cover. Reinstall the two pins and secure
them by pushing on the heads
until they lock. 8. Reinstall the air duct on the air
cleaner housing cover.
Reinstall the maintenance hole cap.
Maintenance
AIR CLEANER ELEMENTProCarManuals.comMain Menu Table of Contents s t