brake HONDA ODYSSEY 1997 Owner's Guide
[x] Cancel search | Manufacturer: HONDA, Model Year: 1997, Model line: ODYSSEY, Model: HONDA ODYSSEY 1997Pages: 241, PDF Size: 2.52 MB
Page 145 of 241
Owner Maintenance Checks
You should check the following items at the specified intervals. If
you are unsure of how to perform any check, turn to the page given. Engine oil level — Check every
time you fill the fuel tank. See
page 112.
Engine coolant level — Check the
radiator reserve tank every time
you fill the fuel tank. See page 113.
Windshield washer fluid — Check the level in the reservoir monthly.
If weather conditions cause you to
use the washers frequently, check
the reservoir each time you stop
for fuel. See page 156.
Automatic transmission — Check the fluid level monthly. See page
157.
Brakes — Check the fluid level
monthly. See page 158. Tires — Check the tire pressure
monthly. Examine the tread for
wear and foreign objects. See page
171.
Lights — Check the operation of
the headlights, parking lights,
taillights, high-mount brake light,
turn signals, brake lights, and
license plate lights monthly. See
page 177.
MaintenanceProCarManuals.comMain Menu Table of Contents s t
Page 146 of 241
Fluid Locations
Maintenance
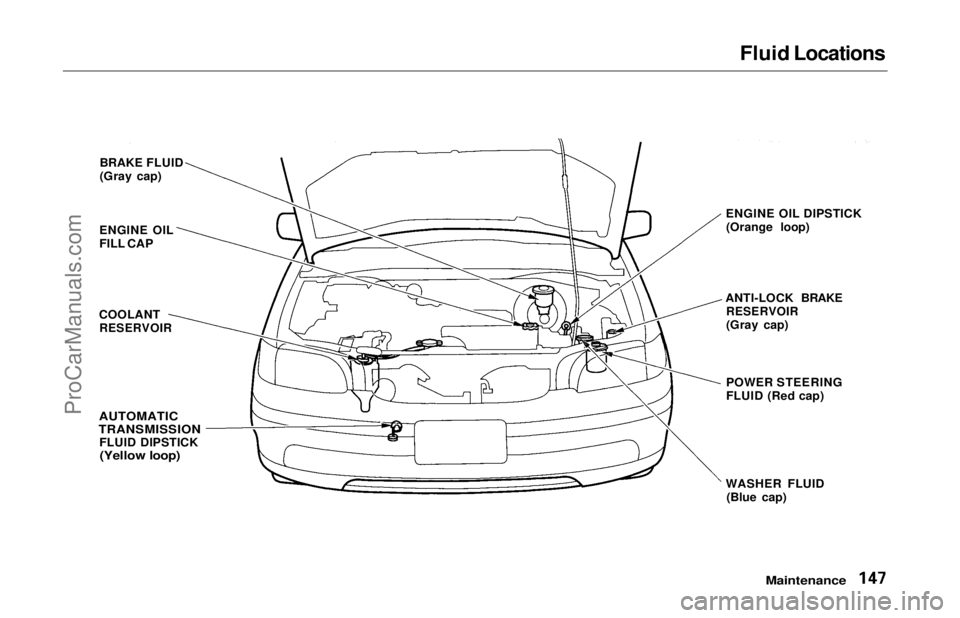
BRAKE FLUID
(Gray cap)
ENGINE OIL
FILL CAP
COOLANT
RESERVOIR
AUTOMATIC
TRANSMISSION
FLUID DIPSTICK
(Yellow loop)
ENGINE OIL DIPSTICK
(Orange loop)
ANTI-LOCK BRAKE
RESERVOIR
(Gray cap)
POWER STEERING
FLUID (Red cap)
WASHER FLUID (Blue cap)ProCarManuals.comMain Menu Table of Contents s t
Page 157 of 241
Brake Fluid
Check the fluid level in the reser-
voirs monthly. There are two reser-
voirs. They are:
Brake fluid reservoir
ABS reservoir
The brake fluid in the brake and anti- lock brake systems should be
replaced according to the time anddistance recommendations in the
maintenance schedule. Always use Genuine Honda DOT 3
brake fluid. If it is not available, youshould use only DOT 3 or DOT 4
fluid, from a sealed container, as a temporary replacement. However,
the use of any non-Honda brake fluid can cause corrosion and decrease
the life of the system. Have the
brake fluid replaced with Honda DOT 3 brake fluid as soon as
possible.
Brake fluid marked DOT 5 is not
compatible with your car's brakingsystem and can cause extensive
damage.
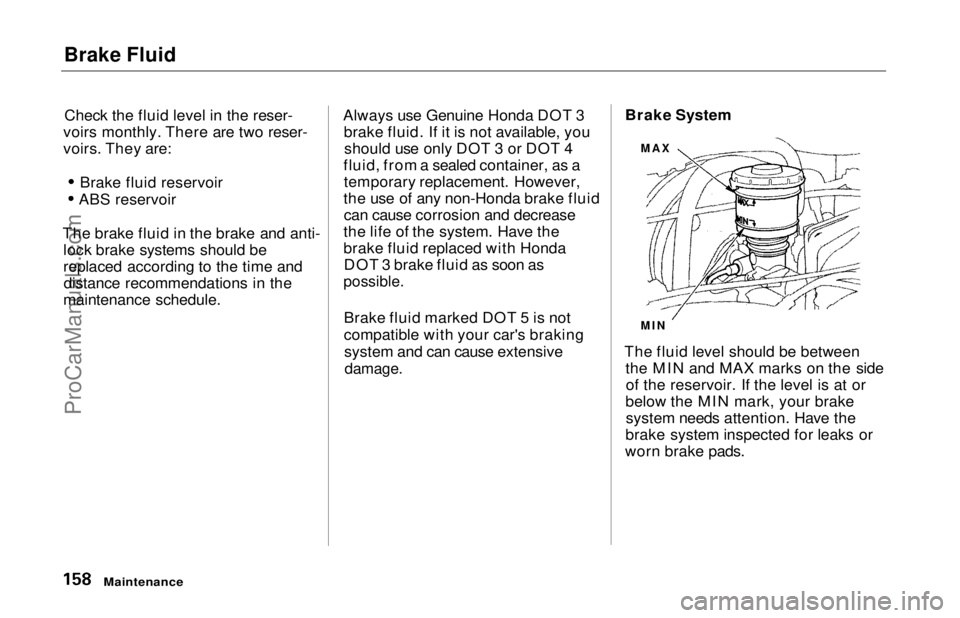
Brake System
The fluid level should be between the MIN and MAX marks on the sideof the reservoir. If the level is at or
below the MIN mark, your brake system needs attention. Have the
brake system inspected for leaks or
worn brake pads.
Maintenance
MAX
MINProCarManuals.comMain Menu Table of Contents s t
Page 158 of 241
Brake Fluid, Power Steering
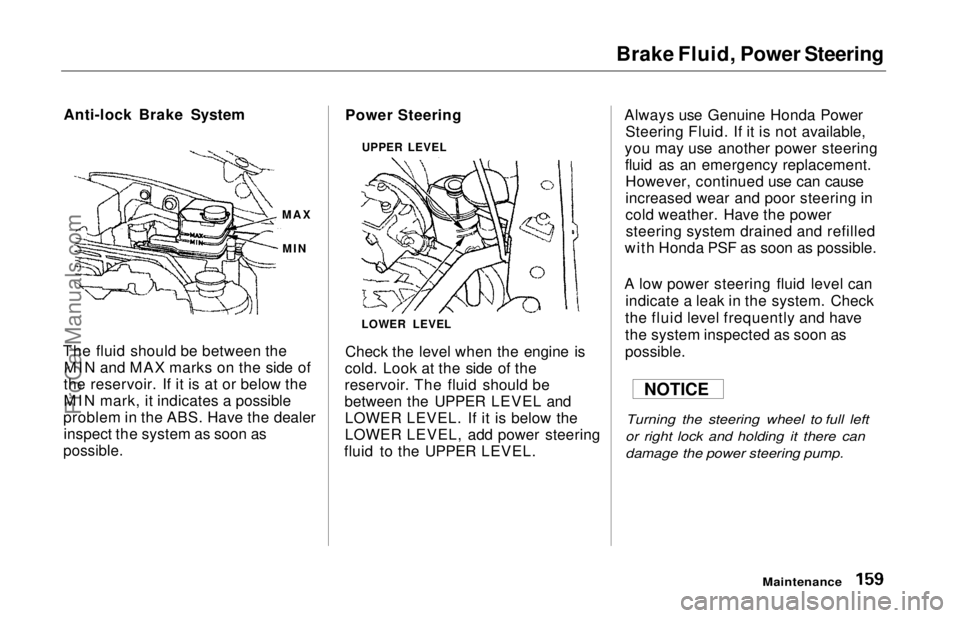
Anti-lock Brake System
The fluid should be between the MIN and MAX marks on the side of
the reservoir. If it is at or below the
MIN mark, it indicates a possible
problem in the ABS. Have the dealer inspect the system as soon as
possible.
Power Steering
Check the level when the engine is
cold. Look at the side of the
reservoir. The fluid should be
between the UPPER LEVEL and LOWER LEVEL. If it is below the
LOWER LEVEL, add power steering
fluid to the UPPER LEVEL. Always use Genuine Honda Power
Steering Fluid. If it is not available,
you may use another power steering fluid as an emergency replacement.However, continued use can cause
increased wear and poor steering in
cold weather. Have the powersteering system drained and refilled
with Honda PSF as soon as possible.
A low power steering fluid level can indicate a leak in the system. Check
the fluid level frequently and have
the system inspected as soon as
possible.
Turning the steering wheel to full left
or right lock and holding it there can
damage the power steering pump.
Maintenance
MAX
MIN
NOTICE
LOWER LEVEL UPPER LEVELProCarManuals.comMain Menu Table of Contents s t
Page 175 of 241
Tires
Snow Tires
If you mount snow tires on your
Honda, make sure they are radial
tires of the same size and load range
as the original tires. Mount snow
tires on all four wheels to balance
your car's handling in all weather conditions. Keep in mind the traction
provided by snow tires on dry roads
may not be as high as your car's original equipment tires. You should
drive cautiously even when the roads
are clear. Check with the tire dealer
for maximum speed recommenda- tions. Tire Chains
Mount snow chains on your car
when warranted by driving condi- tions or required by local laws. Makesure the chains are the correct size
for your tires. Install them only on the front tires. If metal chains are
used, they must be SAE class "S".Cable type traction devices can also
be used.
When installing chains, follow the manufacturer's instructions and
mount them as tightly as you can.
Drive slowly with chains installed. If
you hear the chains contacting the
body or chassis, stop and tighten
them. If they still make contact, slow down until it stops. Remove the
chains as soon as you begin driving
on cleared roads.
Chains of the wrong size or that are
improperly installed can damage your
car's brake lines, suspension, body, and
wheels. Stop driving if you hear the
chains hitting any part of the car.
Maintenance
NOTICEProCarManuals.comMain Menu Table of Contents s t
Page 176 of 241
Lights
Check the operation of your car's
exterior lights at least once a month.
A burned out bulb can create an unsafe condition by reducing your
car's visibility and the ability tosignal your intentions to other
drivers.
Check the following:
Headlights (low and high beam)
Parking lights
Taillights Brake lightsHigh-mount brake light
Turn signals
Back-up lights
Hazard light function
License plate light
Side marker lights
Daytime running lights (Canadian models)
If you find any bulbs are burned out,
replace them as soon as possible. Refer to the chart on page 221 to
determine what type of replacement
bulb is needed.
Headlight Aiming
The headlights were properly aimed when your car was new. You should check their aim if you regularly carry
heavy items in the cargo area or pull a trailer. Each headlight assembly
has horizontal and vertical adjust-
ment indicators. These are set to
their "0" positions after the head-
lights are aimed at the factory.
To check these settings: 1. Make sure the fuel tank is full. Park the car on level ground.
2. The driver or someone who weighs the same should be sittingin the driver's seat for all checks
and adjustments.
Load your car with the items you
normally carry.
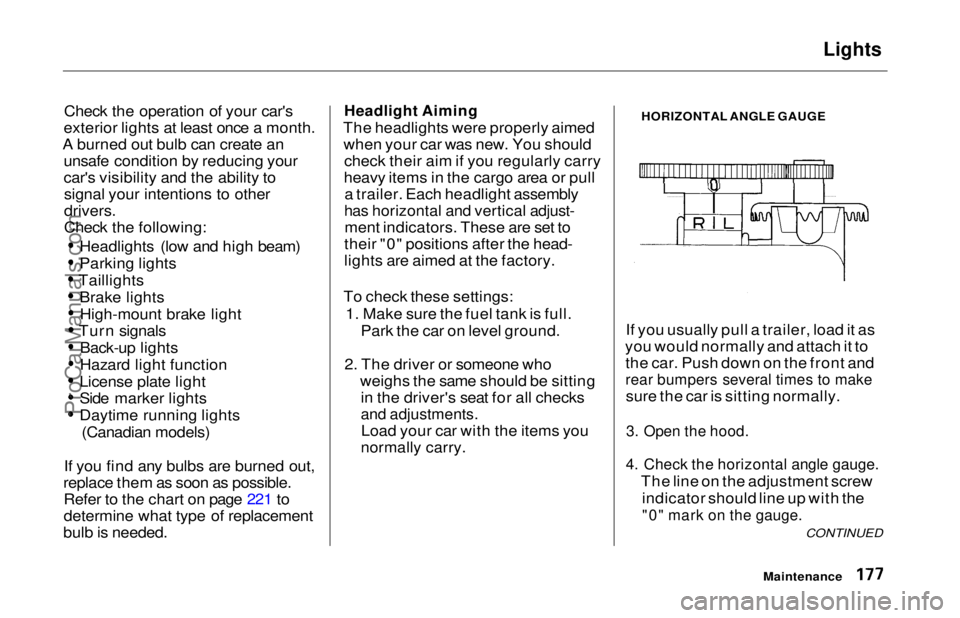
HORIZONTAL ANGLE GAUGE
If you usually pull a trailer, load it as
you would normally and attach it to the car. Push down on the front and
rear bumpers several times to make
sure the car is sitting normally.
3. Open the hood.
4. Check the horizontal angle gauge.
The line on the adjustment screwindicator should line up with the
"0" mark on the gauge.
Maintenance
CONTINUEDProCarManuals.comMain Menu Table of Contents s t
Page 183 of 241
Storing Your Car
If you need to park your car for an
extended period (more than one
month), there are several things you should do to prepare it for storage.
Proper preparation helps prevent deterioration and makes it easier to
get your car back on the road. If
possible, store your car indoors.
Fill the fuel tank.Change the engine oil and filter (see page 150).
Wash and dry the exterior completely.
Clean the interior. Make sure the
carpeting, floor mats, etc. are
completely dry.
Leave the parking brake off. Put
the transmission in Park. Block the rear wheels.
If the car is to be stored for a
longer period, it should be supported on jackstands so the
tires are off the ground.
Leave one window open slightly (if
the car is being stored indoors).
Disconnect the battery.
Support the front and rear wiper
blade arms with a folded towel or
rag so they do not touch the
windshield.
To minimize sticking, apply a silicone spray lubricant to all door
and trunk seals. Also, apply a car
body wax to the painted surfaces
that mate with the door and trunk
seals.
Cover the car with a "breathable"
car cover, one made from a porous
material such as cotton.
Nonporous materials, such as
plastic sheeting, trap moisture,
which can damage the paint.
If possible, run the engine for a
while periodically (preferably once a month).
If you store your car for 12 months
or longer, have your Honda dealer
perform the inspections called for in the 24 months/30,000 miles (48,000
km) maintenance schedule (Normal Conditions) as soon as you take it
out of storage (see page 142). The
replacements called for in the maintenance schedule are not
needed unless the car has actually
reached that time or mileage.
MaintenanceProCarManuals.comMain Menu Table of Contents s t
Page 193 of 241
Changing a Flat Tire
If you have a flat tire while driving, stop in a safe place to change it.
Stopping in traffic or on the shoulder
of a busy road is dangerous. Drive
slowly along the shoulder until you
get to an exit or an area to stop that
is far away from the traffic lanes.
1. Park the car on firm, level groundaway from traffic. Turn on the
hazard warning lights and turn the ignition to LOCK (0).
2. Put the transmission in Park. Set the parking brake. Have all of thepassengers get out of the car while
you change the tire. 3. Open the tailgate. Fold down the
third seat's seat-back (see page60).
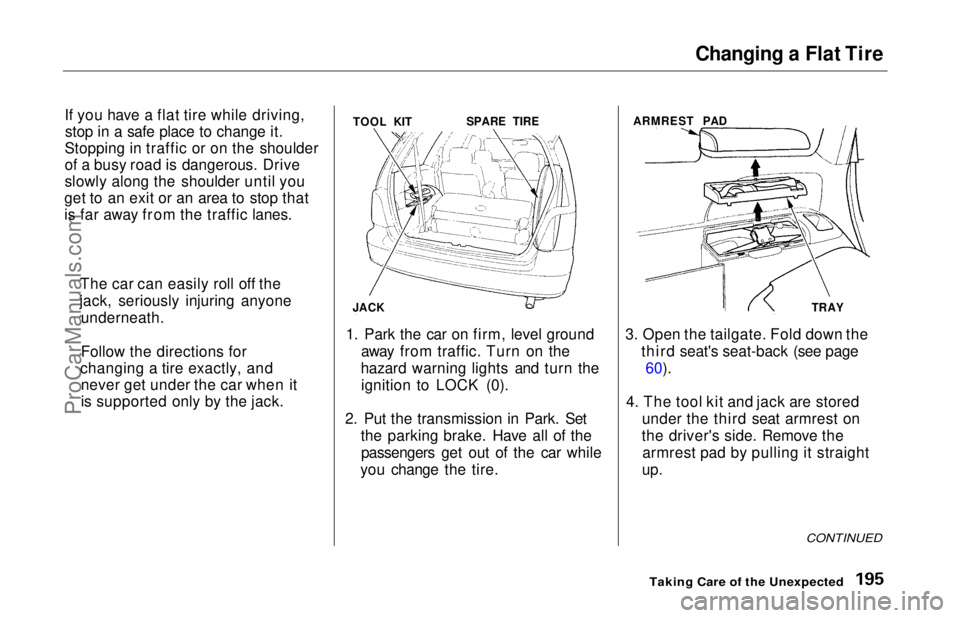
4. The tool kit and jack are stored under the third seat armrest on
the driver's side. Remove the armrest pad by pulling it straight
up.
CONTINUED
Taking Care of the Unexpected
The car can easily roll off the
jack, seriously injuring anyone underneath.
Follow the directions for
changing a tire exactly, and never get under the car when it
is supported only by the jack. TOOL KIT
JACK SPARE TIRE
ARMREST PAD
TRAYProCarManuals.comMain Menu Table of Contents s t
Page 196 of 241
Changing a Flat Tire
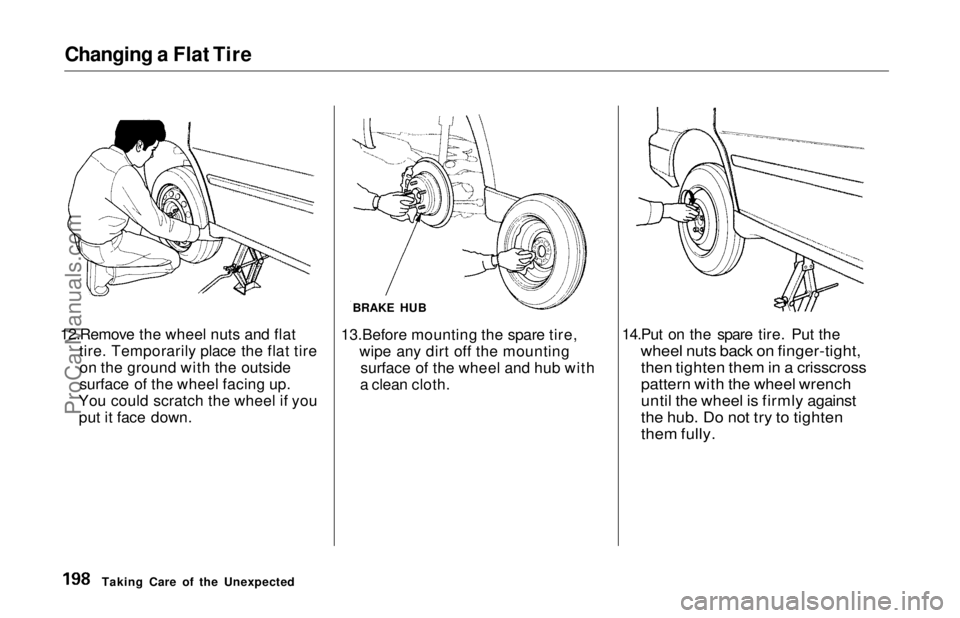
12.Remove the wheel nuts and flat tire. Temporarily place the flat tireon the ground with the outside
surface of the wheel facing up.
You could scratch the wheel if you put it face down. 13.Before mounting the spare tire,
wipe any dirt off the mountingsurface of the wheel and hub with
a clean cloth. 14.Put on the spare tire. Put the
wheel nuts back on finger-tight,
then tighten them in a crisscross
pattern with the wheel wrench
until the wheel is firmly against
the hub. Do not try to tighten
them fully.
Taking Care of the Unexpected BRAKE HUBProCarManuals.comMain Menu Table of Contents s t
Page 200 of 241
If Your Engine Won't Start, Jump Starting
The Starter Operates Normally In this case, the starter motor'sspeed sounds normal, or even faster
than normal, when you turn the
ignition switch to START (III), but
the engine does not run.
Are you using the proper startingprocedure? Refer to Starting the
Engine on page 119.
Do you have fuel? Turn the
ignition switch to ON (II) for a
minute and watch the fuel gauge.
The low fuel level warning light may not be working, so you were
not reminded to fill the tank.
There may be an electrical problem, such as no power to the
fuel pump. Check all the fuses (see page 211).
If you find nothing wrong, you will
need a qualified technician to find
the problem. See Towing on page
215.
Jump Starting
If your car's battery has run down,
you may be able to start the engine by using a booster battery. Although
this seems like a simple procedure,
you should take several precautions.
You cannot start a Honda by pushing or pulling it. To jump start your car, follow these
directions closely:
1. Open the hood and check the physical condition of the battery(see page 164). In very cold
weather, check the condition of
the electrolyte. If it seems slushy or like ice, do not try jump starting
until it thaws.
If a battery sits in extreme cold, the electrolyte, inside can freeze.
Attempting to jump start with a frozen battery can cause it to rupture.
2. Turn off all the electrical acces-
sories: heater, A/C, stereo system,
lights, etc.
Put the transmission in Neutral or
Park and set the parking brake.
Taking Care of the Unexpected
A battery can explode if you do
not follow the correct procedure,
seriously injuring anyone nearby.
Keep all sparks, open flames,
and smoking materials away
from the battery.
NOTICEProCarManuals.comMain Menu Table of Contents s t