battery HONDA ODYSSEY 1999 Owners Manual
[x] Cancel search | Manufacturer: HONDA, Model Year: 1999, Model line: ODYSSEY, Model: HONDA ODYSSEY 1999Pages: 343, PDF Size: 3.73 MB
Page 59 of 343
Indicator Lights
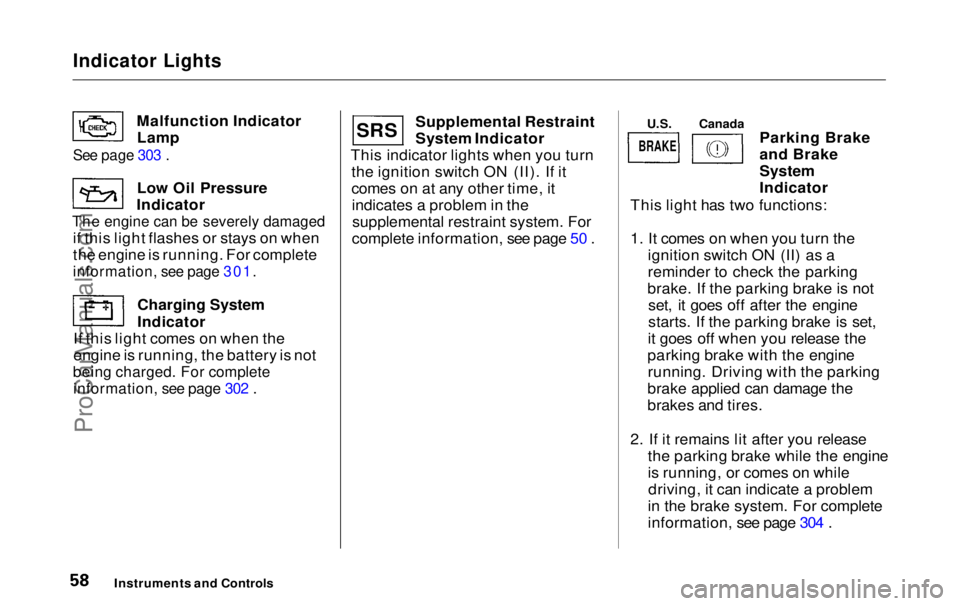
Malfunction IndicatorLamp
Low Oil Pressure
Indicator
The engine can be severely damaged
if this light flashes or stays on when
the engine is running. For complete
information, see page 301.
Charging System
Indicator
If this light comes on when the
engine is running, the battery is not
being charged. For complete
information, see page 302 .
Supplemental Restraint
System Indicator
This indicator lights when you turn the ignition switch ON (II). If it
comes on at any other time, itindicates a problem in thesupplemental restraint system. For
complete information, see page 50 . Parking Brake
and Brake
System
Indicator
This light has two functions:
1. It comes on when you turn the ignition switch ON (II) as a
reminder to check the parking
brake. If the parking brake is not set, it goes off after the engine
starts. If the parking brake is set,
it goes off when you release the
parking brake with the engine running. Driving with the parking
brake applied can damage the
brakes and tires.
2. If it remains lit after you release the parking brake while the engine
is running, or comes on whiledriving, it can indicate a problem
in the brake system. For complete
information, see page 304 .
Instruments and Controls
See page 303 .
S R S
U.S.
Canada
BRAKEProCarManuals.comMain Menu Table of Contents s t
Page 84 of 343
Keys and Locks
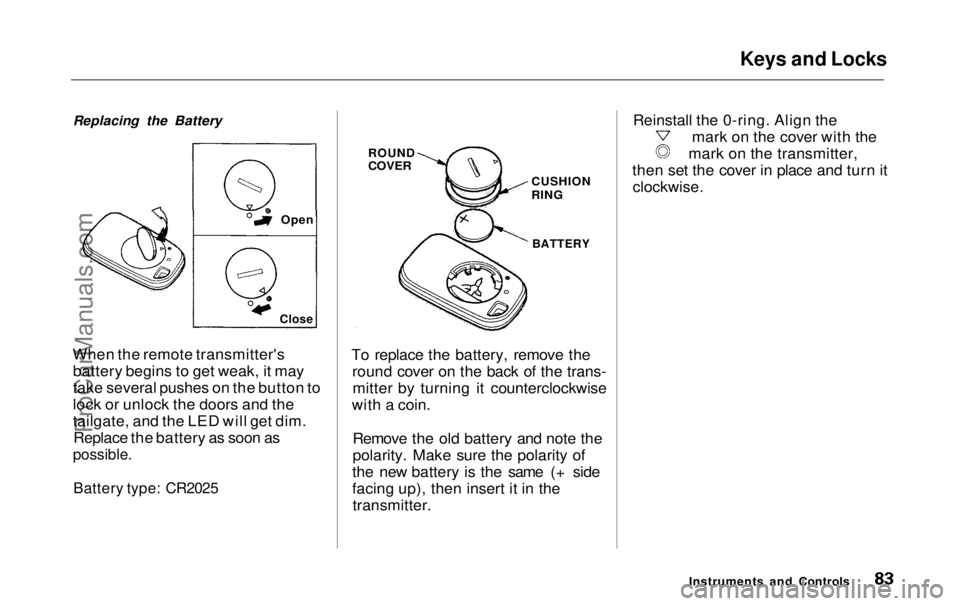
Replacing the Battery
When the remote transmitter's battery begins to get weak, it may
take several pushes on the button to
lock or unlock the doors and the
tailgate, and the LED will get dim.Replace the battery as soon as
possible.
Battery type: CR2025
To replace the battery, remove the
round cover on the back of the trans-mitter by turning it counterclockwise
with a coin.
Remove the old battery and note the
polarity. Make sure the polarity of
the new battery is the same (+ side
facing up), then insert it in the transmitter. Reinstall the 0-ring. Align the mark on the cover with the
mark on the transmitter,
then set the cover in place and turn it clockwise.
Instruments and Controls
Close
Open
ROUND
COVER
CUSHION
RING
BATTERYProCarManuals.comMain Menu Table of Contents s t
Page 94 of 343

Sliding Doors
Before refueling, make sure the driver's side sliding door is fully
closed. When you release the fuel fill
door with the handle, the sliding door automatically locks so it cannot
be opened and interfere with the fuel fill door. After you close the fuel filldoor, the sliding door does not
automatically unlock; you must
unlock it manually.
When you drive with children in your vehicle, use the childproof doorlocks. This will prevent children
from opening the doors accidentally (see page 85).
How to Reset the Power Sliding
Doors
If your vehicle's battery is disconnected or goes dead while the
sliding doors are open, the power
sliding door system needs to besynchronized. After reconnecting
the battery: Close each sliding door completely
by hand; or Move the MAIN switch on the
dashboard to the ON position.
Push and hold the upper side of
each door switch until each sliding
door closes completely.
If the power sliding doors are closed,
the system will reset itself automatically once the battery has
been reconnected. If the power sliding doors do not
operate properly after resetting,
have your vehicle checked by a Honda dealer.
CONTINUED
Instruments and ControlsProCarManuals.comMain Menu Table of Contents s t
Page 97 of 343

HomeLink Universal Transmitter
1. This step erases all previously learned
codes. Perform this step before
training the transmitter for the very
first time. Press and hold the two
outside buttons until the red light
in the transmitter flashes (approximately 20 seconds).
Release the buttons.
2. Hold the end of the garage door opener remote control 1 to 3
inches from the HomeLink
transmitter. Make sure you are
not blocking your view of the redlight in the transmitter.
3. Select the transmitter button you want to train.
4. Press the button on the remote control and the button on the
transmitter at the same time. Holddown both buttons. 5. The red light in the transmitter
should begin flashing. It will flashslowly at first, then rapidly.
6. When the red light flashes rapidly, release both buttons. The
transmitter should have learned
the code from the remote control.
7. Test the transmitter button by pushing it. It should operate the
garage door.
8. Repeat these steps to train the other two transmitter buttons to
operate any other remotely-
controlled devices around your
home (lighting, automatic gate, security system, etc.).
Canadian Owners:
The remote control you are training from may stop transmitting after twoseconds. This is not long enough for
the HomeLink transmitter to learn
the code. Release and press the
button on the remote control every
two seconds until the transmitter has
learned the code.
If you are programming the
transmitter to operate a garage door or gate, it is recommended that you
unplug the motor for that device during programming. Repeatedly
pressing the remote control button could burn out the motor.
The HomeLink transmitter stores the code in a permanent memory.
There should be no need to retrain the transmitter if your vehicle's
battery goes dead or is disconnected.
Instruments and ControlsProCarManuals.comMain Menu Table of Contents s t
Page 153 of 343
Audio System
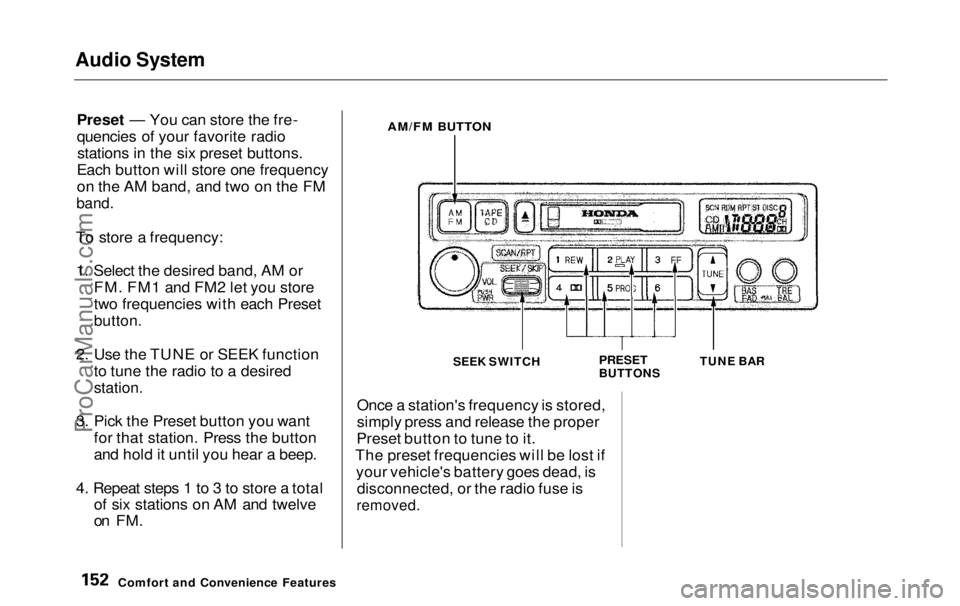
Preset — You can store the fre-
quencies of your favorite radiostations in the six preset buttons.
Each button will store one frequency
on the AM band, and two on the FM
band.
To store a frequency: 1. Select the desired band, AM or FM. FM1 and FM2 let you store
two frequencies with each Preset
button.
2. Use the TUNE or SEEK function to tune the radio to a desired
station.
3. Pick the Preset button you want for that station. Press the button
and hold it until you hear a beep.
4. Repeat steps 1 to 3 to store a total of six stations on AM and twelve
on FM.
AM/FM BUTTON
SEEK SWITCH
PRESET
BUTTONSTUNE BAR
Once a station's frequency is stored,
simply press and release the proper
Preset button to tune to it.
The preset frequencies will be lost if your vehicle's battery goes dead, isdisconnected, or the radio fuse is
removed.
Comfort and Convenience FeaturesProCarManuals.comMain Menu Table of Contents s t
Page 162 of 343
Audio System
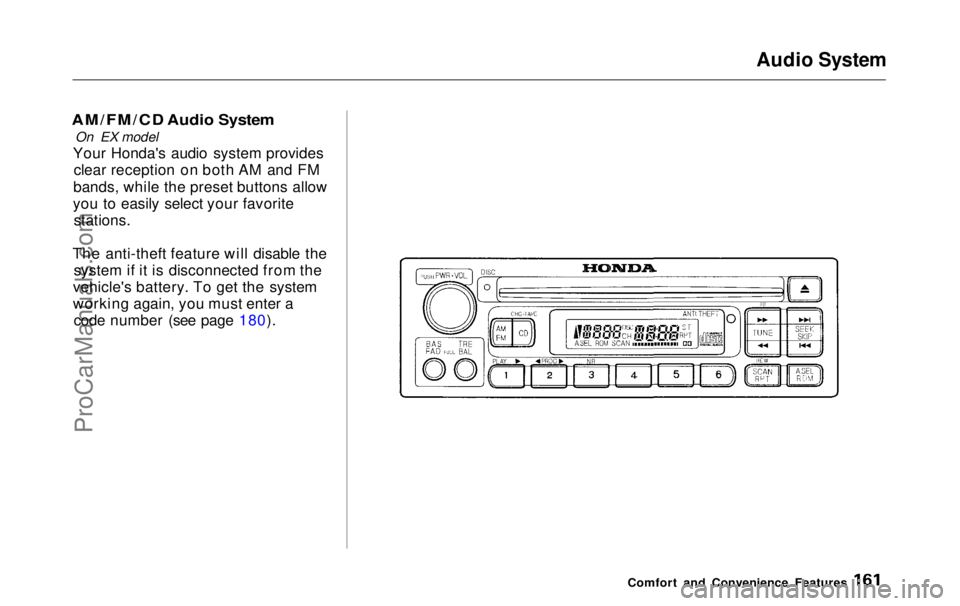
AM/FM/CD Audio System
On EX model
Your Honda's audio system provides clear reception on both AM and FM
bands, while the preset buttons allow
you to easily select your favorite stations.
The anti-theft feature will disable the system if it is disconnected from the
vehicle's battery. To get the system
working again, you must enter a code number (see page 180).
Comfort and Convenience FeaturesProCarManuals.comMain Menu Table of Contents s t
Page 165 of 343
Audio System
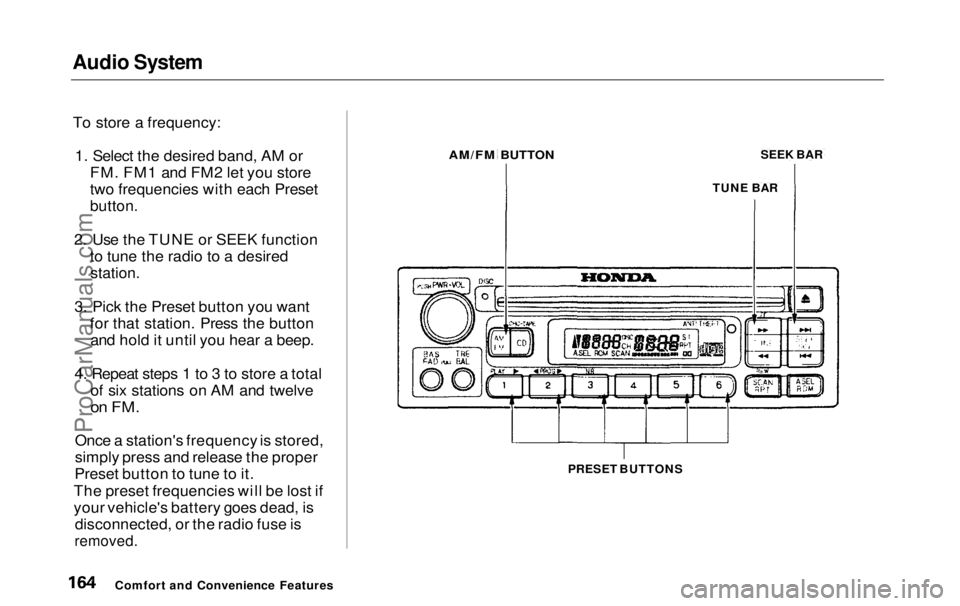
To store a frequency: 1. Select the desired band, AM or FM. FM1 and FM2 let you store
two frequencies with each Preset
button.
2. Use the TUNE or SEEK function to tune the radio to a desired
station.
3. Pick the Preset button you want for that station. Press the buttonand hold it until you hear a beep.
4. Repeat steps 1 to 3 to store a total of six stations on AM and twelve
on FM.
Once a station's frequency is stored,
simply press and release the proper
Preset button to tune to it.
The preset frequencies will be lost if
your vehicle's battery goes dead, is disconnected, or the radio fuse is
removed.
PRESET BUTTONS
Comfort and Convenience Features
AM/FM BUTTON
TUNE BARSEEK BARProCarManuals.comMain Menu Table of Contents s t
Page 181 of 343
Audio System
Theft Protection
On EX model
Your vehicle's audio system will disable itself if it is disconnected
from electrical power for any reason.
To make it work again, the user must enter a specific five-digit code
in the Preset buttons. Because there
are hundreds of number
combinations possible from five
digits, making the system work
without knowing the exact code is nearly impossible.
You should have received a card that lists your audio system's codenumber and serial number. It is best
to store this card in a safe place at
home. In addition, you should write
the audio system's serial number in
this Owner's Manual. If you should
happen to lose the card, you must obtain the code number from your
Honda dealer. To do this, you will
need the system's serial number. If your vehicle's battery is discon-
nected or goes dead, or the radio
fuse is removed, the audio system
will disable itself. If this happens, you will see in the
frequency display the next time youturn on the system. Use the Preset
buttons to enter the five-digit code. Ifit is entered correctly, the radio willstart playing.
If you make a mistake entering the
code, do not start over or try to
correct your mistake. Complete the
five-digit sequence, then enter the correct code. You have ten tries to
enter the correct code. If you are
unsuccessful in ten attempts, you
must then leave the system on forone hour before trying again. You will have to store your favorite
stations in the Preset buttons after
the system begins working. Your original settings were lost when
power was disconnected.
Comfort and Convenience FeaturesProCarManuals.comMain Menu Table of Contents s t
Page 198 of 343

Starting the Engine
1. Apply the parking brake.
2. In cold weather, turn off all electrical accessories to reduce
the drain on the battery.
3. Make sure the shift lever is in Park. Press on the brake pedal.
4. Without touching the accelerator pedal, turn the ignition key to theSTART (III) position. If the enginedoes not start right away, do not
hold the key in START (III) for more than 15 seconds at a time.
Pause for at least 10 seconds
before trying again.
5. If the engine does not start within 15 seconds, or starts but stalls
right away, repeat step 4 with the accelerator pedal pressed half-way
down. If the engine starts, release
pressure on the accelerator pedal so the engine does not race. 6. If the engine still does not start,
press the accelerator pedal all the
way down and hold it there while starting in order to clear flooding.
As before, keep the ignition key in the START (III) position for nomore than 15 seconds. Return to
step 5 if the engine does not start.
If it starts, lift your foot off the
accelerator pedal so the engine
does not race.
Starting in Cold Weather at High
Altitude (Above 8,000 feet/
2,400 meters)
An engine is harder to start in cold weather. The thinner air found athigh altitude above 8,000 feet (2,400meters) adds to the problem.
Use the following procedure:
1. Turn off all electrical accessories to reduce the drain on the battery. 2. Push the accelerator pedal half-
way to the floor and hold it there
while starting the engine. Do nothold the ignition key in START (III) for more than 15 seconds.
When the engine starts, release the accelerator pedal gradually as
the engine speeds up and smoothsout.
3. If the engine fails to start in step 2, push the accelerator pedal to the
floor and hold it there while you try to start the engine for no more
than 15 seconds. If the enginedoes not start, return to step 2.
DrivingProCarManuals.comMain Menu Table of Contents s t
Page 220 of 343
Maintenance
This section explains why it is important to keep your vehicle well
maintained and to follow basic
maintenance safety precautions.
This section also includes Maintenance Schedules for normaldriving and severe driving conditions,
a Maintenance Record, and instruc-
tions for simple maintenance tasks
you may want to take care of yourself.
If you have the skills and tools to per-
form more complex maintenance tasks on your Honda, you may want
to purchase the Service Manual. See page 333 for information on how toobtain a copy, or see your Honda
dealer.
Maintenance Safety.......................
220
Important Safet
y
Precautions ..
221
Maintenance Schedule.................
.
222
Required Maintenance Record.... 229
Owner Maintenance Checks........ 231
Fluid Locations............................... 232
Engine Oil....................................... 233
Adding Oil................................... 233
Recommended Oil..................... 233
Synthetic Oil............................... 234
Additives..................................... 235
Changing the Oil and Filter...... 235
Cooling System.............................. 237
Adding Engine Coolant............. 237Replacing Engine Coolant........ 239
Windshield Washers..................... 242
Automatic Transmission Fluid..... 243
Brake Fluid..................................... 244
Brake System............................. 244
Power Steering............................... 245
Air Cleaner Element...................... 246
Hood Latch..................................... 248
Spark Plugs..................................... 248
Replacement............................... 248
Specifications............................. 250
Battery............................................ 251
Wiper Blades.................................. 253
Air Conditioning System............... 255
Air Conditioning Filter.................. 256
Drive Belts...................................... 256
Timing Belt..................................... 257
Tires................................................ 257 Inflation....................................... 257
Inspection................................... 259Maintenance............................... 260
Tire Rotation.............................. 260
Replacing Tires and Wheels.... 261
Wheels and Tires....................... 262 Winter Driving........................... 262
Snow Tires.............................. 263
Tire Chains............................. 263
Lights..............................................264
Headlight Aiming...................... 266
Replacing Bulbs......................... 266
Storing Your Vehicle..................... 275
MaintenanceProCarManuals.comMain Menu s t