roof HONDA ODYSSEY 1999 Owners Manual
[x] Cancel search | Manufacturer: HONDA, Model Year: 1999, Model line: ODYSSEY, Model: HONDA ODYSSEY 1999Pages: 343, PDF Size: 3.73 MB
Page 26 of 343
Protecting Children
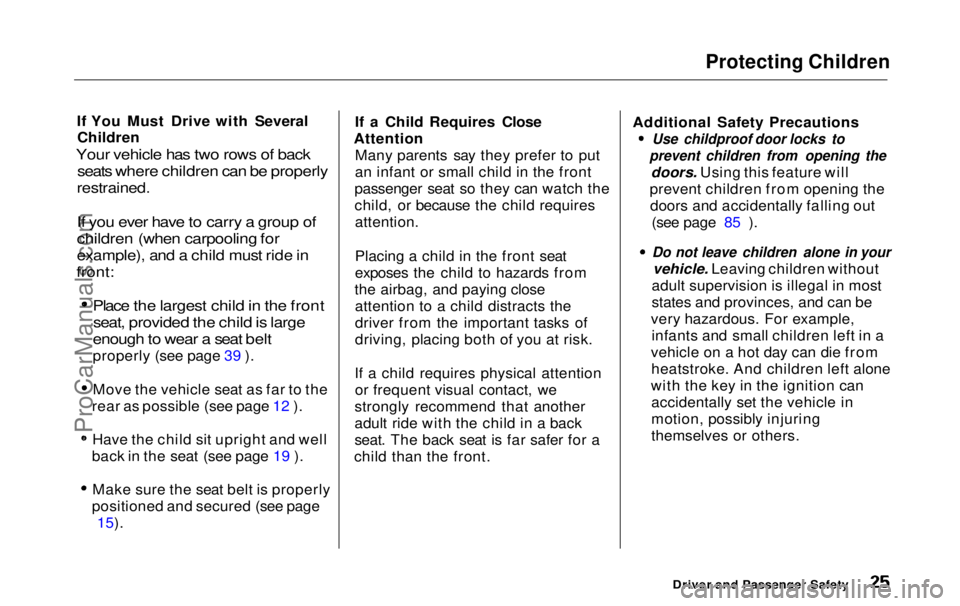
If You Must Drive with Several Children
Your vehicle has two rows of back
seats where children can be properly
restrained.
If you ever have to carry a group of
children (when carpooling for
example), and a child must ride in
front:
Place the largest child in the front
seat, provided the child is large
enough to wear a seat belt
properly (see page 39 ).
Move the vehicle seat as far to the
rear as possible (see page 12 ).
Have the child sit upright and well
back in the seat (see page 19 ).
Make sure the seat belt is properly
positioned and secured (see page 15). If a Child Requires Close
Attention Many parents say they prefer to put
an infant or small child in the front
passenger seat so they can watch the
child, or because the child requires attention.
Placing a child in the front seat
exposes the child to hazards from
the airbag, and paying close attention to a child distracts the
driver from the important tasks of
driving, placing both of you at risk.
If a child requires physical attention or frequent visual contact, we
strongly recommend that another
adult ride with the child in a back
seat. The back seat is far safer for a
child than the front. Additional Safety Precautions
Use childproof door locks to
prevent children from opening the
doors. Using this feature will
prevent children from opening the doors and accidentally falling out (see page 85 ).
Do not leave children alone in your
vehicle. Leaving children without
adult supervision is illegal in most
states and provinces, and can be
very hazardous. For example, infants and small children left in a
vehicle on a hot day can die from heatstroke. And children left alone
with the key in the ignition can accidentally set the vehicle in
motion, possibly injuring
themselves or others.
Driver and Passenger SafetyProCarManuals.comMain Menu Table of Contents s t
Page 56 of 343
Instruments and Controls
This section gives information about
the controls and displays that
contribute to the daily operation of
your Honda. All the essential
controls are within easy reach.
Control Locations............................ 56
Indicator Lights................................ 57
Gauges.............................................. 62
Controls Near the Steering
Wheel........................................65
Headlights...................................
. 66
Automatic Lightin g
Off
Feature......................................67
Daytime Running Lights............. 67
Instrument Panel Brightness..... 67
Turn Signals................................. 68
Windshield Wipers.....................
. 68
Windshield Washers..................
. 70
Rear Windo w
Wiper and
Washer......................................70
Hazard Warning........................... 70
Rear Window Defogger.............. 71
Steering Wheel Adjustment....... 72
Steering Wheel Controls ................ 73
Cruise Control.............................. 73
Remote Audio Controls .............. 76
Keys and Locks................................ 76
Keys............................................... 76
Immobilizer System..................... 77
Ignition Switch............................. 78
Power Door Locks....................... 79
Remote Transmitter.................... 81Childproof Door Locks............... 85
Tailgate......................................... 85
Glove Box..................................... 87
Sliding Doors.................................... 88
Manual Sliding Doors.................. 88
Power Sliding Doors.................... 90
Important Safety Precautions.... 94
HomeLink Universal Transmitter.................................. 95
Seats.................................................. 99
Passenger Seating....................... 99
Seat Adjustments....................... 100
Driver's Seat Power
Adjustments........................... 102
Armrests..................................... 103
Head Restraints......................... 104
Third Seat Access...................... 105 Moving the Second Row Bucket Seat............................ 106
Removing the Bucket Seats in the Second Row................. 108
Removing the Bench Seat in the Second Row................. 109
Folding the Third Seat.............. 110
Power Windows............................. 113
Mirrors............................................ 115 Parking Brake................................ 116
Digital Clock................................... 117
Center Table................................... 117
Beverage Holder............................ 118
Sunglasses Holder......................... 120
Sun Visor......................................... 121
Vanity Mirror................................. 121 Rear Compartment........................ 122Center Pocket................................ 122
Coin Holder.................................... 122
Storage Box.................................... 123 Coat Hook....................................... 123
Accessory Power Sockets............. 124 Interior Lights................................ 125
Instruments and ControlsProCarManuals.comMain Menu s t
Page 86 of 343
Keys and Locks
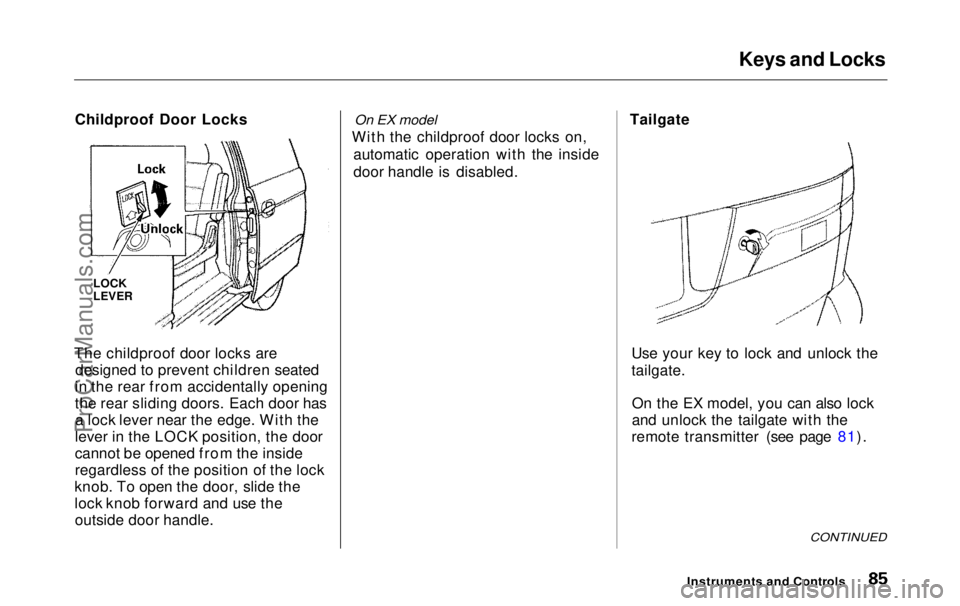
Childproof Door Locks
The childproof door locks are designed to prevent children seated
in the rear from accidentally opening
the rear sliding doors. Each door has a lock lever near the edge. With the
lever in the LOCK position, the door
cannot be opened from the inside
regardless of the position of the lock
knob. To open the door, slide the
lock knob forward and use the outside door handle.
On EX model
With the childproof door locks on, automatic operation with the inside
door handle is disabled. Tailgate
Use your key to lock and unlock the
tailgate.On the EX model, you can also lock
and unlock the tailgate with the
remote transmitter (see page 81).
CONTINUED
Instruments and Controls
LOCK
LEVERProCarManuals.comMain Menu Table of Contents s t
Page 90 of 343
Sliding Doors
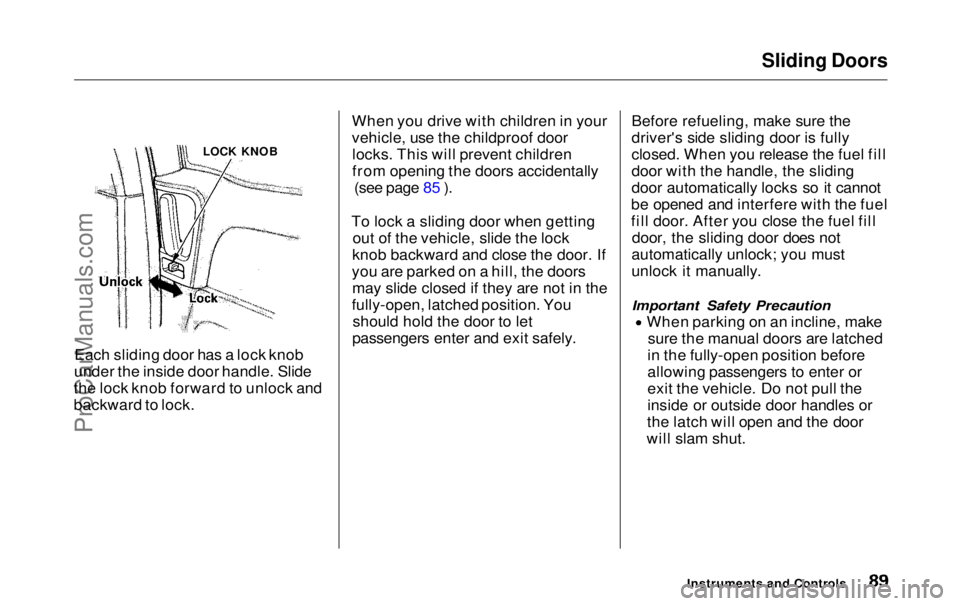
Each sliding door has a lock knob
under the inside door handle. Slide
the lock knob forward to unlock and
backward to lock. When you drive with children in your
vehicle, use the childproof door
locks. This will prevent children
from opening the doors accidentally (see page 85 ).
To lock a sliding door when getting out of the vehicle, slide the lock
knob backward and close the door. If
you are parked on a hill, the doors may slide closed if they are not in the
fully-open, latched position. You should hold the door to let
passengers enter and exit safely. Before refueling, make sure the
driver's side sliding door is fully
closed. When you release the fuel fill
door with the handle, the sliding
door automatically locks so it cannot
be opened and interfere with the fuel
fill door. After you close the fuel fill door, the sliding door does not
automatically unlock; you must
unlock it manually.
Important Safety Precaution
When parking on an incline, make
sure the manual doors are latched
in the fully-open position before
allowing passengers to enter or
exit the vehicle. Do not pull the
inside or outside door handles or
the latch will open and the door
will slam shut.
Instruments and Controls
LOCK KNOBProCarManuals.comMain Menu Table of Contents s t
Page 91 of 343
Sliding Doors
Power Sliding Doors
On EX model
The sliding doors on your vehicle are electrically-powered. You can openor close each power sliding door with
the switches on the dashboard, with
the inside or outside door handles, or
with the remote transmitter. The power sliding doors operate
with the ignition switch in anyposition. In addition: The shift lever must be in Park.
The MAIN switch on the
dashboard must be in the ON
position.
The sliding door you want to
operate must be unlocked. To open the door with the inside
handle, the childproof door lockon the door you want to operate
must be unlocked (see page 85).
You should close each sliding door before you start driving.
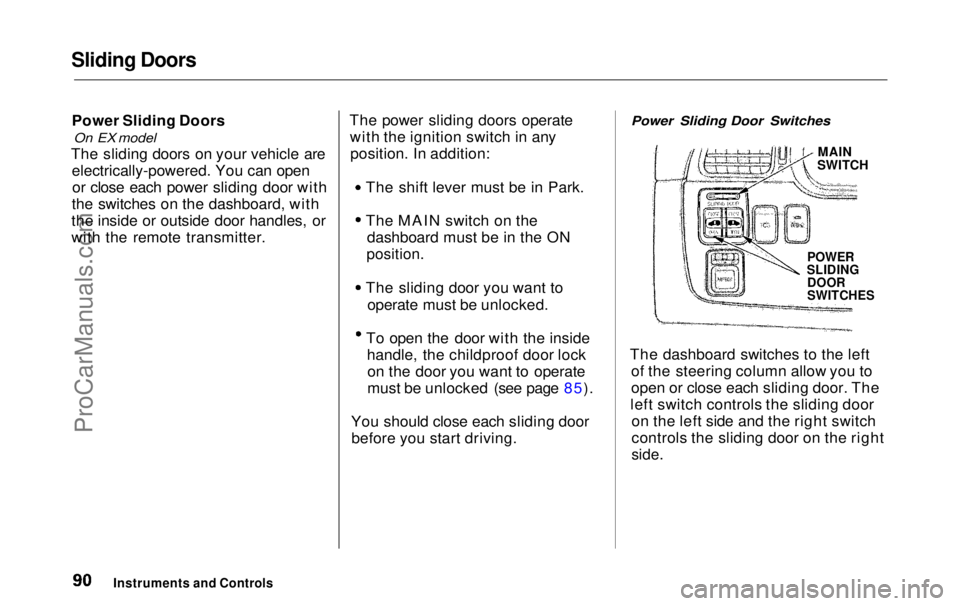
Power Sliding Door Switches
MAIN
SWITCH
POWER
SLIDING
DOOR
SWITCHES
The dashboard switches to the left of the steering column allow you to
open or close each sliding door. The
left switch controls the sliding door on the left side and the right switch
controls the sliding door on the right
side.
Instruments and ControlsProCarManuals.comMain Menu Table of Contents s t
Page 94 of 343

Sliding Doors
Before refueling, make sure the driver's side sliding door is fully
closed. When you release the fuel fill
door with the handle, the sliding door automatically locks so it cannot
be opened and interfere with the fuel fill door. After you close the fuel filldoor, the sliding door does not
automatically unlock; you must
unlock it manually.
When you drive with children in your vehicle, use the childproof doorlocks. This will prevent children
from opening the doors accidentally (see page 85).
How to Reset the Power Sliding
Doors
If your vehicle's battery is disconnected or goes dead while the
sliding doors are open, the power
sliding door system needs to besynchronized. After reconnecting
the battery: Close each sliding door completely
by hand; or Move the MAIN switch on the
dashboard to the ON position.
Push and hold the upper side of
each door switch until each sliding
door closes completely.
If the power sliding doors are closed,
the system will reset itself automatically once the battery has
been reconnected. If the power sliding doors do not
operate properly after resetting,
have your vehicle checked by a Honda dealer.
CONTINUED
Instruments and ControlsProCarManuals.comMain Menu Table of Contents s t
Page 194 of 343
Carrying Cargo
Carrying Cargo in the Cargo Area
or on a Roof Rack
Distribute cargo evenly on the
floor of the cargo area, placing the
heaviest items on the bottom andas far forward as possible. Tiedown items that could be thrown
about the vehicle during a crash or
sudden stop.
If you carry large items that
prevent you from closing the
tailgate, exhaust gas can enter the
passenger area. To avoid the
possibility of carbon monoxide
poisoning, follow the instructions on page 53 . If you can carry any items on a
roof rack, be sure the total weight of the rack and the items does not
exceed the maximum allowable
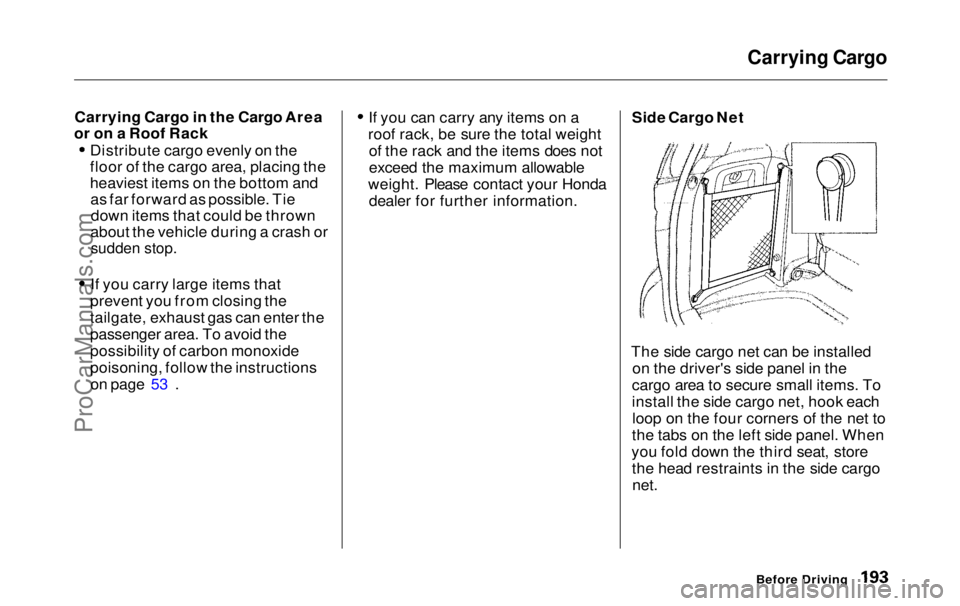
weight. Please contact your Honda dealer for further information. Side Cargo Net
The side cargo net can be installed on the driver's side panel in the
cargo area to secure small items. To
install the side cargo net, hook each loop on the four corners of the net to
the tabs on the left side panel. When
you fold down the third seat, store the head restraints in the side cargo
net.
Before DrivingProCarManuals.comMain Menu Table of Contents s t
Page 224 of 343

Maintenance Schedule
Your authorized Honda dealer knows your vehicle best and canprovide competent, efficient service.
However, service at a dealer is not
mandatory to keep your warranties
in effect. Maintenance may be done
by any qualified service facility or person who is skilled in this type of
automotive service. Keep all the
receipts as proof of completion, and
have the person who does the work
fill out the Maintenance Record. Check your warranty booklet for
more information. We recommend the use of Genuine
Honda parts and fluids whenever you
have maintenance done. These are
manufactured to the same high- quality standards as the original
components, so you can be confident
of their performance and durability.
U.S. Vehicles:
Maintenance, replacement or
repair of emissions control devices and systems may be done
by any automotive repair establishment or individual using
parts that are "certified" to EPA standards. According to state and federal
regulations, failure to perform
maintenance on the items marked
with # will not void your emissions
warranties. However, Honda recommends that all maintenanceservices be performed at the
recommended time or mileage
period to ensure long-term reliability.
MaintenanceProCarManuals.comMain Menu Table of Contents s t
Page 227 of 343
Maintenance Schedule (Severe Conditions)Maintenance
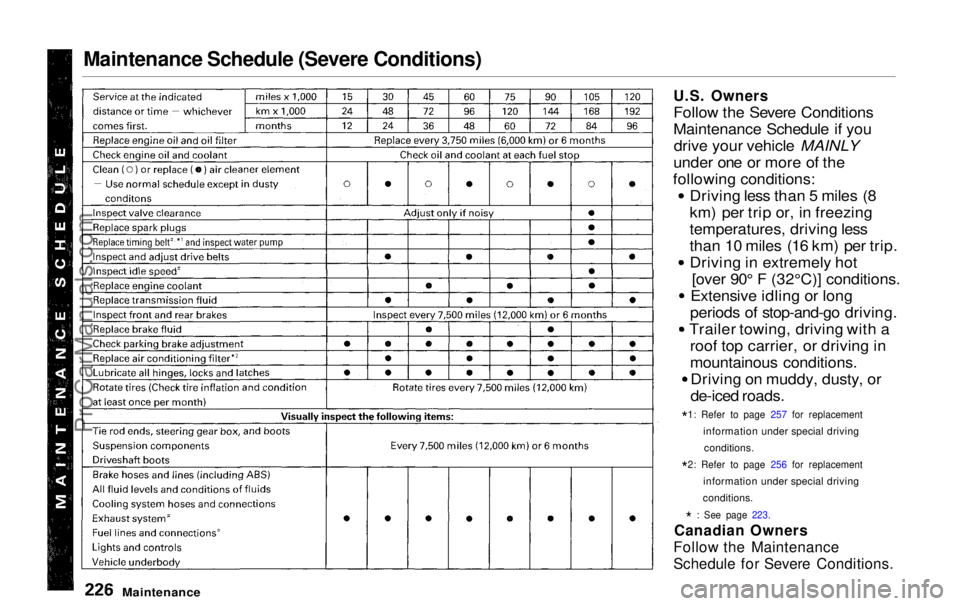
U.S. Owners
Follo
w the Severe Conditions
Maintenance Schedule if you drive your vehicle MAINLY
under one or more of the
following conditions: Driving less than 5 miles (8
km) per trip or, in freezing
temperatures, driving less
than 10 miles (16 km) per trip.
Driving in extremely hot[over 90° F (32°C)] conditions.
Extensive idling or long
periods of stop-and-go driving.
Trailer towing, driving with a roof top carrier, or driving in
mountainous conditions.Driving on muddy, dusty, or
de-iced roads.
*1
:
Refer to page 257 for replacement
information under special driving conditions.
*2
:
Refer to page 256 for replacement
information under special driving
conditions.
*
: See page 223.
Canadian Owners
Follow the Maintenance
Schedule for Severe Conditions.
ProCarManuals.comMain Menu Table of Contents s t
Page 228 of 343
Maintenance Schedule for Severe Conditions (listed by distance/time)
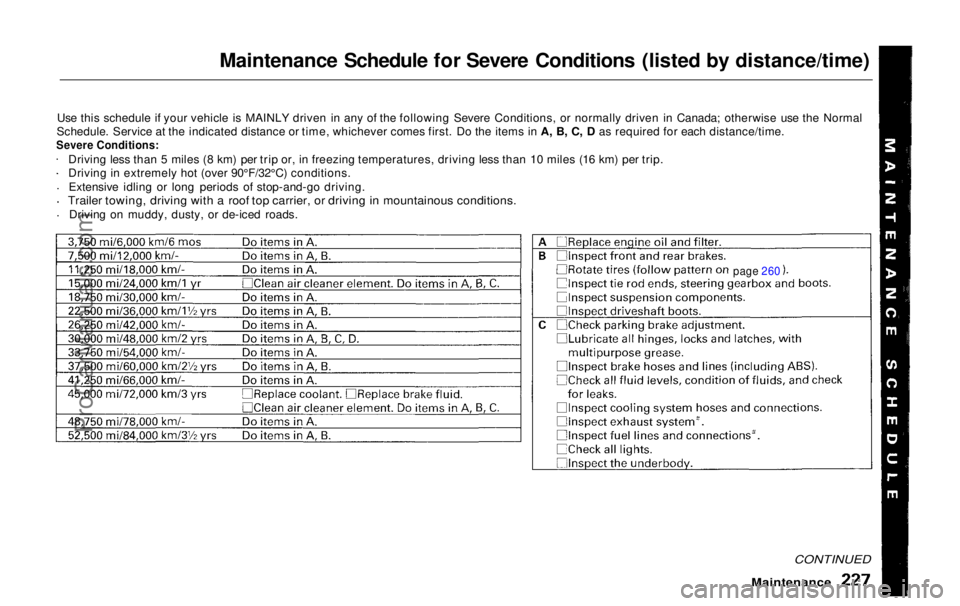
Use this schedule if your vehicle is MAINLY driven in any of the following Severe Conditions, or normally driven in Canada; otherwise use the Normal
Schedule. Service at the indicated distance or time, whichever comes first. Do the items in A, B, C, D as required for each distance/time.
Severe Conditions:
Driving less than 5 miles (8 km) per trip or, in freezing temperatures, driving less than 10 miles (16 km) per trip.
Driving in extremely hot (over 90°F/32°C) conditions.
Extensive idling or long periods of stop-and-go driving.
Trailer towing, driving with a roof top carrier, or driving in mountainous conditions.
Driving on muddy, dusty, or de-iced roads.
Maintenance
CONTINUED
page 260ProCarManuals.comMain Menu Table of Contents s t