bulb HONDA ODYSSEY 2000 RA6-RA9 / 2.G Owners Manual
[x] Cancel search | Manufacturer: HONDA, Model Year: 2000, Model line: ODYSSEY, Model: HONDA ODYSSEY 2000 RA6-RA9 / 2.GPages: 352, PDF Size: 4.43 MB
Page 63 of 352
Indicator Light s
Power Slidin g Doo r
Indicato r
EX model only
This indicator comes on for a few
seconds when you turn the ignition
switch ON (II). If it comes on at anyother time, there is a problem in the
power sliding door system. With this
light on, move the main switch on
the dashboard to the OFF position, and have the system checked by
your Honda dealer as soon as possible. You can still open or closeeach sliding door manually. For
more information on the power
sliding doors, see page 90.
Tur n Signa l an d
Hazar d Warnin g
Indicator s
The left or right turn signal light blinks when you signal a lane change or turn. If the light does not blink or
blinks rapidly, it usually means one of the turn signal bulbs is burned out (see page 273). Replace the bulb as
soon as possible, since other drivers
cannot see that you are signalling.
When you turn on the Hazard
Warning switch, both turn signal lights blink. All turn signals on theoutside of the vehicle should flash. Doo
r an d Brak e Lam p Monito r
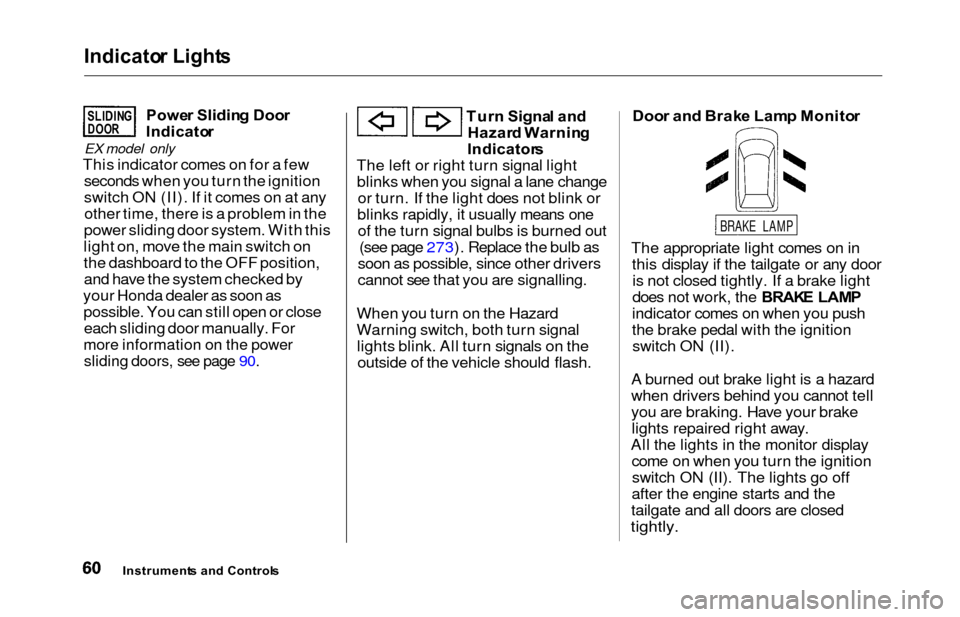
The appropriate light comes on in this display if the tailgate or any dooris not closed tightly. If a brake light
does not work, the BRAK E LAM P
indicator comes on when you push
the brake pedal with the ignition switch ON (II).
A burned out brake light is a hazard
when drivers behind you cannot tell
you are braking. Have your brake lights repaired right away.
All the lights in the monitor display come on when you turn the ignitionswitch ON (II). The lights go off
after the engine starts and the
tailgate and all doors are closed
tightly.
Instrument s an d Control s
SLIDINGDOOR
BRAKE LAMP
Page 228 of 352
Maintenance
This section explains why it is
important to keep your vehicle well
maintained and to follow basic
maintenance safety precautions.
This section also includes Maintenance Schedules for normal
driving and severe driving conditions,
a Maintenance Record, and instruc-
tions for simple maintenance tasks
you may want to take care of
yourself.
If you have the skills and tools to per-
form more complex maintenance tasks on your Honda, you may want
to purchase the Service Manual. See page 337 for information on how to
obtain a copy, or see your Honda
dealer.
Maintenance Safety....................... 226
Important Safety Precautions.. 227
Maintenance Schedule.................. 228
Required Maintenance Record.... 235
Owner Maintenance Checks........ 237
Fluid Locations............................... 238
Engine Oil....................................... 239 Adding Oil................................... 239Recommended Oil..................... 239
Synthetic Oil............................... 240
Additives..................................... 241
Changing the Oil and Filter...... 241
Cooling System.............................. 243
Adding Engine Coolant............. 243
Replacing Engine Coolant........ 245
Windshield Washers..................... 248
Automatic Transmission Fluid..... 249
Brake Fluid..................................... 250
Brake System............................ . 250
Power Steering............................... 251
Air Cleaner Element...................... 252
Hood Latch.................................... . 254
Spark Plugs..................................... 254
Replacement............................... 254
Specifications............................. 256
Battery............................................ 257
Wiper Blades.................................. 259
Air Conditioning System............... 261 Air Conditioning Filter.................. 262Drive Belts...................................... 262
Timing Belt.................................... . 263
Tires................................................ 263 Inflation....................................... 263
Inspection.................................. . 265
Maintenance............................... 266
Tire Rotation.............................. 266 Replacing Tires and Wheels.... 267
Wheels and Tires....................... 268
Winter Driving........................... 268
Snow Tires.............................. 269
Tire Chains............................. 269
Lights............................................. . 270
Headlight Aiming...................... 272
Replacing Bulbs......................... 272
Storing Your Vehicle..................... 281
Maintenanc e
Page 273 of 352
Lights
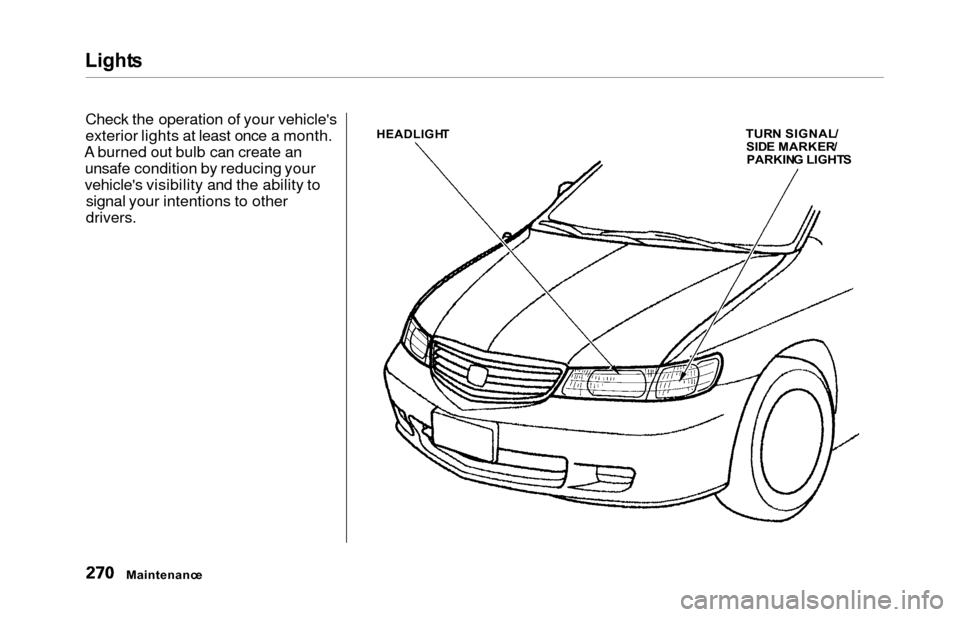
Check the operation of your vehicle's
exterior lights at least once a month.
A burned out bulb can create an unsafe condition by reducing your
vehicle's visibility and the ability to signal your intentions to other
drivers.
HEADLIGH TTURN SIGNAL /SIDE MARKER /PARKING LIGHT S
Maintenanc e
Page 274 of 352
Light
s
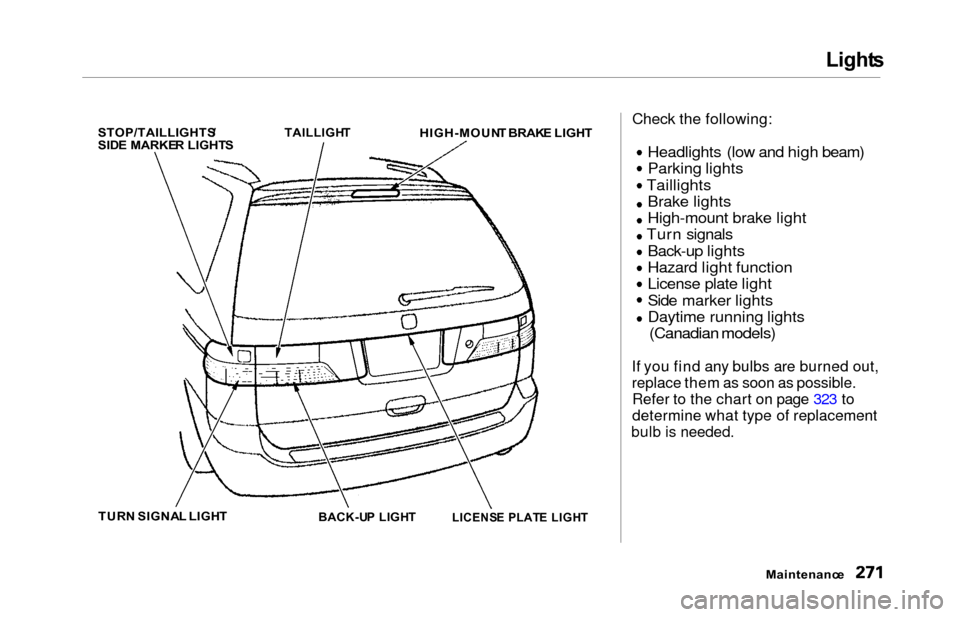
STOP/TAILLIGHTS /
SID E MARKE R LIGHT S
TAILLIGH
T
HIGH-MOUN T BRAK E LIGH T
TUR N SIGNA L LIGH T
BACK-UP LIGH T
Check the following:
Headlights (low and high beam)
Parking lights
Taillights Brake lights
High-mount brake light
Turn signals
Back-up lights
Hazard light function
License plate light
Side marker lights
Daytime running lights
(Canadian models)
If you find any bulbs are burned out,
replace them as soon as possible.
Refer to the chart on page 323 to
determine what type of replacement
bulb is needed.
Maintenance
LICENS
E PLAT E LIGH T
Page 275 of 352
Lights
Headligh t Aimin g
The headlights were properly aimed when your vehicle was new. If youregularly carry heavy items in the
cargo area or pull a trailer,
readjustment may be required.
Adjustment of the headlights should be performed by a Honda technicianor other qualified mechanic. Replacin
g a Headligh t Bul b
Your vehicle has halogen headlight bulbs, one on each side. When
replacing a bulb, handle it by its steel
base and protect the glass fromcontact with your skin or hard
objects. If you touch the glass, clean
it with denatured alcohol and a clean
cloth.
Halogen headlight bulbs get very hot
when lit. Oil, perspiration, or a scratch
on the glass can cause the bulb to
overheat and shatter.
1. Open the hood.
If you need to change the head-
light bulb on the driver's side,
remove the air intake cover (see
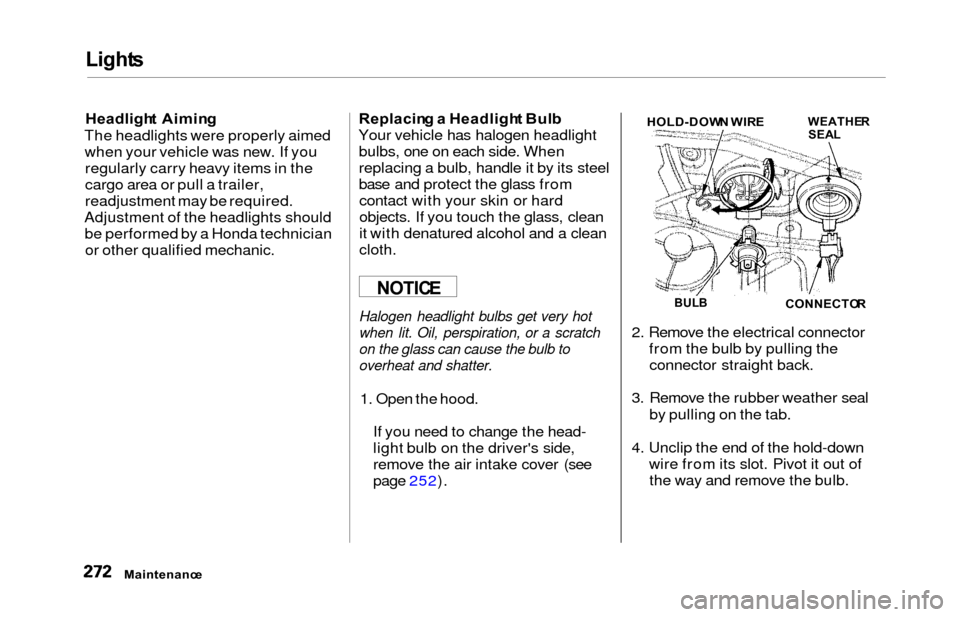
page 252). 2. Remove the electrical connector
from the bulb by pulling theconnector straight back.
3. Remove the rubber weather seal by pulling on the tab.
4. Unclip the end of the hold-down wire from its slot. Pivot it out ofthe way and remove the bulb.
Maintenanc e
NOTICEBULBCONNECTO R
WEATHERSEALHOLD-DOW N WIR E
Page 276 of 352
Lights
5. Insert the new bulb into the hole,
making sure the tabs are in their
slots. Pivot the hold-down wire
back in place and clip the end into
the slot.
6. Install the rubber seal over the back of the headlight assembly.
Make sure it is right side up; it is
marked "TOP."
7. Push the electrical connector ontothe new bulb.
Turn on the headlights to test the
new bulb.
8. (Driver's side) Reinstall the air intake cover. Replacin
g th e Fron t Sid e Marker /
Tur n Signa l an d Parkin g Ligh t
Bul b
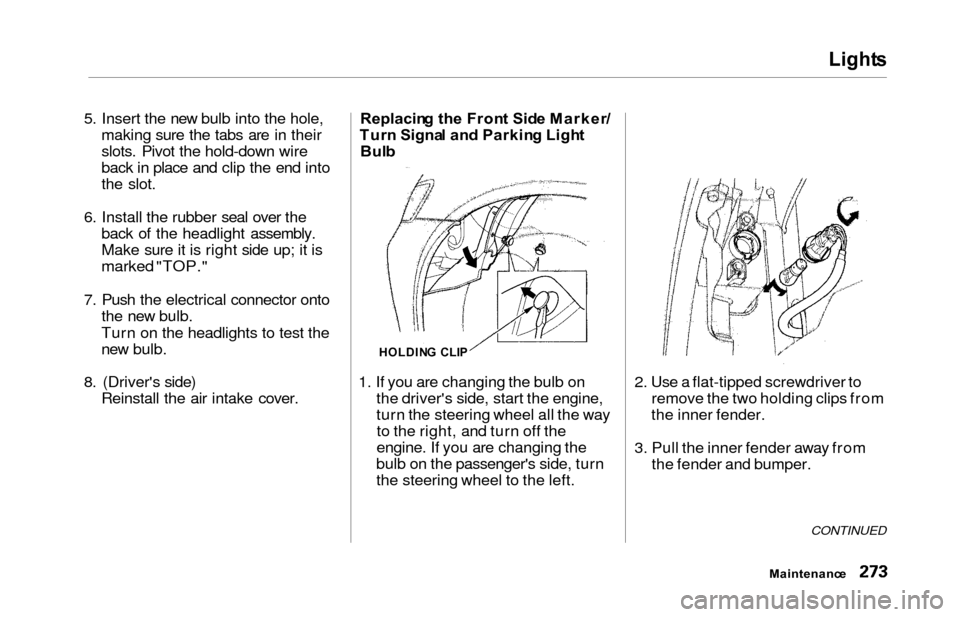
1. If you are changing the bulb on the driver's side, start the engine,
turn the steering wheel all the wayto the right, and turn off the
engine. If you are changing the
bulb on the passenger's side, turn
the steering wheel to the left. 2. Use a flat-tipped screwdriver to
remove the two holding clips from
the inner fender.
3. Pull the inner fender away from the fender and bumper.
CONTINUED
Maintenanc e
HOLDING CLI P
Page 277 of 352
Lights
4. Remove the socket from the
headlight assembly by turning it
one-quarter turn counterclockwise.
5. Remove the burned out bulb from the socket by pushing it in and
turning counterclockwise until it
unlocks.
6. Install the new bulb in the socket. Turn it clockwise to lock it in place.
7. Insert the socket back into the headlight assembly. Turn it
clockwise to lock it in place.
8. Test the lights to make sure the new bulb is working.
9. Put the inner fender in place. Install the two holding clips. Lock
each clip in place by pushing on
the center. Replacin
g Rea r Bulb s
(i n Fenders )
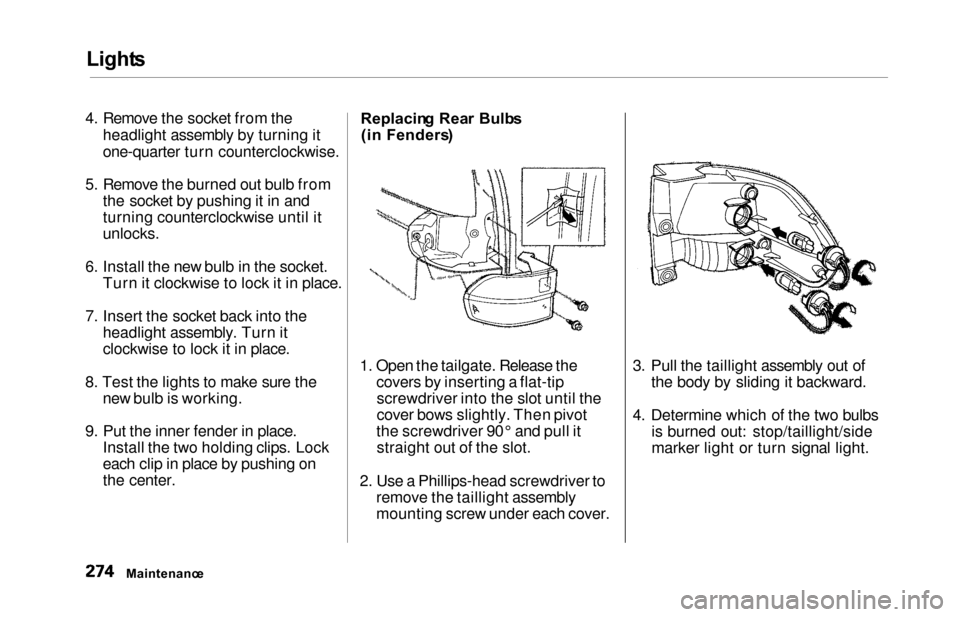
1. Open the tailgate. Release the covers by inserting a flat-tipscrewdriver into the slot until the
cover bows slightly. Then pivot
the screwdriver 90° and pull it straight out of the slot.
2. Use a Phillips-head screwdriver to remove the taillight assembly
mounting screw under each cover. 3. Pull the taillight assembly out of
the body by sliding it backward.
4. Determine which of the two bulbs is burned out: stop/taillight/side
marker light or turn signal light.
Maintenanc e
Page 278 of 352
Lights
5. Remove the socket by turning it
one-quarter turn counterclockwise.
6. Pull the bulb straight out of its
socket.
Push the new bulb straight into
the socket until it bottoms.
7. Reinstall the socket into the light assembly by turning it clockwise
until it locks.
8. Test the lights to make sure the new bulb is working.
9. When reinstalling the taillight assembly, align and pop the snap
fasteners in place. Tighten the two
mounting screws and reinstall the
covers in place. Replacin
g Rea r Bulb s
(i n Tailgate )
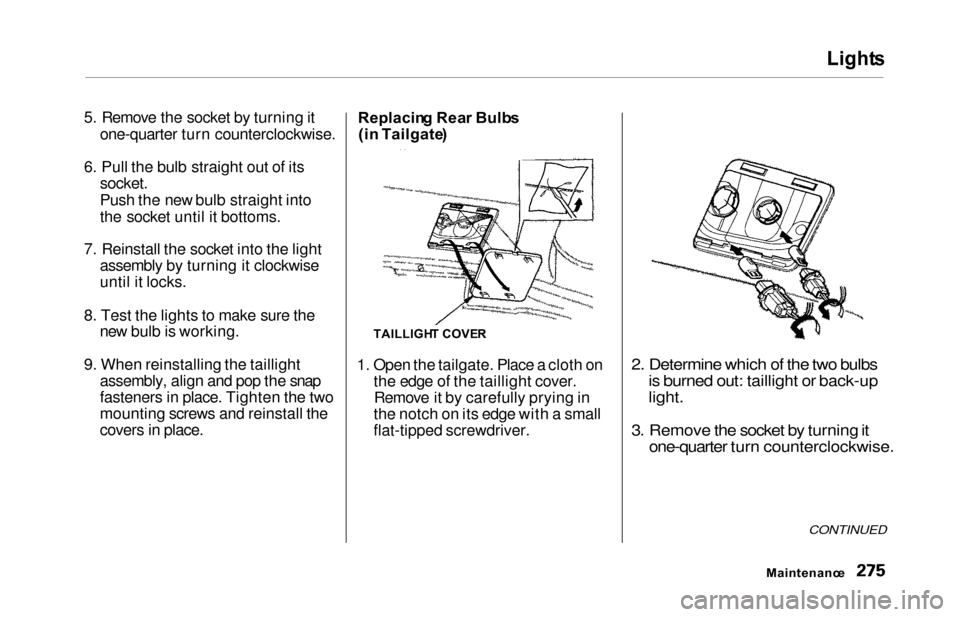
1. Open the tailgate. Place a cloth on the edge of the taillight cover.Remove it by carefully prying in
the notch on its edge with a small
flat-tipped screwdriver.
2. Determine which of the two bulbs is burned out: taillight or back-up
light.
3. Remove the socket by turning it one-quarter turn counterclockwise.
CONTINUED
Maintenanc e
TAILLIGHT COVE R
Page 279 of 352
Lights
4. Pull the bulb straight out of its
socket.
Push the new bulb straight into
the socket until it bottoms.
5. Insert the socket back into the light assembly. Turn it clockwise
to lock it in place.
6. Test the lights to make sure the new bulb is working.
7. Reinstall the taillight cover. Replacin
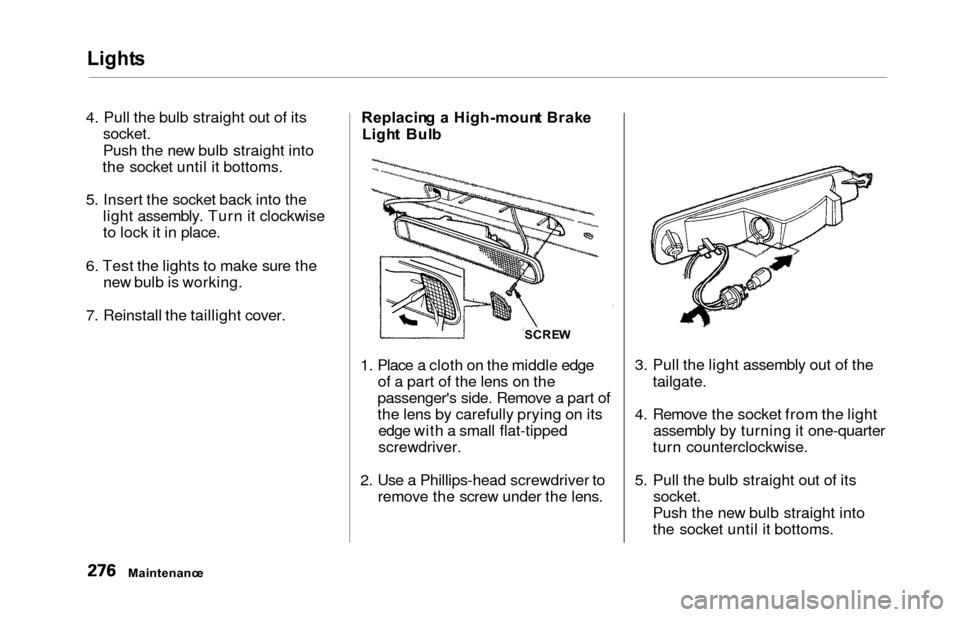
g a High-moun t Brak e
Ligh t Bul b
1. Place a cloth on the middle edge of a part of the lens on the
passenger's side. Remove a part of
the lens by carefully prying on its edge with a small flat-tipped
screwdriver.
2. Use a Phillips-head screwdriver to remove the screw under the lens. 3. Pull the light assembly out of the
tailgate.
4. Remove the socket from the light assembly by turning it one-quarter
turn counterclockwise.
5. Pull the bulb straight out of its socket.
Push the new bulb straight into
the socket until it bottoms.
Maintenanc e SCRE
W
Page 280 of 352
Lights
6. Put the socket back into the light
assembly and turn it clockwise to
lock it in place.
7. Test the light to make sure the new bulb is working.
8. Put the light assembly back into the tailgate. Install the screw and
tighten it securely. Reinstall the
lens piece.
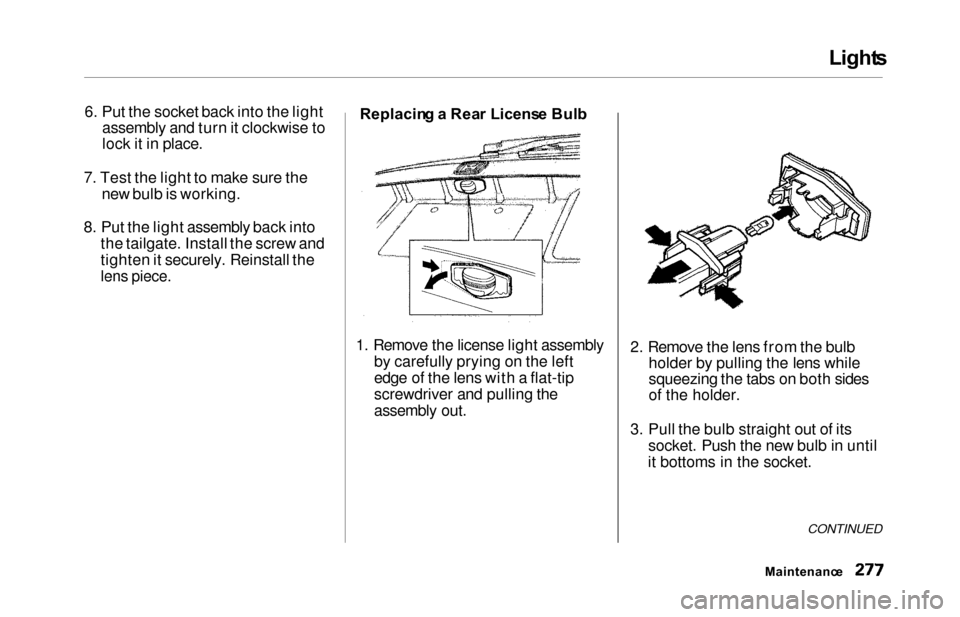
Replacin g a Rea r Licens e Bul b
1. Remove the license light assembly by carefully prying on the left
edge of the lens with a flat-tip
screwdriver and pulling the
assembly out. 2. Remove the lens from the bulb
holder by pulling the lens while
squeezing the tabs on both sides
of the holder.
3. Pull the bulb straight out of its socket. Push the new bulb in until
it bottoms in the socket.
CONTINUED
Maintenanc e