park HONDA ODYSSEY 2000 RA6-RA9 / 2.G Owners Manual
[x] Cancel search | Manufacturer: HONDA, Model Year: 2000, Model line: ODYSSEY, Model: HONDA ODYSSEY 2000 RA6-RA9 / 2.GPages: 352, PDF Size: 4.43 MB
Page 1 of 352
2000 Odyssey Online Reference Owner's Manual Use these links (and links throughout this manual) to navigate through this reference.
For a printed owner's manual, click on authorized manuals or go to www.helminc.com.
Contents
Owner's Identification Form
Introduction ........................................................................\
............................................................................. i
A Few Words About Safety ........................................................................\
.................................................. ii
Your Vehicle at a Glance ........................................................................\
....................................................... 2
Driver and Passenger Safety ........................................................................\
............................................... 5
Proper use and care of your vehicle's seat belts, and Supplemental Restraint System.
Instruments and Controls........................................................................\
...................................................55
Instrument panel indica tor and gauge, and how to use dashboard and steering column controls.
Comfort and Convenience Features........................................................................\
...............................129
How to operate the climate control system, the audio system, and other convenience features.
Before Driving ........................................................................\
.....................................................................187
What gasoline to use, how to break-in your new vehicle, and how to load luggage and other cargo.
Driving........................................................................\
...................................................................................201
The proper way to start the engine, shift the transmission, and park, plus towing a trailer.
Maintenance........................................................................\
.........................................................................225
The Maintenance Schedule shows you when you need to take your vehicle to the dealer.
Appearance Care........................................................................\
.................................................................283
Tips on cleaning and protecting your vehicle. Things to look for if your car ever needs body repairs.
Taking Care of the Unexpected........................................................................\
.......................................291
This section covers several problems motorists sometimes experience, and how to handle them.
Technical Information........................................................................\
.......................................................319
ID numbers, dimensions, capaciti es, and technical information.
Warranty and Customer Relations (U.S. and Canada)......................................................................331
A summary of the warranties covering your new Honda, and how to contact us.
Authorized Manuals (U.S. only)........................................................................\
.......................................337
How to order manuals and other technical literature.
Index ........................................................................\
......................................................................................... I
Service Information Summary
A summary of information you need when you pull up to the fuel pump.
Page 5 of 352
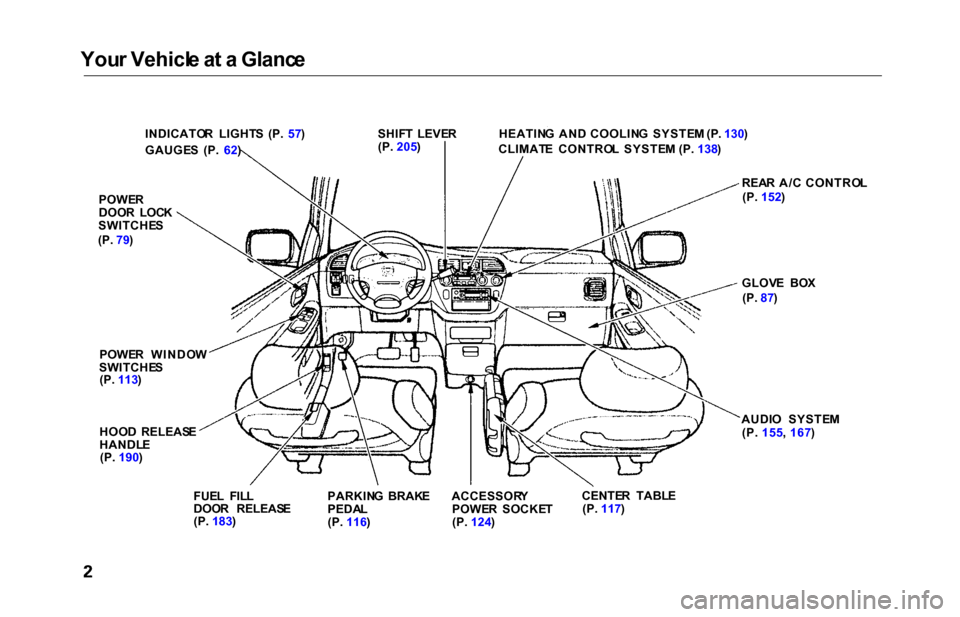
Your Vehicl e a t a Glanc e
INDICATO R LIGHT S (P. 57)
GAUGE S (P. 62)
POWE R
DOO R LOC K
SWITCHE S
(P. 79)
POWE R WINDO W
SWITCHE S
(P. 113 )
HOO D RELEAS E
HANDL E
(P. 190 )
FUEL FIL L
DOO R RELEAS E
(P. 183 ) REA
R A/ C CONTRO L
(P. 152 )
GLOV E BO X
(P. 87)
AUDI O SYSTE M
(P. 155 , 167 )
SHIF
T LEVE R
(P. 205 ) HEATIN
G AN D COOLIN G SYSTE M (P . 130 )
CLIMAT E CONTRO L SYSTE M (P. 138)
PARKIN G BRAK E
PEDAL(P. 116 ) ACCESSOR
Y
POWE R SOCKE T
(P. 124 ) CENTE
R TABL E
(P. 117 )
Page 22 of 352
Protecting Adult s
6.Adjus t th e Steerin g Whee l
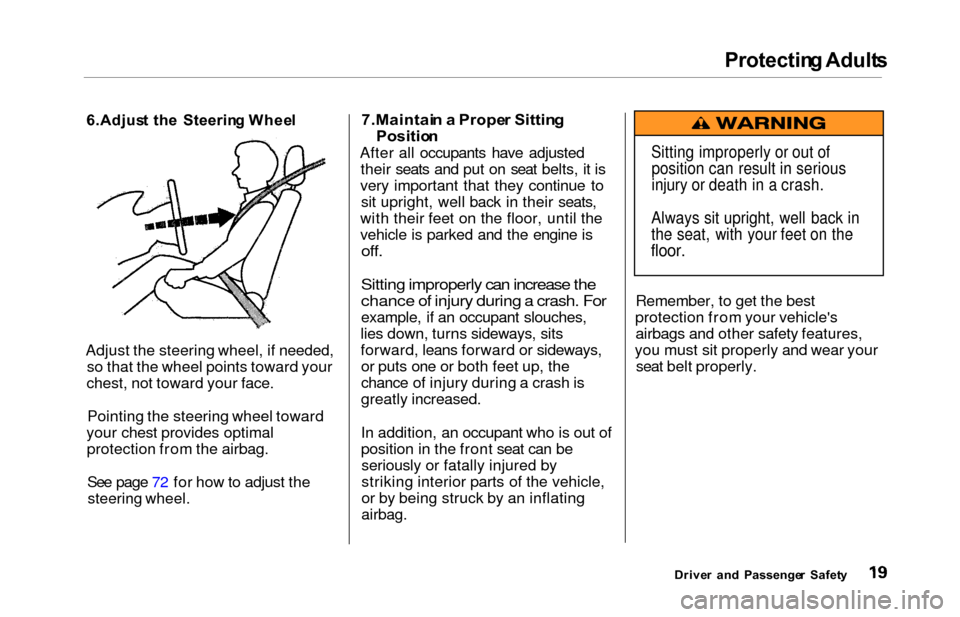
Adjust the steering wheel, if needed, so that the wheel points toward your
chest, not toward your face.
Pointing the steering wheel toward
your chest provides optimal protection from the airbag.
See page 72 for how to adjust the
steering wheel.
7.Maintai n a Prope r Sittin g
Positio n
After all occupants have adjusted
their seats and put on seat belts, it is
very important that they continue to sit upright, well back in their seats,
with their feet on the floor, until the
vehicle is parked and the engine is
off.
Sitting improperly can increase the
chance of injury during a crash. For
example, if an occupant slouches,
lies down, turns sideways, sits
forward, leans forward or sideways, or puts one or both feet up, the
chance of injury during a crash is
greatly increased.
In addition, an occupant who is out of
position in the front seat can beseriously or fatally injured by
striking interior parts of the vehicle,
or by being struck by an inflating
airbag.
Remember, to get the best
protection from your vehicle's airbags and other safety features,
you must sit properly and wear your seat belt properly.
Drive r an d Passenge r Safet y
Sitting improperly or out of
position can result in serious
injury or death in a crash.
Always sit upright, well back in
the seat, with your feet on the
floor.
Page 37 of 352
Protecting Childre n
Rear-Facing Child Seat Installation
Tips
For proper protection, an infant must
ride in a reclined, or semi-reclined
position. To determine the proper
reclining angle, check with the baby'sdoctor or follow the seat maker's
recommendations.
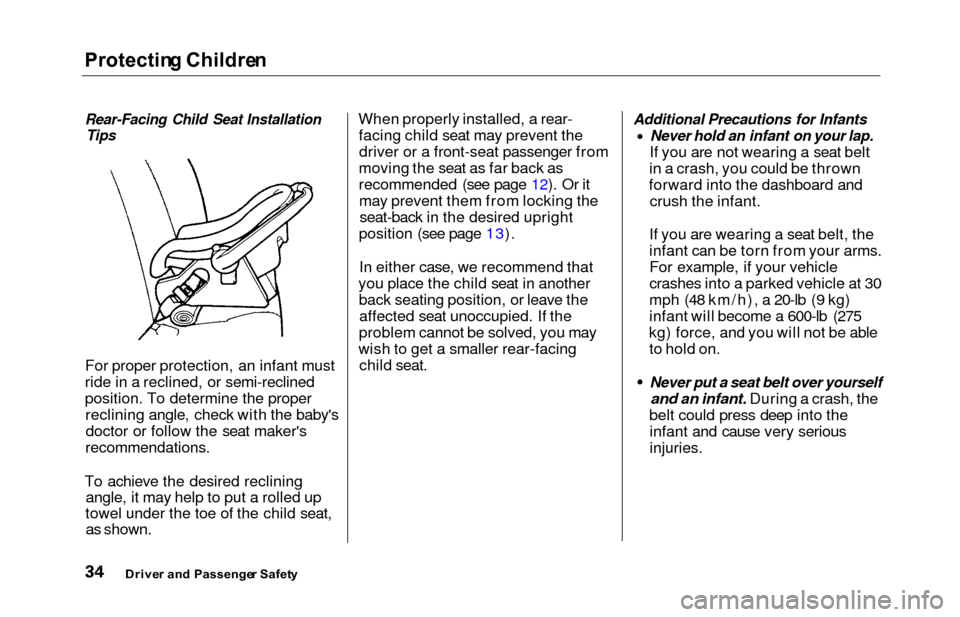
To achieve the desired reclining angle, it may help to put a rolled up
towel under the toe of the child seat, as shown. When properly installed, a rear-
facing child seat may prevent thedriver or a front-seat passenger from
moving the seat as far back as
recommended (see page 12). Or it may prevent them from locking theseat-back in the desired upright
position (see page 13).
In either case, we recommend that
you place the child seat in another back seating position, or leave theaffected seat unoccupied. If the
problem cannot be solved, you may
wish to get a smaller rear-facing child seat.
Additional Precautions for Infants
Never hold an infant on your lap.
If you are not wearing a seat belt
in a crash, you could be thrown
forward into the dashboard and crush the infant.
If you are wearing a seat belt, the
infant can be torn from your arms.
For example, if your vehicle
crashes into a parked vehicle at 30
mph (48 km/h), a 20-lb (9 kg)
infant will become a 600-lb (275
kg) force, and you will not be able to hold on.
Never put a seat belt over yourself
and an infant. During a crash, the
belt could press deep into the infant and cause very serious
injuries.
Drive r an d Passenge r Safet y
Page 42 of 352
Protecting Childre n
Additional Precautions for Small
Children
Never hold a small child on your
lap. If you are not wearing a seat
belt in a crash, you could be thrown forward into thedashboard and crush the child.
If you are wearing a seat belt, the
child can be torn from your armsduring a crash. For example, if
your vehicle crashes into a parked
vehicle at 30 mph (48 km/h), a 30-lb (14 kg) child will become a
900-lb (410 kg) force, and you will
not be able to hold on.
Never put a seat belt over yourself
and a child. During a crash, the
belt could press deep into the child
and cause very serious injuries.
Protectin g Large r Childre n
When a child reaches the recommended weight or height limit
for a forward-facing child seat, thechild should sit in the back seat and
wear a lap/shoulder belt.
If a child is too short for the shoulder
part of the belt to properly fit, we
recommend that the child use a
booster seat until tall enough to use the seat belt without a booster.
The following pages give instructions on how to check properseat belt fit, what kind of booster
seat to use if one is needed, and
important precautions for children
who must sit in the front seat.
CONTINUED
Drive r an d Passenge r Safet y
Allowing a larger child to sit
improperly in the front seat can
result in injury or death if the
airbags inflate.
If a larger child must sit in front,
make sure the child moves the
seat as far back as possible
and wears the seat belt properly.
Page 56 of 352
Carbon Monoxid e Hazar d
Your vehicle's exhaust contains
carbon monoxide gas. You should
hav e no problem with carbon
monoxide entering the vehicle in
normal driving if you maintain your
vehicle properly.
Have the exhaust system inspected
for leaks whenever:
The vehicle is raised for an oil
change.
You notice a change in the soundof the exhaust.
The vehicle was in an accident that may have damaged the under-
side.
High levels of carbon monoxide can
collect rapidly in enclosed areas,such as a garage. Do not run the
engine with the garage door closed.
Even with the door open, run the engine only long enough to move the
vehicle out of the garage. With the tailgate open, air flow can
pull exhaust gas into your vehicle'sinterior and create a hazardous
condition. If you must drive with the
tailgate open, open all the windowsand set the heating and cooling
system/climate control system as
shown below.
If you must sit in your parked vehicle,
even in an unconfined area, with the
engine running, adjust the heating
and cooling system/climate controlsystem as follows:
1. Select the Fresh Air mode.
2. Select the mode.
3. Turn the fan on high speed.
4. Set the temperature control to a comfortable setting.
Drive r an d Passenge r Safet y
Carbon monoxide gas is toxic.
Breathing it can cause
unconsciousness and even kill
you.
Avoid any enclosed areas or activities that expose you to
carbon monoxide.
Page 58 of 352
Instrument
s an d Control s
This section gives information about
the controls and displays that
contribute to the daily operation of
your Honda. All the essential
controls are within easy reach.
Control Locations............................
56
Indicator Lights...............................
. 57
Gauges.............................................. 62
Controls Near the Steering
Wheel........................................ 65
Headlights.................................... 66
Automatic Lighting Off
Feature......................................
67
Daytime Runnin
g Lights.............
67
Instrument
Pane
l Brightness.....
67
Turn
Signals................................
.
68
Windshield
Wipers.....................
. 68
Windshield Washers................... 70
Rear Window Wiper and Washer...................................... 70
Hazard Warning........................ 70
Rear Windo
w Defogger.............. 71
Steering Wheel Adjustment....... 72
Steering Wheel Controls................ 73
Cruise Control.............................. 73
Remote Audio Controls .............. 76
Keys and Locks................................ 76
Keys............................................... 76
Immobilizer System..................... 77
Ignition Switch............................. 78
Power Door Locks....................... 79
Remote Transmitter.................... 81
Childproof Door Locks............... 85
Tailgate......................................... 85
Glove Box..................................... 87
Manual Sliding Doors...................... 88
Power Sliding Doors........................ 89
HomeLink Universal Transmitter.................................. 95
Seats.................................................. 99
Passenger Seating....................... 99
Seat Adjustments....................... 100
Driver's Seat Power
Adjustments........................... 102
Armrests..................................... 103
Head Restraints......................... 104
Third Seat Access...................... 105 Moving the Second Row Bucket Seat............................ 106
Removing the Bucket Seats in the Second Row................. 108
Folding the Third Seat.............. 109
Power Windows............................. 112
Mirrors............................................ 115
Parking Brake................................ 116
Digital Clock................................... 117 Center Table................................... 117
Beverage Holder............................ 118
Sunglasses Holder......................... 120
Sun Visor......................................... 121
Vanity Mirror................................. 121 Rear Compartment........................ 122
Center Pocket................................ 122Coin Holder.................................... 122
Storage Box.................................... 123
Coat Hook....................................... 123
Accessory Power Sockets............. 124 Interior Lights................................ 125
Instrument s an d Control s
Page 60 of 352
Indicator Light s
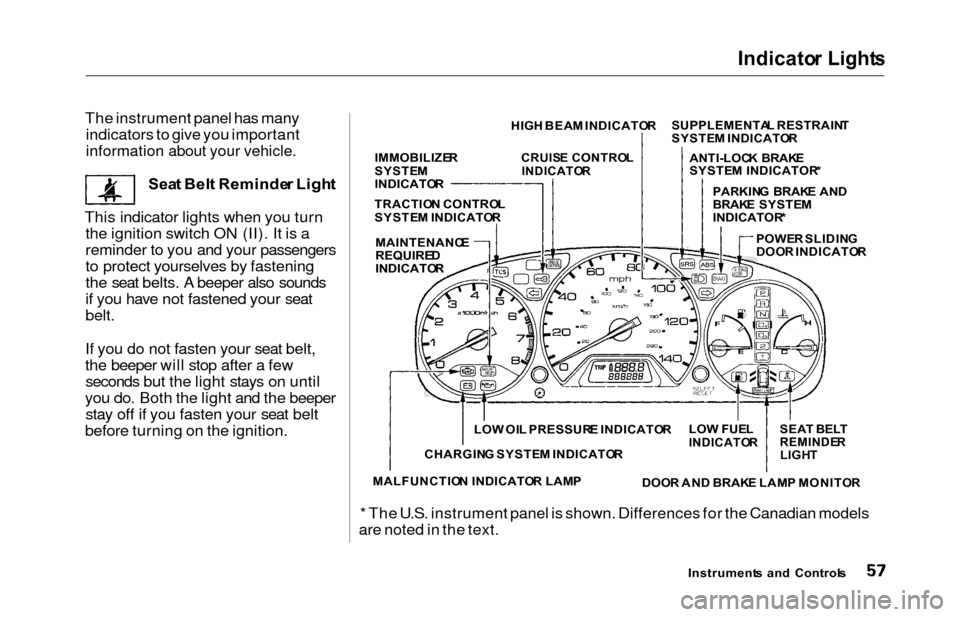
The instrument panel has many
indicators to give you important
information about your vehicle.
Sea t Bel t Reminde r Ligh t
This indicator lights when you turn the ignition switch ON (II). It is a
reminder to you and your passengers
to protect yourselves by fastening
the seat belts. A beeper also sounds
if you have not fastened your seat
belt.
If you do not fasten your seat belt,
the beeper will stop after a few seconds but the light stays on until
you do. Both the light and the beeper stay off if you fasten your seat belt
before turning on the ignition.
* The U.S. instrument panel is shown. Differences for the Canadian models
are noted in the text.
Instrument s an d Control s
HIG
H BEA M INDICATO RSUPPLEMENTA
L RESTRAIN T
SYSTE M INDICATO R
ANTI-LOC K BRAK E
SYSTE M INDICATOR *
POWE R SLIDIN G
DOO R INDICATO R
PARKIN
G BRAK E AN D
BRAK E SYSTE M
INDICATOR *
IMMOBILIZE
R
SYSTE M
INDICATO R
CRUISE CONTRO L
INDICATO R
TRACTION CONTRO L
SYSTE M INDICATO R
MAINTENANC E
REQUIREDINDICATO R
SEAT BEL T
REMINDE RLIGHT
LOW FUE LINDICATO R
DOOR AN D BRAK E LAM P MONITO R
LO
W OI L PRESSUR E INDICATO R
CHARGIN G SYSTE M INDICATO R
MALFUNCTIO N INDICATO R LAM P
Page 61 of 352
Indicator Light s
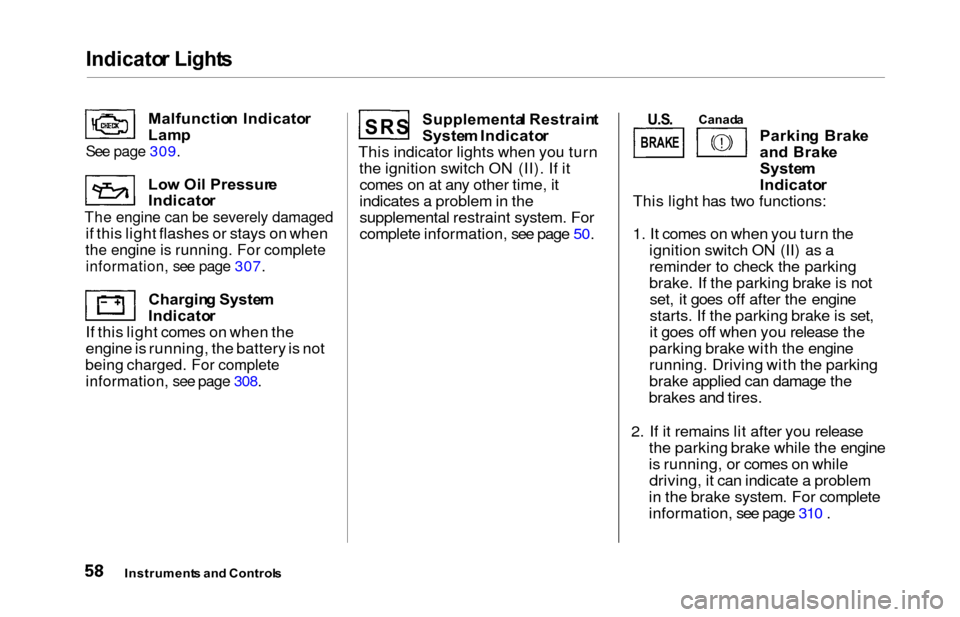
Malfunctio n Indicato r
Lam p
See page 309.
Low Oi l Pressur e
Indicato r
The engine can be severely damaged
if this light flashes or stays on when
the engine is running. For complete
information, see page 307.
Charging Syste m
Indicato r
If this light comes on when the
engine is running, the battery is not
being charged. For complete
information, see page 308.
Supplementa l Restrain t
System Indicato r
This indicator lights when you turn the ignition switch ON (II). If itcomes on at any other time, it
indicates a problem in the
supplemental restraint system. For
complete information, see page 50. Parkin
g Brak e
an d Brak e
System
Indicato r
This light has two functions:
1. It comes on when you turn the ignition switch ON (II) as a
reminder to check the parking
brake. If the parking brake is notset, it goes off after the engine
starts. If the parking brake is set,
it goes off when you release the
parking brake with the engine
running. Driving with the parking
brake applied can damage the
brakes and tires.
2. If it remains lit after you release the parking brake while the engine
is running, or comes on whiledriving, it can indicate a problem
in the brake system. For complete
information, see page 310 .
Instrument s an d Control s
S R SBRAKE
U.S.Canad a
Page 64 of 352
Indicator Light s
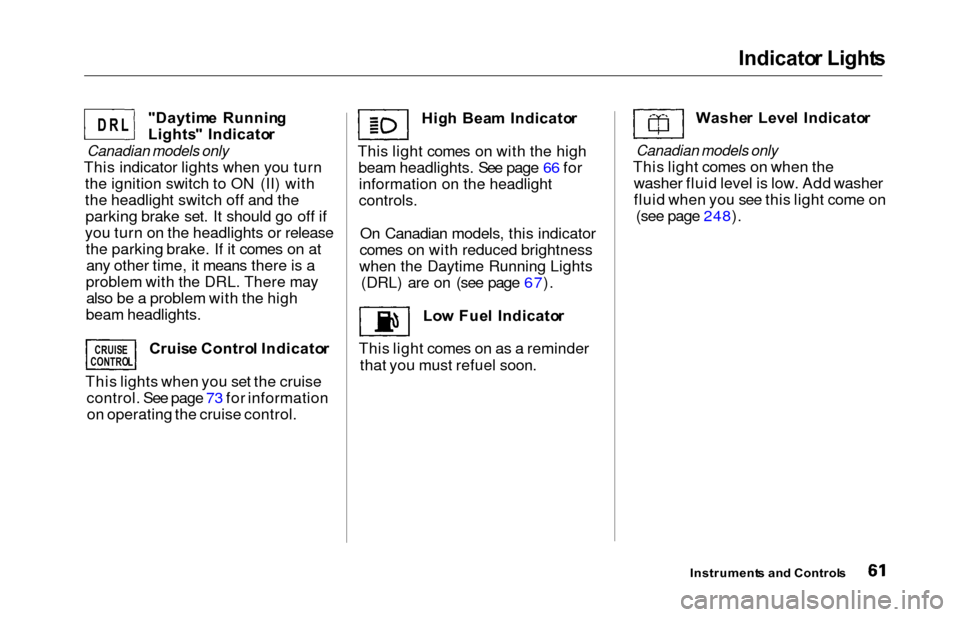
"Daytim e Runnin g
Lights " Indicato r
Canadian models only
This indicator lights when you turn
the ignition switch to ON (II) with
the headlight switch off and theparking brake set. It should go off if
you turn on the headlights or release the parking brake. If it comes on atany other time, it means there is a
problem with the DRL. There may also be a problem with the high
beam headlights.
Cruise Contro l Indicato r
This lights when you set the cruise control. See page 73 for informationon operating the cruise control. Hig
h Bea m Indicato r
This light comes on with the high beam headlights. See page 66 forinformation on the headlight
controls.
On Canadian models, this indicator
comes on with reduced brightness
when the Daytime Running Lights (DRL) are on (see page 67).
Low Fue l Indicato r
This light comes on as a reminder that you must refuel soon. Washe
r Leve l Indicato r
Canadian models only
This light comes on when the
washer fluid level is low. Add washer
fluid when you see this light come on (see page 248).
Instrument s an d Control s
D R L
CRUIS E
CONTRO L