odometer HONDA ODYSSEY 2005 RB1-RB2 / 3.G Owners Manual
[x] Cancel search | Manufacturer: HONDA, Model Year: 2005, Model line: ODYSSEY, Model: HONDA ODYSSEY 2005 RB1-RB2 / 3.GPages: 414, PDF Size: 5.85 MB
Page 71 of 414

This indicator reminds you that the
maintenance main items and sub
items will be displayed in the
odometer/trip meter display. See
page f or more inf ormation on
the maintenance minder.This indicator comes on when there
is a system message in the multi-
inf ormation display. Press the INFO
button on the steering wheel to see
the message (see page ).
Most of the time, this indicator
comes on along with other indicators
in the instrument panel such as the
seat belt reminder indicator, SRS
indicator, VSA system indicator, etc.
While the engine is operating in its
most economical range, this
indicator comes on and stays on. It
goes of f when your vehicle uses
extra f uel.
This indicator goes of f when your
dealer resets it after completing the
required maintenance service. 79
315On LX and EX models On Touring model
On EX with leather and Touring models
Instrument Panel Indicators
System Message
Indicator
Fuel Economy
Indicator Maintenance MINDER
Indicator
70
Page 72 of 414
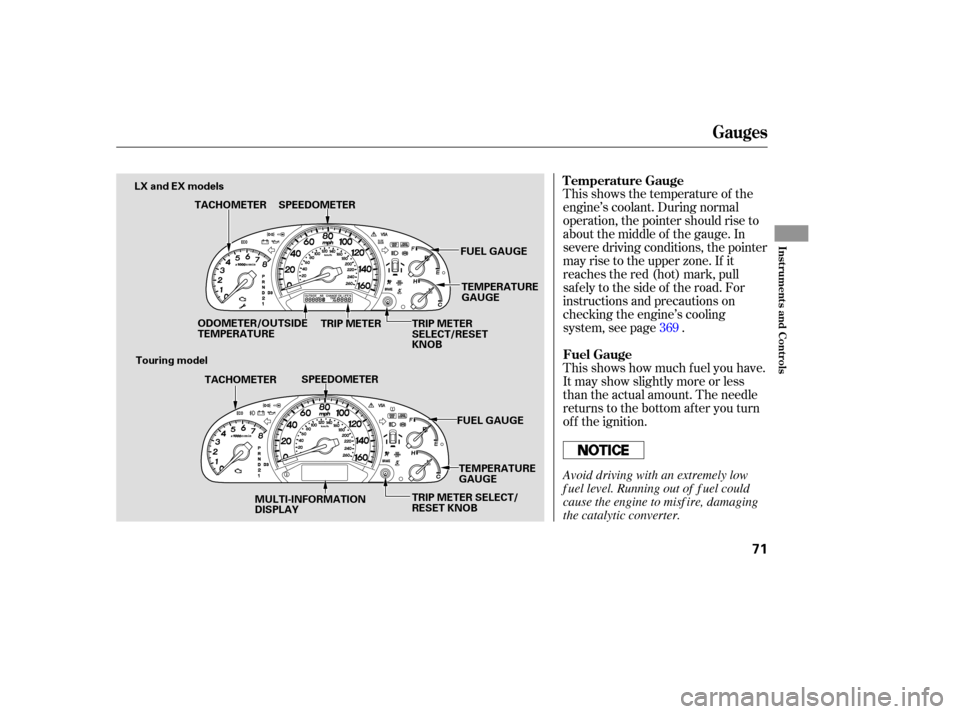
This shows how much f uel you have.
It may show slightly more or less
than the actual amount. The needle
returns to the bottom after you turn
of f the ignition. This shows the temperature of the
engine’s coolant. During normal
operation, the pointer should rise to
about the middle of the gauge. In
severe driving conditions, the pointer
may rise to the upper zone. If it
reaches the red (hot) mark, pull
safely to the side of the road. For
instructions and precautions on
checking the engine’s cooling
system, see page .369
Temperature Gauge
Fuel Gauge
Gauges
Inst rument s and Cont rols
71
SPEEDOMETER
FUEL GAUGE
SPEEDOMETER
ODOMETER/OUTSIDE
TEMPERATURE TEMPERATURE
GAUGE
FUEL GAUGE
MULTI-INFORMATION
DISPLAY TEMPERATURE
GAUGE
TACHOMETER
TACHOMETER TRIP METER
LX and EX models
Touring model TRIP METER
SELECT/RESET
KNOB
TRIP METER SELECT/
RESET KNOB
Avoid driving with an extremely low
f uel level. Running out of f uel could
cause the engine to misf ire, damaging
the catalytic converter.
Page 73 of 414

The odometer shows the total
distance your vehicle has been
driven. It measures miles in U.S.
models and kilometers in Canadian
models. It is illegal under U.S.
federal law and Canadian provincial
regulations to disconnect, reset, or
alter the odometer with the intent to
change the number of miles or
kilometers indicated.This indicator displays the outside
temperature in Fahrenheit (U.S.
models) or Centigrade (Canadian
models). To see the outside
temperature, press and release the
Select/Reset button until the
temperature is displayed.
The temperature sensor is in the
f ront bumper. The temperature
reading can be affected by heat
ref lection f rom the road surf ace,
engine heat, and the exhaust f rom
surrounding traf f ic. This can cause
an incorrect temperature reading
when your speed is under
19 mph (30 km/h). When you start
your trip, the sensor is not f ully
acclimatized, theref ore it may take
several minutes until the proper
temperature is displayed.
This meter shows the number of
miles (U.S.) or kilometers (Canada)
driven since you last reset it.
There are two trip meters: Trip A
and Trip B. Switch between these
displays and the outside temperature
display by pressing the Select/Reset
knob repeatedly.
Each trip meter works independently,
so you can keep track of two
dif f erent distances.
To reset a trip meter, display it and
then press and hold the Select/Reset
knob until the number resets to ‘‘0.0.’’
Both trip meters will reset if the
vehicle’s battery goes dead or is
disconnected.If equipped
Gauges
Odometer
Outside T emperature Indicator
Trip Meter
72
Page 74 of 414

In certain weather conditions,
temperature readings near f reezing
(32°F, 0°C) could mean that ice is
f orming on the road surf ace.
On the Touring model, the odometer,
trip meter, and the outside
temperature indicator are displayed
in the multi-inf ormation display. See
page f or more inf ormation.(Odometer/trip meter message)
If the system still detects a loose or
missing f uel cap, the Malf unction
Indicator Lamp (MIL) comes on.
Turn the engine of f and check or
retighten the f uel cap at least 3 clicks.
The MIL goes out af ter 3 days of
normal driving once the cap is
tightened or replaced. If it does not
go out, have your dealer inspect the
vehicle. For more inf ormation, see
page .
If your f uel cap is loose or missing, a
‘‘CHECK FUEL CAP’’ message
appears as text in the odometer/trip
meter display after you start the
engine. Turn the engine of f and
conf irm the f uel cap is installed. If it
is, loosen the cap, then retighten it at
least 3 clicks. When you restart the
engine, the message appears again.
To clear the message, press and hold
the select/reset button until the
message is replaced in the
odometer/trip meter display.
372
77
On LX and EX models
Gauges
Check Fuel Cap Indicator
Inst rument s and Cont rols
73
Page 76 of 414
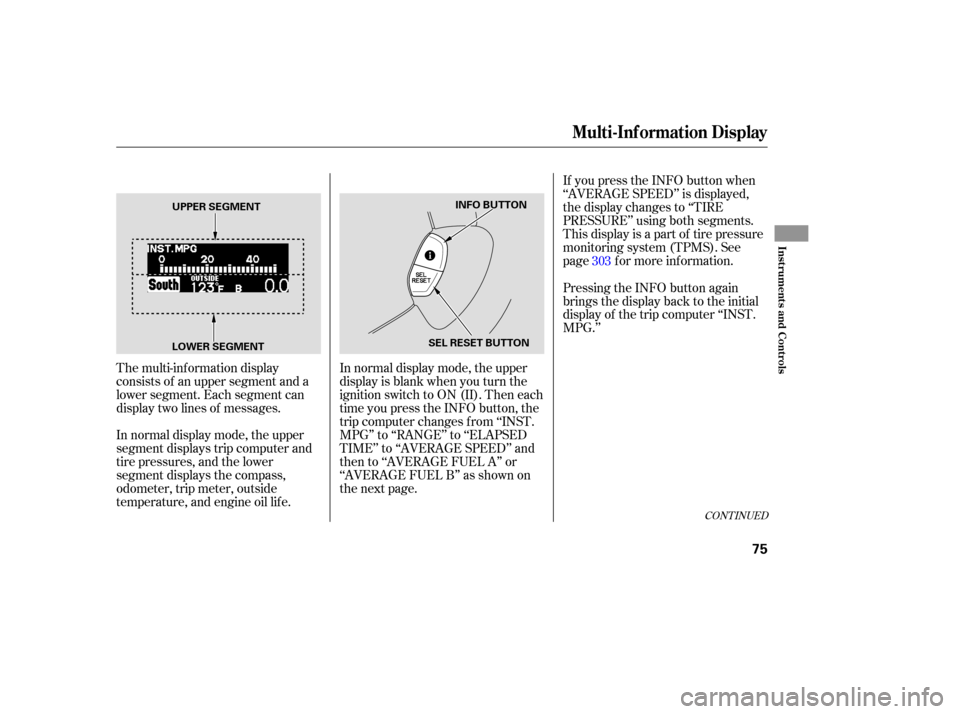
If you press the INFO button when
‘‘AVERAGE SPEED’’ is displayed,
the display changes to ‘‘TIRE
PRESSURE’’ using both segments.
This display is a part of tire pressure
monitoring system (TPMS). See
page f or more inf ormation.
The multi-inf ormation display
consists of an upper segment and a
lower segment. Each segment can
display two lines of messages.
In normal display mode, the upper
segment displays trip computer and
tire pressures, and the lower
segment displays the compass,
odometer, trip meter, outside
temperature, and engine oil lif e. In normal display mode, the upper
display is blank when you turn the
ignition switch to ON (II). Then each
time you press the INFO button, the
trip computer changes f rom ‘‘INST.
MPG’’ to ‘‘RANGE’’ to ‘‘ELAPSED
TIME’’ to ‘‘AVERAGE SPEED’’ and
then to ‘‘AVERAGE FUEL A’’ or
‘‘AVERAGE FUEL B’’ as shown on
the next page.Pressing the INFO button again
brings the display back to the initial
display of the trip computer ‘‘INST.
MPG.’’
303
CONT INUED
Multi-Inf ormation Display
Inst rument s and Cont rols
75
LOWER SEGMENT UPPER SEGMENT
INFO BUTTON
SEL RESET BUTTON
Page 78 of 414
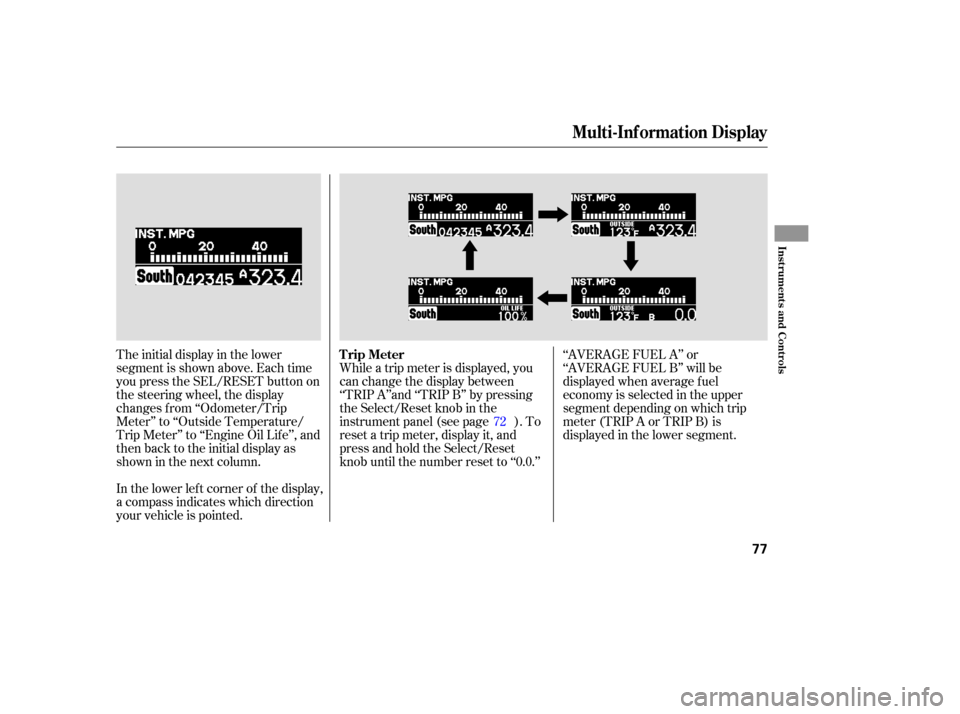
The initial display in the lower
segment is shown above. Each time
you press the SEL/RESET button on
the steering wheel, the display
changes f rom ‘‘Odometer/Trip
Meter’’ to ‘‘Outside Temperature/
Trip Meter’’ to ‘‘Engine Oil Lif e’’, and
then back to the initial display as
showninthenextcolumn.
In the lower lef t corner of the display,
a compass indicates which direction
your vehicle is pointed.While a trip meter is displayed, you
can change the display between
‘‘TRIP A’’and ‘‘TRIP B’’ by pressing
the Select/Reset knob in the
instrument panel (see page ). To
reset a trip meter, display it, and
press and hold the Select/Reset
knob until the number reset to ‘‘0.0.’’
‘‘AVERAGE FUEL A’’ or
‘‘AVERAGE FUEL B’’ will be
displayed when average f uel
economy is selected in the upper
segment depending on which trip
meter(TRIPAorTRIPB)is
displayed in the lower segment.
72
Multi-Inf ormation Display
Trip Meter
Inst rument s and Cont rols
77
Page 126 of 414
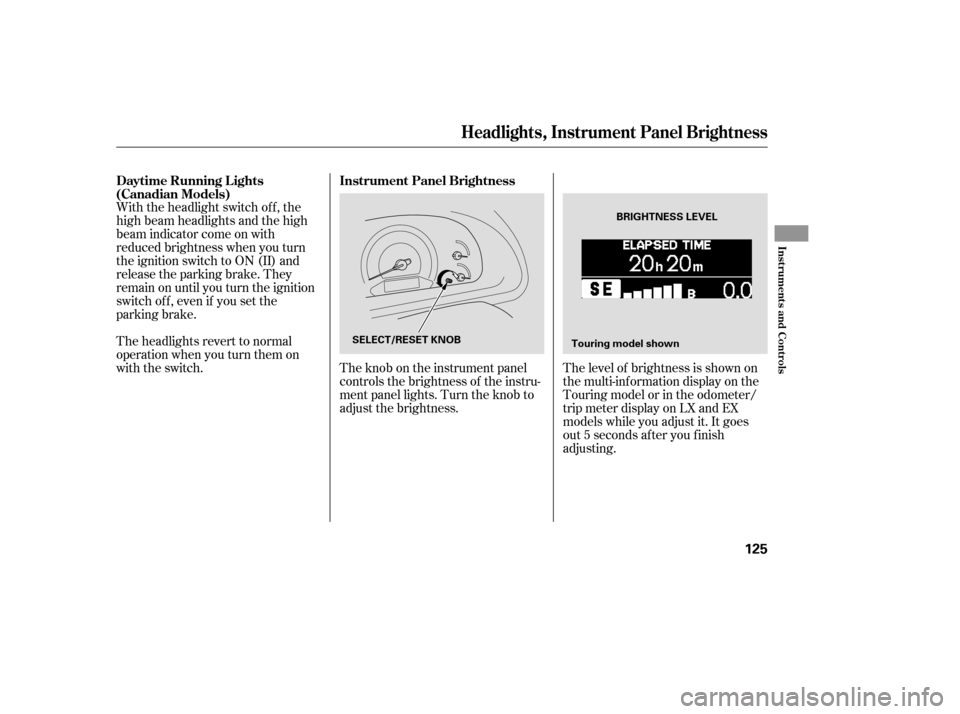
The level of brightness is shown on
the multi-information display on the
Touring model or in the odometer/
trip meter display on LX and EX
models while you adjust it. It goes
out 5 seconds af ter you f inish
adjusting.
The knob on the instrument panel
controls the brightness of the instru-
ment panel lights. Turn the knob to
adjust the brightness.
With the headlight switch off, the
high beam headlights and the high
beam indicator come on with
reduced brightness when you turn
the ignition switch to ON (II) and
release the parking brake. They
remain on until you turn the ignition
switch of f , even if you set the
parking brake.
The headlights revert to normal
operation when you turn them on
with the switch.
Instrument Panel Brightness
Daytime Running L ights
(Canadian Models)
Headlights, Instrument Panel Brightness
Inst rument s and Cont rols
125
BRIGHTNESS LEVEL
SELECT/RESET KNOB Touring model shown
Page 314 of 414

This section explains why it is
important to keep your vehicle well
maintained and how to f ollow basic
maintenance saf ety precautions.......................
Maintenance Saf ety .314
....................
Maintenance Minder . 315
....................
Maintenance Record .325
..............................
Fluid Locations .327
........................
Adding Engine Oil .328
.........
Changing the Oil and Filter . 329
..............................
Engine Coolant .331
....................
Windshield Washers .333
....
Automatic Transmission Fluid . 334
....................................
Brake Fluid .335
....................
Power Steering Fluid . 336
....................................
Timing Belt .336
.............................................
Lights .337
................
Cleaning the Seat Belts . 343
.....................................
Floor Mats .343
.................................
Wiper Blades .344
...............................................
Tires .346
...................
Checking the Battery . 352
.............................
Vehicle Storage .353
This section also includes
instructions on how to read the
maintenance messages in the
odometer/trip meter display or
multi-Inf ormation display, a
maintenance record, and instructions
for simple maintenance tasks you
may want to take care of yourself.
If you have the skills and tools to
perf orm more complex maintenance
tasks on your vehicle, you may want
to purchase the service manual. See
page f or inf ormation on how to
obtain a copy, or see your dealer.
401
Maintenance
Maint enance
313
Page 316 of 414
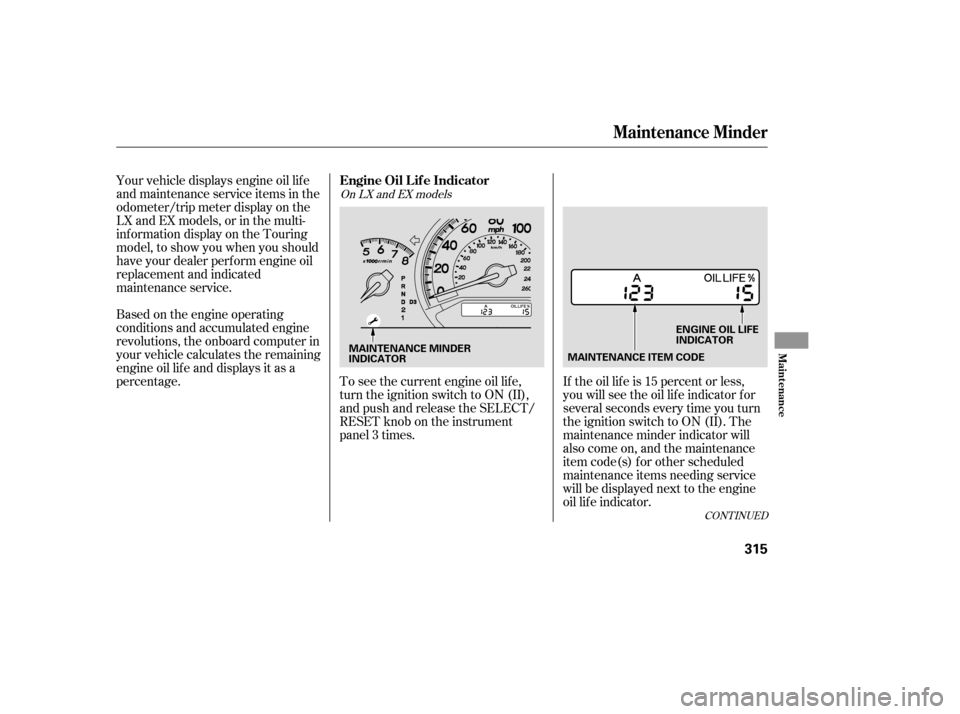
Your vehicle displays engine oil lif e
and maintenance service items in the
odometer/trip meter display on the
LX and EX models, or in the multi-
inf ormation display on the Touring
model, to show you when you should
have your dealer perf orm engine oil
replacement and indicated
maintenance service.
Based on the engine operating
conditions and accumulated engine
revolutions, the onboard computer in
your vehicle calculates the remaining
engine oil lif e and displays it as a
percentage.To see the current engine oil lif e,
turn the ignition switch to ON (II),
and push and release the SELECT/
RESET knob on the instrument
panel 3 times.If the oil lif e is 15 percent or less,
you will see the oil lif e indicator f or
several seconds every time you turn
the ignition switch to ON (II). The
maintenance minder indicator will
also come on, and the maintenance
item code(s) f or other scheduled
maintenance items needing service
will be displayed next to the engine
oil lif e indicator.
CONT INUED
On LX and EX models
Maintenance Minder
Engine Oil L if e Indicator
Maint enance
315
MAINTENANCE ITEM CODE
ENGINE OIL LIFE
INDICATOR
MAINTENANCE MINDER
INDICATOR
Page 317 of 414
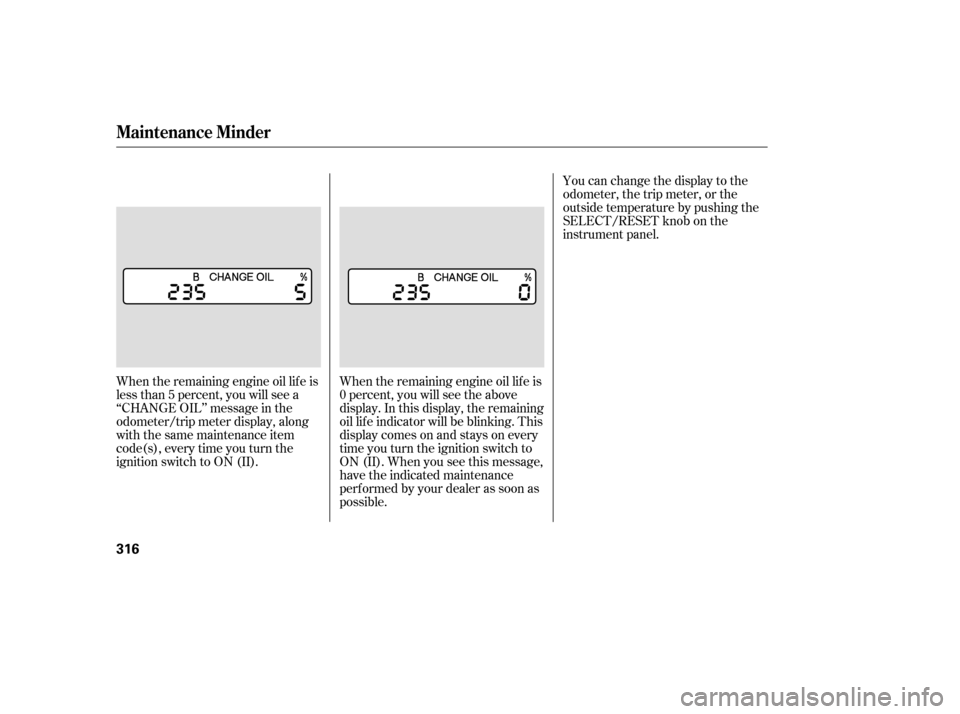
When the remaining engine oil lif e is
less than 5 percent, you will see a
‘‘CHANGE OIL’’ message in the
odometer/trip meter display, along
with the same maintenance item
code(s), every time you turn the
ignition switch to ON (II).When the remaining engine oil lif e is
0 percent, you will see the above
display. In this display, the remaining
oil lif e indicator will be blinking. This
display comes on and stays on every
time you turn the ignition switch to
ON (II). When you see this message,
have the indicated maintenance
perf ormed by your dealer as soon as
possible.You can change the display to the
odometer, the trip meter, or the
outside temperature by pushing the
SELECT/RESET knob on the
instrument panel.
Maintenance Minder
316