Signal HONDA ODYSSEY 2008 RB1-RB2 / 3.G Navigation Manual
[x] Cancel search | Manufacturer: HONDA, Model Year: 2008, Model line: ODYSSEY, Model: HONDA ODYSSEY 2008 RB1-RB2 / 3.GPages: 148, PDF Size: 7.91 MB
Page 4 of 148
4Navigation System
Introduction
Manual Overview
The manual is divided into the
following sections:
Getting started - A basic introduction that discusses the controls and how to
communicate with the system.
Entering a Destination - How to enter an address or locate a point of interest
(POI).
Driving to your Destination – An explanation of the map features,
guidance, and cautions.
Information Features - Cellular Phonebook*, Voice Command Help,
Map Legend, Calendar, Calculator,
and Key to Zagat Ratings.
* Available only for the Touring model.
System Set-up - How to set up and tailor the system for your personal
use and use the Address Book. The back of this manual contains:
Map Coverage (page
110)
Frequently Asked Questions (FAQs) (page
121)
Troubleshooting Guide (page 128 )
Glossary of Terms (page
129)
Voice Command List (page 132)
System Overview
Your navigation system is a highly
sophisticated location system with voice
control that uses satellites and a map
database to show you where you are and
to help guide you to a desired
destination.
The navigation system receives signals
from the global positioning system
(GPS), a network of 24 satellites in orbit
around the earth. By receiving signals
from several of these satellites, the
navigation system can determine the
latitude, longitude, and elevation of
your vehicle. In a ddition, a gyroscopic
yaw sensor and a vehicle speed sensor
in your vehicle k eep track of the
direction and speed of travel at all times.
The navigation system applies this
location, direction, and speed
information to the maps and calculates a
route to the destination you enter. As
you drive to that des tination, the system
provides map and voice guidance.
2008 Odyssey 00X31-SHJ-8101
Page 5 of 148
Navigation System5
Introduction
The navigation system is easy to use.
The locations of many places of
business and entertainment are already
entered in the system. You can select
any of them as a destination by using the
touch screen, joystick or voice control.
There are several ways to enter a
destination, such as by point of interest
(POI), by address, by phone number,
and by selecting it from the map. The
last 50 destinations are saved for reuse
at a later date. The system also allows
you to store a home address to simplify
returning home from your destination.Accessories Precautions
If you have front window tinting
installed, be aware that if the tint has
metallic properties, it can seriously
degrade or prevent GPS reception. This
is because the GPS antenna is located
under the dashboard.
If you plan to install electronic
components such as radar detectors,
vehicle location devices, remote
starters, additional amplifiers, or other
audio components, ensure that they are
not located near the navigation control
unit under the driver’s seat, near the
navigation screen in the dash, or near
the GPS antenna under the dashboard.
Signal noise emanating from these
devices can cause intermittent
disruption of the navigation system.
Important Safety Information
The navigation system can distract your
attention from the road if you focus on
the screen or operate the system’s
controls while driving.
Enter as much information as possible
into the system before you begin
driving, or when the vehicle is stopped.
Then, as you drive, listen to the audio
instructions and use voice commands
when possible.
2008 Odyssey 00X31-SHJ-8101
Page 6 of 148
6Navigation System
While driving, do not look at the screen
or operate the system controls for more
than a second or so at a time, and only
after deciding you can do so safely. Pull
to the side of the road if you need more
time to look at the screen or operate the
controls. The navigation system is designed to
provide route information to help you
reach your destination. However, this
route guidance may sometimes conflict
with current road conditions such as
street closures, road construction,
detours, and out-of-date map data.
Additionally, the system itself has
certain limitations (see page
103).
Therefore, you must verify the audio
and visual route information provided
by the system by caref
ully observing the
roadway, signs and signals, etc. If you
are unsure, proceed with caution.
Always use your own good judgment,
and obey traffic laws while driving.
Map Overview
Current Street
The current street on which your vehicle
is, appears at the bottom of the map
screen (see page
20 ). A message saying
“Not on a digitized road” may appear
instead when you driv e half a mile away
from a mapped road. For more details,
see Off-road Tracking on page
62.
Verified/Unverified Street
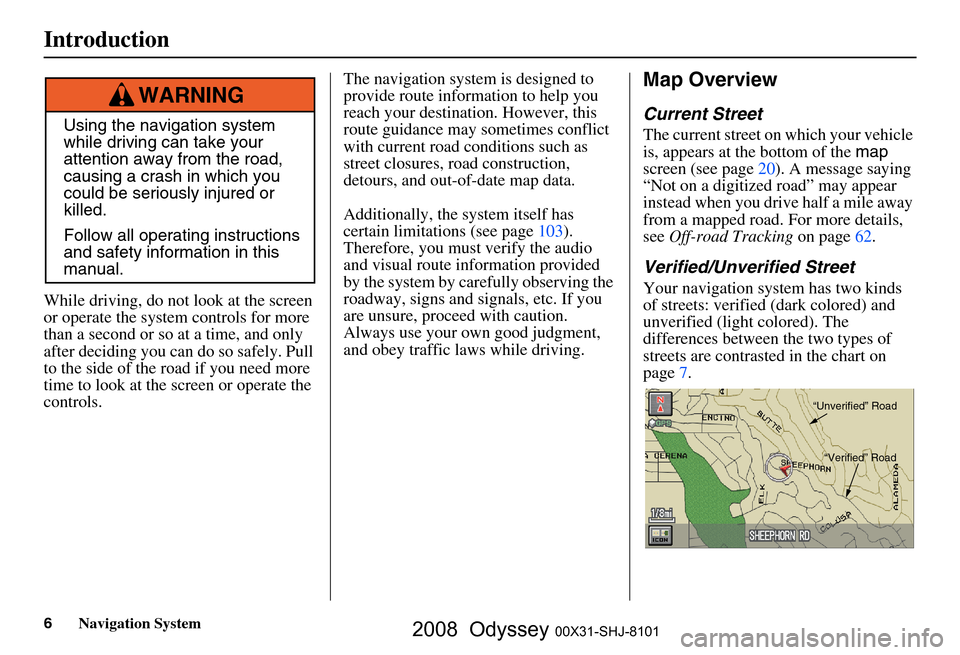
Your navigation system has two kinds
of streets: verified (dark colored) and
unverified (light colored). The
differences between the two types of
streets are contrasted in the chart on
page7.
Using the navigation system
while driving can take your
attention away from the road,
causing a crash in which you
could be seriously injured or
killed.
Follow all operating instructions
and safety information in this
manual.
WARNING
“Unverified” Road“Verified” Road
Introduction
2008 Odyssey 00X31-SHJ-8101
Page 20 of 148
20Navigation System
Getting Started
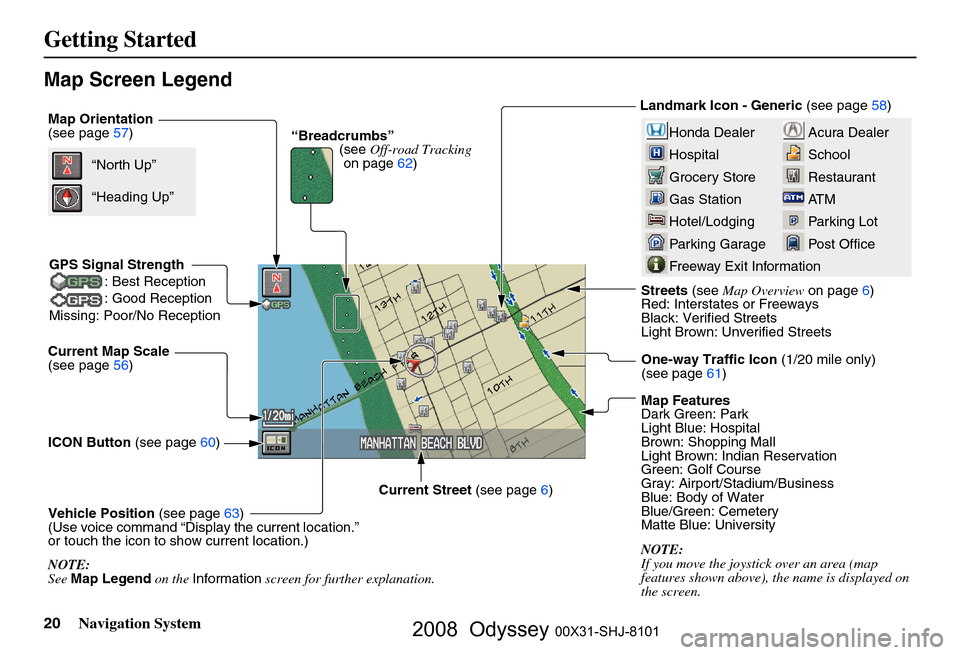
Map Screen Legend
Map Orientation
(see page57)
Current Map Scale
(see page
56)
ICON Button (see page
60)
Vehicle Position (see page
63)
(Use voice command “Display the current location.”
or touch the icon to show current location.) Streets
(see Map Overview on page
6)
Red: Interstates or Freeways
Black: Verified Streets
Light Brown: Unverified Streets
Map Features
Dark Green: Park
Light Blue: Hospital
Brown: Shopping Mall
Light Brown: Indian Reservation
Green: Golf Course
Gray: Airport/Stadium/Business
Blue: Body of Water
Blue/Green: Cemetery
Matte Blue: University
NOTE:
If you move the joystick over an area (map
features shown above), the name is displayed on
the screen.
Current Street
(see page
6)“North Up”
NOTE:
See Map Legend on the Information screen for further explanation.
“Heading Up”
“Breadcrumbs”
(see Off-road Tracking
on page
62) Landmark Icon - Generic
(see page 58)
GPS Signal Strength : Best Reception
: Good Reception
Missing: Poor/No ReceptionAcura Dealer
School
Restaurant
AT M
Parking Lot
Post OfficeHonda Dealer
Hospital
Grocery Store
Gas Station
Hotel/Lodging
Parking Garage
Freeway Exit Information
One-way Traffic Icon (1/20 mile only)
(see page 61)
2008 Odyssey 00X31-SHJ-8101
Page 62 of 148
62Navigation System
Driving to Your Destination
Going Off the Route
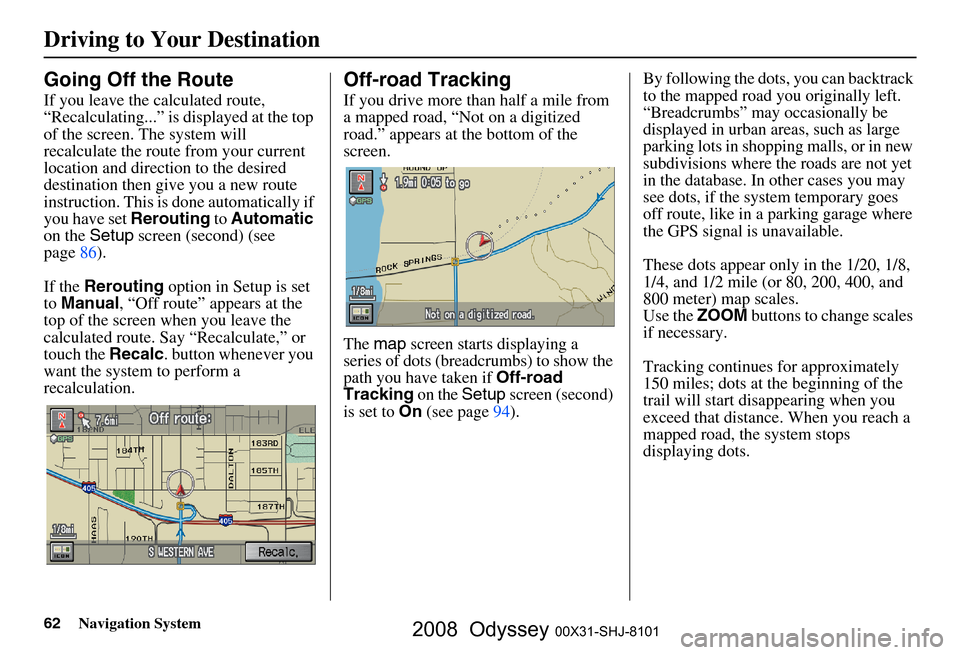
If you leave the calculated route,
“Recalculating...” is displayed at the top
of the screen. The system will
recalculate the route from your current
location and direction to the desired
destination then give you a new route
instruction. This is done automatically if
you have set Rerouting to Automatic
on the Setup screen (second) (see
page
86 ).
If the Rerouting option in Setup is set
to Manual , “Off route” appears at the
top of the screen when you leave the
calculated route. Sa y “Recalculate,” or
touch the Recalc. button whenever you
want the system to perform a
recalculation.
Off-road Tracking
If you drive more than half a mile from
a mapped road, “Not on a digitized
road.” appears at the bottom of the
screen.
The map screen starts displaying a
series of dots (breadcrumbs) to show the
path you have taken if
Off-road
Tracking on the Setup screen (second)
is set to On (see page 94 ). By following the dots, you can backtrack
to the mapped road you originally left.
“Breadcrumbs” may occasionally be
displayed in urban areas, such as large
parking lots in shoppi
ng malls, or in new
subdivisions where th e roads are not yet
in the database. In other cases you may
see dots, if the system temporary goes
off route, like in a parking garage where
the GPS signal is unavailable.
These dots appear only in the 1/20, 1/8,
1/4, and 1/2 mile (or 80, 200, 400, and
800 meter) map scales.
Use the ZOOM buttons to change scales
if necessary.
Tracking continues for approximately
150 miles; dots at the beginning of the
trail will start disappearing when you
exceed that distance . When you reach a
mapped road, th e system stops
displaying dots.
2008 Odyssey 00X31-SHJ-8101
Page 89 of 148
Navigation System89
System Set-up
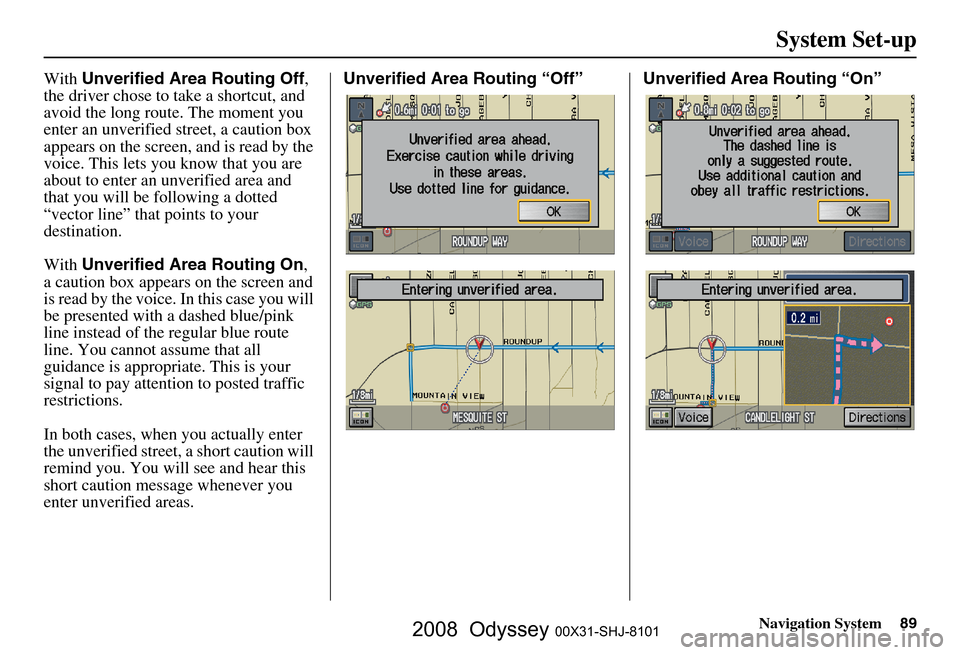
With Unverified Area Routing Off ,
the driver chose to take a shortcut, and
avoid the long route. The moment you
enter an unverified street, a caution box
appears on the screen, and is read by the
voice. This lets you know that you are
about to enter an unverified area and
that you will be following a dotted
“vector line” that points to your
destination.
With Unverified Area Routing On ,
a caution box appear s on the screen and
is read by the voice. In this case you will
be presented with a dashed blue/pink
line instead of the regular blue route
line. You cannot assume that all
guidance is appropriate. This is your
signal to pay attention to posted traffic
restrictions.
In both cases, when you actually enter
the unverified street, a short caution will
remind you. You will see and hear this
short caution message whenever you
enter unverified areas. Unverified Area Routing “Off” Unverified Area Routing “On”
2008 Odyssey 00X31-SHJ-8101
Page 90 of 148
90Navigation System
System Set-up
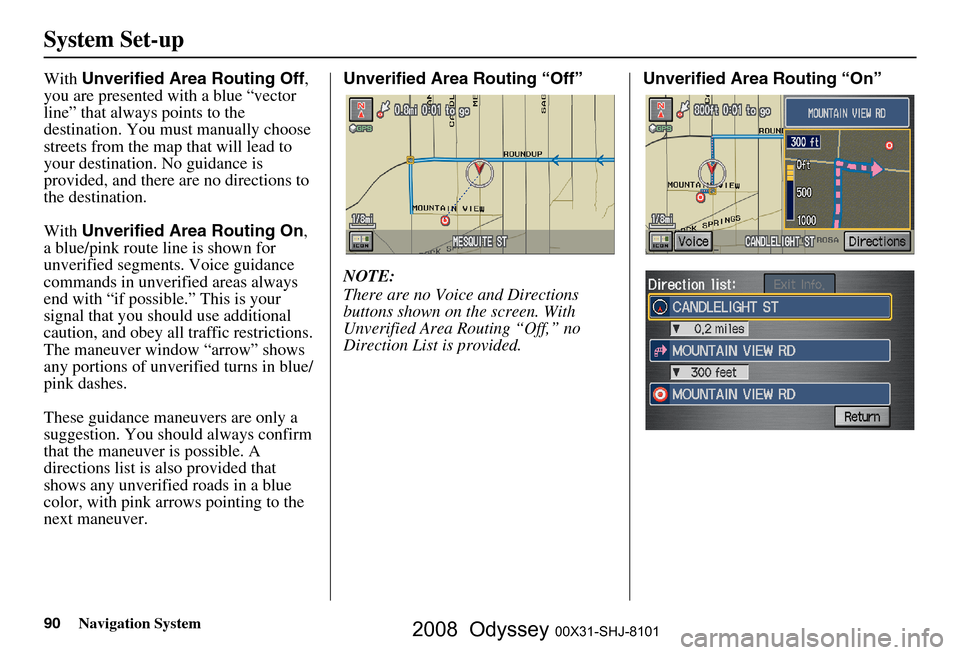
With Unverified Area Routing Off ,
you are presented with a blue “vector
line” that always points to the
destination. You must manually choose
streets from the map that will lead to
your destination. No guidance is
provided, and there ar e no directions to
the destination.
With Unverified Area Routing On ,
a blue/pink route line is shown for
unverified segmen ts. Voice guidance
commands in unverified areas always
end with “if possible.” This is your
signal that you should use additional
caution, and obey all traffic restrictions.
The maneuver window “arrow” shows
any portions of unverified turns in blue/
pink dashes.
These guidance maneuvers are only a
suggestion. You should always confirm
that the maneuver is possible. A
directions list is also provided that
shows any unverified roads in a blue
color, with pink arrows pointing to the
next maneuver. Unverified Area Routing “Off”
NOTE:
There are no Voice and Directions
buttons shown on the screen. With
Unverified Area Routing “Off,” no
Direction List is provided.
Unverified Area Routing “On”
2008 Odyssey 00X31-SHJ-8101
Page 95 of 148
Navigation System95
System Set-up
Correct Vehicle Position
The system relies on satellites for
positioning information. Buildings,
tunnels, and other objects can block or
reflect these signals, requiring the
system to use “dead reckoning” to
determine your location and direction.
This can sometimes lead to small errors
in positioning, such as showing you on
an adjacent street.
NOTE:
Using this function to adjust vehicle
position is not recommended. When the
system acquires a GPS signal, it will
automatically place the vehicle in the
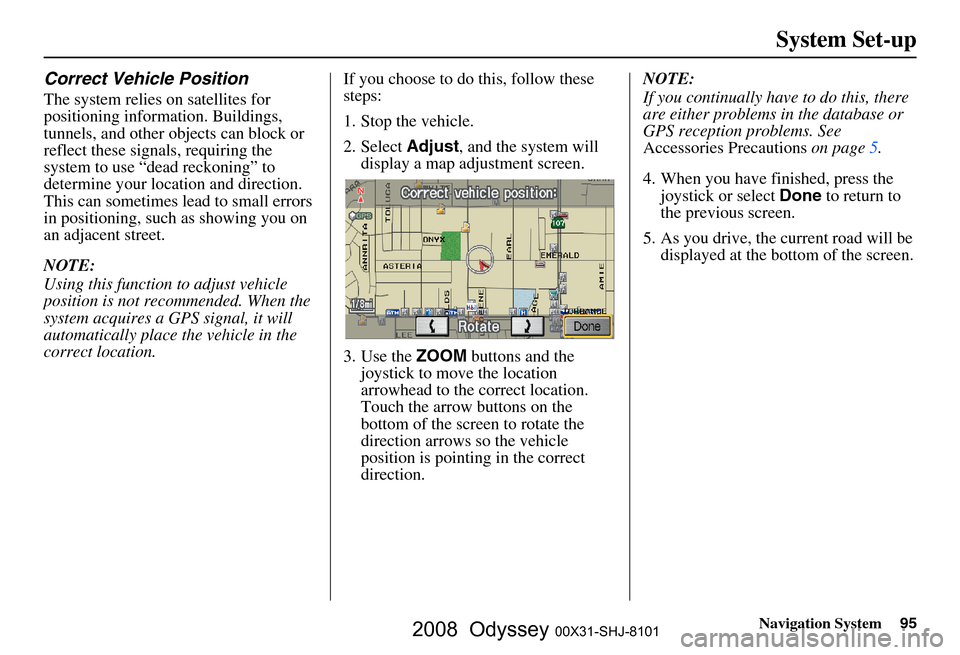
correct location. If you choose to do this, follow these
steps:
1. Stop the vehicle.
2. Select
Adjust, and the system will
display a map adjustment screen.
3. Use the ZOOM buttons and the
joystick to move the location
arrowhead to the correct location.
Touch the arrow buttons on the
bottom of the screen to rotate the
direction arrows so the vehicle
position is pointin g in the correct
direction. NOTE:
If you continually have to do this, there
are either problems in the database or
GPS reception problems. See
Accessories Precautions
on page
5 .
4. When you have finished, press the joystick or select Done to return to
the previous screen.
5. As you drive, the current road will be displayed at the bottom of the screen.
2008 Odyssey 00X31-SHJ-8101
Page 97 of 148
Navigation System97
System Set-up
Clock Adjustment
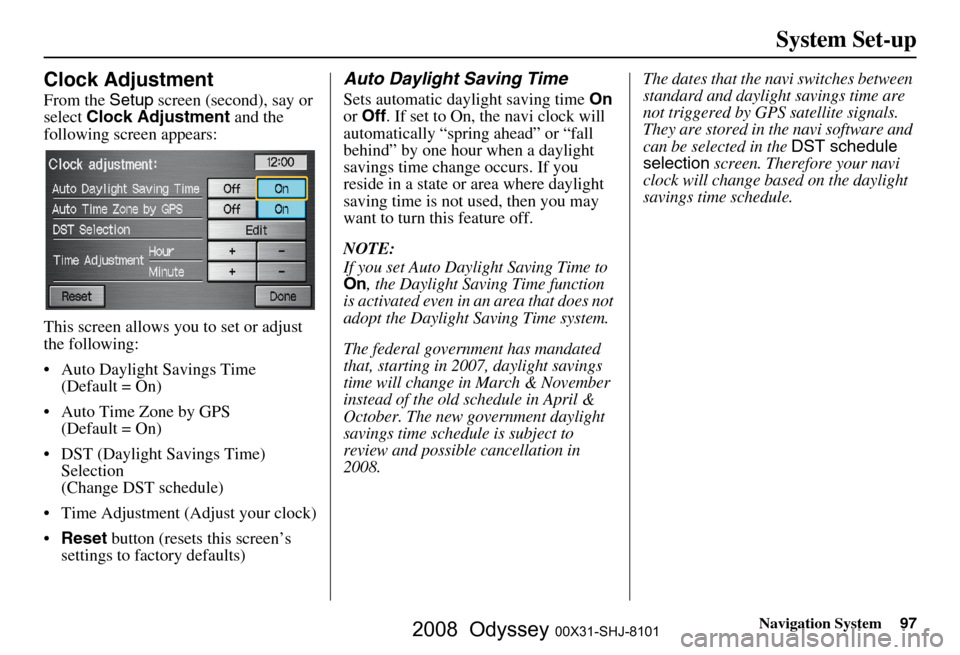
From the Setup screen (second), say or
select Clock Adjustment and the
following screen appears:
This screen allows you to set or adjust
the following:
Auto Daylight Savings Time (Default = On)
Auto Time Zone by GPS (Default = On)
DST (Daylight Savings Time) Selection
(Change DST schedule)
Time Adjustment (Adjust your clock)
Reset button (resets this screen’s
settings to factory defaults)
Auto Daylight Saving Time
Sets automatic daylight saving time On
or Off . If set to On, the navi clock will
automatically “spring ahead” or “fall
behind” by one hour when a daylight
savings time change occurs. If you
reside in a state or area where daylight
saving time is not used, then you may
want to turn this feature off.
NOTE:
If you set Auto Daylight Saving Time to On, the Daylight Saving Time function
is activated even in an area that does not
adopt the Daylight Saving Time system.
The federal government has mandated
that, starting in 2007, daylight savings
time will change in March & November
instead of the old schedule in April &
October. The new government daylight
savings time schedule is subject to
review and possible cancellation in
2008. The dates that the navi switches between
standard and daylight savings time are
not triggered by GPS satellite signals.
They are stored in the navi software and
can be selected in the
DST schedule
selection screen. Therefore your navi
clock will change based on the daylight
savings time schedule.
2008 Odyssey 00X31-SHJ-8101
Page 102 of 148
102Navigation System
System Initialization
GPS Initialization
Depending on the length of time the
battery was disconnected, your system
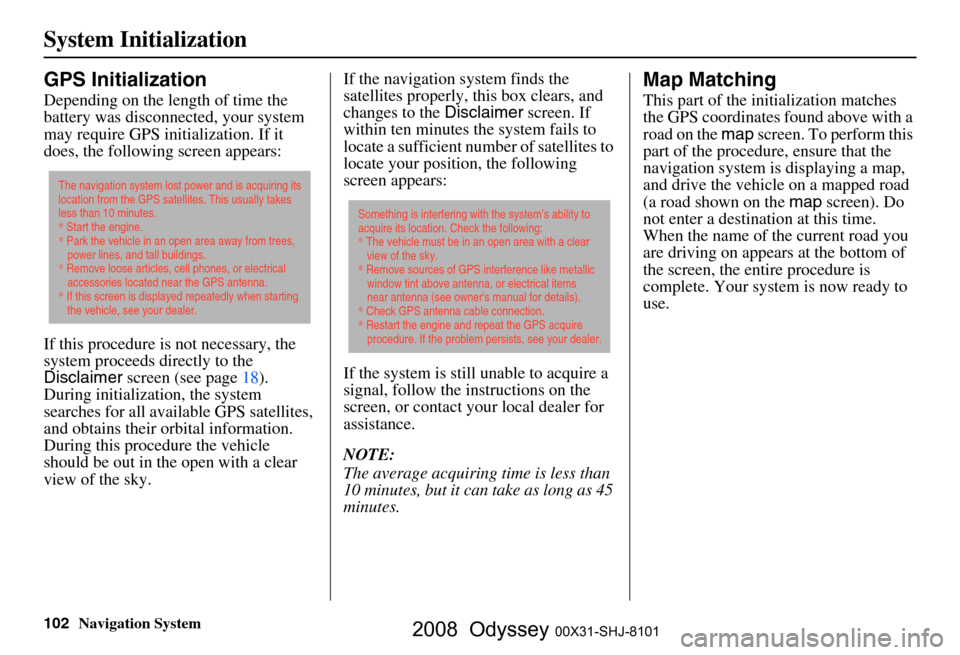
may require GPS initialization. If it
does, the following screen appears:
If this procedure is not necessary, the
system proceeds directly to the
Disclaimer screen (see page
18).
During initialization, the system
searches for all available GPS satellites,
and obtains their orbital information.
During this procedure the vehicle
should be out in the open with a clear
view of the sky. If the navigation system finds the
satellites properly, this box clears, and
changes to the
Disclaimer screen. If
within ten minutes the system fails to
locate a sufficient number of satellites to
locate your position, the following
screen appears:
If the system is still unable to acquire a
signal, follow the in structions on the
screen, or contact you r local dealer for
assistance.
NOTE:
The average acquiring time is less than
10 minutes, but it can take as long as 45
minutes.
Map Matching
This part of the initialization matches
the GPS coordinates found above with a
road on the map screen. To perform this
part of the procedure, ensure that the
navigation system is displaying a map,
and drive the vehicle on a mapped road
(a road shown on the map screen). Do
not enter a destina tion at this time.
When the name of the current road you
are driving on appears at the bottom of
the screen, the entire procedure is
complete. Your system is now ready to
use.
The navigation system lost power and is acquiring its
location from the GPS satellites. This usually takes
less than 10 minutes.
* Start the engine.
* Park the vehicle in an open area away from trees,
power lines, and tall buildings.
* Remove loose articles, cell phones, or electrical
accessories located near the GPS antenna.
* If this screen is displayed repeatedly when starting
the vehicle, see your dealer.
Something is interfering with the system’s ability to
acquire its location. Check the following:
* The vehicle must be in an open area with a clear
view of the sky.
* Remove sources of GPS interference like metallic
window tint above antenna, or electrical items
near antenna (see owner's manual for details).
* Check GPS antenna cable connection.
* Restart the engine and repeat the GPS acquire
procedure. If the problem persists, see your dealer.
2008 Odyssey 00X31-SHJ-8101