sat nav HONDA ODYSSEY 2009 RB3-RB4 / 4.G Navigation Manual
[x] Cancel search | Manufacturer: HONDA, Model Year: 2009, Model line: ODYSSEY, Model: HONDA ODYSSEY 2009 RB3-RB4 / 4.GPages: 153, PDF Size: 4.75 MB
Page 4 of 153
4Navigation System
Introduction
Manual Overview
The manual is divided into the
following sections:
Getting Started - A basic introduction that discusses the controls and how to
communicate with the system.
Entering a Destination - How to enter an address or locate a point of interest
(POI).
Driving to Your Destination - An explanation of the map features,
guidance, and cautions.
Information Features - Setup, Cellular Phonebook, Calendar,
Calculator, Voice Command Help,
Map Legend, and Key to Zagat
Ratings.
System Setup - How to Setup and tailor the system for your personal
use and use the Address Book. The back of this manual contains:
Map Coverage (page109)
Frequently Asked Questions (FAQs)
(page124)
Troubleshooting Guide (page131)
Glossary of Terms (page133)
Voice Command List (page136)
Operation Specific to Alaska and Hawaii (page122)
System Overview
Your navigation system is a highly
sophisticated location system with voice
control that uses satellites and a map
database to show you where you are and
to help guide you to a desired
destination.
The navigation system receives signals
from the global positioning system
(GPS), a network of 24 satellites in orbit
around the earth. By receiving signals
from several of these satellites, the
navigation system can determine the
latitude, longitude, and elevation of
your vehicle. In a ddition, a gyroscopic
yaw sensor and a vehicle speed sensor
in your vehicle k eep track of the
direction and speed of travel at all times.
2009 Odyssey
Page 8 of 153
8Navigation System
User Agreement
In using this DVD “Satellite Linked
Navigation System” (the “DVD”),
which includes HONDA MOTOR CO.,
LTD. software, ALPINE
ELECTRONICS, INC. software,
NAVTEQ database contents, INFO
USA CORPORATION database,
ZAGAT SURVEY database contents,
and ZENRIN CO. database contents
(hereinafter referred to as “Licensors”),
you are bound by the terms and
conditions set forth below.
By using your copy of the DVD, you
have expressed your Agreement to the
terms and conditions of this Agreement.
You should, therefore, make sure that
you read and understand the following
provisions. If for any reason you do not
wish to be bound by the terms of this
Agreement, please return the DVD to
your dealer. The DVD may not be copied,
duplicated, or otherwise modified, in
whole or in part, without the express
written permission of the Licensors.
The DVD may not be transferred or sublicensed to any third party for
profit, rent or loan, or licensed for
reuse in any manner.
The DVD may not be decompiled, reverse engineered or otherwise
disassembled, in whole or in part.
The DVD may not be used in a network or by any other manner of
simultaneous use in multiple systems.
The DVD is intended solely for personal use (or internal use where
the end-user is a business) by the
consumer. The DVD is not to be used
for commercial purposes. The Licensors do not guarantee to the
customer that the functions included
in the DVD meet the specific
objectives of the user.
Licensor shall not be responsible for any damages caused by the use of the
DVD to the actual user or to any third
party.
The warranty on the DVD shall not extend to an exchange or refund due
to misspelling, omission of letters, or
any other cosmetic discrepancy in the
contents of the DVD.
The right to use the DVD shall expire either when the user destroys the
DVD or software, or when any of the
terms of this Agreement are violated
and the Licensors exercise the option
to revoke the license to use the DVD
or software.
2009 Odyssey
Page 11 of 153
Navigation System11
Getting Started
ZOOM (IN)/ (OUT) buttons
Press ZOOM to zoom in (to show
more detail), or ZOOM to zoom out
(to show more area and less detail)
while a map screen is displayed.
ZOOM IN reduces the scale (showing
less area with greater detail). ZOOM
OUT increases the scale (showing more
area with less detail).
MENU button
Displays the Enter destination by
screen. When en r oute, displays the
Change route by screen.
INFO button
Displays the screen for selecting
Cellular Phonebook , Calendar,
Calculator , Voice Command Help ,
Map Legend , and Key to Zagat
Ratings . See page70.
AUDIO button
Press to display the audio screen.
For information on audio system
features, see the Audio section of the
vehicle Owner’s manual. SETUP button
Displays the
Setup screens to change
and update informa tion in the system.
See page76.
OPEN/CLOSE button
Tilts the screen down to access the CD
changer.
CLOCK
Both the screen clock* and console
clock are controlled by the navigation
system and automatically compensate
for daylight saving and time zone
changes during vehicle operation. They
can be adjusted in Setup mode. See
page96.
* For the screen clock, see page18.
Screen
All selections and instructions are
displayed on the screen. In addition, the
display is a “touch screen” – you can
enter information into the system by
touching the images (icons) on the
screen with your finger. For example, if you need to enter a
street name, a keyboard will be
displayed. You can type in the street
name by saying or selecting the
individual character
s on the screen.
Clean the screen with a soft damp cloth.
You may use a mild cl eaner intended for
use on liquid crystal displays (LCDs).
Harsher chemicals may damage the
screen.
NOTE:
Whenever you shift to R (Reverse), the
rear view behind the vehicle is shown on
the navigation system screen.
2009 Odyssey
Page 94 of 153
94Navigation System
System Setup
Correct Vehicle Position
The system relies on satellites for
positioning information. Buildings,
tunnels, and other objects can block or
reflect these signals, requiring the
system to use “dead reckoning” to
determine your location and direction.
This can sometimes lead to small errors
in positioning, such as showing you on
an adjacent street.
NOTE:
Using this function to adjust vehicle
position is not recommended. When the
system acquires a GPS signal, it will
automatically place the vehicle in the
correct location.
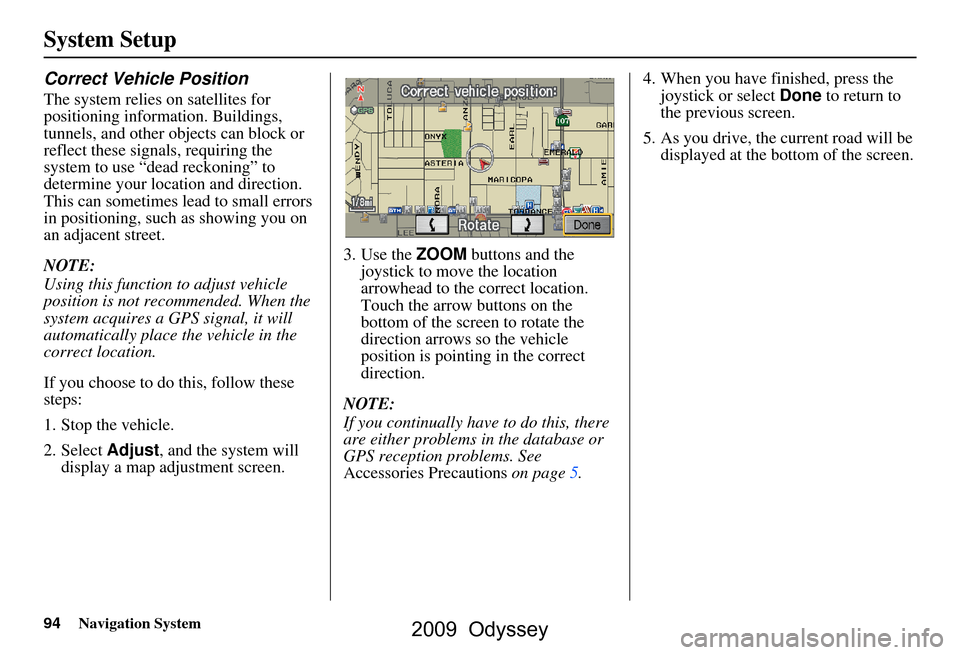
If you choose to do this, follow these
steps:
1. Stop the vehicle.
2. Select Adjust, and the system will
display a map adjustment screen. 3. Use the
ZOOM buttons and the
joystick to move the location
arrowhead to the correct location.
Touch the arrow buttons on the
bottom of the screen to rotate the
direction arrows so the vehicle
position is pointin g in the correct
direction.
NOTE:
If you continually have to do this, there
are either problems in the database or
GPS reception problems. See
Accessories Precautions on page5.4. When you have finished, press the
joystick or select Done to return to
the previous screen.
5. As you drive, the current road will be displayed at the bottom of the screen.
2009 Odyssey
Page 96 of 153
96Navigation System
System Setup
Clock Adjustment
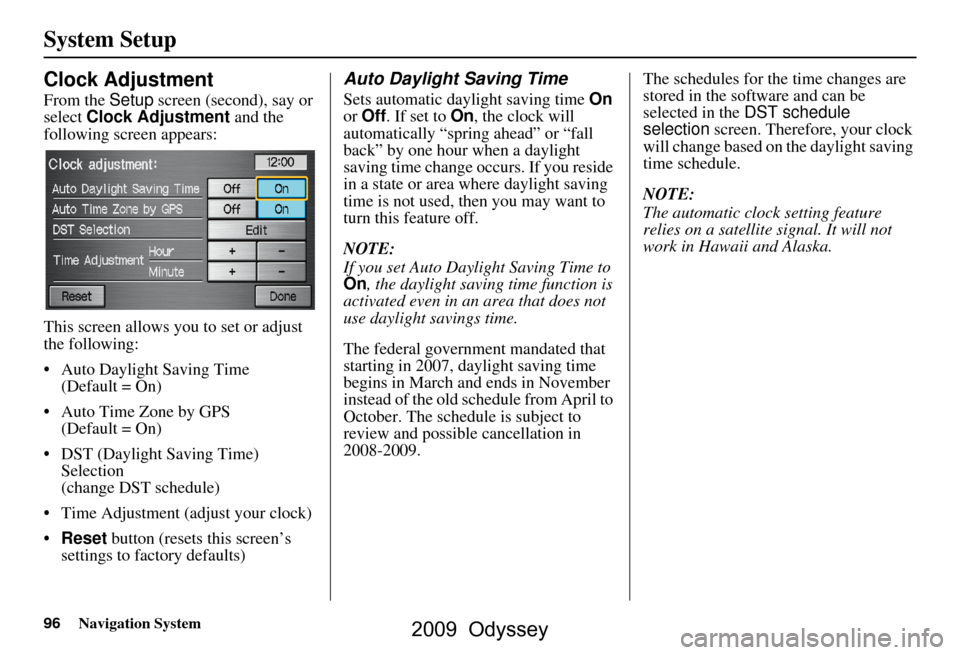
From the Setup screen (second), say or
select Clock Adjustment and the
following screen appears:
This screen allows you to set or adjust
the following:
Auto Daylight Saving Time (Default = On)
Auto Time Zone by GPS (Default = On)
DST (Daylight Saving Time) Selection
(change DST schedule)
Time Adjustment (adjust your clock)
Reset button (resets this screen’s
settings to factory defaults)
Auto Daylight Saving Time
Sets automatic daylight saving time On
or Off . If set to On, the clock will
automatically “spring ahead” or “fall
back” by one hour when a daylight
saving time change occurs. If you reside
in a state or area where daylight saving
time is not used, then you may want to
turn this feature off.
NOTE:
If you set Auto Day light Saving Time to
On , the daylight saving time function is
activated even in an area that does not
use daylight savings time.
The federal government mandated that
starting in 2007, daylight saving time
begins in March and ends in November
instead of the old schedule from April to
October. The schedule is subject to
review and possible cancellation in
2008-2009. The schedules for the time changes are
stored in the software and can be
selected in the
DST schedule
selection screen. Therefore, your clock
will change based on the daylight saving
time schedule.
NOTE:
The automatic clock setting feature
relies on a satellite signal. It will not
work in Hawaii and Alaska.
2009 Odyssey
Page 101 of 153
Navigation System101
System Initialization
GPS Initialization
Depending on the length of time the
battery was disconnected, your system
may require GPS initialization. If it
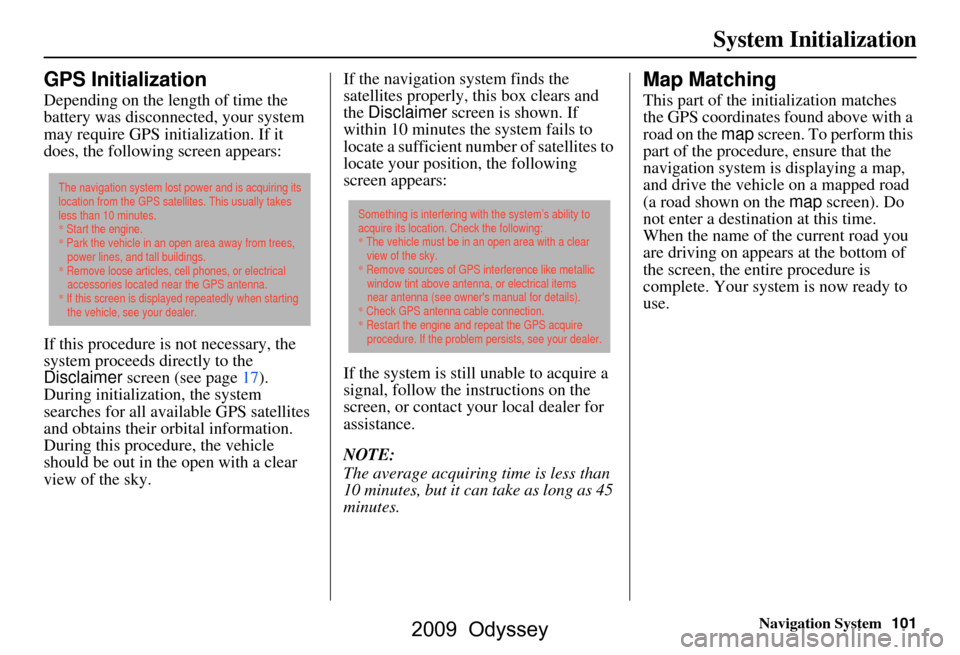
does, the following screen appears:
If this procedure is not necessary, the
system proceeds directly to the
Disclaimer screen (see page17).
During initialization, the system
searches for all available GPS satellites
and obtains their orbital information.
During this procedure, the vehicle
should be out in th e open with a clear
view of the sky. If the navigation system finds the
satellites properly, this box clears and
the
Disclaimer screen is shown. If
within 10 minutes the system fails to
locate a sufficient number of satellites to
locate your position, the following
screen appears:
If the system is still unable to acquire a
signal, follow the instructions on the
screen, or contact you r local dealer for
assistance.
NOTE:
The average acquiring time is less than
10 minutes, but it can take as long as 45
minutes.
Map Matching
This part of the initialization matches
the GPS coordinates found above with a
road on the map screen. To perform this
part of the procedure, ensure that the
navigation system is displaying a map,
and drive the vehicle on a mapped road
(a road shown on the map screen). Do
not enter a destina tion at this time.
When the name of the current road you
are driving on appears at the bottom of
the screen, the entire procedure is
complete. Your system is now ready to
use.
The navigation system lost power and is acquiring its
location from the GPS satellites. This usually takes
less than 10 minutes.
* Start the engine.
* Park the vehicle in an open area away from trees,
power lines, and tall buildings.
* Remove loose articles, cell phones, or electrical
accessories located near the GPS antenna.
* If this screen is displayed repeatedly when starting
the vehicle, see your dealer.
Something is interfering with the system’s ability to
acquire its location. Check the following:
* The vehicle must be in an open area with a clear
view of the sky.
* Remove sources of GPS interference like metallic
window tint above antenna, or electrical items
near antenna (see owner's manual for details).
* Check GPS antenna cable connection.
* Restart the engine and repeat the GPS acquire
procedure. If the problem persists, see your dealer.
2009 Odyssey
Page 102 of 153
102Navigation System
System Limitations
Although your navigation system is one
of the most highly sophisticated pieces
of equipment you will find in a modern
automobile, you may find during its use
that it has certain limitations.
The system uses GPS signals to aid in
determining its current location. The
GPS is operated by the U.S.
Department of Defense. For security
reasons, there are certain inaccuracies
built into the GPS that the navigation
system must constantly compensate for.
This can cause occasional positioning
errors of up to several hundred feet.
For example, in urban areas where
streets are close together, this could
cause the system to show that you are
traveling on a street that parallels the
street you are actually on. The system
will, under most circumstances, correct
itself while you drive. Depending on your current view of the
sky and the position of the satellites, the
elevation may be shown incorrectly.
You may also notice some delay of the
vehicle position icon at intersections;
this is normal.
GPS Reception Issues
The signals received from the GPS
satellites are extremely weak (less than
a millionth of the strength of a local FM
station) and requir
e an unobstructed
view of the sky. The signal can easily be
interrupted or interfered with by the
following:
Aftermarket metallic window tint above or to the sides of the GPS
antenna (located under the
dashboard)
Cell phones, PDAs, or other electronic devices docked in a cradle
or lying loose on the dashboard
Radar detectors mounted on the dashboard
Remote starters, or “hidden” vehicle tracking systems mounted near the
navigation unit Other aftermarket audio electronic
devices mounted near the navigation
unit
Trees, tall buildings, freeway overpasses, tunnels, or overhead
electrical power wires
Although the system will direct you to
your desired destination, it may not
always generate what you consider to be
the most direct rout e. Try changing the
method of routing. See Changing the
Routing Method on page48. You may
also have Unverified Area Routing set
to OFF. See Unverified Area Routing on
page86.
Additionally, the mapping database
contains verified and unverified maps.
See Map Overview on page6. A
Disclaimer screen will warn you if your
route includes unverified streets.
Unverified streets may be missing from
the map, in the wrong location, or have
an incorrect name or address range.
Exercise addition al caution when
driving in these unverified areas.
2009 Odyssey
Page 122 of 153
122Navigation System
Operation in Alaska and
Hawaii
Certain functions that rely on a satellite
signal will not work in Alaska and
Hawaii. These functions include but are
not limited to XM radio, automatic
clock updates, and time zone
adjustments.
Alaska
If the vehicle was purchased in the
lower 48 states and driven to Alaska, the
system cannot display maps. The
message “Vehicle is out of the
database...” will be displayed.
Hawaii
This section describes the differences in
navigation system operation for vehicles
delivered in Hawaii.
XM Radio
Navigation-equipped vehicles delivered
to Hawaii are equipped with XM
hardware, but XM broadcasting is not
available; therefore sections of the
manual that mention XM audio do not
apply. Vehicles originally delivered to
the U.S. mainland and shipped to Hawaii
also have XM, but will not function
because the XM satellites (aimed toward
the U.S. mainland) are too far away to
obtain reception.
Map Coverage
All roads displayed on the Hawaii map
screens are detailed coverage roads.
Text related to “unverified” roads or
areas are not applicable. The following
topics do not apply in Hawaii:
Unverified road descriptions (see page
6 and 86 ).
Cautions and pop-up windows related to unverified roads (see page
64). Setup entries that relate to turning on
or off unverified routing (see
page 87 ).
When zooming in and out, there is no 350-mile scale for Hawaii.
Other Map Issues
See the coverage section for a list of islands with coverage (see page 109).
Freeway Exit information does not
exist in Hawaii, so the “Freeway Exit
Info” icon is not shown on the icon
bar.
Coverage Areas
2009 Odyssey
Page 127 of 153
Navigation System127
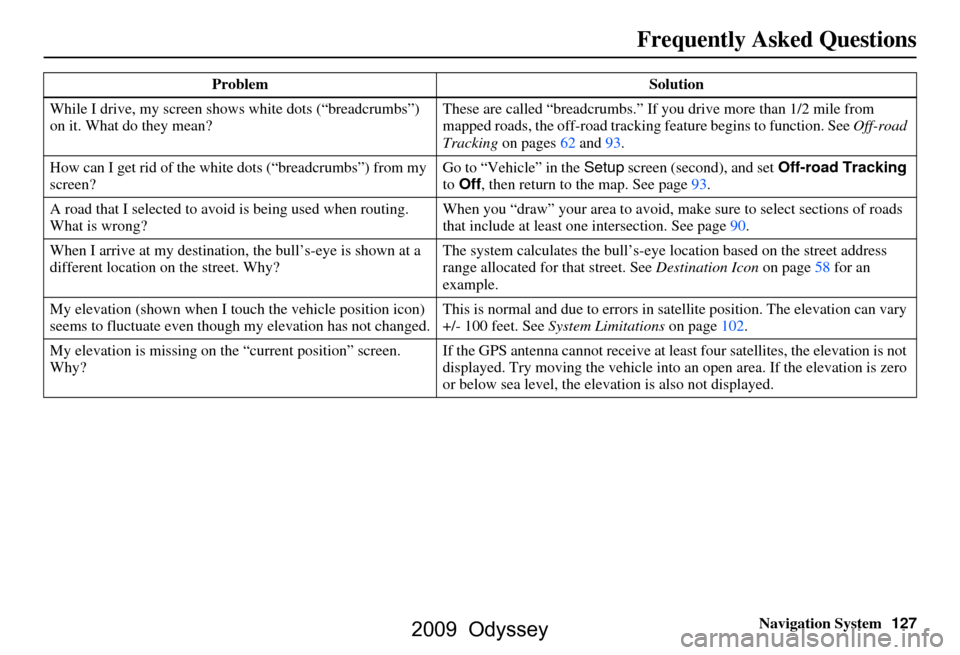
While I drive, my screen s
hows white dots (“breadcrumbs”)
on it. What do they mean? These are called “breadcrumbs.”
If you drive more than 1/2 mile from
mapped roads, the off-road tracking feature begins to function. See Off-road
Tracking on pages 62 and 93.
How can I get rid of the whit e dots (“breadcrumbs”) from my
screen? Go to “Vehicle” in the
Setup screen (second), and set Off-road Tracking
to Off , then return to the map. See page93.
A road that I selected to avoi d is being used when routing.
What is wrong? When you “draw” your area to avoid, make sure to select sections of roads
that include at least one
intersection. See page90.
When I arrive at my destination, the bull’s-eye is shown at a
different location on the street. Why? The system calculates the bull’s-eye
location based on the street address
range allocated for that street. See Destination Icon on page58 for an
example.
My elevation (shown when I t ouch the vehicle position icon)
seems to fluctuate even though my elevation has not changed. This is normal and due to errors in sa
tellite position. The elevation can vary
+/- 100 feet. See System Limitations on page102.
My elevation is missing on th e “current position” screen.
Why? If the GPS antenna cannot receive at least four satellites, the elevation is not
displayed. Try moving the vehicle into
an open area. If the elevation is zero
or below sea level, the elev ation is also not displayed.
Problem
Solution
Frequently Asked Questions
2009 Odyssey
Page 133 of 153
Navigation System133
Glossary
Glossary
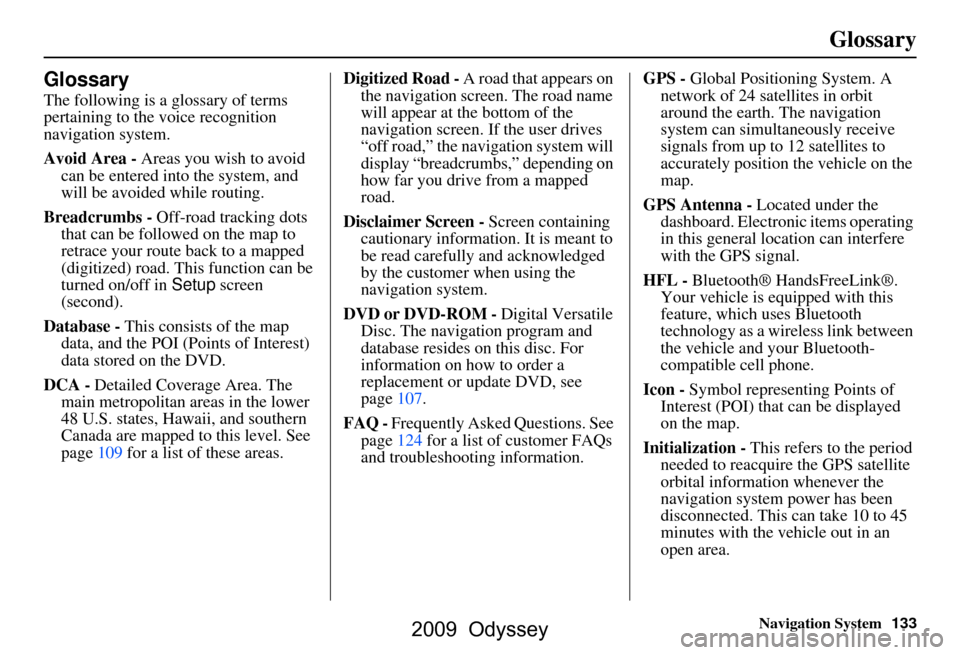
The following is a glossary of terms
pertaining to the voice recognition
navigation system.
Avoid Area - Areas you wish to avoid
can be entered into the system, and
will be avoided while routing.
Breadcrumbs - Off-road tracking dots
that can be followe d on the map to
retrace your route back to a mapped
(digitized) road. This function can be
turned on/off in Setup screen
(second).
Database - This consists of the map
data, and the POI (Points of Interest)
data stored on the DVD.
DCA - Detailed Coverage Area. The
main metropolitan areas in the lower
48 U.S. states, Hawaii, and southern
Canada are mapped to this level. See
page109 for a list of these areas. Digitized Road -
A road that appears on
the navigation screen. The road name
will appear at the bottom of the
navigation screen. If the user drives
“off road,” the navigation system will
display “breadcrumbs,” depending on
how far you drive from a mapped
road.
Disclaimer Screen - Screen containing
cautionary information. It is meant to
be read carefully and acknowledged
by the customer when using the
navigation system.
DVD or DVD-ROM - Digital Versatile
Disc. The navigation program and
database resides on this disc. For
information on how to order a
replacement or update DVD, see
page107.
FAQ - Frequently Asked Questions. See
page124 for a list of customer FAQs
and troubleshootin g information. GPS -
Global Positioning System. A
network of 24 satellites in orbit
around the earth. The navigation
system can simultaneously receive
signals from up to 12 satellites to
accurately position the vehicle on the
map.
GPS Antenna - Located under the
dashboard. Electronic items operating
in this general location can interfere
with the GPS signal.
HFL - Bluetooth® HandsFreeLink®.
Your vehicle is equipped with this
feature, which uses Bluetooth
technology as a wireless link between
the vehicle and your Bluetooth-
compatible cell phone.
Icon - Symbol representing Points of
Interest (POI) that can be displayed
on the map.
Initialization - This refers to the period
needed to reacquire the GPS satellite
orbital information whenever the
navigation system power has been
disconnected. This can take 10 to 45
minutes with the vehicle out in an
open area.
2009 Odyssey